

1需要申请身份
模型下载
https://huggingface.co/facebook/sam3
网站申请 大概几十分钟就同意了
成功后 给你个跳转链接
https://huggingface.co/collections/facebook/sam3

下载facebook/sam3

未来代码加载本地的权重
# Load the model
model = build_sam3_image_model(
    checkpoint_path="/home/r9000k/v2_project/sam/sam3/assets/model/sam3.pt"
)
processor = Sam3Processor(model, confidence_threshold=0.3)
2 安装过程
1 虽然官方要求cuda12 ,但是cuda11.8也能用,安装对应的torch。
2 win11 conda安装各种报错库缺少问题。
'''
conda create -n sam3 python=3.12
conda deactivate
conda activate sam3

pip install torch==2.7.0 torchvision torchaudio --index-url https://download.pytorch.org/whl/cu118


git clone https://github.com/facebookresearch/sam3.git
cd sam3
pip install -e .

# For running example notebooks
pip install -e ".[notebooks]"

# For development
pip install -e ".[train,dev]"

https://huggingface.co/madbuda/triton-windows-builds/blob/main/triton-3.0.0-cp312-cp312-win_amd64.whl

############ 1 额外库
在powershell中 输入以下命令:
git clone https://github.com/triton-lang/triton.git
cd triton
pip install -r python/requirements.txt # build-time dependencies
pip install -e .

'''
import torch
#################################### For Image ####################################
from PIL import Image
from sam3.model_builder import build_sam3_image_model
from sam3.model.sam3_image_processor import Sam3Processor
# Load the model
model = build_sam3_image_model()
processor = Sam3Processor(model)
# Load an image
image = Image.open("npu2pm.JPG")
inference_state = processor.set_image(image)
# Prompt the model with text
output = processor.set_text_prompt(state=inference_state, prompt="house")

# Get the masks, bounding boxes, and scores
masks, boxes, scores = output["masks"], output["boxes"], output["scores"]
完整1
car and building

building


tree


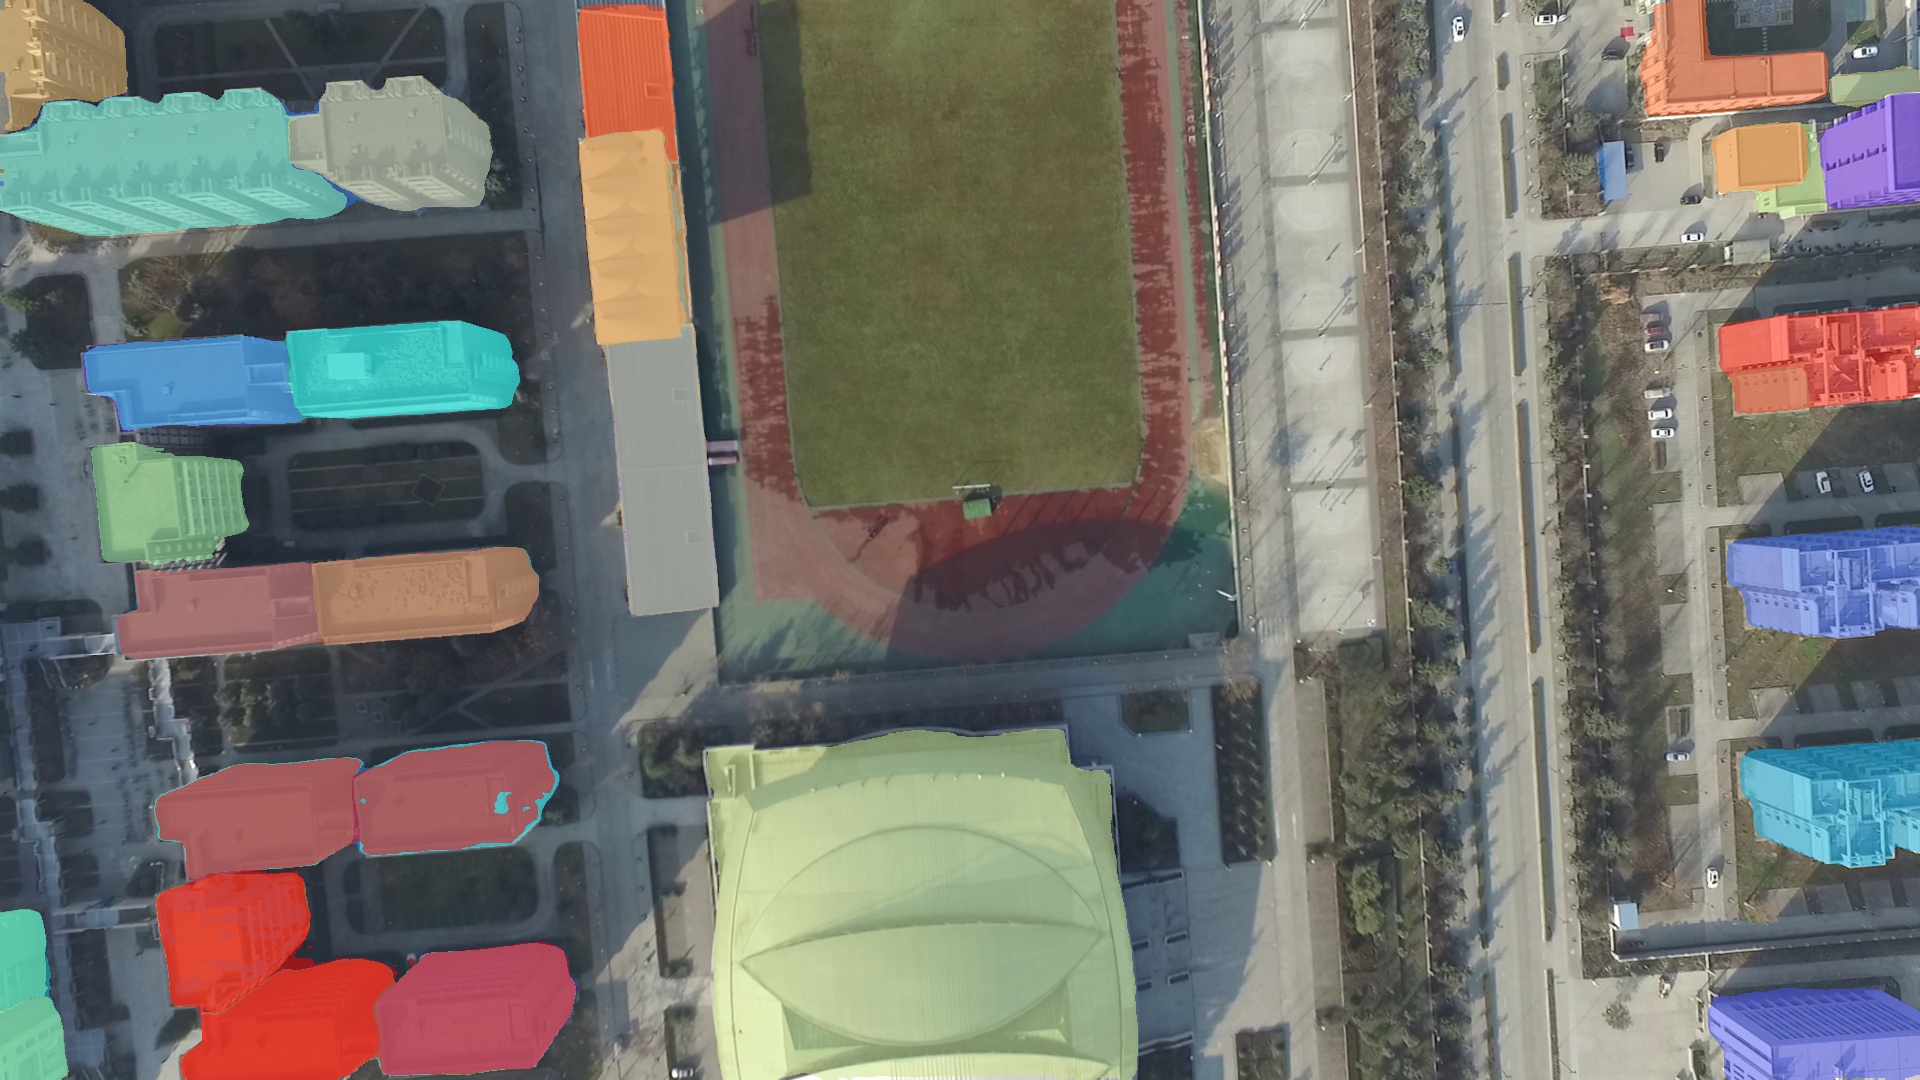
car


1测试1
import torch
import numpy as np
from PIL import Image, ImageDraw, ImageFont
import matplotlib.pyplot as plt
import matplotlib.font_manager as fm
import matplotlib.patches as patches
import time # 添加时间模块
#################################### For Image ####################################
from sam3.model_builder import build_sam3_image_model
from sam3.model.sam3_image_processor import Sam3Processor
# 记录总开始时间
total_start_time = time.time()
# 记录模型加载开始时间
model_load_start_time = time.time()
# Load the model
model = build_sam3_image_model(
checkpoint_path="/home/r9000k/v2_project/sam/sam3/assets/model/sam3.pt"
)
processor = Sam3Processor(model, confidence_threshold=0.3)
# 记录模型加载结束时间
model_load_end_time = time.time()
model_load_time = model_load_end_time - model_load_start_time
print(f"模型加载时间: {model_load_time:.3f} 秒")
# 记录单张检测开始时间
detection_start_time = time.time()
image_path = "testimage/微信图片_20251120225825_37.jpg"
# Load an image
image = Image.open(image_path)
inference_state = processor.set_image(image)
# Prompt the model with text
output = processor.set_text_prompt(state=inference_state, prompt="person in white clothes") #building car car、people、bicycle
# Get the masks, bounding boxes, and scores
masks, boxes, scores = output["masks"], output["boxes"], output["scores"]
# 记录单张检测结束时间
detection_end_time = time.time()
detection_time = detection_end_time - detection_start_time
print(f"检测单张时间: {detection_time:.3f} 秒")
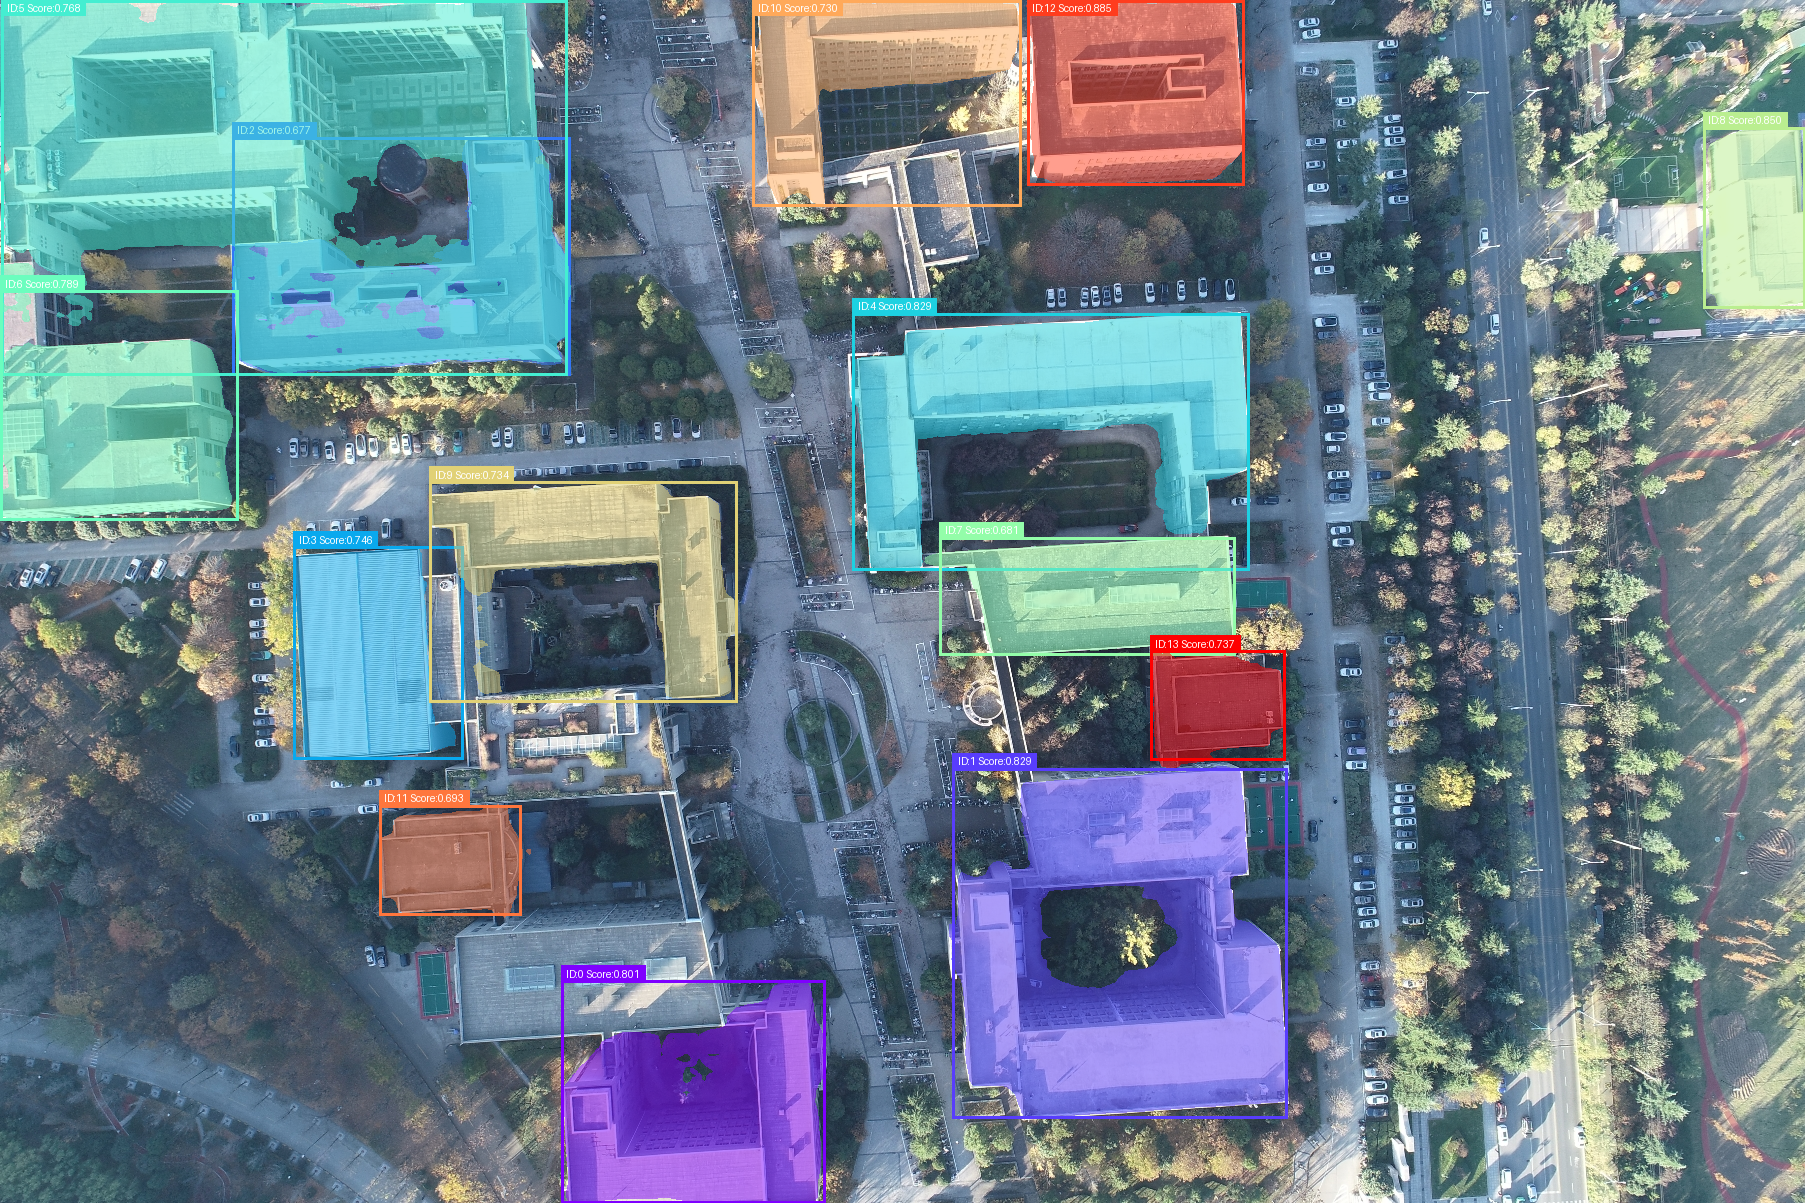
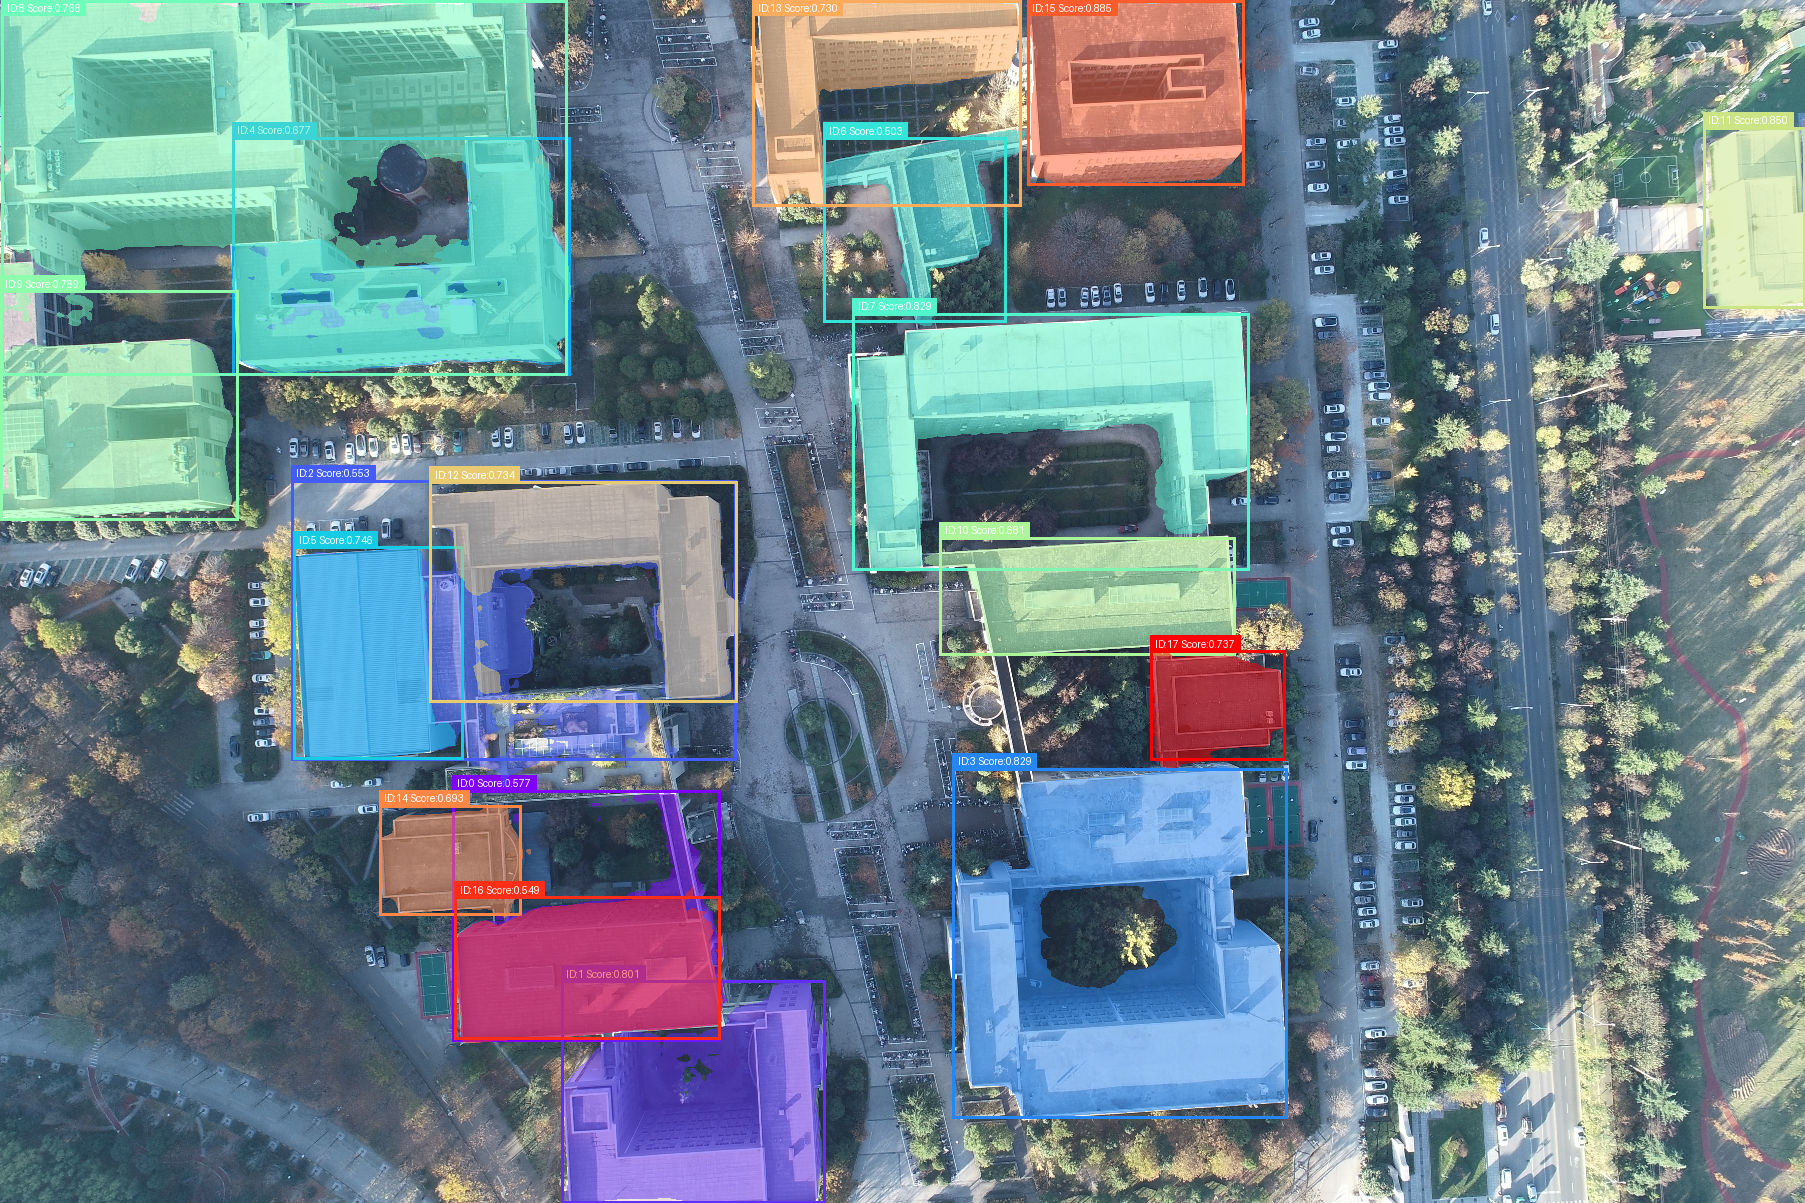
print(f"检测到 {len(masks)} 个分割结果")
print(f"掩码形状: {masks.shape}")
def overlay_masks_with_info(image, masks, boxes, scores):
"""
在图像上叠加掩码,并添加ID、得分和矩形框
masks: 形状为 [N, 1, H, W] 的四维张量
boxes: 形状为 [N, 4] 的边界框张量 [x1, y1, x2, y2]
scores: 形状为 [N] 的得分张量
"""
# 转换为RGB模式以便绘制
image = image.convert("RGB")
draw = ImageDraw.Draw(image)
# 尝试加载字体,如果失败则使用默认字体
try:
# 尝试使用系统中文字体
font = ImageFont.truetype("SimHei.ttf", 20)
except:
try:
font = ImageFont.truetype("Arial.ttf", 20)
except:
font = ImageFont.load_default()
# 将掩码转换为numpy数组并去除通道维度
masks_np = masks.cpu().numpy().astype(np.uint8) # 形状: [N, 1, H, W]
masks_np = masks_np.squeeze(1) # 移除通道维度,形状: [N, H, W]
boxes_np = boxes.cpu().numpy() # 形状: [N, 4]
scores_np = scores.cpu().numpy() # 形状: [N]
n_masks = masks_np.shape[0]
cmap = plt.cm.get_cmap("rainbow", n_masks)
for i, (mask, box, score) in enumerate(zip(masks_np, boxes_np, scores_np)):
# 获取颜色
color = tuple(int(c * 255) for c in cmap(i)[:3])
# 确保掩码是二维的
if mask.ndim == 3:
mask = mask.squeeze(0)
# 创建透明度掩码
alpha_mask = (mask * 128).astype(np.uint8) # 0.5透明度
# 创建彩色覆盖层
overlay = Image.new("RGBA", image.size, color + (128,))
# 应用alpha通道
alpha = Image.fromarray(alpha_mask, mode='L')
overlay.putalpha(alpha)
# 叠加到图像上
image = Image.alpha_composite(image.convert("RGBA"), overlay).convert("RGB")
draw = ImageDraw.Draw(image)
# 绘制边界框
x1, y1, x2, y2 = box
# 确保坐标在图像范围内
x1 = max(0, min(x1, image.width))
y1 = max(0, min(y1, image.height))
x2 = max(0, min(x2, image.width))
y2 = max(0, min(y2, image.height))
# 绘制矩形框
draw.rectangle([x1, y1, x2, y2], outline=color, width=3)
# 准备文本信息
text = f"ID:{i} Score:{score:.3f}"
# 计算文本位置(在框的上方)
text_width, text_height = draw.textbbox((0, 0), text, font=font)[2:4]
text_x = x1
text_y = max(0, y1 - text_height - 5)
# 绘制文本背景
draw.rectangle([text_x, text_y, text_x + text_width + 10, text_y + text_height + 5],
fill=color)
# 绘制文本
draw.text((text_x + 5, text_y + 2), text, fill="white", font=font)
return image
# 记录可视化开始时间
visualization_start_time = time.time()
# 应用掩码叠加(带信息)
result_image = overlay_masks_with_info(Image.open(image_path), masks, boxes, scores)
# 保存结果图像
output_path = "segmentation_result_with_info.png"
result_image.save(output_path)
# 记录可视化结束时间
visualization_end_time = time.time()
visualization_time = visualization_end_time - visualization_start_time
print(f"可视化时间: {visualization_time:.3f} 秒")
print(f"带信息的分割结果已保存到: {output_path}")
# 设置中文字体或使用英文避免警告
try:
# 尝试设置中文字体
plt.rcParams['font.sans-serif'] = ['SimHei', 'DejaVu Sans']
plt.rcParams['axes.unicode_minus'] = False
title = f"检测到 {len(masks)} 个建筑分割结果(带ID、得分和边界框)"
except:
# 如果中文字体不可用,使用英文
title = f"Detected {len(masks)} building segmentation results (with ID, score and bbox)"
# 显示图像
plt.figure(figsize=(12, 8))
plt.imshow(result_image)
plt.axis('off')
plt.title(title)
plt.tight_layout()
plt.savefig("segmentation_plot_with_info.png", bbox_inches='tight', dpi=300, facecolor='white')
plt.show()
# 记录总结束时间
total_end_time = time.time()
total_time = total_end_time - total_start_time
# 打印详细的时间统计
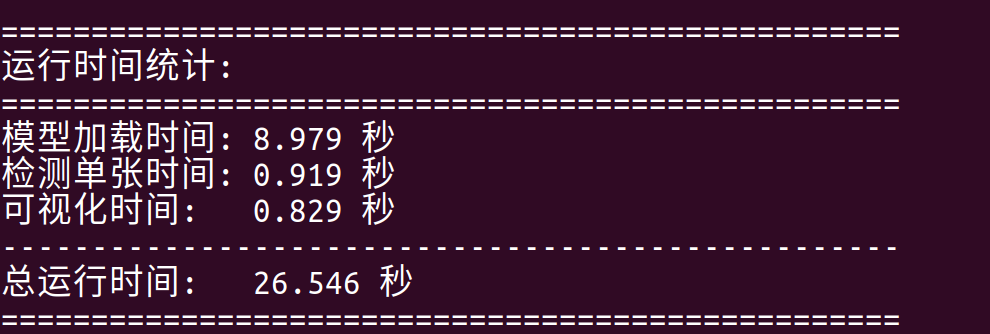
print("\n" + "="*50)
print("运行时间统计:")
print("="*50)
print(f"模型加载时间: {model_load_time:.3f} 秒")
print(f"检测单张时间: {detection_time:.3f} 秒")
print(f"可视化时间: {visualization_time:.3f} 秒")
print("-"*50)
print(f"总运行时间: {total_time:.3f} 秒")
print("="*50)
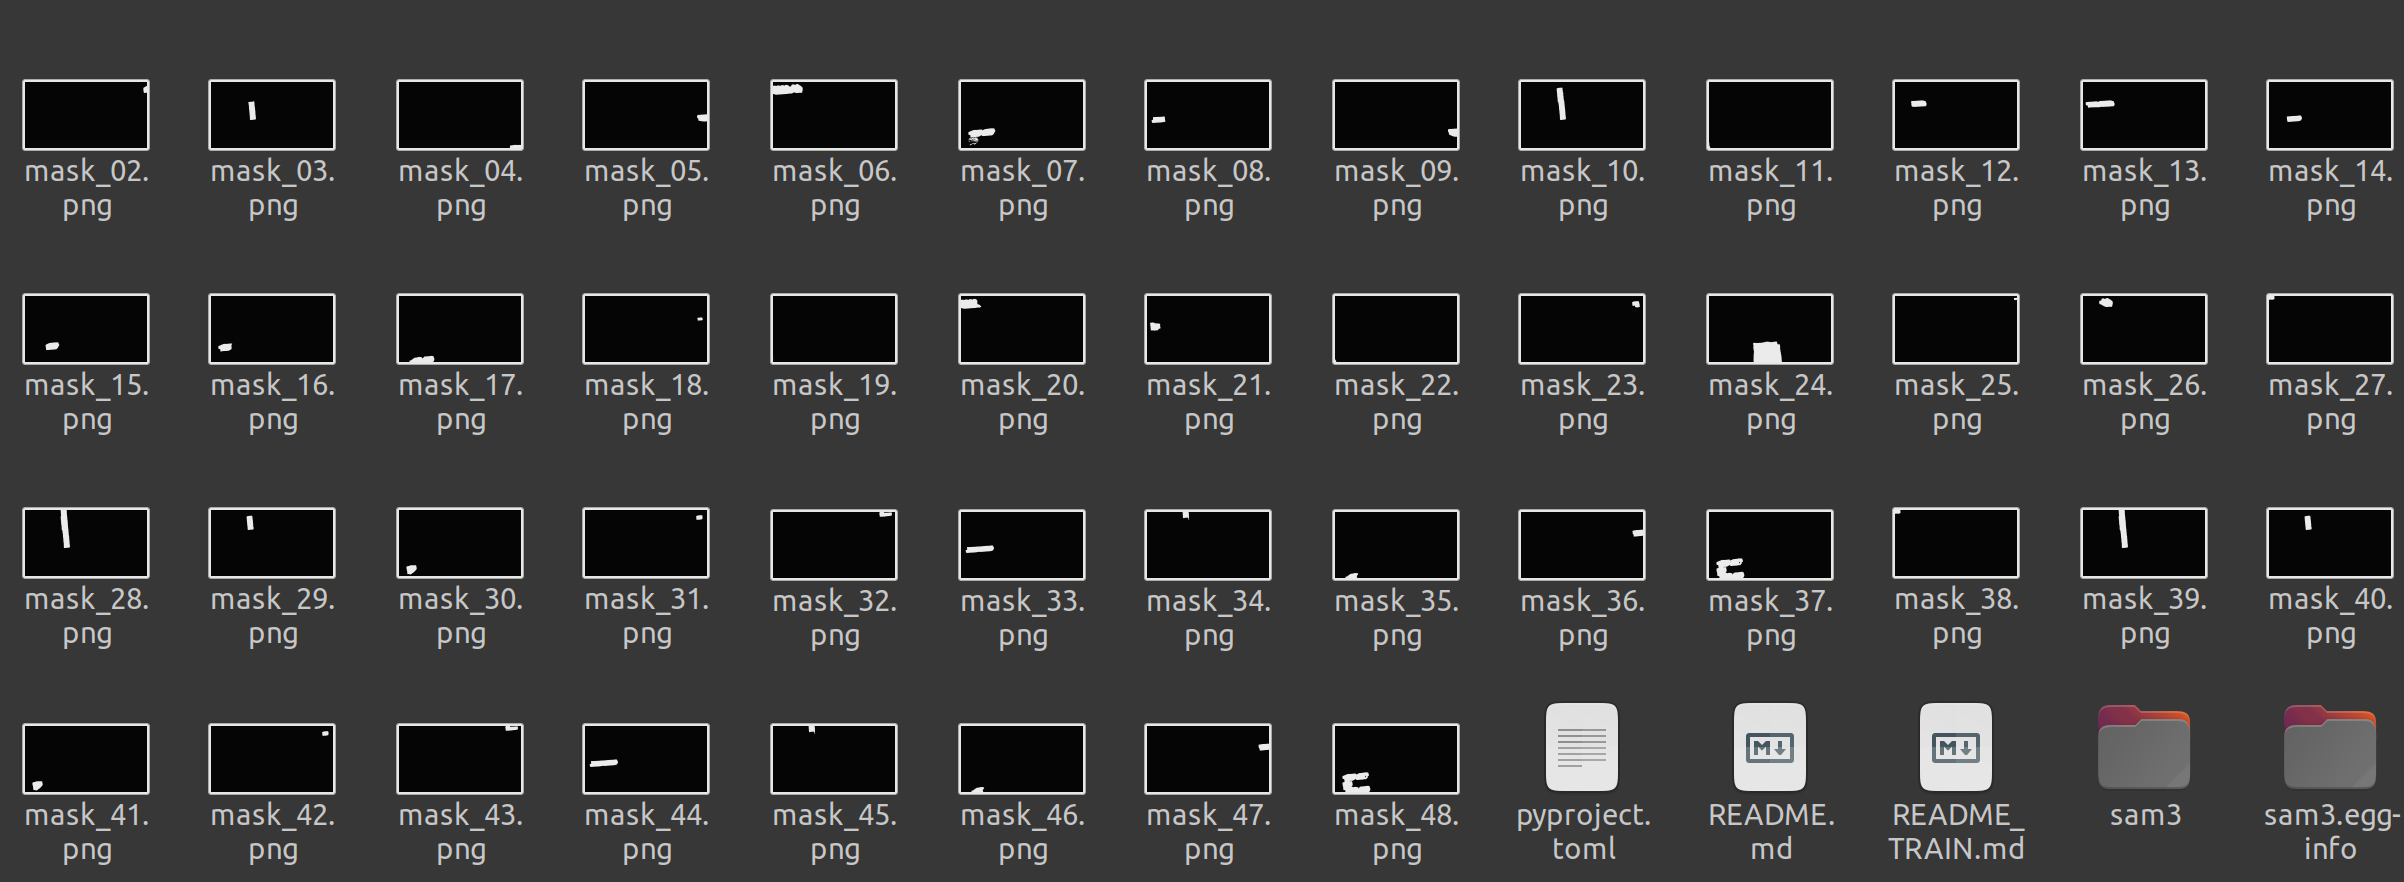
# # 可选:保存每个单独的掩码(带信息)
# print("\n保存带信息的单个掩码...")
# for i, (mask, box, score) in enumerate(zip(masks, boxes, scores)):
# # 创建单个掩码的可视化
# base_image = Image.open(image_path).convert("RGB")
# single_draw = ImageDraw.Draw(base_image)
# # 尝试加载字体
# try:
# single_font = ImageFont.truetype("SimHei.ttf", 24)
# except:
# try:
# single_font = ImageFont.truetype("Arial.ttf", 24)
# except:
# single_font = ImageFont.load_default()
# # 处理掩码
# mask_np = mask.cpu().numpy().squeeze().astype(np.uint8)
# color = tuple(int(c * 255) for c in plt.cm.get_cmap("rainbow", len(masks))(i)[:3])
# # 创建透明度掩码
# alpha_mask = (mask_np * 128).astype(np.uint8)
# overlay = Image.new("RGBA", base_image.size, color + (128,))
# alpha = Image.fromarray(alpha_mask, mode='L')
# overlay.putalpha(alpha)
# base_image = Image.alpha_composite(base_image.convert("RGBA"), overlay).convert("RGB")
# single_draw = ImageDraw.Draw(base_image)
# # 绘制边界框和文本
# x1, y1, x2, y2 = box.cpu().numpy()
# single_draw.rectangle([x1, y1, x2, y2], outline=color, width=3)
# text = f"ID:{i} Score:{score:.3f}"
# text_width, text_height = single_draw.textbbox((0, 0), text, font=single_font)[2:4]
# text_x = x1
# text_y = max(0, y1 - text_height - 5)
# single_draw.rectangle([text_x, text_y, text_x + text_width + 10, text_y + text_height + 5],
# fill=color)
# single_draw.text((text_x + 5, text_y + 2), text, fill="white", font=single_font)
# base_image.save(f"mask_with_info_{i:02d}.png")
# print(f"保存带信息的掩码 {i:02d}.png (得分: {score:.3f})")
# print("所有处理完成!")
后续开发 测试
1 根据iou 合并重合的物体为一个。
2 测试视频跟踪目标功能,使得多帧目标跟踪知道是同一个物体。
SAM3 视频 - 视频的可提示概念分割 (PCS)
SAM3 Video 对视频执行可提示概念分割 (PCS),以文本作为提示,检测并跟踪视频帧中所有匹配的对象实例。
from transformers import Sam3VideoModel, Sam3VideoProcessor
from accelerate import Accelerator
import torch

device = Accelerator().device
model = Sam3VideoModel.from_pretrained("facebook/sam3").to(device, dtype=torch.bfloat16)
processor = Sam3VideoProcessor.from_pretrained("facebook/sam3")

# Load video frames
from transformers.video_utils import load_video
video_url = "https://huggingface.co/datasets/hf-internal-testing/sam2-fixtures/resolve/main/bedroom.mp4"
video_frames, _ = load_video(video_url)

# Initialize video inference session
inference_session = processor.init_video_session(
    video=video_frames,
    inference_device=device,
    processing_device="cpu",
    video_storage_device="cpu",
    dtype=torch.bfloat16,
)

# Add text prompt to detect and track objects
text = "person"
inference_session = processor.add_text_prompt(
    inference_session=inference_session,
    text=text,
)

# Process all frames in the video
outputs_per_frame = {}
for model_outputs in model.propagate_in_video_iterator(
    inference_session=inference_session, max_frame_num_to_track=50
):
    processed_outputs = processor.postprocess_outputs(inference_session, model_outputs)
    outputs_per_frame[model_outputs.frame_idx] = processed_outputs

print(f"Processed {len(outputs_per_frame)} frames")

# Access results for a specific frame
frame_0_outputs = outputs_per_frame[0]
print(f"Detected {len(frame_0_outputs['object_ids'])} objects")
print(f"Object IDs: {frame_0_outputs['object_ids'].tolist()}")
print(f"Scores: {frame_0_outputs['scores'].tolist()}")
print(f"Boxes shape (XYXY format, absolute coordinates): {frame_0_outputs['boxes'].shape}")
print(f"Masks shape: {frame_0_outputs['masks'].shape}")
2

 浙公网安备 33010602011771号