

https://www.instructables.com/How-to-Connect-MPU9250-and-Raspberry-Pi-Part-1/
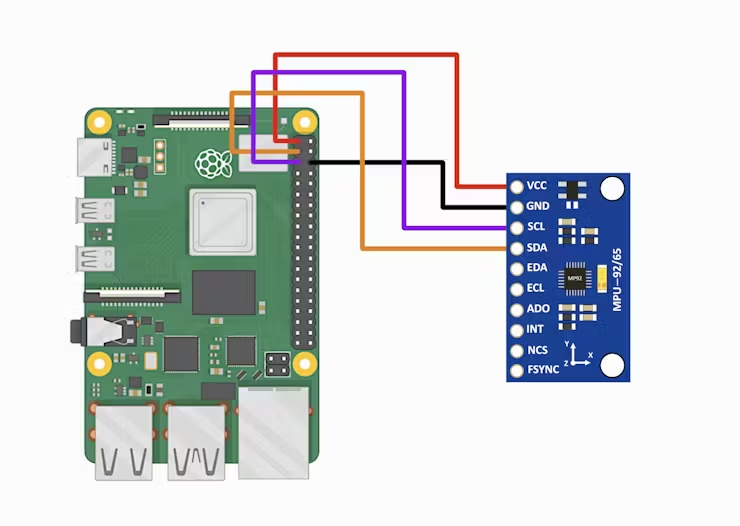
Step 2: Library and System Setup
- 从桌面环境中的“首选项”菜单打开 Raspberry Pi 配置工具,或者在终端中运行sudo raspi-config 。
- 导航至界面选项。
- 选择I2C并启用它。
- 重新启动你的 Raspberry Pi。
- 更新您的软件包列表:sudo apt-get update
- 如果还没有安装 Python 的包管理器,请安装:sudo apt-get install python3-pip
- 安装 I2C 所需的 Python 库:sudo pip3 install smbus2
- 安装专门针对 MPU9250 的库,例如mpu9250-jmdev:sudo pip3 install mpu9250-jmdev
import time
from mpu9250_jmdev.registers import *
from mpu9250_jmdev.mpu_9250 import MPU9250

# Create an MPU9250 instance
mpu = MPU9250(
    address_ak=AK8963_ADDRESS,
    address_mpu_master=MPU9050_ADDRESS_68,  # In case the MPU9250 is connected to another I2C device
    address_mpu_slave=None,
    bus=1,
    gfs=GFS_1000,
    afs=AFS_8G,
    mfs=AK8963_BIT_16,
    mode=AK8963_MODE_C100HZ)

# Configure the MPU9250
mpu.configure()

while True:
    # Read the accelerometer, gyroscope, and magnetometer values
    accel_data = mpu.readAccelerometerMaster()
    gyro_data = mpu.readGyroscopeMaster()
    mag_data = mpu.readMagnetometerMaster()

    # Print the sensor values

 浙公网安备 33010602011771号