import cv2
import numpy as np
thresh_gaizi=117
thresh_gaizi_range=3
thresh_yemian=257
thresh_yemian_range=3
thresh_baozhuang=436
thresh_baozhuang_range=3
value_gaizi=0
value_yemian=0
value_baozhuang=0
#对比1
#mask_img=mask_hsv #使用预先标定的颜色抠图
#对比2
#mask_img=dst #使用Sobel融合后的检测抠图
#对比3
#mask_img=edge_output #使用Canny边缘检测算法的检测抠图
mask_use=1 # 1-hsv 2-canny 3-canny
#(c1)是否窗口打印消息-调试使用但是会降低检测速度
debug_print=0 #调试阶段1 正式使用追求速度0
#选择检测形状
detect_what=0#1圆 0矩形
#(c2)选择是否出现标定颜色界面
detect_biaoding=1# 每次换一个光照环境 给1 鼠标点击颜色区域矫正颜色数值,获取范围填写在color_dist的最大最小中
#(c3)选择检测多少颜色
#检测一种颜色 Lower颜色下限数值 Upper颜色上限数值
#color_dist = {'red': {'Lower': np.array([0, 230, 150]), 'Upper': np.array([10, 255, 190])},}
#检测多种颜色-有更多自己往后添加
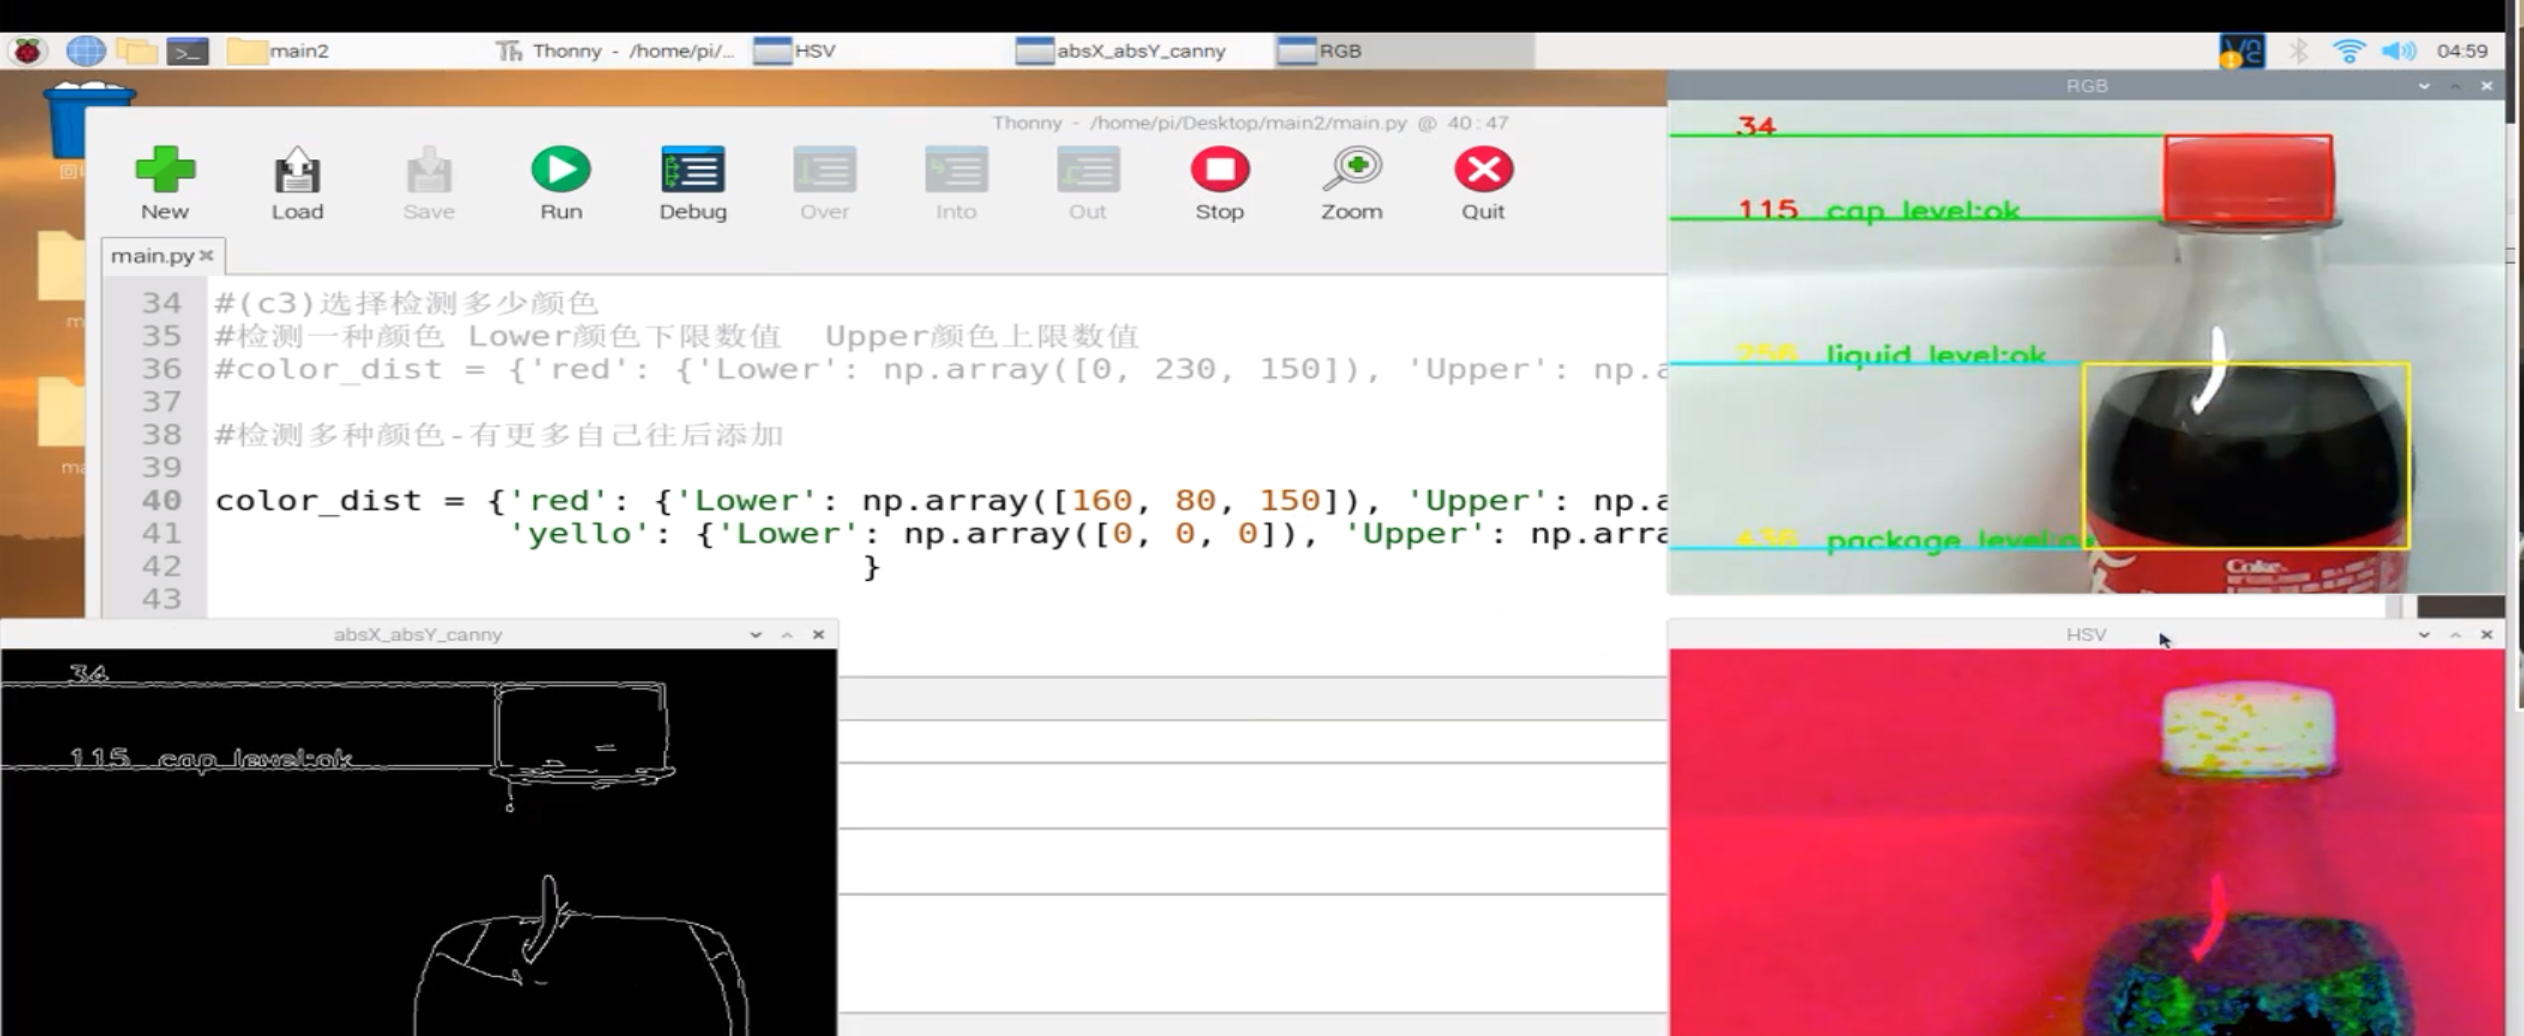
color_dist = {'red': {'Lower': np.array([160, 80, 150]), 'Upper': np.array([190, 210, 220])},
'yello': {'Lower': np.array([0, 0, 0]), 'Upper': np.array([170, 160, 80])}
}
hsvshow=0
#鼠标点击函数
def getposHsv(event,x,y,flags,param):
if event==cv2.EVENT_LBUTTONDOWN:
print("HSV is",hsvshow[y,x])
def getColorBox(shareData,shareLock):
cap = cv2.VideoCapture(0)
#cv2.namedWindow('imageHSV', 1)
if mask_use==1 and detect_biaoding==1:
cv2.namedWindow('HSV', 1)
cv2.setMouseCallback("HSV",getposHsv)#鼠标函数
while cap.isOpened():
ret, frame = cap.read()
if frame is not None:
gs_frame = cv2.GaussianBlur(frame, (5, 5), 0) # 高斯模糊
hsv = cv2.cvtColor(gs_frame, cv2.COLOR_BGR2HSV) # 转化成HSV图像
global hsvshow
hsvshow=hsv
erode_hsv = cv2.erode(hsv, None, iterations=2) # 腐蚀 粗的变细
global color_dist
if mask_use==1:
#color_dist=color_dist
pass
else:
color_dist = {'red': {'Lower': np.array([0, 190, 140]), 'Upper': np.array([10, 255, 255])} }
for nowcoloe in color_dist:
#使用纯颜色抠图
global mask_hsv
if mask_use==1:
mask_hsv = cv2.inRange(erode_hsv, color_dist[nowcoloe]['Lower'], color_dist[nowcoloe]['Upper'])
# 灰度图像
gray = cv2.cvtColor(frame, cv2.COLOR_BGR2GRAY)
# 高斯模糊,降低噪声
blurred = cv2.GaussianBlur(gray, (3, 3), 0)
# 图像梯度
#对比1 横向检测
xgrad = cv2.Sobel(blurred, cv2.CV_16SC1, 1, 0)
absX = cv2.convertScaleAbs(xgrad) # 转回uint8
#对比2 纵向检测
ygrad = cv2.Sobel(blurred, cv2.CV_16SC1, 0, 1)
absY = cv2.convertScaleAbs(ygrad)
#对比3 横+纵检测
dst = cv2.addWeighted(absX,0.5,absY,0.5,0)
#cv2.imshow("absX", absX)
#cv2.imshow("absY", absY)
#cv2.imshow("absX_absY", dst)
edge_output = cv2.Canny(xgrad, ygrad, 50, 150)
cv2.imshow("absX_absY_canny", edge_output)
#img = cv2.GaussianBlur(mask_hsv,(3,3),0)
#canny = cv2.Canny(img, 50, 150)
#下面检测用那个放开那个 默认是1
mask_img=frame
if mask_use==1:
#对比1
mask_img=mask_hsv #使用预先标定的颜色抠图erode_hsv
elif mask_use==2:
#对比2
mask_img=dst #使用Sobel融合后的检测抠图
elif mask_use==3:
#对比3
mask_img=edge_output #使用Canny边缘检测算法的检测抠图
#print(colorshow)
cnts = cv2.findContours(mask_img.copy(), cv2.RETR_EXTERNAL, cv2.CHAIN_APPROX_SIMPLE)[-2]
draw_color=(255,255,255)
if nowcoloe=="red":
draw_color=(0,0,255)
elif nowcoloe=="yello":
draw_color=(0,255,255)
elif nowcoloe=="green":
draw_color=(0,255,0)
image=frame
if cnts:
cnt = max(cnts, key=cv2.contourArea)
c=cnt
#函数可以计算面积,也可以使用矩 M[‘m00’]
area=cv2.contourArea(c)
#if area<1000:#踢出小边界
#continue
perimeter = cv2.arcLength(c,True) #计算周长
#hull = cv2.convexHull(cnt) #凸包
#最大边界矩形(包围盒)
draw_rec=0
if draw_rec:
x,y,w,h = cv2.boundingRect(c)
image = cv2.rectangle(image,(x,y),(x+w,y+h),(0,255,255),2)
#旋转矩形
draw_rec_ro=0
if draw_rec_ro :
rect = cv2.minAreaRect(c)
box = cv2.boxPoints(rect)
box = np.int0(box)
cv2.drawContours(image,[box],0,(255,0,255),2)
#最小外接圆
draw_yuan=0
if draw_yuan:
(x,y),radius = cv2.minEnclosingCircle(c)
center = (int(x),int(y))
radius = int(radius)
img = cv2.circle(image,center,radius,(0,255,0),2)
# 计算每一个轮廓的中心点
M = cv2.moments(c)#计算图像的矩,并返回一个字典 根据这些矩的值可以得到重心
M["m00"]=M["m00"]+0.001 #避免除以0
cX = int((M["m10"] / M["m00"]))
cY = int((M["m01"] / M["m00"]))
#print("面积",area,"周长",perimeter,'最小外接圆',radius,'轮廓的中心点',(cX,cY))
#检测圆形
if detect_what==1:
#用圆拟合目标
(x, y), radius = cv2.minEnclosingCircle(cnt)
with shareLock:
shareData[1]=int(x)
shareData[2]=int(y)
shareData[3]=int(radius)
if debug_print==1:
print("r",radius)
#画圆函数 radius 半径 int(x), int(y) 位置
cv2.circle(image, (int(x), int(y)), int(radius), draw_color, 2)
pass
#检测矩形
else:
#
# 获取最小外接矩阵,中心点坐标,宽高,旋转角度
rect = cv2.minAreaRect(cnt)
## 获取矩形四个顶点,浮点型
box = cv2.boxPoints(rect)
# 取整
box = np.int0(box)
# 获取四个顶点坐标
left_point_x = np.min(box[:, 0])
right_point_x = np.max(box[:, 0])
top_point_y = np.min(box[:, 1])
bottom_point_y = np.max(box[:, 1])
left_point_y = box[:, 1][np.where(box[:, 0] == left_point_x)][0]
right_point_y = box[:, 1][np.where(box[:, 0] == right_point_x)][0]
top_point_x = box[:, 0][np.where(box[:, 1] == top_point_y)][0]
bottom_point_x = box[:, 0][np.where(box[:, 1] == bottom_point_y)][0]
if nowcoloe=="red":
#print("red",box[2][0],box[2][1])
value_gaizi=bottom_point_y
#value_yemian=0
#value_baozhuang=0
if value_gaizi>= (thresh_gaizi-thresh_gaizi_range) and value_gaizi<= (thresh_gaizi+thresh_gaizi_range):
cv2.putText(image, str("cap level:ok"), (120,bottom_point_y), cv2.FONT_HERSHEY_SIMPLEX, 0.8, (0, 255, 0), 2)
else:
cv2.putText(image, str("cap level:error"), (120,bottom_point_y), cv2.FONT_HERSHEY_SIMPLEX, 0.8, (0, 0, 255), 2)
cv2.putText(image, str(top_point_y), (50,top_point_y), cv2.FONT_HERSHEY_SIMPLEX, 0.8, (0, 0, 255), 2)
cv2.putText(image, str(bottom_point_y), (50,bottom_point_y), cv2.FONT_HERSHEY_SIMPLEX, 0.8, (0, 0, 255), 2)
pt1=(0,top_point_y)
pt2=(left_point_x,top_point_y)
cv2.line(image, pt1, pt2, color=(0,255,0), thickness=2)
pt1=(0,bottom_point_y)
pt2=(left_point_x,bottom_point_y)
cv2.line(image, pt1, pt2, color=(0,255,0), thickness=2)
elif nowcoloe=="yello":
#value_gaizi=bottom_point_y
value_yemian=top_point_y
value_baozhuang=bottom_point_y
if value_yemian>= (thresh_yemian-thresh_yemian_range) and value_yemian<= (thresh_yemian+thresh_yemian_range):
cv2.putText(image, str("liquid level:ok"), (120,top_point_y), cv2.FONT_HERSHEY_SIMPLEX, 0.8, (0, 255, 0), 2)
else:
cv2.putText(image, str("liquid level:error"), (120,top_point_y), cv2.FONT_HERSHEY_SIMPLEX, 0.8, (0, 0, 255), 2)
if value_baozhuang>= (thresh_baozhuang-thresh_baozhuang_range) and value_baozhuang<= (thresh_baozhuang+thresh_baozhuang_range):
cv2.putText(image, str("package level:ok"), (120,bottom_point_y), cv2.FONT_HERSHEY_SIMPLEX, 0.8, (0, 255, 0), 2)
else:
cv2.putText(image, str("package level:error"), (120,bottom_point_y), cv2.FONT_HERSHEY_SIMPLEX, 0.8, (0, 0, 255), 2)
#print("yello",box[0][0],box[0][1])
cv2.putText(image, str(top_point_y), (50,top_point_y), cv2.FONT_HERSHEY_SIMPLEX, 0.8, (0, 255, 255), 2)
cv2.putText(image, str(bottom_point_y), (50,bottom_point_y), cv2.FONT_HERSHEY_SIMPLEX, 0.8, (0, 255, 255), 2)
pt1=(0,top_point_y)
pt2=(left_point_x,top_point_y)
cv2.line(image, pt1, pt2, color=(255,255,0), thickness=2)
pt1=(0,bottom_point_y)
pt2=(left_point_x,bottom_point_y)
cv2.line(image, pt1, pt2, color=(255,255,0), thickness=2)
#print(box)
with shareLock:
shareData[1]=box[0][0]#右上角h
shareData[2]=box[0][1]#右上角w
shareData[3]=box[2][0]#左下角h
shareData[4]=box[2][1]#左下角w
#print(rect)
if debug_print==1:
#print("h",box[0][0]-box[2][0],"w",box[0][1]-box[2][1])
h=abs(box[2][0]-box[0][0])
w=abs(box[2][1]-box[0][1])
#周长
zhouchang=(h+w)*2
txt = "Length:"+str(zhouchang)+" w:"+str(w)+" h:"+str(h)
cv2.putText(image, txt, (50,50), cv2.FONT_HERSHEY_SIMPLEX, 0.8, (0, 0, 255), 2)
#颜色
colorshow=(color_dist[nowcoloe]['Lower']+color_dist[nowcoloe]['Upper'])/2
txt = "Color-R G B:"+str(colorshow)
cv2.putText(image, txt, (50,100), cv2.FONT_HERSHEY_SIMPLEX, 0.8, (0, 255, 255), 2)
#坐标点
x=int((box[0][0]+box[2][0])/2)
y=int((box[0][1]+box[2][1])/2)
txt = "Position-x:"+str(x)+" y:"+str(y)
cv2.putText(image, txt, (50,150), cv2.FONT_HERSHEY_SIMPLEX, 0.8, (255, 0, 255), 2)
txt ="w:"+str(w)+" h:"+str(h)
cv2.putText(image, txt, (50,200), cv2.FONT_HERSHEY_SIMPLEX, 0.8, (0, 255, 255), 2)
if rect[1][0]<90 and rect[1][1]<90: #剔除掉像素小于90×90的框 排除干扰
pass
else:
cv2.drawContours(image, [np.int0(box)], -1, draw_color, 2)
#为了加快速度 检测进程连窗口都可以不显示,图像送给给主线程序来显示
cv2.imshow("RGB",image)
key=cv2.waitKey(1)
if key == ord('q') or key == ord('Q'):
shareData[5]=0
break
if mask_use==1 and detect_biaoding==1:
cv2.imshow("HSV",hsv)
key=cv2.waitKey(1)
if key == ord('q') or key == ord('Q'):
break
#单独测试代码
from multiprocessing import Process,Manager
if __name__ == '__main__':
#进程共享内存
manager=Manager()
shareData=manager.dict()#共享数据
shareLock=manager.Lock() #进程数据锁
#根据检测的形状 数据含义不同
shareData[1]=0# 圆-x 矩形-左上角h
shareData[2]=0# 圆-y 矩形-左上角w
shareData[3]=0# 圆-r 矩形-右下角h
shareData[4]=0# 圆-无 矩形-右下角w
shareData[8]=0 #wegiht
shareData[9]=1# 控制标志 控制检测进程关闭
#开启进程1
p1=Process(target=getColorBox,args=(shareData,shareLock)) #必须加,号
p1.deamon=True #伴随主进程关闭而关闭
p1.start()
#主进程不断获取进程1返回的结果
while 1:
if shareData[9]==0:#串口按退出
break
#print(shareData[1],shareData[2],shareData[3],shareData[4])


 浙公网安备 33010602011771号