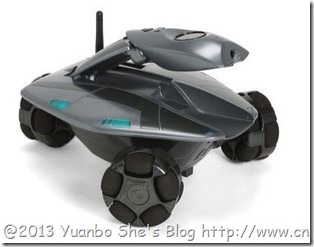
WowWee Rovio API for ROS Groovy
posted @ 2013-06-09 22:00 from [FreedomShe]
玩WowWee Rovio小车有段时间了,整理了一下之前写的代码,在ROS Groovy里面,对WowWee Rovio的CGI接口进行了封装,这次封装的主要是控制接口(三个全向轮,摄像头),图像接口(为了节约流量没有采取视频流的方式获取图像,而是采用request来response实时图像),MCU Report接口(包含红外传感,编码盘信息,电池信息等)。
Environment: Ubuntu 12.10 + Ros groovy (catkin workspace)
科普
WowWee Rovio是WowWee的早些年的一款WIFI小车,对于机器人爱好者来说,它的强大在于不错的硬件配置:
- 三个全向轮,附带三个编码传感器
- WIFI功能+摄像头
- 双向语音
- 一个红外障碍传感器
而对于普通玩家来说,它的亮点还在于北极星导航系统,内置的WEB控制页面易于访问控制,外观高端。只可惜国内流行的都是洋垃圾,电池老化,内置部件质量差,电路设计早已过时,不合理效率低,以至于大部分产品都是随时可能坏掉崩溃的产品,对普通玩家来说没有实用价值。但是对于机器人爱好者,做一些改装也能变废为宝。
ROS (Robot Operating System),无需多言,做机器人研究的不用ROS,永远都会比别人落后一步。
How to use rovio_base package to develop with Rovio API
1. Download rovio_base package into your catkin workspace (here is ros_ws)
$ cd ~/ros_ws/src
$ git clone https://github.com/yuanboshe/rovio_base.git
2. Edit rovioServer.launch
$ roscd rovio_base
$ gedit launch/rovioServer.launch
Change the parameter values to yours
<param name="/rovio_base/host" type="string" value="192.168.10.18" />
<param name="/rovio_base/port" type="string" value="80" />
<param name="/rovio_base/user" type="string" value="admin" />
<param name="/rovio_base/pw" type="string" value="admin" />
3. Create rovio_test package
$ cd ~/ros_ws/src
$ catkin_create_pkg rovio_test std_msgs roscpp cv_bridge
4. Create rovioTest.cpp
$ roscd rovio_test
$ gedit src/rovioTest.cpp
Paste the following code in to rovioTest.cpp and save.
#include "ros/ros.h"
#include "rovio_base/manDrv.h"
#include "rovio_base/image.h"
#include "rovio_base/report.h"
#include <cv_bridge/cv_bridge.h>
#include <sensor_msgs/image_encodings.h>
#include <opencv2/opencv.hpp>

int main(int argc, char **argv)
{
  ros::init(argc, argv, "rovioTest");
  ros::NodeHandle n;
  ros::ServiceClient imageClient = n.serviceClient<rovio_base::image>("rovioImage");
  ros::ServiceClient controlClient = n.serviceClient<rovio_base::manDrv>("rovioControl");
  ros::ServiceClient reportClient = n.serviceClient<rovio_base::report>("rovioReport");
  rovio_base::image imageSrv;
  rovio_base::manDrv controlSrv;
  rovio_base::report reportSrv;

  // Head middle control
  controlSrv.request.drive = 13;
  controlSrv.request.speed = 9;
  if (controlClient.call(controlSrv))
  {
    ROS_INFO("Control response code: %d", (int )controlSrv.response.code);
  }
  else
  {
    ROS_ERROR("Failed to call service rovioControl");
    return 1;
  }

  // Get report info
  if (reportClient.call(reportSrv))
  {
    int length = reportSrv.response.length;
    int lDirection = reportSrv.response.lDirection;
    int lNum = reportSrv.response.lNum;
    int rDirection = reportSrv.response.rDirection;
    int rNum = reportSrv.response.rNum;
    int rearDirection = reportSrv.response.rearDirection;
    int rearNum = reportSrv.response.rearNum;
    int headPosition = reportSrv.response.headPosition;
    bool isLedOn = reportSrv.response.isLedOn;
    bool isIrOn = reportSrv.response.isIrOn;
    bool isDetectedBarrier = reportSrv.response.isDetectedBarrier;
    ROS_INFO("MCU Report:\nlength=%d", length);
    ROS_INFO("Left direction:num=%d:%d", lDirection, lNum);
    ROS_INFO("Right direction:num=%d:%d", rDirection, rNum);
    ROS_INFO("Rear direction:num=%d:%d", rearDirection, rearNum);
    ROS_INFO("headPosition=%d", headPosition);
    ROS_INFO("isLedOn=%d,isIrOn=%d,isDetectedBarrier=%d", isLedOn, isIrOn, isDetectedBarrier);
  }
  else
  {
    ROS_ERROR("Failed to call service rovioReport");
    return 1;
  }

  // Show images from camera
  for (int i = 0; i < 20; i++)
  {
    if (imageClient.call(imageSrv))
    {
      ROS_INFO("Image size: %dx%d", (int )imageSrv.response.img.width, (int )imageSrv.response.img.height);
      cv_bridge::CvImagePtr cvImgPtr;
      try
      {
        cvImgPtr = cv_bridge::toCvCopy(imageSrv.response.img, sensor_msgs::image_encodings::BGR8);
        cv::imshow("", cvImgPtr->image);
        cv::waitKey(100);
      }
      catch (cv_bridge::Exception& e)
      {
        ROS_ERROR("cv_bridge exception: %s", e.what());
        return 1;
      }
    }
    else
    {
      ROS_ERROR("Failed to call service rovioImage");
      return 1;
    }
  }

  // Head down control
  controlSrv.request.drive = 12;
  controlSrv.request.speed = 9;
  if (controlClient.call(controlSrv))
  {
    ROS_INFO("Control response code: %d", (int )controlSrv.response.code);
  }
  else
  {
    ROS_ERROR("Failed to call service rovioControl");
    return 1;
  }

  return 0;
}
About how to use the API, you can refer to Rovio API document. The above test program shows that three services you can use: "rovioControl", "rovioImage" and "rovioReport". You can find them as ManualDrive(), GetImage, GetMCUReport () in the above document.
Also, you may prefer to use the rovioParser class directly, that avoids using ROS's service and client frame.
5. Edit the rovio_test CMakeLists.txt located at ~/row_ws/src/rovio_test/CMakeLists.txt and change the related regions as follows(or just add at the end)
add_executable(rovioTest src/rovioTest.cpp)
target_link_libraries(rovioTest ${catkin_LIBRARIES})
6. Build the packages
$ cd ~/ros_ws/
$ catkin_make
7. Run them to test
Run the follow commands in three terminals respectively
$ roscore
$ roslaunch rovio_base rovioServer.launch
$ rosrun rovio_test rovioTest
After you executed the last command, your WowWee Rovio would head middle and head down, and you would view the images from camera 2 seconds.
在测试程序rovioTest node的terminal中,Control response code为0,MCU Report length > 0,Image size 显示正确值,则三个services调用返回了正确数据。


 浙公网安备 33010602011771号