ros2 control 1
ros2 control framework
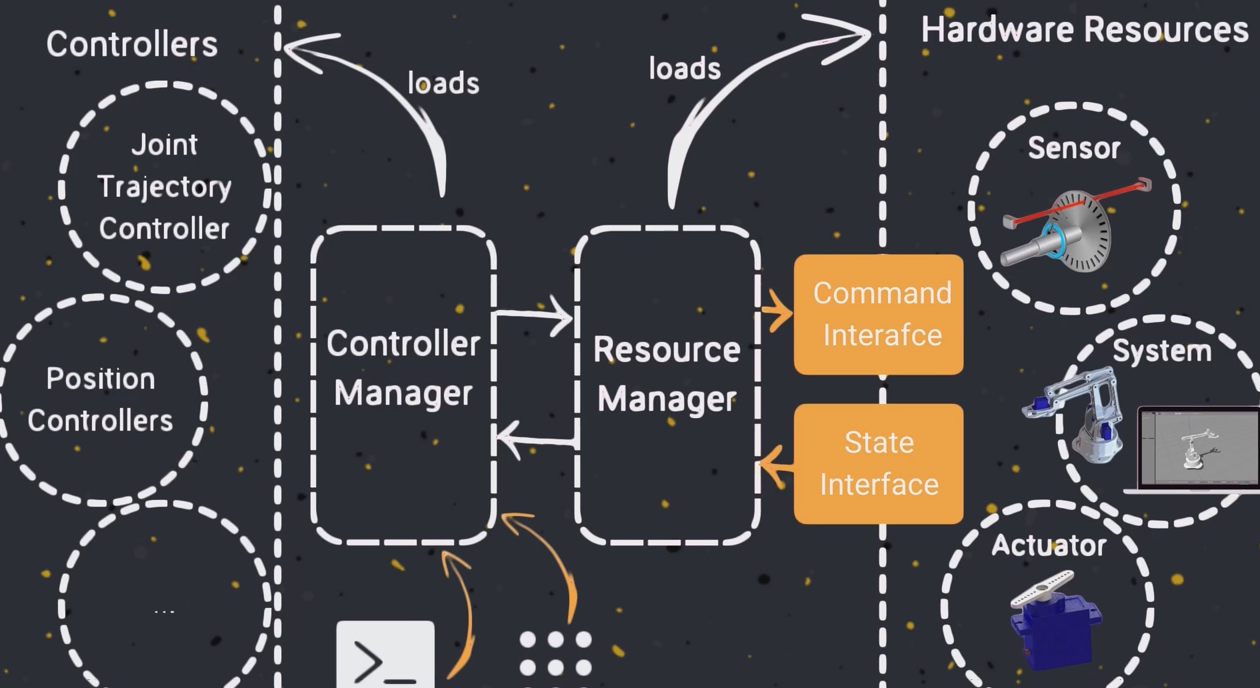
hardware resources包含各种传感器和执行器,can send command or retrieve information, such as position,velocity。
ros2 control 使用 Command interface发送指令,State interface接收消息。这两个接口由resources manager管理。
Controller manager可以加载ros2自带的controller来控制硬件。
以模拟control.xacro为例
在ros2_control标签内起个名字,type可以选sensor,actuator和system。在hardware标签内添加plugin,因为是模拟所以选用mock plugin。接着添加joint和sensor等部件,名字要与描述模型的urdf文件中的名字一直。在部件中按需求添加command_interface 和state_interface 来接收和发送消息。
点击查看代码
  <ros2_control name="RRBotSystemWithSensor" type="system">
    <hardware>
      <plugin>mock_components/GenericSystem</plugin>
    </hardware>
    <joint name="joint1">
      <command_interface name="position"/>
      <state_interface name="position"/>
    </joint>
  </ros2_control>
在arduinobot_urdf.xacro中添加
<!-- the number of the joint to which transmission refers to -->
<xacro:macro name="default_transmission" params="number">
    <transmission name="transmission_${number}">
        <!-- simulation of transmission logic -->
        <plugin>transmission_interface/SimpleTransmission</plugin>
        <joint name="joint_${number}" role="joint1">
            <!-- one degree of the motor corresponds to one degree of the robot arm -->
            <mechanicalReduction>1.0</mechanicalReduction>
        </joint>
        <actuator name="motor_${number}" role="actuator1">

        </actuator>
    </transmission>
</xacro:macro>
在xacro添加了transmission后启动ros2 control library 和 gazebo的接口
添加arduinobot_gazebo.xacro 用来指定controller_manager
?xml version="1.0"?>
<robot xmlns:xacro="http://www.ros.org/wiki/xacro" name="arduinobot">
  <gazebo>
    <plugin filename="gz_ros2_control-system" name="gz_ros2_control::GazeboSimROS2ControlPlugin">
      <robot_param>robot_description</robot_param>
      <robot_param_node>robot_state_publisher</robot_param_node>
      <parameters>$(find gz_ros2_control_demos)/config/cart_controller.yaml</parameters>
    </plugin>
  </gazebo>
</robot>
gz_ros2_control-system provides the following ros2_control interfaces:
- hardware_interface::JointStateInterface
- hardware_interface::EffortJointInterface
- hardware_interface::VelocityJointInterface
Use the tag <parameter> inside <plugin> to set the YAML file with the controller configuration and use the tag <controller_manager_name> to set the controller manager node name,default controller_manager
Joint Trajectory controller yaml file for using it could be:
点击查看代码
controller_manager:
  ros__parameters:
    joint_trajectory_controller:
    type: "joint_trajectory_controller/JointTrajectoryController"

joint_trajectory_controller:
  ros__parameters:
    joints:
      - joint1
      - joint2
      - joint3
      - joint4
      - joint5
      - joint6

    command_interfaces:
      - position

    state_interfaces:
      - position
      - velocity

    state_publish_rate: 50.0
    action_monitor_rate: 20.0

    allow_partial_joints_goal: false
    open_loop_control: true
    constraints:
      stopped_velocity_tolerance: 0.01
      goal_time: 0.0
      joint1:
        trajectory: 0.05
        goal: 0.03

 浙公网安备 33010602011771号