MapServer Tutorial——MapServer7.2.1教程学习——第一节用例实践:Example1.3 Displaying Classes in a Layer
MapServer Tutorial——MapServer7.2.1教程学习——第一节用例实践:Example1.3 Displaying Classes in a Layer
一、前言
关于第一节的案例,分别介绍了一个基本的地图站点应用程序创建和多图层地图站点 应用程序创建。这个案例 主要来介绍一下mapfile文件中 LAYER 对象里面,CLASS对象的应用。
同时还有如何根据CLASSITEM、EXPRESSION等配置去修改地图的显示方式。
最后还有一个很酷炫的方法一次性读取shp文件中的数据信息。
当前案例官网:https://www.mapserver.org/tutorial/example1-3.html#example1-3
附带一点其他的,当前系列博客的大纲博文《MapServer Tutorial——MapServer7.2.1教程学习(大纲)》,我会持续更新。
以及我所写博文的应用环境 《MapServer Configuring with IIS》。
希望能够给新手带来帮助。
二、创建Example1.3 Displaying Classes in a Layer站点
老规矩,按照先前的创建站点规则。
在cmd中输入:cd /d E:\SvnWorkspace\LY_WEB_GIS\branches\Documents\ms4w-mapserver-for-wimdows\release-1911-x64-gdal-2-3-3-mapserver-7-2-1\apps
在cmd中输入:md Example1.3
在cmd中输入:cd Example1.3
在cmd中输入:md data
在cmd中输入:md logs
在cmd中输入:cd.>web.config
在cmd中输入:cd.>example1_3.map
红色标记路径部分,按照你站点创建位置填写。
修改web.config,内容如下:
<?xml version="1.0" encoding="UTF-8"?>
<configuration>
    <system.webServer>
        <handlers>
            <add name="MapServerFastCgi"
            path="*" verb="*" type="" modules="FastCgiModule"
            scriptProcessor="E:\SvnWorkspace\LY_WEB_GIS\branches\Documents\ms4w-mapserver-for-wimdows\release-1911-x64-gdal-2-3-3-mapserver-7-2-1\bin\mapserv.exe"
            resourceType="Unspecified" requireAccess="Script" allowPathInfo="false" preCondition=""  />
        </handlers>
        <caching enabled="true" enableKernelCache="true" />
    </system.webServer>
</configuration>
打开IIS创建站点,站点名称、应用程序池名称为:Example1.3。端口号:8013。
给应用程序池添加对logs文件夹的读写权限。
在cmd中输入:icacls "E:\SvnWorkspace\LY_WEB_GIS\branches\Documents\ms4w-mapserver-for-wimdows\release-1911-x64-gdal-2-3-3-mapserver-7-2-1\apps\Example1.3\logs" /grant "IIS AppPool\Example1.3":(OI)(CI)RW
将states_ugl.dbf、states_ugl.shp、states_ugl.shx等文件复制到Example1.3中的data文件夹下面。
mapfile(example1_3.map)文件内容如下:
# The annotated map file (sort of)
# Created by Pericles S. Nacionales for the MapServer tutorial
# 20050408
#
# MapServer map file uses the pound sign (#) to denote the start of a line
# comment--each line that needs to be commented has to be prepended with a "#".
#
# Map files begin with MAP keyword to signify the start of the map object.
# Well, the entire map file is THE map object.  Enclosed between MAP and END
# at the very bottom of this map file, are keyword/value pairs and other
# objects.
MAP
  IMAGETYPE      PNG
  EXTENT         -97.238976 41.619778 -82.122902 49.385620
  SIZE           400 300
  SHAPEPATH      "./data"
  IMAGECOLOR     255 255 255

  # Layer objects are defined beneath the map object.  You need at least one
  # layer defined in your map file before you can display a map...  You can
  # define as many layers as you'd like although a limit is typically hard-coded
  # in map.h in the MapServer source.  The default limit is set at 100.  You'd
  # have to have a very specialized application to need more than 100 layers in
  # your application.

  # Start of LAYER DEFINITIONS ---------------------------------------------
  LAYER # States polygon layer begins here
    NAME         states_poly
    DATA         states_ugl
    STATUS       OFF
    TYPE         POLYGON

    # CLASSITEM defines the non-spatial attribute that you will be using to
    # separate a layer into classes.  This attribute will be in the DBF file
    # of your shapefile (it will be different for each data format).  In this
    # example the shapefile states_ugl has an associated database
    # (states_ugl.dbf) that contains an attribute called "CLASS".  You will be
    # using two values in the CLASS attribute to separate the classes (also
    # called themes) used in this layer--land and water.  CLASSITEM is used in
    # association with the EXPRESSION parameter in the CLASS object.  See below.
    CLASSITEM    "CLASS"

    # The class object is defined within the layer object.  You can define as
    # many classes as you need (well, there are limits as with layers, but it's
    # senseless to define more than ten on a "normal" layer.  There are
    # situations, however, where you might have to do it.)
    CLASS
      NAME 'States'
      EXPRESSION 'land' # Only polygons where "CLASS" = 'land' will be drawn.

      # There are styles in a class, just like there are classes in a layer,
      # just like there are layers in a map.  You can define multiple styles in
      # a class just as you can define multiple classes in a layer and multiple
      # layers in a map.
      STYLE
        COLOR      232 232 232
      END
    END
    CLASS
      NAME 'Water'
      EXPRESSION 'water' # Only polygons where "CLASS" = 'water' will be drawn.
      STYLE
        COLOR      198 198 255
      END
    END
  END # States polygon layer ends here

  LAYER # States line layer begins here
    NAME         states_line
    DATA         states_ugl
    STATUS       OFF
    TYPE         LINE

    CLASSITEM    "CLASS"
    CLASS
      NAME       'State Boundary'
      EXPRESSION 'land'
      STYLE
        COLOR    32 32 32
      END
    END
  END # States line layer ends here
  # End of LAYER DEFINITIONS -------------------------------
  DEBUG 5
  CONFIG "MS_ERRORFILE" "logs\ms.log"
END # All map files must come to an end just as all other things must come to...
在浏览器中输入:http://localhost:8013/mapserv?map=../apps/Example1.3/example1_3.map&layer=states_poly&layer=states_line&mode=map

URL参数解析通上一章《MapServer Tutorial——MapServer7.2.1教程学习——第一节用例实践:Example1.2 Static Map with Two Layers》相同,详见上一章URL参数解析。
同样的shp数据文件,只是mapfile文件不同,然后 polygon 区域的颜色就不同。这就是mapfile中CLASS对象的不同配置导致的。
三、MapFile文件解析
mapfile文件结构如下:
                            MAP
(states_poly) LAYER----------|---------LAYER (states_line)
               |                        |
(land) CLASS---|---CLASS (water)        |-CLASS
          |         |                      |
    STYLE-|         |-STYLE                |-STYLE
当前mapfile同样只有两个图层(layer),但是 polygon(NAME值为states_poly)的图层却有两个 CLASS 对象。其中 polygon 颜色的区分是通过:CLASSITEM、EXPRESSION等两个对象座椅区分的。
CLASSITEM
当一个layer使用多个CLASS时,CLASSITEM用于指定DBF文件(可理解为shp文件的数据库表)中,根据哪个属性(可理解为当前表的字段)去使用对应的CLASS。
当前案例 states_ugl.shp 文件有多个 polygon 区域,states_ugl.shp记录这个区域的矢量数据 polygon 所在区域、数量等。同时每个polygon还包含其他哪些属性。
但是,states_ugl.shp 中的 polygon 的其他属性数据在 states_ugl.dbf 文件里面。
打开cmd输入:cd /d E:\SvnWorkspace\LY_WEB_GIS\branches\Documents\ms4w-mapserver-for-wimdows\release-1911-x64-gdal-2-3-3-mapserver-7-2-1\apps\Example1.3\data
在cmd中输入:ogrinfo -al -so states_ugl.shp,查看当前shp文件的相关属性数据。数据如下:
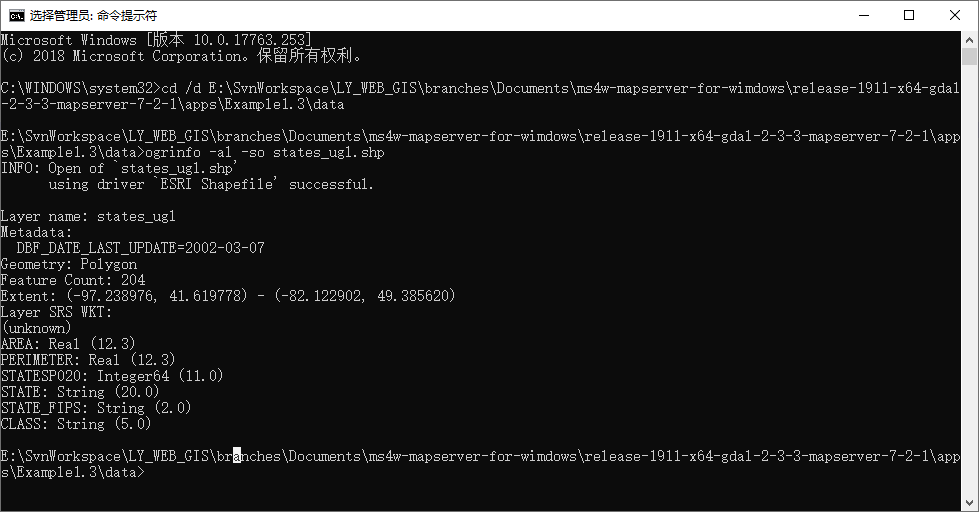
INFO: Open of `states_ugl.shp'
      using driver `ESRI Shapefile' successful.

Layer name: states_ugl
Metadata:
  DBF_DATE_LAST_UPDATE=2002-03-07
Geometry: Polygon
Feature Count: 204
Extent: (-97.238976, 41.619778) - (-82.122902, 49.385620)
Layer SRS WKT:
(unknown)
AREA: Real (12.3)
PERIMETER: Real (12.3)
STATESP020: Integer64 (11.0)
STATE: String (20.0)
STATE_FIPS: String (2.0)
CLASS: String (5.0)
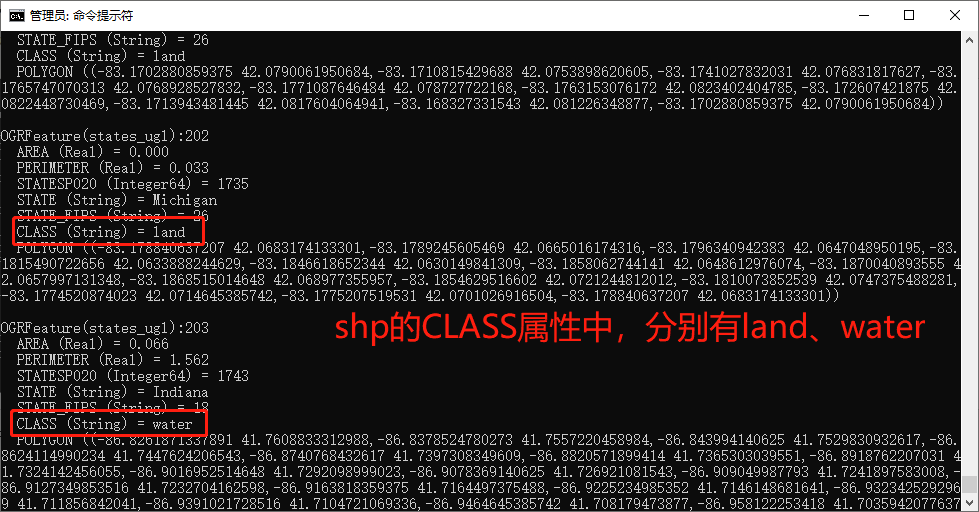
可以看到,shp的属性中包含一个叫做CLASS的属性。
在cmd中输入:ogrinfo -al -ro states_ugl.dbf 。可以查看当前shp文件的所有数据。
当然,输入:ogrinfo -al -ro states_ugl.shp也可以。因为目前案例中的数据文件是ESRI Shapefiles,所以最少包含三个文件,后缀名分别是:dbf、shp、shx,可以查看:https://www.mapserver.org/input/vector/format_types.html
相关命令查看:https://gdal.org/ogrinfo.html
EXPRESSION
EXPRESSION,字面意思就是表达式。
当前mapfile中,对于 CLASS 对象,我们根据 EXPRESSION 指定的属性值去选择 CLASS 应用到 LAYER 层上。
当然,EXPRESSION 可以多个值,也可以是逻辑表达式。详情请看:https://www.mapserver.org/mapfile/expressions.html#expressions
四、后记
通过当前案例,主要学习了CLASSITEM、EXPRESSION等的简单使用。
同时,也知道了如何通过GDAL包中的相关ogrinfo命令去查看shape文件中的相关数据。

 浙公网安备 33010602011771号