收藏:Upgrading VS 2005 Web Site Projects to be VS 2005 Web Application Projects
http://webproject.scottgu.com/CSharp/Migration2/Migration2.aspx
http://msdn2.microsoft.com/en-us/library/aa983476(VS.80).aspx
Upgrading VS 2005 Web Site Projects to be VS 2005 Web Application Projects
The below tutorial helps explain how you can migrate existing VS 2005 Web Site Projects to use the new VS 2005 Web Application Project option. Please make sure that you have already completed Tutorials 1-6 on this site first, as this will help provide you with context about how the VS 2005 Web Application Project model works.
Note: If you want to migrate an existing VS 2003 Web Project to use the VS 2005 Web Application Project option, you should read this tutorial here.
Migrating from VS 2005 Web Site Projects to VS 2005 Web Application Projects
Please follow the below steps in exact order. If you have problems using the below steps, please post in this forum and VS team members will be able to help.
Note: the sample I am using with the migration steps below is the Personal Starter Kit that ships with Visual Studio (if you want to follow along exactly, you can choose File->New Web Site to create the VS 2005 Web Site Project version of it).
Step 0: Install the VS 2005 Web Application Project Preview
VS 2005 Web Application Project support is not built-into the shipping VS 2005 (although it will be included with the SP1 release). So the first step (if you haven't done it already) is to install it.
You can learn more about it and install the released build from here. After installing it, please spend a few minutes following the tutorials on this site to test it out and learn the basics of how it works.
Step 1: Create a New VS 2005 Web Application Project
The best strategy to migrate an existing VS 2005 Web Site Project is to first create a new blank VS 2005 Web Application Project in a separate directory. This avoids changing any of the existing web site files, and will allow us to copy in already implemented functionality. You can add this new project either to your existing solution (ideal when you have lots of other class library projects that you want to use), or by starting a new instance of Visual Studio and creating a new solution+project within it.
To create a new VS 2005 Web Application Project in a new solution, choose File->New Project and then select the ASP.NET Web Application Project option. If you want to add a VS 2005 Web Application Project to an existing solution right click on the solution node and select Add->New Project. Name the project whatever you want, and select the language type you want to use.
Once you've either created or added this new VS 2005 Web Application Project, delete the "default.aspx" and "web.config" that are added to it by default (since you'll instead just want to copy in your existing ones). In this example I added the new Web Application Project to my existing solution. If you do this you'll then be left with a blank project that looks like this:
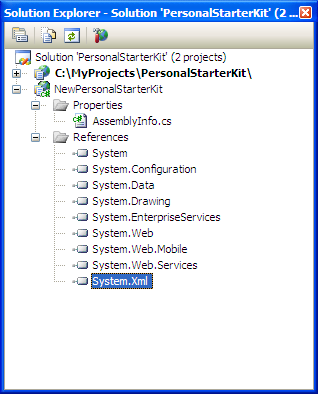
Step 2: Setup Project References
Before migrating any code into your new VS 2005 Web Application Project, you should first make sure to setup any project or assembly references for it. You can see the list of default references with new VS 2005 Web Application Projects under the References node above. You can right-click on the References node to add new References to the project, as well as setup project-to-project references if you have other class library projects part of the solution.
Once you have all of your references setup for the project, right click on the project and choose "Build" (or just hit Ctrl-Shift-B). This will build the project and verify that any project to project references are working.
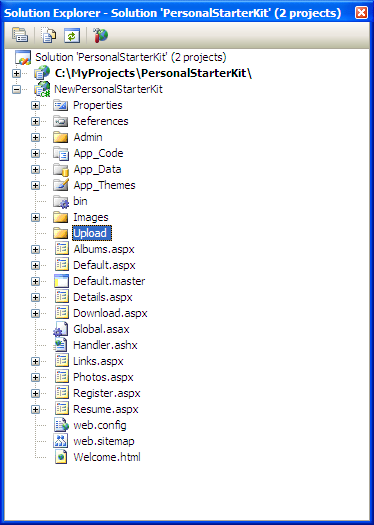
Step 3: Copy the files from the Web Site Project into the new Web Application Project
The easiest way to add your existing files from a VS 2005 Web Site Project is simply select all the files in the Web Site Project copy and paste them into the New Web Application Project.
At this point none of the files have been converted and the directory structure looks the same as it did in the Web Site Project.
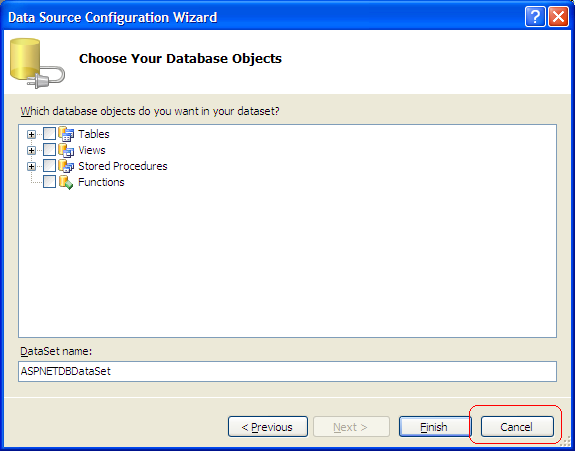
If the Data Source Configuration Wizard is launched during the copy, cancel the dialog and allow the rest of the files to be copied.
One difference between a VS 2005 Web Site Project and a VS 2005 Web Application Project is that the VS 2005 Web Site Project Model dynamically generates the tool-generated partial class half of a page, and does not persist it on disk. The VS 2005 Web Application Project model on the other-hand does save this partial class on disk within files that have a .designer.cs extension and compiles it using the in-memory VS compilers when a build occurs (one benefit of this is faster build times). You can learn more about how this code-generation model works by reading this tutorial.
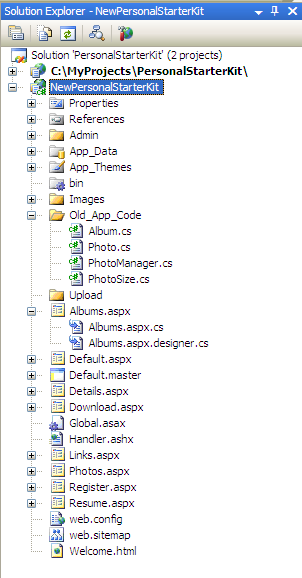
Notice how the code-behind files for each page/user-control is still associated with the .aspx, .master and .ascx content. However, no .designer.cs files have been generated.

As part of our next step, we will be converting these pages to persist their partial class declarations on disk within a .designer.cs file.
Step 4: Converting the Project Files
To convert pages and classes within the project, right click the root node of the Web Application Project and select "Convert to Web Application". This will cause VS 2005 to recursively examine every page, user-control, and master-page in the project and automatically generate a .designer.cs file for each, as well as change the .aspx/.ascx files to use the "codebehind" rather than the "codefile" attribute. This command will also rename App_Code to Old_App_Code. When it's completed your project will look as follows:
After you've added these files, build the project again to see if there are any compile errors. The most likely cause of errors at this stage are: a) You are missing an assembly reference, or b) You are using a dynamically generated type like the "Profile" object or a Typed DataSet. If you are missing an assembly reference, you should go to the reference manager and add it. If you are using a dynamically generated type, please see the Appendix of this tutorial for details on how to use it with the new VS 2005 Web Application Project option.
VERY, VERY IMPORTANT: Because ASP.NET 2.0 tries to dynamically compile any classes it finds under the /App_Code directory of an application at runtime, you explictly *DO NOT* want to store classes that you compile as part of your VS 2005 Web Application Project under an "app_code" folder. If you do this, then the class will get compiled twice -- once as part of the VS 2005 Web Application Project assembly, and then again at runtime by ASP.NET. The result will most likely be a "could not load type" runtime exception -- caused because you have duplicate type names in your application. Instead, you should store your class files in any other directory of your project other than one named "app_code". This will be handled automatically by the "Convert to Web Applicaiton" command. This command will rename the folder Old_App_Code.
Step 5: Running the Site
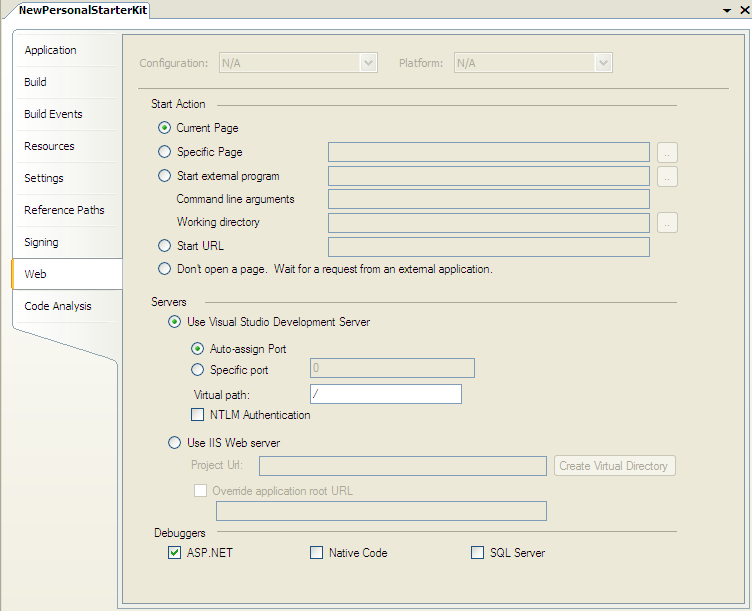
Once you have completed the above steps, you should be able to cleanly compile and run your application. By default it will use the built-in VS Web Server (aka Cassini) to run the site. You can alternatively configure the project to use IIS instead. To manage these settings, right-click on the project and pull up its project properties. You can then select the "Web" tab to configure these runtime settings:
Step 6: Optionally Adding Namespaces
By default, pages and classes built within the VS 2005 Web Site Project option are not automatically added using a code namespace. Pages/Controls/Classes built using the VS 2005 Web Application Project option, on the other hand, do -- so new pages/classes you add will by default have namespaces.
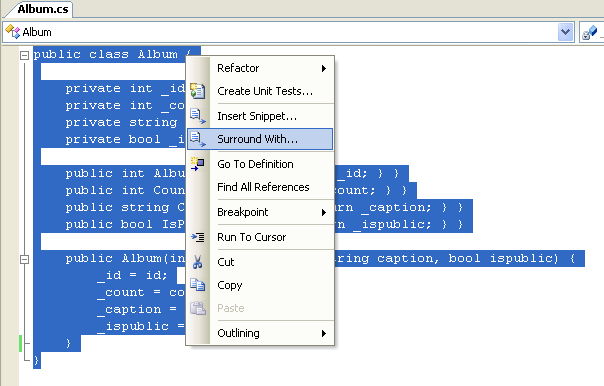
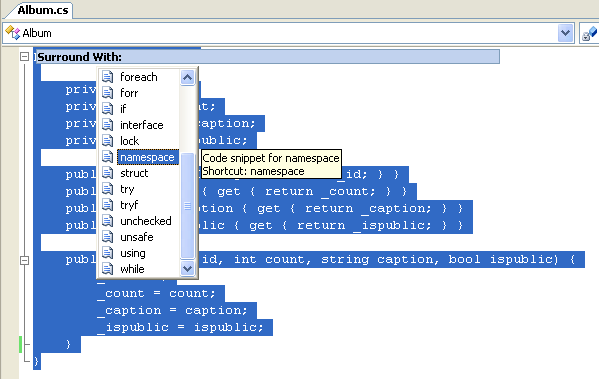
You can easily add namespaces in code to existing classes within VS using the "Surround With" context menu command in the C# code editor. Simply select a class (or multiple classes) in the source editor, then right click and select "Surround With->Namespace" option:
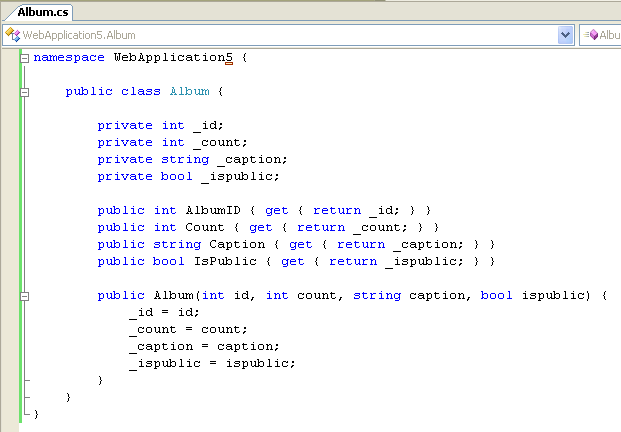
Note that .aspx, .ascx, .master, .ashx, .asmx, and .asax files contain "inherits=" or "class=" attributes that list the class names they should invoke. So if you add namespaces to the code-behind files of these types you will also want/need to update the inherits and class declarations to also contain the namespace you use. For example: a Details.aspx page would need to have its page directive changed from "inherits=Details_aspx" to "inherits=WebApplication5.Details_aspx"
One easy way to bulk edit the namespace is to use Edit->Find and Replace command to find all inherits=" strings and change them to inherits="WebApplication. (note the trailing "." -- which will be prepended before the previous class name).
Appendix 1: Migrating Declarative Typed DataSets (.xsd files)
If you have Strongly Typed DataSets under the App_Code directory in your VS 2005 Web Site Project, then you need to make an additional change to fixup the connection string in web.config.
Specifically, you need to open each DataSet in the Data Designer and select each TableAdapter and re-set the connectionstring for the object (you can do this by selecting the TableAdapter in the designer and then changing the "ConnectionString" property in the propertygrid).
Appendix 2: Migrating Code that works with the ASP.NET 2.0 Profile Object
ASP.NET 2.0 adds support for a new feature called "Profile Personalization". This enables developers to easily store and retrieve profile data about a user visiting the site within a personalization database. With VS 2005 Web Site Projects, ASP.NET automatically adds a strongly typed "Profile" object to each page in the project that provides a strongly-typed mapping of all properties defined within the "profile" section of the application's web.config file. Developers can then get intellisense against this, and automatically save/retrieve values from it. For example, if an application's web.config file had this section in it:

Then developers could write this code within their pages to save/retrieve "Teachers" information:

This is supported because with the VS 2005 Web Site Project option Visual Studio is dynamically creating and adding a "ProfileCommon" class named "Profile" into every code-behind instance.
VS 2005 Web Application Projects don't automatically support generating a strongly-typed Profile class proxy. However, you can use this free download to automatically keep your own proxy class in sync with the profile configuration.
This walkthrough explains the process of converting an existing Visual Studio 2005 Web site project to a Visual Studio 2005 Web application project. The Web application project model uses the same conceptual approach as a Web project in Visual Studio .NET 2003. This includes a project file to include and exclude files and compilation to a single assembly. For more information about Web project conversion, see Web Project Conversion from Visual Studio .NET.
Tasks illustrated in this walkthrough include the following:
-
Opening and verifying your Visual Studio 2005 Web site project.
-
Creating a new Visual Studio 2005 Web application project.
-
Setting project references.
-
Copying files to the new Web application project.
-
Converting the project files.
-
Running the Web application project.
-
Adding namespace syntax.
-
Converting declarative typed datasets.
-
Converting profile object code.
Prerequisites
In order to complete this walkthrough, you will need:
-
Visual Studio 2005 Service Pack 1 (SP1)
-
The .NET Framework version 2.0
Opening and Verifying Your Visual Studio 2005 Web Site Project
Before converting a project, open your existing Visual Studio 2005 solution. Compile and run the solution to verify that everything works the way you want.
To open and verify your Visual Studio 2005 Web project
-
On the File menu, click Open and then click Web Site.
-
In the Open Web Site dialog box, select the project folder you want to open and then click Open.
-
On the Build menu, select Build Web Site.
-
On the Debug menu, select Start Debugging. Alternatively, you can press F5.
.gif) Note
Note If the Debugging Not Enabled dialog box is displayed, select Add a new Web.config file with debugging enabled.
-
Verify that your project runs as expected.
Creating a New Visual Studio 2005 Web Application Project
The best strategy for converting an existing Visual Studio 2005 Web site project is to first create a new, blank Visual Studio 2005 Web application project in a separate directory. This avoids changing any part of the existing Web site files, and will enable you to copy already implemented functionality into the new Web application project. You can add this new project either to your existing solution, which is ideal when you have several class-library projects that you want to use, or by starting a new instance of Visual Studio and creating a new solution and project within it.
To create a new Visual Studio 2005 Web application project in a new solution
-
In Visual Studio 2005, close all open solutions.
-
On the File menu, click New, and then click Project.The New Project dialog box opens.
-
In the Project types section of the New Project dialog box, double-click (or expand) the language that you want to use, and then select Web to display the Web-related templates.
-
Select the ASP.NET Web Application template.
-
Type the Name, Location, and Solution Name that you want to use, and then click OK to create the Web application project.
-
Once the project is created, delete the Default.aspx and Web.config files.
Setting Project References
If your Visual Studio 2005 Web site project requires additional project or assembly references, you can add them to the Web application project. You can see the list of default references with new Visual Studio 2005 Web application projects under the References node within Solution Explorer.
| Note |
|---|
|
Before converting the project files, add references to the Web application project for assemblies that existed in the Bin folder to help prevent errors. |
For more information about references, see Project References.
To add references to a Visual Studio 2005 Web application project
-
In Solution Explorer, right-click References, and then click Add Reference.
-
In the Add Reference dialog box, select the reference that you want to add and then click OK.
-
In Solution Explorer, right-click the Web application and click Build.Visual Studio builds the project and verifies that any project-to-project references are working.
Copying Files to the New Web Application Project
The easiest way to add your existing files is to copy the files from a Visual Studio 2005 Web site project to the Web application project. In Solution Explorer, select all the files in the Web site project and then copy and paste the files into the new Web application project. The directory structure should look the same as it did in the Web site project.
| Note |
|---|
|
If the Data Source Configuration Wizard is started during the copy process, click Cancel in the wizard's dialog box and allow the rest of the files to be copied. |
One difference between a Visual Studio 2005 Web site project and a Visual Studio 2005 Web application project is that the Visual Studio 2005 Web site project model dynamically generates the tool-generated partial class and does not persist it on disk. However, the Visual Studio 2005 Web application project model saves this partial class on disk within files that have a .designer.cs file name extension. Also, the Web application project model compiles the partial class using the in-memory Visual Studio compilers when a build occurs.
After copying the files from the Web site project to the Web application project, you will notice how the code-behind files for each page and user-control are still associated with the .aspx, .master, and .ascx files. No .designer.cs files have been generated. As part of the next step, you will be converting these pages to persist their partial class declarations on disk in a .designer.cs file.
Converting the Project Files
Visual Studio includes an option to convert pages and classes within Web application projects to use partial class declarations. Partial classes are used to separate designer-generated code from code-behind code. These designer-generated classes are stored in a separate file from the code-behind file. This conversion process causes Visual Studio 2005 to recursively examine every page, user-control, and master-page in the project, and to automatically generate a .designer.cs file for each. Visual Studio also changes the .aspx or .ascx files to use the codeBehind attribute instead of the codeFile attribute. This command will also rename the App_Code file to Old_App_Code.
To convert pages and classes to use partial classes in a Web application project
-
In Solution Explorer, right-click the root project folder that contains the pages and classes you want to convert, and then click Convert to Web Application.
After you have converted pages and classes to use partial classes, build the project to see whether there are any compilation errors. The two most likely causes of errors are:
-
A missing assembly reference that must be added to your project.
-
An issue with a dynamically generated type, such as the "Profile" object or a typed dataset.
If you are missing an assembly reference, you should open the reference manager and add it. If you are using a dynamically generated type, see Converting Declarative Typed Datasets and Converting Profile Object Code later in this topic.
| Note |
|---|
|
If a Visual Basic class file contains more than one namespace, make sure to verify each namespace after conversion. |
Because ASP.NET 2.0 dynamically compiles any classes it finds in the App_Code directory of an application at run time, you should not store classes that you compile as part of your Visual Studio 2005 Web application project in the App_Code folder. If you do, the class will get compiled two times: one time as part of the Visual Studio 2005 Web application project assembly, and then again at run time by ASP.NET. The result will most likely be a could not load type runtime exception, which occurs because there are duplicate type names in the application. Instead, you should store your class files in any folder of your project other than the App_Code folder. This will be handled automatically by the Convert to Web Applicaiton command, which will rename the folder to Old_App_Code.
Running the Web Application Project
Once you have completed the previous steps, you will be able to compile and run your application without any errors. By default, Visual Studio will use the built-in Visual Studio Development Server to run the site. Alternatively, you can configure the project to use Internet Information Services (IIS). To manage Web application project settings, right-click the project and then click Properties. You can then select the Web tab to configure these runtime settings. For more information about the Web application project Web tab, see Web Page, Project Designer.
Additional Conversion Options
There are three additional conversion options to consider when you convert your project to a Web application project. These options are:
-
Adding namespace syntax.
-
Converting declarative typed datasets.
-
Converting profile object code.
Adding Namespace Syntax
By default, pages and classes built by using the Visual Studio 2005 Web site project model do not automatically include a code namespace. However, pages, controls, and classes built by using the Visual Studio 2005 Web application project model automatically include a code namespace. When converting the Web site project to a Web application project, you will have to add the namespaces to the code.
You can easily add namespaces to code in existing classes within Visual Studio by using the Surround With shortcut menu command in the C# code editor.
To add a namespace to existing classes
-
In Solution Explorer, select and open the code file that you want to modify.
-
Select a class (or multiple classes) in the source editor, right-click the selected code, and then click Surround With.
-
Select the Namespace item in the list.
Note that .aspx, .ascx, .master, .ashx, .asmx, and .asax files contain inherits or class attributes that list the class names they should invoke. So, if you add namespaces to the code-behind files of these file types, you must also add the namespace to the Inherits and Class declarations. For example, if you add a namespace called "WebApplication5" to the code-behind file, then you would change the page directive of the Details.aspx page from "inherits=Details_aspx" to "inherits=WebApplication5.Details_aspx".
| Note |
|---|
|
When converting the Web site project to a Web application project, verify that the Inherits attribute and the CodeFile attribute of the Page directive contain the namespace of the class to be inherited. |
If you must update the namespace multiple times in a file, you can use the Find and Replace command on the Edit menu to avoid individually changing each instance. In the Find what text box, type the inherits=" string, and in the Replace with box, type the inherits="WebApplicationName. string, where "WebApplicationName" is the new namespace. Make sure that you include the trailing period (.) at the end of the replacement string because it will be prepended to the previous class name during the replacement process.
For more information about how to use the Surround With command, see How to: Use Surround-with Code Snippets.
Converting Declarative Typed Datasets
If you have strongly typed DataSet classes in the App_Code directory in your Visual Studio 2005 Web site project, then you must make an additional change to fix the connectionString in the Web.config file. Specifically, you must open each DataSet in the Designer, select each TableAdapter, and then reset the connectionString for the object.
To fix the connectionString of strongly typed DataSets
-
In Solution Explorer, right-click the DataSet and then select View Designer.The Designer window opens.
Note If the DataSet connection is configured, you can double-click the DataSet to display it in View Designer.
-
Right-click each TableAdapter and select Properties.
-
Select the Connection property and reset the connection by selecting an available drop-down option. When you update the connection, the ConnectionString will also be updated.
Converting Profile Object Code
ASP.NET 2.0 adds support for a new feature named profile personalization. This feature enables developers to easily store and retrieve user-profile data in a personalization database. With Visual Studio 2005 Web site projects, ASP.NET automatically adds a strongly typed Profile object to each page in the project. This object provides a strongly typed mapping of all properties defined in the profile section of the application's Web.config file. Developers can then get IntelliSense data for this object, and automatically save and retrieve values from it. For example, an application's Web.config file might contain the following section.
<profile defaultProvider="AspNetSqlProfileProvider">
<properties>
<add name="Teachers"
type="Teachers"
allowAnonymous="true" />
</properties>
</profile>
In this case, developers could add the following code to their pages to save and retrieve information about the "Teachers" object as shown in the following code example.
public partial class _Default : System.Web.UI.Page
{
protected void Button1_Click(object sender, EventArgs e)
{
Teachers teachers = new Teachers();
teachers.Add(new Teacher("Scott"));
teachers.Add(new Teacher("Bob"));
teachers.Add(new Teacher("Paul"));
Profile.Teachers = teachers;
}
protected void Button2_Click(object sender, EventArgs e)
{
GridView1.DataSource = Profile.Teachers;
GridView1.DataBind();
}
}
With the Visual Studio 2005 Web site project option, this scenario is supported because Visual Studio is dynamically creating and adding a ProfileCommon class named Profile to every code-behind instance.
The SP1 version of the Visual Studio 2005 Web application project does not automatically include the ProfileCommon class. Therefore, some additional steps are required to obtain strong-typing for the Profile class. Specifically, you can create your own ProfileCommon class that contains strongly typed properties for the items configured in the profile system. Then you can accesses the current Profile property of the HttpContext object to get and set the properties as shown in the following code example.
using System;
using System.Collections.Generic;
using System.Text;
using System.Web;
using System.Web.Profile;
namespace WebApplication6
{
public class ProfileCommon
{
public Teachers Teachers
{
get
{
return (Teachers) HttpContext.Current.Profile.GetPropertyValue("Teachers");
}
set
{
HttpContext.Current.Profile.SetPropertyValue("Teachers",value);
}
}
}
}
You can then add an instance of the ProfileCommon class named "Profile" to the pages that must use the profile system as shown in the following code example.
namespace WebApplication20
{
public partial class _Default : System.Web.UI.Page
{
ProfileCommon Profile = new ProfileCommon();
protected void Button1_Click(object sender, EventArgs e)
{
Teachers teachers = new Teachers();
teachers.Add(new Teacher("scott"));
teachers.Add(new Teacher("bob"));
teachers.Add(new Teacher("paul"));
Profile.Teachers = teachers;
}
protected void Button2_Click(object sender, EventArgs e)
{
GridView1.DataSource = Profile.Teachers;
GridView1.DataBind();
}
}
}
You will not have to change any other code on the page. Also, you will be able to use the profile system as you did with your original Web site project. For more information about how to use the profile system, see ASP.NET Profile Properties Overview.

 浙公网安备 33010602011771号