
ASP.NET Core on K8S深入学习(9)Secret & Configmap
 本文探索了在K8S中如何进行配置管理,如果需要密文配置,可以使用Secret,如果是一般应用配置,可以使用ConfigMap。虽然Secret和ConfigMap都定义了好几种定义方式,但是我们一般采用YAML配置创建和Volume方式读取,因为Volume方式可以支持动态更新。最后,通过分享圣杰的一篇文章,介绍了如何在ASP.NET Core下使用Configmap的方式,希望对你有帮助!
本篇已加入《.NET Core on K8S学习实践系列文章索引》,可以点击查看更多容器化技术相关系列文章。
一、Secret
1.1 关于Secret
在应用启动过程中需要一些敏感信息,比如数据库用户名、密码,如果直接明文存储在容器镜像中是不安全的,K8S提供的方案是Secret。

Secret 会以密文的方式存储数据,避免了直接在配置文件中保存敏感信息。
Secret 会以 Volume 的形式被 mount 到 Pod,容器可通过文件的方式使用 Secret 中的敏感数据,也可以使用环境变量的方式使用。
1.2 创建与查看Secret
这里假设我们要创建一个包含以下信息的Secret:
(1)用户名:Edison
(2)密码:EDC123456*
有4种方法来创建Secret:
(1)通过 --from-literal:
kubectl create secret generic mysecret --from-literal=username=Edison --from-literal=password=EDC123456*
PS:每个 --from-literal 对应一个信息条目
(2)通过 --from-file:
echo -n Edison > ./username
echo -n EDC123456* > ./password
kubectl create secret generic mysecret --from-file=./username --from-file=./password
PS:每个文件内容对应一个信息条目
(3)通过 --from-env-file:
cat << EOF > env.txt
username=Edison
password=EDC123456*
EOF
kubectl create secret generic mysecret --from-env-file=env.txt
PS:文件 env.txt 中每行 Key=Value 对应一个信息条目
(4)通过YAML配置文件创建:(推荐方式)
由于配置文件中的敏感数据必须是通过base64编码后的结果,因此需要获取base64编码后的值:

下面就是这个YAML文件的内容:
apiVersion: v1
kind: Secret
metadata:
  name: edc-secret
data:
  username: RWRpc29u
  password: RURDMTIzNDU2Kg==
通过kubectl apply来创建Secret:

创建成功后,验证一下,查看一下这个Secret:
kubectl get secret edc-secret      // 查看存在的secret
kubectl describe secret edc-secret  // 查看条目的Key
kubectl edit secret edc-secret     // 查看条目的Value

将Value进行base64反编码,如下所示,与预期一致:

1.3 在Pod中使用Secret
K8S中Pod中使用Secret有两种方式,一是Volume方式,二是环境变量的方式。
(1)Volume方式
这里我们以一个示例演示一下如何通过Volume方式使用Secret,首先定义一个Pod:
apiVersion: v1
kind: Pod
metadata:
  name: secret-demo
spec:
  containers:
  - name: secret-demo-pod
    image: busybox
    args:
    - /bin/sh
    - -c
    - sleep 10; touch /tmp/healthy; sleep 30000
    volumeMounts:
    - name: foo
      mountPath: "/etc/foo"
      readOnly: true
  volumes:
  - name: foo
    secret:
      secretName: edc-secret
该Pod中会使用到刚刚定义的secret(edc-secret),然后volumeMounts定义了将foo mount到容器中的路径为/etc/foo的目录下,并且指定了读写权限为只读。
通过kubectl apply创建之后,我们试着在容器中读取secret来验证一下,如下图所示:
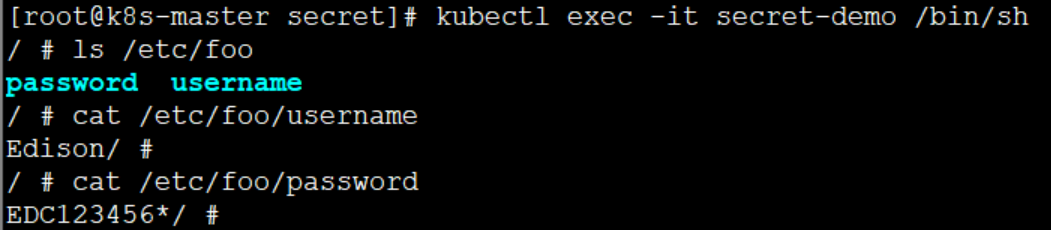
可以看到,K8S为每条敏感数据创建了一个文件,而且其Value是以明文存放的。
当然,你也可以自定义存放数据的目录,如下配置所示:
apiVersion: v1
kind: Pod
metadata:
  name: secret-demo
spec:
  containers:
  - name: secret-demo-pod
    image: busybox
    args:
    - /bin/sh
    - -c
    - sleep 10; touch /tmp/healthy; sleep 30000
    volumeMounts:
    - name: foo
      mountPath: "/etc/foo"
      readOnly: true
  volumes:
  - name: foo
    secret:
      secretName: edc-secret
      items:
      - key: username
        path: /edc-group/username
      - key: password
        path: /edc-group/password
这时,该secret就会存放于/etc/foo/edc-group/username 和 /etc/foo/edc-group/password 两个目录下了。
(2)动态更新
以Volume方式使用Secret,其中一个优点就是支持动态更新。例如,我们将Secret更新一下,重新应用到K8S中:
apiVersion: v1
kind: Secret
metadata:
  name: edc-secret
data:
  username: RWRpc29u
  password: YWJjZGVmZyo=    // 换为了 abcdefg*
通过kubectl apply重新应用之后,等待一段时间后,再次进入容器中验证:

已经改为了 abcdefg*,符合预期。
(2)环境变量方式
通过Volume使用Secret看起来稍微麻烦了一点,容器必须通过文件读取数据。K8S提供了另外一种方式,那就是环境变量方式。
下面仍以上面的例子为例,修改配置文件:
apiVersion: v1
kind: Pod
metadata:
  name: secret-demo
spec:
  containers:
  - name: secret-demo-pod
    image: busybox
    args:
    - /bin/sh
    - -c
    - sleep 10; touch /tmp/healthy; sleep 30000
    env:
      - name: EDC_SECRET_USERNAME
        valueFrom:
          secretKeyRef:
            name: edc-secret
            key: username
      - name: EDC_SECRET_PASSWORD
        valueFrom:
          secretKeyRef:
            name: edc-secret
            key: password
通过kubectl apply应用之后,进入容器验证一下:

可以看到,可以方便地通过环境变量获取到Value。
PS:需要注意的也是,虽然通过环境变量读取Secret比较方便,但是无法支持Secret动态更新!
二、Configmap
2.1 关于Configmap
上面提到的Secret可以为Pod提供机密数据的存储,而对于一些非机密敏感的数据,像一些应用的配置信息啊神马的,则可以使用Configmap。
Configmap的创建与使用方式与Secret非常类似,不同点只在于数据以明文形式存放(不过,我觉得Secret的密文形式也并不密文,只能算得上是简单编码)。
2.2 创建Configmap
和Secret一样,可以通过 --from-literal,--from-file 和 --from-env-file来创建,这里我们跳过,直接说下我们最常用的yaml配置文件的方式。
apiVersion: v1
kind: ConfigMap
metadata:
  name: service-configmap
data:
  LogLevel: Error
  LogFile: service-timestamp.log
  AllowedHosts: edc.com
2.3 使用Configmap
和Secret一样,也可以通过Volume 或 环境变量两种方式来使用Configmap。
(1)Volume方式
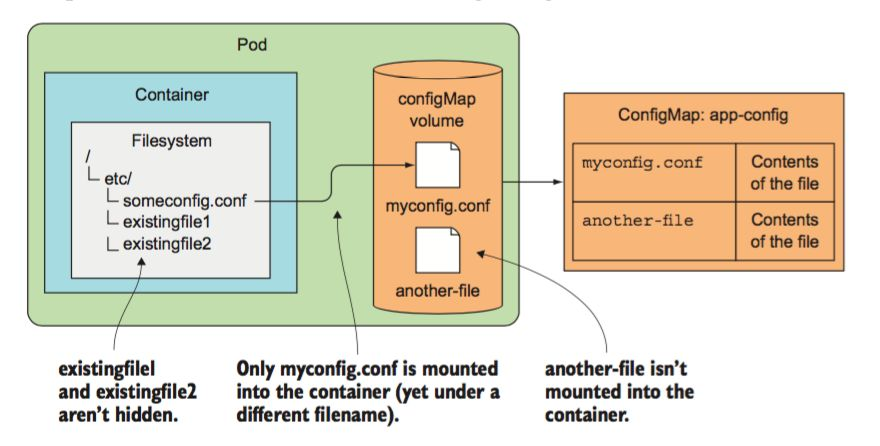
apiVersion: v1
kind: Pod
metadata:
  name: configmap-demo
spec:
  containers:
  - name: configmap-demo-pod
    image: busybox
    args:
    - /bin/sh
    - -c
    - sleep 10; touch /tmp/healthy; sleep 30000
    volumeMounts:
    - name: foo
      mountPath: "/etc/foo"
      readOnly: true
  volumes:
  - name: foo
    configMap:
      name: service-configmap
(2)环境变量方式
apiVersion: v1
kind: Pod
metadata:
  name: secret-demo
spec:
  containers:
  - name: secret-demo-pod
    image: busybox
    args:
    - /bin/sh
    - -c
    - sleep 10; touch /tmp/healthy; sleep 30000
    env:
      - name: SERVICE_LOG_LEVEL
        valueFrom:
          configMapKeyRef:
            name: service-configmap
            key: LogLevel
      - name: SERVICE_LOG_FILE
        valueFrom:
          configMapKeyRef:
            name: service-configmap
            key: LogFile
      - name: SERVICE_ALLOWED_HOSTS
        valueFrom:
          configMapKeyRef:
            name: service-configmap
            key: AllowedHosts
2.4 最佳实践
大多数情况下,大家建议的最佳实践是:
(1)创建ConfigMap采用YAML配置方式 => 便于复用和版本管理
(2)读取ConfigMap采用Volume方式 => 便于配置动态更新
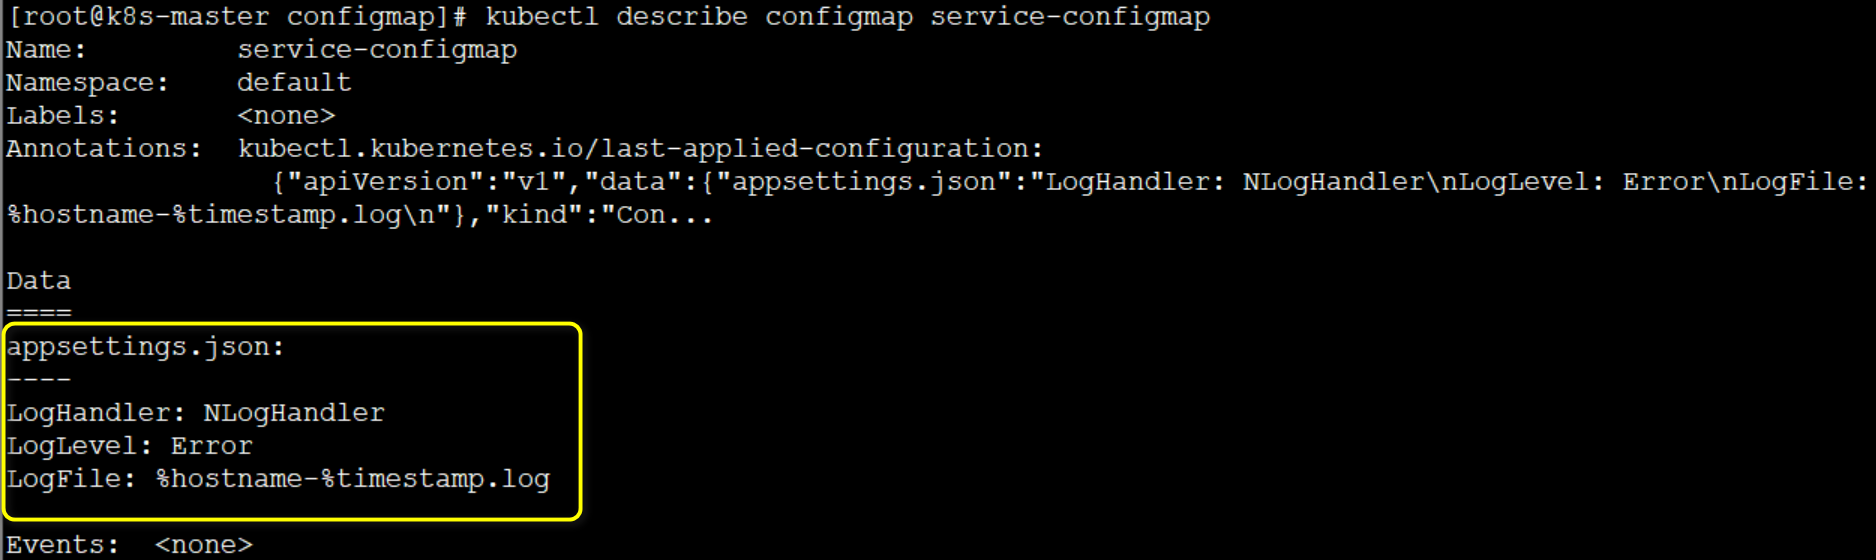
下面我们创建一个Configmap,其YAML内容如下:
apiVersion: v1
kind: ConfigMap
metadata:
  name: service-configmap
data:
  appsettings.json: |
    LogHandler: NLogHandler
    LogLevel: Error
    LogFile: %hostname-%timestamp.log
这里注意别忘了:后面的 | 符号,然后创建&查看Configmap:
如果想要在Pod中使用此Configmap,可以在YAML配置如下:
apiVersion: v1
kind: Pod
metadata:
  name: configmap-demo
spec:
  containers:
  - name: configmap-demo-pod
    image: busybox
    args:
    - /bin/sh
    - -c
    - sleep 10; touch /tmp/healthy; sleep 30000
    volumeMounts:
    - name: configmap
      mountPath: "/etc/configmap"
  volumes:
  - name: configmap
    configMap:
      name: service-configmap
      items:
        - key: appsettings.json
          path: appsettings.json
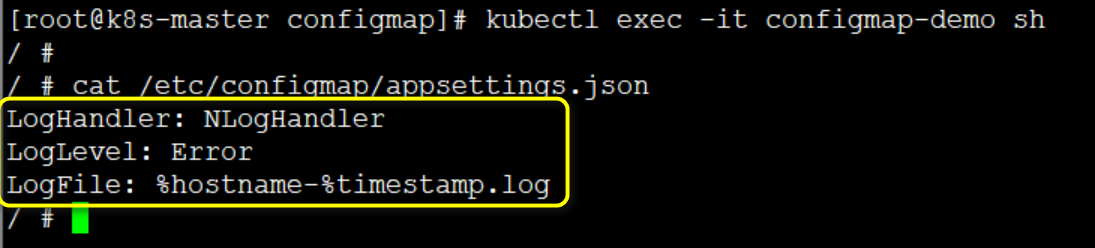
这里将Volume mount到了容器的 /etc/configmap 目录中,下面我们验证一下:
这时我们将configmap更新一下,如下:
apiVersion: v1
kind: ConfigMap
metadata:
  name: service-configmap
data:
  appsettings.json: |
    Logging:
      LogLevel:
        Default: "Error"
    AllowedHosts: "*"
通过kubectl apply更新一下configmap,然后再到pod中验证是否动态更新:
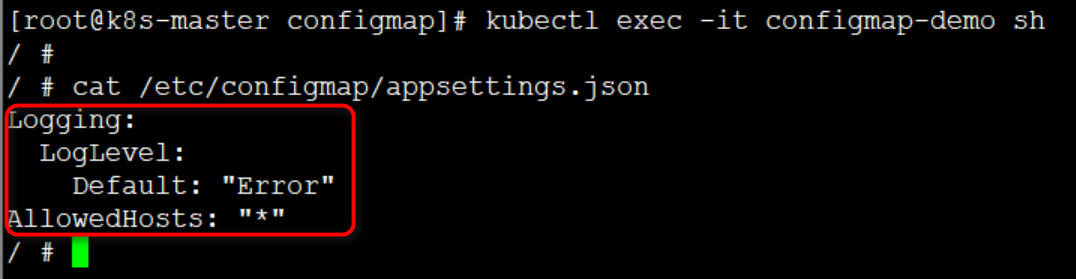
可以看出,已经动态更新,符合预期!
2.5 ASP.NET Core appSettings
我们在ASP.NET Core中的配置都是写在appSettings.json文件中,如何将appSettings.json转换为ConfigMap呢?圣杰已经总结归纳为了《.NET Core使用K8S Configmap的正确姿势》一文,有兴趣的读者可以参考此文。
三、小结
本文探索了在K8S中如何进行配置管理,如果需要密文配置,可以使用Secret,如果是一般应用配置,可以使用ConfigMap。虽然Secret和ConfigMap都定义了好几种定义方式,但是我们一般采用YAML配置创建和Volume方式读取,因为Volume方式可以支持动态更新。最后,通过分享圣杰的一篇文章,介绍了如何在ASP.NET Core下使用Configmap的方式,希望对你有帮助!
参考资料
(1)CloudMan,《每天5分钟玩转Kubernetes》
(2)李振良,《一天入门Kubernets教程》
(3)马哥(马永亮),《Kubernetes快速入门》
(4)benjamin杨,《K8S通过Secret管理敏感信息》
(5)伊凡的一天,《K8S对象之Secret》


 浙公网安备 33010602011771号