foundationpose 自定义数据集制作以及成功运行demo
Foundationpose 数据集制作以及在WSL2上面成功运行自己的数据集
1. 环境准备
可以参考这一篇进行环境配置WSL2搭建foundationpose
如果是使用docker 可以查看这个github上的Run with WSL2
2. Foundationpose 数据集分析
具体的一些可以看这一篇Foundationpose数据集制作
这里做一些细节的补充。
分析官方的数据集文件,如下图:
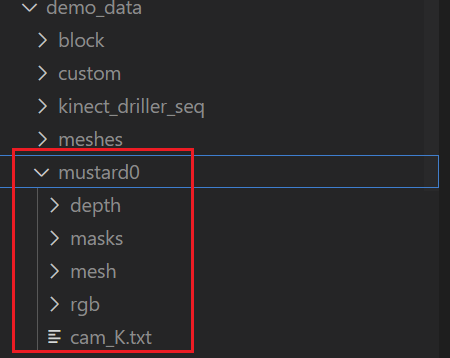
数据集主要分为5个部分:
-
depth: 深度图文件夹,用于保存相机采集到的深度图。(具体采集代码后面贴出)
-
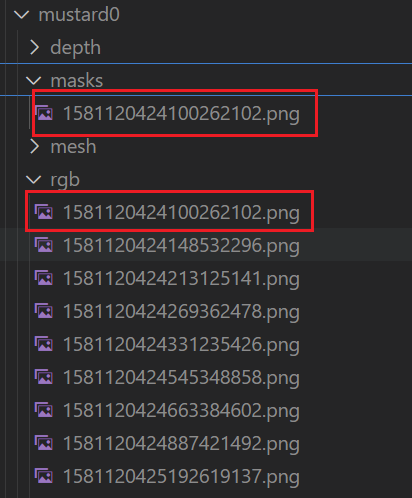
masks: 彩色相机第一帧mask图片,后续的检测是根据这个文件的mask图片进行位姿估计。
注意:这个的文件名要与depth以及rgb的第一张图片文件名保持一致不然运行会报错
官方的如下:
![image]()
-
mesh: 这个是保存模型以及模型纹理的文件夹。
包括:
textured_simple.obj :物体的模型文件
textured_simple.obj.mtl :物体的模型文件与纹理文件之间的调用桥梁
texture_map.png :物体的纹理文件 保存了物体的皮肤特征
三个文件 -
rgb: 彩色图片文件夹,用于保存相机读取的彩色图片数据集
-
cam_K.txt: 保存了相机的内参矩阵(注意保存的是彩色视频流的相机内参)
3. 制作自己的数据集
3.1 采集rgb以及depth图片
这里使用的是Intel RealSense D435进行采集的,具体代码如下:
import pyrealsense2 as rs
import numpy as np
import cv2
import os
import json
from datetime import datetime


def setup_realsense():
    """配置并启动RealSense摄像头"""
    print("RealSense")

    # 创建管道
    pipeline = rs.pipeline()
    config = rs.config()

    # 启用彩色和深度流
    config.enable_stream(rs.stream.color, 640, 480, rs.format.bgr8, 30)
    config.enable_stream(rs.stream.depth, 640, 480, rs.format.z16, 30)

    # 启动管道
    profile = pipeline.start(config)

    # 获取深度传感器和深度比例
    depth_sensor = profile.get_device().first_depth_sensor()
    depth_scale = depth_sensor.get_depth_scale()
    print(f"深度比例系数: {depth_scale}")

    # 创建对齐对象(深度对齐到彩色)
    align_to = rs.stream.color
    align = rs.align(align_to)

    return pipeline, align, depth_scale


def capture_rgbd_data(output_dir, num_frames=1000, capture_interval=0.5):
    """
    采集RGB-D数据

    参数:
        output_dir: 输出目录
        num_frames: 要采集的帧数
        capture_interval: 采集间隔(秒)
    """
    # 创建输出目录
    rgb_dir = os.path.join(output_dir, "rgb")
    depth_dir = os.path.join(output_dir, "depth")
    os.makedirs(rgb_dir, exist_ok=True)
    os.makedirs(depth_dir, exist_ok=True)

    # 设置摄像头
    pipeline, align, depth_scale = setup_realsense()

    # 获取相机内参
    frames = pipeline.wait_for_frames()
    aligned_frames = align.process(frames)
    color_frame = aligned_frames.get_color_frame()
    intr = color_frame.profile.as_video_stream_profile().intrinsics
    camera_params = {
        "width": intr.width,
        "height": intr.height,
        "fx": intr.fx,
        "fy": intr.fy,
        "ppx": intr.ppx,
        "ppy": intr.ppy,
        "depth_scale": depth_scale
    }

    # 保存相机参数
    with open(os.path.join(output_dir, "camera_params.json"), "w") as f:
        json.dump(camera_params, f, indent=4)

    print(f"开始采集 {num_frames} 帧数据,间隔 {capture_interval}秒...")

    try:
        frame_count = 0
        while frame_count < num_frames:
            # 等待帧
            frames = pipeline.wait_for_frames()

            # 对齐深度帧到彩色帧
            aligned_frames = align.process(frames)

            # 获取对齐后的帧
            depth_frame = aligned_frames.get_depth_frame()
            color_frame = aligned_frames.get_color_frame()

            if not depth_frame or not color_frame:
                continue

            # 转换为numpy数组
            depth_image = np.asanyarray(depth_frame.get_data())
            color_image = np.asanyarray(color_frame.get_data())

            # cv2.imwrite("test.png", depth_image)

            # 生成时间戳
            timestamp = datetime.now().strftime("%Y%m%d_%H%M%S_%f")

            # 保存图像
            rgb_filename = os.path.join(rgb_dir, f"frame_{timestamp}.png")
            depth_filename = os.path.join(depth_dir, f"frame_{timestamp}.png")

            cv2.imwrite(rgb_filename, color_image)
            cv2.imwrite(depth_filename, depth_image)

            print(f"已采集帧 {frame_count + 1}/{num_frames}")
            frame_count += 1

            # 显示预览
            depth_colormap = cv2.applyColorMap(
                cv2.convertScaleAbs(depth_image, alpha=0.03), cv2.COLORMAP_JET)

            # 水平堆叠图像
            images = np.hstack((color_image, depth_colormap))

            # 显示图像
            cv2.namedWindow('RealSense Capture', cv2.WINDOW_AUTOSIZE)
            cv2.imshow('RealSense Captrue', images)

            # 等待间隔或按键
            key = cv2.waitKey(int(capture_interval * 1000))
            if key == ord('q'):
                break

    finally:
        # 停止管道
        pipeline.stop()
        cv2.destroyAllWindows()
        print("采集完成!")


if __name__ == "__main__":
    # 配置输出目录
    timestamp = datetime.now().strftime("%Y%m%d_%H%M%S")
    output_directory = f"realsense_capture_{timestamp}"

    # 开始采集
    capture_rgbd_data(output_directory, num_frames=2000, capture_interval=0.001)
3.2 获取摄像头内参矩阵
前面的代码已经将摄像头内参保存好,采集完成后会自动保存为以下文件:

# 获取相机内参
    frames = pipeline.wait_for_frames()
    aligned_frames = align.process(frames)
    color_frame = aligned_frames.get_color_frame()
    intr = color_frame.profile.as_video_stream_profile().intrinsics
    camera_params = {
        "width": intr.width,
        "height": intr.height,
        "fx": intr.fx,
        "fy": intr.fy,
        "ppx": intr.ppx,
        "ppy": intr.ppy,
        "depth_scale": depth_scale
    }
接下来是将获取的内参矩阵进行转换为和官方文件要求的
import json
import sys


def main():

    json_file = "camera_params.json"

    try:
        # 读取 JSON 文件
        with open(json_file, 'r') as f:
            camera_params = json.load(f)

        # 提取内参
        fx = camera_params["fx"]
        fy = camera_params["fy"]
        ppx = camera_params["ppx"]
        ppy = camera_params["ppy"]

        # 构造3x3内参矩阵
        matrix = [
            [fx, 0.0, ppx],
            [0.0, fy, ppy],
            [0.0, 0.0, 1.0]
        ]

        # 生成格式化的矩阵文本
        matrix_text = ""
        for row in matrix:
            formatted_row = " ".join([f"{val:.18e}" for val in row])
            matrix_text += formatted_row + "\n"

        # 保存到 cam_K.txt 文件
        with open("cam_K.txt", 'w') as f:
            f.write(matrix_text)

        print(f"内参矩阵已成功保存到 cam_K.txt 文件")

    except FileNotFoundError:
        print(f"错误: 文件 '{json_file}' 不存在")
        sys.exit(1)
    except json.JSONDecodeError:
        print(f"错误: 文件 '{json_file}' 不是有效的 JSON 格式")
        sys.exit(1)
    except KeyError as e:
        print(f"错误: JSON 文件中缺少必要的参数: {e}")
        sys.exit(1)
    except Exception as e:
        print(f"发生未知错误: {e}")
        sys.exit(1)


if __name__ == "__main__":
    main()
3.3 制作mask第一帧图片
这里我使用了Grounded-segment-anything进行了分割,具体配置看Grounded-segment-anything官方配置 以及CSDN Grounded-segment-anything配置
将Grounded-segment-anything环境搭建好后,先下载sam_hq_vit_b.pth (可能需要使用魔法)
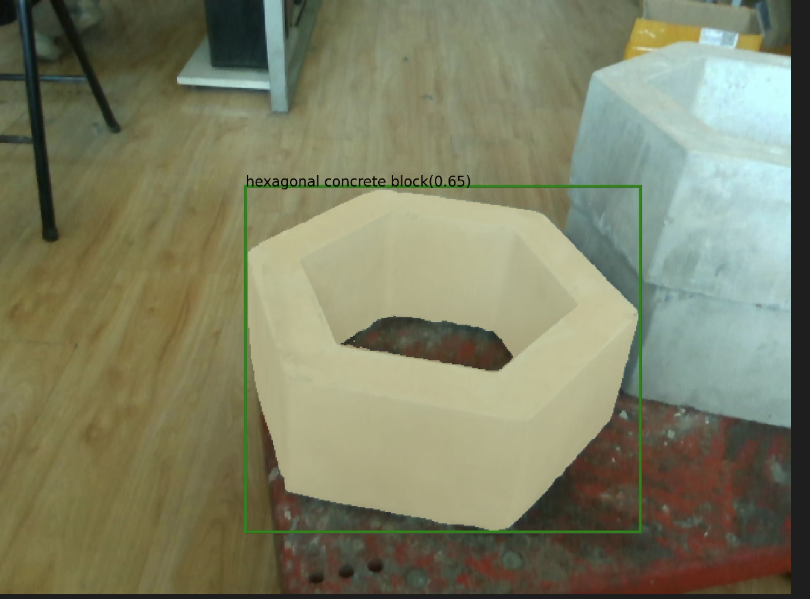
然后运行下面这个代码可以得到mask.jpg(text_prompt = "left hexagonal concrete block" # largest "left hexagonal concrete block"要修改成自己对应的目标即可)
我这里描述的是下面这张图
import argparse
import os
import sys
import numpy as np
import json
import torch
from PIL import Image
sys.path.append(os.path.join(os.getcwd(), "GroundingDINO"))
sys.path.append(os.path.join(os.getcwd(), "segment_anything"))
# Grounding DINO
import GroundingDINO.groundingdino.datasets.transforms as T
from GroundingDINO.groundingdino.models import build_model
from GroundingDINO.groundingdino.util.slconfig import SLConfig
from GroundingDINO.groundingdino.util.utils import clean_state_dict, get_phrases_from_posmap
# segment anything
from segment_anything import (
    sam_model_registry,
    sam_hq_model_registry,
    SamPredictor
)
import cv2
import matplotlib.pyplot as plt

# 加载图片
def load_image(image_path):
    # load image
    image_pil = Image.open(image_path).convert("RGB")  # load image

    transform = T.Compose(
        [
            T.RandomResize([800], max_size=1333),
            T.ToTensor(),
            T.Normalize([0.485, 0.456, 0.406], [0.229, 0.224, 0.225]),
        ]
    )
    image, _ = transform(image_pil, None)  # 3, h, w
    return image_pil, image
# 加载模型
def load_model(model_config_path, model_checkpoint_path, bert_base_uncased_path, device):
    args = SLConfig.fromfile(model_config_path)
    args.device = device
    args.bert_base_uncased_path = bert_base_uncased_path
    model = build_model(args)
    checkpoint = torch.load(model_checkpoint_path, map_location="cpu")
    load_res = model.load_state_dict(clean_state_dict(checkpoint["model"]), strict=False)
    print(load_res)
    _ = model.eval()
    return model
# 得到Grounding_DINO模型的检测框输出
def get_grounding_output(model, image, caption, box_threshold, text_threshold, with_logits=True, device="cpu"):
    caption = caption.lower()
    caption = caption.strip()
    if not caption.endswith("."):
        caption = caption + "."
    model = model.to(device)
    image = image.to(device)
    with torch.no_grad():
        outputs = model(image[None], captions=[caption])
    logits = outputs["pred_logits"].cpu().sigmoid()[0]  # (nq, 256)
    boxes = outputs["pred_boxes"].cpu()[0]  # (nq, 4)
    logits.shape[0]

    # filter output
    logits_filt = logits.clone()
    boxes_filt = boxes.clone()
    filt_mask = logits_filt.max(dim=1)[0] > box_threshold
    logits_filt = logits_filt[filt_mask]  # num_filt, 256
    boxes_filt = boxes_filt[filt_mask]  # num_filt, 4
    logits_filt.shape[0]

    # get phrase
    tokenlizer = model.tokenizer
    tokenized = tokenlizer(caption)
    # build pred
    pred_phrases = []
    for logit, box in zip(logits_filt, boxes_filt):
        pred_phrase = get_phrases_from_posmap(logit > text_threshold, tokenized, tokenlizer)
        if with_logits:
            pred_phrases.append(pred_phrase + f"({str(logit.max().item())[:4]})")
        else:
            pred_phrases.append(pred_phrase)

    return boxes_filt, pred_phrases
# 展示mask
def show_mask(mask, ax, random_color=False):
    if random_color:
        color = np.concatenate([np.random.random(3), np.array([0.6])], axis=0)
    else:
        color = np.array([30/255, 144/255, 255/255, 0.6])
    h, w = mask.shape[-2:]
    mask_image = mask.reshape(h, w, 1) * color.reshape(1, 1, -1)
    ax.imshow(mask_image)
# 展示检索框
def show_box(box, ax, label):
    x0, y0 = box[0], box[1]
    w, h = box[2] - box[0], box[3] - box[1]
    ax.add_patch(plt.Rectangle((x0, y0), w, h, edgecolor='green', facecolor=(0,0,0,0), lw=2))
    ax.text(x0, y0, label)
# 保存mask数据
def save_mask_data(output_dir, mask_list, box_list, label_list):
    value = 0  # 0 for background

    mask_img = torch.zeros(mask_list.shape[-2:])
    for idx, mask in enumerate(mask_list):
        mask_img[mask.cpu().numpy()[0] == True] = value + idx + 1
    plt.figure(figsize=(10, 10))
    plt.imshow(mask_img.numpy())
    plt.axis('off')
    plt.savefig(os.path.join(output_dir, 'mask.jpg'), bbox_inches="tight", dpi=300, pad_inches=0.0)

    json_data = [{
        'value': value,
        'label': 'background'
    }]
    for label, box in zip(label_list, box_list):
        value += 1
        name, logit = label.split('(')
        logit = logit[:-1] # the last is ')'
        json_data.append({
            'value': value,
            'label': name,
            'logit': float(logit),
            'box': box.numpy().tolist(),
        })
    with open(os.path.join(output_dir, 'mask.json'), 'w') as f:
        json.dump(json_data, f)

def main():
    # 直接初始化参数,不使用 argparse 解析命令行
    config_file = "GroundingDINO/groundingdino/config/GroundingDINO_SwinT_OGC.py"
    grounded_checkpoint = "groundingdino_swint_ogc.pth"
    sam_version = "vit_b"
    sam_checkpoint = None
    sam_hq_checkpoint = "sam_hq_vit_b.pth"  # 填入sam-hq相应路径
    use_sam_hq = True  # 是否使用 sam-hq
    image_path = "test.png"
    text_prompt = "left hexagonal concrete block" # largest "left hexagonal concrete block"
    output_dir = "outputs"
    box_threshold = 0.3
    text_threshold = 0.25
    device = "cuda"
    bert_base_uncased_path = None  # 如果有 BERT 相关路径,填入相应路径

    # 创建输出目录
    os.makedirs(output_dir, exist_ok=True)
    # 加载图像
    image_pil, image = load_image(image_path)
    image_pil.save(os.path.join(output_dir, "raw_image.jpg"))
    # 加载 Grounding DINO 模型
    model = load_model(config_file, grounded_checkpoint, bert_base_uncased_path, device=device)
    # 运行 Grounding DINO 进行目标检测 先看能否运行到这步 如果不能再启用修改浮点数
    # 可以考虑预先保存分割框的位置
    image = image.half()
    model = model.half()
    boxes_filt, pred_phrases = get_grounding_output(model, image, text_prompt, box_threshold, text_threshold,
                                                    device=device)
    # 初始化 SAM-HQ 预测器
    print(f"Using SAM-HQ model: {sam_hq_checkpoint}")
    predictor = SamPredictor(sam_hq_model_registry[sam_version](checkpoint=sam_hq_checkpoint).to(device))
    # 读取图像
    image = cv2.imread(image_path)
    image = cv2.cvtColor(image, cv2.COLOR_BGR2RGB)
    predictor.set_image(image)
    # 变换 box 坐标
    size = image_pil.size
    H, W = size[1], size[0]
    for i in range(boxes_filt.size(0)):
        boxes_filt[i] = boxes_filt[i] * torch.Tensor([W, H, W, H])
        boxes_filt[i][:2] -= boxes_filt[i][2:] / 2
        boxes_filt[i][2:] += boxes_filt[i][:2]

    boxes_filt = boxes_filt.cpu()
    transformed_boxes = predictor.transform.apply_boxes_torch(boxes_filt, image.shape[:2]).to(device)

    # 进行分割
    masks, _, _ = predictor.predict_torch(
        point_coords=None,
        point_labels=None,
        boxes=transformed_boxes.to(device),
        multimask_output=False,
    )
    # **调整 mask 大小**
    target_size = (480, 640)  # 目标 mask 分辨率
    masks_resized = torch.nn.functional.interpolate(masks.float(), size=target_size, mode="nearest")

    # 绘制分割结果
    plt.figure(figsize=(10, 10))
    plt.imshow(image)
    for mask in masks_resized:
        show_mask(mask.cpu().numpy(), plt.gca(), random_color=True)
    for box, label in zip(boxes_filt, pred_phrases):
        show_box(box.numpy(), plt.gca(), label)

    plt.axis('off')
    plt.savefig(
        os.path.join(output_dir, "grounded_sam_output_hexagona_brick.jpg"),
        bbox_inches="tight", dpi=300, pad_inches=0.0
    )
    print("成功保存分割后的数据 Saved grounded sam output")

    # 保存分割数据
    save_mask_data(output_dir, masks_resized, boxes_filt, pred_phrases)


if __name__ == '__main__':
    main()

再运行一下下面的代码将得到的最后分割好的图片:
import cv2
import os
import numpy as np
from matplotlib import pyplot as plt

def resize_and_convert_to_png(input_path, output_path, width=640, height=480):
    # 读取图片
    image = cv2.imread(input_path)

    # 检查图片是否正确读取
    if image is None:
        print(f"Error: 无法读取图片 {input_path}")
        return

    # 调整大小
    resized_image = cv2.resize(image, (width, height), interpolation=cv2.INTER_AREA)

    # 确保输出路径是 PNG 格式
    output_path = os.path.splitext(output_path)[0] + ".png"

    # 保存图片为 PNG 格式
    cv2.imwrite(output_path, resized_image)
    print(f"已保存调整后的 PNG 图片: {output_path}")


# 示例用法
input_image_path = "outputs/mask.jpg"  # 输入图片路径
output_image_path = "outputs/mask_out.png"  # 输出文件路径(会自动转换为 PNG)
resize_and_convert_to_png(input_image_path, output_image_path)

# 读取图片
image_path = "outputs/mask_out.png"
image = cv2.imread(image_path)

# 转换为HSV颜色空间,以便提取黄色区域
hsv = cv2.cvtColor(image, cv2.COLOR_BGR2HSV)

# 定义黄色的HSV范围
lower_yellow = np.array([20, 100, 100])
upper_yellow = np.array([30, 255, 255])

# 创建掩码,提取黄色区域
mask = cv2.inRange(hsv, lower_yellow, upper_yellow)

# 创建黑白图像:黄色区域变白色,其余变黑色
result = np.zeros_like(image)  # 先创建黑色背景
result[mask > 0] = [255, 255, 255]  # 将黄色区域变为白色

# 转换为灰度图
result_gray = cv2.cvtColor(result, cv2.COLOR_BGR2GRAY)

# 保存处理后的图片
output_path = "outputs/1742097201894254684.png"
cv2.imwrite(output_path, result_gray)

# 显示处理后的图片
plt.imshow(result_gray, cmap='gray')
plt.axis('off')
plt.show()
得到mask的图片如下:

3.4 mesh文件的制作
- 通过官方的BundleSDF进行模型重建。
- 可以使用AR软件对物体进行模型重建,我使用的是Apple Store 里的AR Code进行的,不过这个需要注意这个只支持iPhone 12 以上并且需要是PRO版本的(有深度相机) 或者是iPad PRO M1以上的才行。
- 使用stable-fast-3d (需要魔法)
可以从下面的链接看相应的一些信息:
Stable Fast 3D(SF3D):单张图片快速生成高质量3D模型
模型重建完可以参照前面的Foundation_pose在自己的物体上复现指南 ,再把相应的文件放到mesh文件夹下即可
4. 运行
4.1 运行自己的demo
数据集制作完成后即可运行
代码如下:
# Copyright (c) 2023, NVIDIA CORPORATION.  All rights reserved.
#
# NVIDIA CORPORATION and its licensors retain all intellectual property
# and proprietary rights in and to this software, related documentation
# and any modifications thereto.  Any use, reproduction, disclosure or
# distribution of this software and related documentation without an express
# license agreement from NVIDIA CORPORATION is strictly prohibited.


from estimater import *
from datareader import *
import argparse


if __name__=='__main__':
  parser = argparse.ArgumentParser()
  code_dir = os.path.dirname(os.path.realpath(__file__))
  parser.add_argument('--mesh_file', type=str, default=f'{code_dir}/demo_data/realsense_capture_20250620_155827/mesh/hexagona_brick.obj')
  parser.add_argument('--test_scene_dir', type=str, default=f'{code_dir}/demo_data/realsense_capture_20250620_155827')
  parser.add_argument('--est_refine_iter', type=int, default=5)
  parser.add_argument('--track_refine_iter', type=int, default=2)
  parser.add_argument('--debug', type=int, default=1)
  parser.add_argument('--debug_dir', type=str, default=f'{code_dir}/debug')
  args = parser.parse_args()

  set_logging_format()
  set_seed(0)

  mesh = trimesh.load(args.mesh_file)

  debug = args.debug
  debug_dir = args.debug_dir
  os.system(f'rm -rf {debug_dir}/* && mkdir -p {debug_dir}/track_vis {debug_dir}/ob_in_cam')

  to_origin, extents = trimesh.bounds.oriented_bounds(mesh)
  bbox = np.stack([-extents/2, extents/2], axis=0).reshape(2,3)

  scorer = ScorePredictor()
  refiner = PoseRefinePredictor()
  glctx = dr.RasterizeCudaContext()
  est = FoundationPose(model_pts=mesh.vertices, model_normals=mesh.vertex_normals, mesh=mesh, scorer=scorer, refiner=refiner, debug_dir=debug_dir, debug=debug, glctx=glctx)
  logging.info("estimator initialization done")

  reader = YcbineoatReader(video_dir=args.test_scene_dir, shorter_side=None, zfar=np.inf)

  for i in range(len(reader.color_files)):
    logging.info(f'i:{i}')
    color = reader.get_color(i)
    depth = reader.get_depth(i)
    if i==0:
      mask = reader.get_mask(0).astype(bool)
      pose = est.register(K=reader.K, rgb=color, depth=depth, ob_mask=mask, iteration=args.est_refine_iter)

      if debug>=3:
        m = mesh.copy()
        m.apply_transform(pose)
        m.export(f'{debug_dir}/model_tf.obj')
        xyz_map = depth2xyzmap(depth, reader.K)
        valid = depth>=0.001
        pcd = toOpen3dCloud(xyz_map[valid], color[valid])
        o3d.io.write_point_cloud(f'{debug_dir}/scene_complete.ply', pcd)
    else:
      pose = est.track_one(rgb=color, depth=depth, K=reader.K, iteration=args.track_refine_iter)

    os.makedirs(f'{debug_dir}/ob_in_cam', exist_ok=True)
    np.savetxt(f'{debug_dir}/ob_in_cam/{reader.id_strs[i]}.txt', pose.reshape(4,4))

    if debug>=1:
      center_pose = pose@np.linalg.inv(to_origin)
      vis = draw_posed_3d_box(reader.K, img=color, ob_in_cam=center_pose, bbox=bbox)
      vis = draw_xyz_axis(color, ob_in_cam=center_pose, scale=0.1, K=reader.K, thickness=3, transparency=0, is_input_rgb=True)
      cv2.imshow('1', vis[...,::-1])
      cv2.waitKey(1)


    if debug>=2:
      os.makedirs(f'{debug_dir}/track_vis', exist_ok=True)
      imageio.imwrite(f'{debug_dir}/track_vis/{reader.id_strs[i]}.png', vis)
输入以下命令
python run_my_demo.py --debug 2
4.2 运行结果
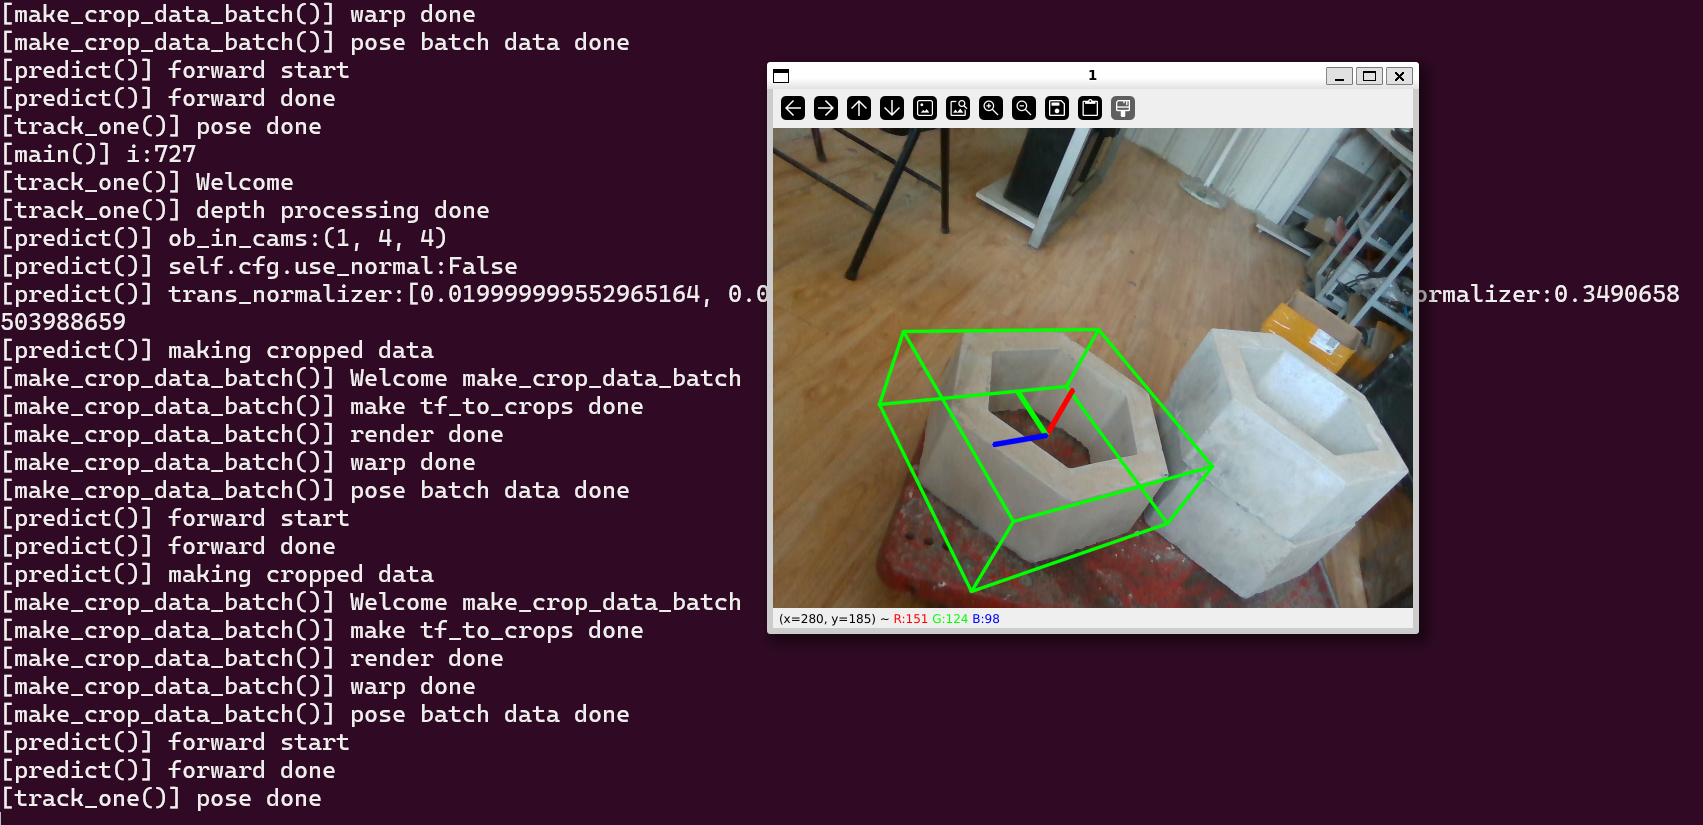
5. 下一步计划
制作LineMod训练集以及将该项目部署到jetson上面,控制然后进行目标抓取。

 浙公网安备 33010602011771号