【STM32开发-基于标准库】学习笔记-stm32与esp32通信
stm32使用USART串口与ESP32-C3模组通信
1.连接图
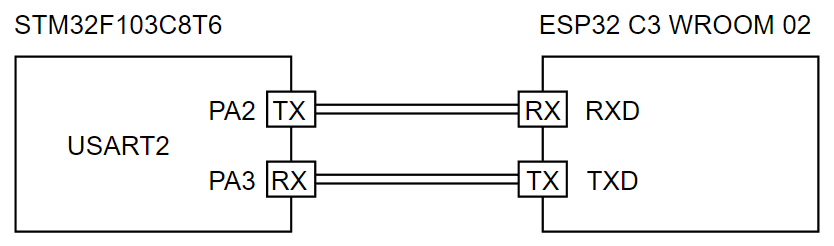
这里stm32使用的是USART2,对应引脚为PA2和PA3。
2.具体流程
3.STM32代码
STM32仅发送
#include "stm32f10x.h"
#define USART_Baud_Rate 921600 //最高稳定速度可达~1M

/**
 USART2串口通信 TX-PA2 RX-PA3
**/
void Serial_Init(void)
{
	/* 开启时钟 */
	RCC_APB1PeriphClockCmd(RCC_APB1Periph_USART2, ENABLE); //USART1是APB2外设,其他都是APB1
	RCC_APB2PeriphClockCmd(RCC_APB2Periph_GPIOA, ENABLE);

	/* GPIO初始化 */
	GPIO_InitTypeDef GPIO_InitStructure;
	GPIO_InitStructure.GPIO_Mode = GPIO_Mode_AF_PP;
	GPIO_InitStructure.GPIO_Pin = GPIO_Pin_2 | GPIO_Pin_3;
	GPIO_InitStructure.GPIO_Speed = GPIO_Speed_50MHz;
	GPIO_Init(GPIOA, &GPIO_InitStructure);

	/* USART初始化 */
	USART_InitTypeDef USART_InitStructure;
	USART_InitStructure.USART_BaudRate = USART_Baud_Rate; //波特率
	USART_InitStructure.USART_HardwareFlowControl = USART_HardwareFlowControl_None;
	USART_InitStructure.USART_Mode = USART_Mode_Tx; //模式为仅发送
	USART_InitStructure.USART_Parity = USART_Parity_No; //设置为无校验
	USART_InitStructure.USART_StopBits = USART_StopBits_1;
	USART_InitStructure.USART_WordLength = USART_WordLength_8b;
	USART_Init(USART2, &USART_InitStructure);

	USART_Cmd(USART2, ENABLE);
}

void Serial_SendByte(uint8_t byte)
{
	USART_SendData(USART2, byte);
	while (USART_GetFlagStatus(USART2, USART_FLAG_TXE) == RESET);//等待标志位
}

void Serial_SendString(char* String){
	uint8_t i;
	for(i = 0; String[i] != '\0'; i++){
		Serial_SendByte(String[i]);
	}
}

int main(void){
	Serial_Init();
    while(1){
		Serial_SendString("test");
		Delay(10);
	}
}
STM32发送/接收
4.ESP32代码
#include <Arduino.h>

void setup() {
  Serial.begin(921600); //波特率与STM32一致
}

String USART_getString(){
    String s = "";
    while(Serial.available() > 0){
        s += char(Serial.read());
    }
    return s;
}

void STM32_Data(){
  if(Serial.available() > 0){
    String s = USART_getString();
    println(s);
  }
}

void loop() {
  STM32_Data();
}

 浙公网安备 33010602011771号