WCF入门教程(四)通过Host代码方式来承载服务 一个WCF使用TCP协议进行通协的例子 jquery ajax调用WCF,采用System.ServiceModel.WebHttpBinding System.ServiceModel.WSHttpBinding协议 学习WCF笔记之二 无废话WCF入门教程一[什么是WCF]
WCF入门教程(四)通过Host代码方式来承载服务
Posted on 2014-05-15 13:03 停留的风 阅读(7681) 评论(0) 编辑 收藏WCF入门教程(四)通过Host代码方式来承载服务
之前已经讲过WCF对外发布服务的具体方式。
Host承载,可以是web,也可以是控制台程序等等。比WebService有更大的使用空间。具体承载的简单框图如下:

通过服务终结点,然后通过Host承载这些终结点,这样客户端就可以访问这些服务了。
一个服务可以添加多个终结点,终结点中定义了Address,Binding和Contract。
而且还可以针对终结点定义一定的行为。
下面给出简单实例,通过ServiceHost来承载相关服务。

            #region 采用代码方式实现对契约的绑定
            Uri baseAddress = new Uri("http://127.0.0.1:9999/");
            using (ServiceHost host = new ServiceHost(typeof(CalculatorService), baseAddress))
            {
                Binding wsBinding = new WSHttpBinding();
                NetTcpBinding tcpBinding = new NetTcpBinding();
                //提供安全传输
                tcpBinding.Security.Mode = SecurityMode.Transport;
                //需要提供证书
                tcpBinding.Security.Transport.ClientCredentialType = TcpClientCredentialType.Certificate;


                //添加多个服务终结点
                //使用指定的协定、绑定和终结点地址将服务终结点添加到承载服务中
                ServiceEndpoint svEndpiont = host.AddServiceEndpoint(typeof(ICalculator), wsBinding, "CalculatorService");
                //netTcp协议终结点
                host.AddServiceEndpoint(typeof(ICalculator), tcpBinding, "net.tcp://127.0.0.1:8888/CalculatorServiceTcp");


                #region 添加行为
                //元数据发布行为
                ServiceMetadataBehavior behavior = new ServiceMetadataBehavior();
                //支持get请求
                behavior.HttpGetEnabled = true;
                behavior.HttpGetUrl = new Uri("http://127.0.0.1:9999/CalculatorService/metadata");
                //设置到Host中
                host.Description.Behaviors.Add(behavior);
                #endregion


                host.Opened += delegate
                {
                    Console.WriteLine("CalculaorService已经启动,按任意键终止服务!");
                };

                //服务启动
                host.Open();
                Console.Read();
            }
            #endregion
如果已经很了解这些类型的使用了,后面的内容可以直接略过。
ServiceHost
提供服务的主机。就是服务的承载者。
主要属性:
|
名称 |
说明 |
|
获取服务身份验证行为。 |
|
|
获取所承载服务的授权行为。 |
|
|
获取所承载服务使用的基址。 |
|
|
获取服务主机所使用的通道调度程序的集合。 |
|
|
获取或设置允许服务主机关闭的时间间隔。 |
|
|
获取或设置允许服务主机打开的时间间隔。 |
|
|
获取承载服务的单一实例。 |
|
|
获取指示通信对象当前状态的值。 |
主要方法:
其方法很多,Host开启、关闭、终止等,还支持异步操作,以及一些动作前后事件。在这里只列举了最基本几个方法。
|
名称 |
说明 |
|
使用指定的协定、绑定和终结点地址将服务终结点添加到承载服务中。 |
|
|
使通信对象从其当前状态转换到关闭状态。 (继承自 CommunicationObject。) |
|
|
获取所承载服务的服务凭据、服务身份验证和授权行为。 (继承自ServiceHostBase。) |
|
|
使通信对象从已创建状态转换到已打开状态。 (继承自 CommunicationObject。) |
ServiceEndpoint
表示允许服务的客户端查找并与服务通信的服务的终结点。
该服务终结点包含客户端在此终结点进行查找和与服务交互所需的地址、绑定、协定和行为信息。
属性:
|
名称 |
说明 |
|
获取或设置服务终结点的终结点地址。 |
|
|
获取服务终结点的行为。 |
|
|
获取或设置服务终结点的绑定。 |
|
|
获取服务终结点的协定。 |
|
|
获取或设置是否由系统生成服务终结点而不由用户定义服务终结点。 |
|
|
获取或设置服务终结点侦听的 URI。 |
|
|
获取或设置传输处理提供给服务的供其侦听的 URI 的方式。 |
|
|
获取或设置服务终结点的名称。 |
Binding
包含绑定元素,这些元素指定客户端和服务之间的通信所用的协议、传输和消息编码器。
这李只给出几种常见的绑定类型,不深入展开
具体绑定规则根据具体需求而定。
|
Binding名称 |
Configuration Element |
描述 |
|
BasicHttpBinding |
basicHttpBinding |
一个指定用符合基本网络服务规范通讯的binding,它用http进行传输,数据格式为text/xml |
|
WSHttpBinding |
wsHttpBinding |
一个安全的通用的binding,但它不能在deplex中使用 |
|
WSDualHttpBinding |
wsDualHttpBinding |
一个安全的通用的binding,但能在deplex中使用 |
|
WSFederationHttpBinding |
wsFederationHttpBinding |
一个安全的通用的支持WSF的binding,能对用户进行验证和授权 |
|
NetTcpBinding |
netTcpBinding |
在wcf应用程序中最适合跨机器进行安全通讯的binding |
|
NetNamedPipeBinding |
netNamedPipeBinding |
在wcf应用程序中最适合本机进行安全通讯的binding |
|
NetMsmqBinding |
netMsmqBinding |
在wcf应用程序中最适合跨机器进行安全通讯的binding,并且支持排队 |
|
NetPeerTcpBinding |
netPeerTcpBinding |
一个支持安全的,多机交互的binding |
|
MsmqIntegrationBinding |
msmqIntegrationBinding |
一个用于wcf与现有msmq程序进行安全通讯的binding |
ServiceDescription
表示一个完整的服务的内存中说明,包括服务的所有终结点及其各自地址、绑定、协定和行为的规范。
|
名称 |
说明 |
|
获取与该服务关联的行为。 |
|
|
获取或设置 <service> 配置元素的名称。 |
|
|
从服务说明获取终结点的集合。 |
|
|
获取或设置服务的名称。 |
|
|
获取或设置服务的命名空间。 |
|
|
获取服务的类型。 |
ServiceMetadataBehavior
控制服务元数据和相关信息的发布。
|
属性 |
说明 |
|
获取或设置作为服务元数据的位置的值。 |
|
|
获取或设置当传输为 HTTP 时用于配置元数据检索的绑定。 |
|
|
获取或设置一个值,该值指示是否发布服务元数据以便使用 HTTP/GET 请求进行检索。 |
|
|
获取或设置进行 HTTP/GET 请求的元数据发布的位置。 |
|
|
获取或设置当传输为 HTTPS 时用于配置元数据检索的绑定。 |
|
|
获取或设置一个值,该值指示是否发布服务元数据以便使用 HTTPS/GET 请求进行检索。 |
|
|
获取或设置进行 HTTPS/GET 请求的元数据发布的位置。 |
|
|
获取或设置用于发布服务元数据的内部 MetadataExporter 对象。 |
一个WCF使用TCP协议进行通协的例子
之前写的例子都是基于http协议的,但在局域网环境下,我希望可以获取更高的传输性能和更低的服务端资源占用,所以我尝试使用TCP协议来进行传输。网上的例子都讲得非常复杂,但终于让我找到一个简单的实现方法,记录如下:
一、建立WCF服务
首先建立一个WCF服务库,名称为"WCFService",解决方案名称为"WCFDemo",同时"为解决方案
创建目录"要勾上。

确定后VS会自动创建一个IService1接口和Service1程序文件,不过由于这个例子是演示如何使
用TCP协议的,所以我们就不再作任何修改。
二、建立宿主程序
在解决方案上按右键,选择"添加" -> "新建项目",然后新建一个Windows 窗体应用程序,程
序名称为"WCFHost"。


在解决方案资源管理器中,需要添加两个引用:System.ServiceModel和WCFService。然后双击窗口,在Form_Load事件中编写如下代码:
添加一个应用程序配置文件App.Config,然后粘贴如下内容:
|
1
2
3
4
5
6
7
8
9
10
11
12
13
14
15
16
17
18
19
20
21
22
23
24
25
26
27
28
29
30
31
32
33
34
35
36
37
38
39
40
41
42
43
44
45
46
47
48
49
50
51
52
53
54
|
<?xml version="1.0" encoding="utf-8" ?><configuration> <system.serviceModel> <bindings> <netTcpBinding> <binding name="TcpBinding" closeTimeout="00:01:00" openTimeout="00:01:00" receiveTimeout="00:10:00" sendTimeout="00:01:00" transactionFlow="false" transferMode="Buffered" transactionProtocol="OleTransactions" hostNameComparisonMode="StrongWildcard" listenBacklog="10" maxBufferPoolSize="524288" maxBufferSize="65536" maxConnections="10" maxReceivedMessageSize="65536"> <readerQuotas maxDepth="32" maxStringContentLength="8192" maxArrayLength="16384" maxBytesPerRead="4096" maxNameTableCharCount="16384" /> <reliableSession ordered="true" inactivityTimeout="00:10:00" enabled="false" /> <security mode="Transport"> <transport clientCredentialType="Windows" protectionLevel="EncryptAndSign" /> <message clientCredentialType="Windows" /> </binding> </netTcpBinding> <wsDualHttpBinding> <binding name="HttpBinding" closeTimeout="00:01:00" openTimeout="00:01:00" receiveTimeout="00:10:00" sendTimeout="00:01:00" bypassProxyOnLocal="false" transactionFlow="false" hostNameComparisonMode="StrongWildcard" maxBufferPoolSize="524288" maxReceivedMessageSize="65536" messageEncoding="Text" textEncoding="utf-8" useDefaultWebProxy="true"> <readerQuotas maxDepth="32" maxStringContentLength="8192" maxArrayLength="16384" maxBytesPerRead="4096" maxNameTableCharCount="16384" /> <reliableSession ordered="true" inactivityTimeout="00:10:00" /> <security mode="Message"> <message clientCredentialType="Windows" negotiateServiceCredential="true" algorithmSuite="Default" /> </security> </binding> </wsDualHttpBinding> </bindings> <client> <endpoint address="net.tcp://localhost:8000/service" binding="netTcpBinding" bindingConfiguration="TcpBinding" contract="ServiceReference1.IService1" name="TcpBinding"> <identity> <userPrincipalName value="OverBlue-PC\OverBlue" /> </identity> </endpoint> <endpoint address="http://localhost:8001/service" binding="wsDualHttpBinding" bindingConfiguration="HttpBinding" contract="ServiceReference1.IService1" name="HttpBinding"> <identity> <userPrincipalName value="OverBlue-PC\OverBlue" /> </identity> </endpoint> </client> </system.serviceModel></configuration> |
对于这个配置文件,我是这样理解的:
1、baseAddress:由协议、地址和端口三个部分组成。其中net.tcp对应TCP协议,http对应Http协
议。
2、endPoint:该属性有一个address属性,指的是在baseAddress基础上增加address属性等于一个
完整的路径。contract则是对应程序接口,这个就不多说。而每种协议都是对应WCFService.IService1契约。
到现在,WCF宿主程序就已经建立好了,我们编译并在"非VS环境下"运行WCFHost应用程序。
三、建立客户端应用程序
在解决方案上按右键,选择"添加" -> "新建项目",然后新建一个Windows 窗体应用程序,程序名称为"WCFClient"。0004
然后在项目上按右键,选择"添加服务引用",在弹出的添加服务引用中,输入baseAddRess地址
:http://localhost:8001,然后点击“前往”,当确定没问题后,点击“确定”按钮。
在客户端程序中,会自动产生一个app.config文件,双击打开该文件,我们可以在"client"段
中可以看到,net.tcp和Http两种协议属性下面都有一个"name"属性。通过这个"name"属性,我们可
以控制使用什么协议与访问服务端。
我们现在为程序添加一个按钮,双击后编写如下代码:
|
1
2
3
4
5
6
7
|
private void button1_Click(object sender, EventArgs e){ WCFClient.ServiceReference1.Service1Client sc = new ServiceReference1.Service1Client("TcpBinding"); sc.Open(); MessageBox.Show(sc.GetData(10)); sc.Close();} |
就个Demo这么简单就完成了。
Jquery ajax调用WCF服务
例子效果如下:原界面
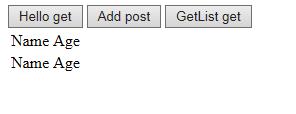
点击按钮GetList get后,通过指定的Url获取数据添加到table

新建一个控制台项目,添加IContract.cs,DBService.cs(为了简单,契约和服务都建在一个项目里面)
一、服务的发布
1、定义 契约接口
|
1
2
3
4
5
6
7
8
9
10
11
12
13
14
15
16
17
18
19
20
21
22
23
24
25
26
27
28
29
30
31
32
33
|
using System;using System.Collections.Generic;using System.Linq;using System.Text;using System.ServiceModel;using System.ServiceModel.Web;using System.Data;namespace IContract //注意:如果命名空间为WCFHost,则在采用配置文件寄宿服务的时候会不认配置文件,不知道为什么{ [ServiceContract] public interface IContract { [OperationContract] //通过post方法调用 [WebInvoke( RequestFormat = WebMessageFormat.Json, ResponseFormat = WebMessageFormat.Json)] double Add(double x, double y); [OperationContract] //通过get方法调用 [WebGet( RequestFormat = WebMessageFormat.Json, ResponseFormat = WebMessageFormat.Json)] string Hello(string mes); [OperationContract] //通过get方法调用 [WebGet(RequestFormat = WebMessageFormat.Json, ResponseFormat = WebMessageFormat.Json)] IList<User> getlist(); } public class User { public string Name{get;set;} public int Age { get; set; } }} |
2、服务的实现
|
1
2
3
4
5
6
7
8
9
10
11
12
13
14
15
16
17
18
19
20
21
22
23
24
25
26
27
28
29
30
31
32
33
34
35
36
37
38
39
40
41
42
43
44
45
46
47
48
49
50
51
52
53
54
55
56
57
58
59
60
61
62
63
64
65
66
67
68
|
using IContract;using System;using System.Collections.Generic;using System.Data;using System.Linq;using System.Reflection;using System.ServiceModel.Activation;using System.Text;namespace DBService //注意:如果命名空间为WCFHost,则在采用配置文件寄宿服务的时候会不认配置文件,不知道为什么{<br> //注意此处一定要设置,为了支持ajax调用 [AspNetCompatibilityRequirements(RequirementsMode = AspNetCompatibilityRequirementsMode.Allowed)] public class DBService:IContract.IContract { public double Add(double x, double y) { return x+y; } public string Hello(string mes) { return "holle word:" + mes; } public IList<User> getlist() { DataTable dt = new DataTable(); dt.Columns.Add("Name"); dt.Columns.Add("Age",typeof(System.Int32)); dt.Rows.Add("joe", "20"); dt.Rows.Add("ethan", "25"); dt.Rows.Add("jane", "36"); IList<User> lst = dt.ToList<User>(); return lst; } } public static class Extension { public static IList<T> ToList<T>(this DataTable dt) { var lst = new List<T>(); var plist = new List<System.Reflection.PropertyInfo>(typeof(T).GetProperties()); foreach (DataRow item in dt.Rows) { T t = System.Activator.CreateInstance<T>(); for (int i = 0; i < dt.Columns.Count; i++) { PropertyInfo info = plist.Find(p => p.Name == dt.Columns[i].ColumnName); if (info != null) { if (!Convert.IsDBNull(item[i])) { info.SetValue(t, item[i], null); } } } lst.Add(t); } return lst; ///throw new NotImplementedException(); } }} |
3、 启动服务
3.1、方式一:以代码方式发布服务(不使用配置文件),寄宿到控制台程序。
|
1
2
3
4
5
6
7
8
9
10
11
12
13
14
15
16
17
18
19
20
21
22
23
24
25
26
27
28
29
30
31
32
33
34
35
36
37
38
39
40
41
42
|
using System;using System.Collections.Generic;using System.Linq;using System.Text;using System.ServiceModel;using System.ServiceModel.Web;using System.ServiceModel.Description;namespace WCFHost{ class Program { static void Main(string[] args) { open(); } static void host_Opened(object sender, EventArgs e) { Console.WriteLine("DBService opened successful"); } //代码方式开启服务,此时要删除配置文件 static void open() { //Uri uri = new Uri("http://127.0.0.1:8883/DBServer"); //和下面一句等价 Uri uri = new Uri("http://localhost:8883/DBServer"); using (ServiceHost host = new ServiceHost(typeof(DBService.DBService), uri)) { //定义元数据发布方式,此处 通过在服务所在的URL后加“?wsdl”的方式公布WSDL,可直接通过HTTP访问得到。 System.ServiceModel.Description.ServiceMetadataBehavior behavior = new System.ServiceModel.Description.ServiceMetadataBehavior(); //此处没有定义mex终结点,必须设置HttpGetEnabled为true,否则客户端无法访问服务 behavior.HttpGetEnabled = true; host.Description.Behaviors.Add(behavior); //添加终结点 ServiceEndpoint endpoint = host.AddServiceEndpoint(typeof(IContract.IContract), new WebHttpBinding(), string.Empty); //设置wcf支持ajax调用,仅适用于WebHttpBinding |
//System.ServiceModel.Description.WebScriptEnablingBehavior' is only intended for use with WebHttpBinding or similar bindings.
|
1
2
3
4
5
6
7
8
9
10
11
12
|
endpoint.Behaviors.Add(new WebScriptEnablingBehavior()); host.Opened += host_Opened; host.Open(); Console.ReadLine(); } } }} |
3.2、方式二:使用配置文件进行配置,启动服务,寄宿到控制台程序。
新建一个配置文件App.config
|
1
2
3
4
5
6
7
8
9
10
11
12
13
14
15
16
17
18
19
20
21
22
23
24
25
26
27
28
29
30
31
32
|
<?xml version="1.0" encoding="utf-8" ?><configuration> <system.serviceModel> <!--可不配置--> <!--同服务里面的设置[AspNetCompatibilityRequirements(RequirementsMode = AspNetCompatibilityRequirementsMode.Allowed)]--> <!--<serviceHostingEnvironment aspNetCompatibilityEnabled="true"></serviceHostingEnvironment>--> <behaviors> <serviceBehaviors> <behavior name="metadataBehavior"> <serviceMetadata httpGetEnabled="true" /> <!--以wsdl方式发布,因为没有mex终结点,此处必须设置为true,--> </behavior> </serviceBehaviors> <endpointBehaviors> <behavior name="endpointbehavior"> <enableWebScript/> </behavior> </endpointBehaviors> </behaviors> <services> <!--注意此处name必须与第三步服务的命名空间一致--> <service behaviorConfiguration="metadataBehavior" name="DBService.DBService"> <endpoint address="" binding="webHttpBinding" contract="IContract.IContract" behaviorConfiguration="endpointbehavior"/> <host> <baseAddresses> <add baseAddress="http://127.0.0.1:8883/DBServer"/> </baseAddresses> </host> </service> </services> </system.serviceModel></configuration> |
代码开启服务,寄宿到控制台程序。
|
1
2
3
4
5
6
7
8
9
10
11
12
13
14
15
16
17
18
19
20
21
22
23
24
25
26
27
28
29
30
31
32
33
34
35
36
37
38
39
|
using System;using System.Collections.Generic;using System.Linq;using System.Text;using System.ServiceModel;using System.ServiceModel.Web;using System.ServiceModel.Description;namespace WCFHost{ class Program { static void Main(string[] args) { StartService(); } private static void StartService() { try { ServiceHost host1 = new ServiceHost(typeof(DBService.DBService)); host1.Opened += host_Opened; host1.Open(); Console.ReadLine(); } catch (Exception e) { throw e; } } static void host_Opened(object sender, EventArgs e) { Console.WriteLine("DBService opened successful"); } }} |
二、验证服务是否发布成功
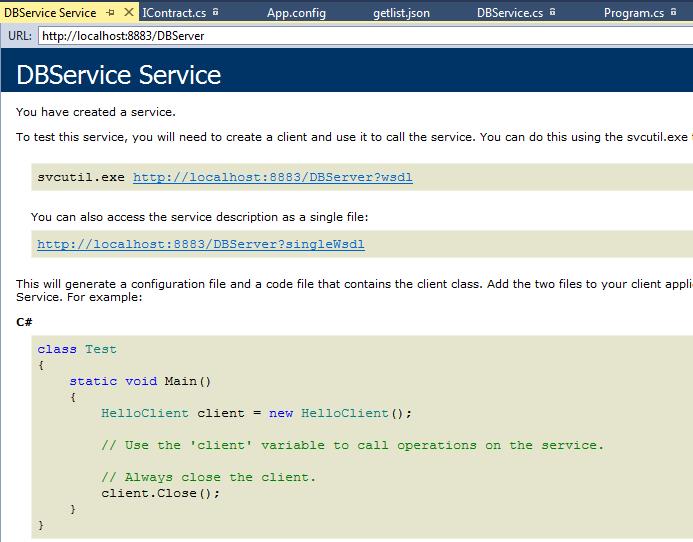
1、F5运行控制台程序,界面显示:DBService opened successful说明服务成功开启。
2、在浏览器中输入http://localhost:8883/DBServer,出现如下界面,服务寄宿成功。
3、服务中定义的get方法可以直接通过浏览器验证
3.1、验证不带参数的方法: service地址+方法名称
在浏览器输入http://localhost:8883/DBServer/getlist 回车,会出现下面类似的提示

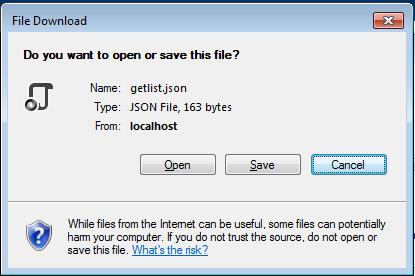
打开后文件内容为:
{"d":[{"__type":"User:#IContract","Age":20,"Name":"joe"},{"__type":"User:#IContract","Age":25,"Name":"ethan"},{"__type":"User:#IContract","Age":36,"Name":"jane"}]}
是 IList<User>的json格式数据。
3.2 带参数的方法,service地址+方法名称 + ? 参数1名称=值 & 参数2名称=值
在浏览器输入http://127.0.0.1:8883/DBServer/hello?mes=nihao
或者:http://127.0.0.1:8883/DBServer/hello?mes=”nihao“
会弹出是否打开or保存json文件,打开后内容为:{"d":"holle word:nihao"}
如果Add也标记为get,那么可以用此地址调用:http://127.0.0.1:8883/DBServer/Add?x=1&y=2
三、jquery调用
1、ajax调用WCF的代码(新建一个empty web项目,添加一个webform,添加文件夹js,添加jquery-1.8.3.min.js文件)
|
1
2
3
4
5
6
7
8
9
10
11
12
13
14
15
16
17
18
19
20
21
22
23
24
25
26
27
28
29
30
31
32
33
34
35
36
37
38
39
40
41
42
43
44
45
46
47
48
49
50
51
52
53
54
55
56
57
58
59
60
61
62
63
64
65
66
67
68
69
70
71
72
73
74
75
76
77
78
79
80
81
82
83
84
85
86
87
88
89
90
91
92
93
94
|
<%@ Page Language="C#" AutoEventWireup="true" CodeBehind="WebForm1.aspx.cs" Inherits="WebAjax.WebForm1" %><!DOCTYPE html><html xmlns="http://www.w3.org/1999/xhtml"><head runat="server"> <title></title> <script src="js/jquery-1.8.3.min.js"></script> <script> //1、Hello function Hello() { var mes = "ninhao"; $.ajax({ type: "get", //type: "POST", url: "http://localhost:8883/DBServer/hello?mes=" + mes, //url: "http://localhost:8883/DBServer/hello", //post方式时的地址 dataType: "json", //data: '{"mes":"nihao"}', //post方式是传递的输入参数 contentType: 'text/json', success: function (data) { alert("successful to get data:" + data.d); }, error: function (data) { alert(data.statusText); }, }); } //2、Add function Add() { $.ajax({ type: "POST", url: "http://localhost:8883/DBServer/Add", dataType: "json", contentType: 'text/json', data: '{"x":1,"y":2}', success: function (data) { alert("successful:" + data.d); }, error: function (data) { alert(data.statusText); }, }); } //3、获取用户list,添加到table后面 function getlist() { $.ajax({ type: "get", url: "http://localhost:8883/DBServer/getlist", dataType: "json", contentType: 'text/json', success: function (data) { var html = ""; $.each(data.d, function (index, item) { var name = item.Name; var age = item.Age; html += "<tr><td>" + name + "</td><td>" + age + "</td></tr>"; }); //三种形式等价 //$("#mytable").after(html); //$("#mytable tr").eq(0).after(html); $("table tr:eq(0)").after(html); }, error: function (data) { alert(data.statusText); }, }); } </script></head><body> <%--<form id="form1" runat="server">--%> <%--特别注意此处要注释掉,不然getlist看不到效果,table添加新行后立马就消失了--%> <div> <button onclick="Hello()">Hello get</button> <button onclick="Add()">Add post</button> <button onclick="getlist()">GetList get</button> </div> <table id="mytable"> <tr> <td>Name</td> <td>Age</td> </tr> <tr> <td>Name</td> <td>Age</td> </tr> </table> <%--</form>--%></body></html> |
四 jQuery调用WCF的要点:
1. 契约方法加属性[WebInvoke(RequestFormat = WebMessageFormat.Json, ResponseFormat = WebMessageFormat.Json, BodyStyle = WebMessageBodyStyle.WrappedRequest)]
2.服务类加属性 [AspNetCompatibilityRequirements(RequirementsMode = AspNetCompatibilityRequirementsMode.Allowed)]
3. binding="webHttpBinding"
4. <enableWebScript/> 或者
|
1
2
|
//设置wcf支持ajax调用endpoint.Behaviors.Add(new WebScriptEnablingBehavior()); |
5. contentType: 'text/json'
五、使用System.ServiceModel.WebHttpBinding协议注意点
1、采用System.ServiceModel.WebHttpBinding协议,客户端不需要配置终结点,只需要指定一个Url即可使用ajax方法调用服务。
2、而且采用在客户端添加服务的办法是行不通的,添加服务后不会自动生成终结点配置,用客户端代理调用服务一直提示服务内部错误。
3. host.Open();报错The communication object, System.ServiceModel.ServiceHost, cannot be used for communication because it is in the Faulted state.
必须以管理员身份打开解决方案。
六 源代码
七、参考:
jquery ajax调用WCF,采用System.ServiceModel.WSHttpBinding协议
webHttpBinding、basicHttpBinding和wsHttpBinding区别
采用System.ServiceModel.WSHttpBinding或者basicHttpBinding 协议。客户端就不能直接在前端通过url直接访问服务了
它是基于SOAP协议的bing,会采用WSDL、XSD语言描述服务,你可以在客户端添加服务,通过使用客户端代理调用服务
例子效果如下,点击按钮通过服务获取数据,并把数据添加到table里面

1、定义契约以及自定义类型User
|
1
2
3
4
5
6
7
8
9
10
11
12
13
14
15
16
17
18
19
20
21
22
23
24
25
26
27
28
29
30
31
32
33
34
35
36
37
38
39
40
41
|
using System;using System.Collections.Generic;using System.Linq;using System.Text;using System.ServiceModel;using System.ServiceModel.Web;using System.Data;using System.Runtime.Serialization;namespace IContract{ [ServiceContract] [ServiceKnownType(typeof(User))] //为了客户端可以生成对应的类 public interface IContract { [OperationContract] [WebInvoke(RequestFormat = WebMessageFormat.Json, ResponseFormat = WebMessageFormat.Json)] double Add(double x, double y); [OperationContract] [WebInvoke(RequestFormat = WebMessageFormat.Json, ResponseFormat = WebMessageFormat.Json)] string Hello(string mes); [OperationContract] [ServiceKnownType(typeof(User))] [WebInvoke(RequestFormat = WebMessageFormat.Json, ResponseFormat = WebMessageFormat.Json)] IList<User> getlist(); } [Serializable] [DataContract] [ServiceKnownType(typeof(User))] //为了客户端可以生成对应的类 public class User { [DataMember] public string Name{get;set;} [DataMember] public int Age { get; set; } }} |
2、实现服务
|
1
2
3
4
5
6
7
8
9
10
11
12
13
14
15
16
17
18
19
20
21
22
23
24
25
26
27
28
29
30
31
32
33
34
35
36
37
38
39
40
41
42
43
44
45
46
47
48
49
50
51
52
53
54
55
56
57
58
59
60
61
62
63
64
65
66
|
using System;using System.Collections.Generic;using System.Data;using System.Linq;using System.Reflection;using System.ServiceModel.Activation;using System.Text;using IContract;namespace DBService { public class DBService:IContract.IContract { public double Add(double x, double y) { return x+y; } public string Hello(string mes) { return "holle word:" + mes; } public IList<User> getlist() { DataTable dt = new DataTable(); dt.Columns.Add("Name"); dt.Columns.Add("Age",typeof(System.Int32)); dt.Rows.Add("joe", "20"); dt.Rows.Add("ethan", "25"); dt.Rows.Add("jane", "36"); IList<User> lst = dt.ToList<User>(); return lst; } } public static class Extension { public static IList<T> ToList<T>(this DataTable dt) { var lst = new List<T>(); var plist = new List<System.Reflection.PropertyInfo>(typeof(T).GetProperties()); foreach (DataRow item in dt.Rows) { T t = System.Activator.CreateInstance<T>(); for (int i = 0; i < dt.Columns.Count; i++) { PropertyInfo info = plist.Find(p => p.Name == dt.Columns[i].ColumnName); if (info != null) { if (!Convert.IsDBNull(item[i])) { info.SetValue(t, item[i], null); } } } lst.Add(t); } return lst; } }} |
3、开启服务
|
1
2
3
4
5
6
7
8
9
10
11
12
13
14
15
16
17
18
19
20
21
22
23
24
25
26
27
28
29
30
31
32
33
34
35
36
37
38
39
40
41
42
43
44
45
46
47
48
49
50
51
52
53
54
55
56
57
58
59
60
61
62
63
|
using System;using System.Collections.Generic;using System.Linq;using System.Text;using System.ServiceModel;using System.ServiceModel.Web;using System.ServiceModel.Description;namespace WCFHost{ class Program { static void Main(string[] args) { StartService(); //open(); } private static void StartService() { try { ServiceHost host1 = new ServiceHost(typeof(DBService.DBService)); host1.Opened += host_Opened; host1.Open(); Console.ReadLine(); } catch (Exception e) { throw e; } } static void host_Opened(object sender, EventArgs e) { Console.WriteLine("DBService opened successful"); } //代码方式开启服务,此时要删除配置文件 static void open() { Uri uri = new Uri("http://localhost:8883/DBServer"); using (ServiceHost host = new ServiceHost(typeof(DBService.DBService), uri)) { //定义元数据发布方式,此处 通过在服务所在的URL后加“?wsdl”的方式公布WSDL,可直接通过HTTP访问得到。 System.ServiceModel.Description.ServiceMetadataBehavior behavior = new System.ServiceModel.Description.ServiceMetadataBehavior(); //此处没有定义mex终结点,必须设置HttpGetEnabled为true,否则客户端无法访问服务 behavior.HttpGetEnabled = true; host.Description.Behaviors.Add(behavior); //添加终结点 ServiceEndpoint endpoint = host.AddServiceEndpoint(typeof(IContract.IContract), new WSHttpBinding(), string.Empty); host.Opened += host_Opened; host.Open(); Console.ReadLine(); } } }} |
4、配置文件
|
1
2
3
4
5
6
7
8
9
10
11
12
13
14
15
16
17
18
19
20
21
22
23
24
25
26
27
28
|
<?xml version="1.0" encoding="utf-8" ?><configuration> <system.web> <compilation debug="true"></compilation> </system.web> <system.serviceModel> <behaviors> <serviceBehaviors> <behavior name="metadataBehavior"> <serviceMetadata httpGetEnabled="true" /> <!--以wsdl方式发布,因为没有mex终结点,此处必须设置为true,--> </behavior> </serviceBehaviors> <endpointBehaviors> </endpointBehaviors> </behaviors> <services> <!--注意此处name必须与第三步服务的命名空间一致--> <service behaviorConfiguration="metadataBehavior" name="DBService.DBService"> <endpoint address="" binding="wsHttpBinding" contract="IContract.IContract" ></endpoint> <host> <baseAddresses> <add baseAddress="http://127.0.0.1:8883/DBServer"/> </baseAddresses> </host> </service> </services> </system.serviceModel></configuration> |
5、客户端添加服务,注意点,因为WCF默认 .NET collections 对象会以数组传递,为了传递我们自定义的List<User>,
需要在引用服务时设置DataType的collection type为System.Collections.Generic.List
可以在添加时,通过高级选项设置,对于已有的可以通过服务配置设置


添加服务会自动生成客户端代理及配置文件,如下:
|
1
2
3
4
5
6
7
8
9
10
11
12
13
14
15
16
17
18
19
20
21
22
23
24
|
<?xml version="1.0"?><configuration> <system.web> <compilation debug="true" targetFramework="4.0" /> </system.web> <system.serviceModel> <bindings> <wsHttpBinding> <binding name="WSHttpBinding_IContract" /> </wsHttpBinding> </bindings> <client> <endpoint address="http://127.0.0.1:8883/DBServer" binding="wsHttpBinding" bindingConfiguration="WSHttpBinding_IContract" contract="ServiceReference1.IContract" name="WSHttpBinding_IContract"> <identity> <userPrincipalName value="xiaochun-zhai@mercer.com" /> </identity> </endpoint> </client> </system.serviceModel></configuration> |
6、后端代码
|
1
2
3
4
5
6
7
8
9
10
11
12
13
14
15
16
17
18
19
20
21
22
23
24
25
26
27
28
|
using System;using System.Collections.Generic;using System.Linq;using System.Web;using System.Web.Services;using System.Web.UI;using System.Web.UI.WebControls;namespace WebAjax{ public partial class WebForm1 : System.Web.UI.Page { [WebMethod] public static string SayHello() { return "Hello Ajax!"; } [WebMethod] public static IList<ServiceReference1.User> getlist() { ServiceReference1.ContractClient client = new ServiceReference1.ContractClient(); IList<ServiceReference1.User> lst = client.getlist(); return lst; } }} |
7、前端代码
|
1
2
3
4
5
6
7
8
9
10
11
12
13
14
15
16
17
18
19
20
21
22
23
24
25
26
27
28
29
30
31
32
33
34
35
36
37
38
39
40
41
42
43
44
45
46
47
48
49
50
51
52
53
54
55
56
57
58
59
60
61
62
63
64
65
66
67
68
69
70
71
72
73
74
75
76
77
78
79
80
81
82
83
84
85
86
87
88
|
<%@ Page Language="C#" AutoEventWireup="true" CodeBehind="WebForm1.aspx.cs" Inherits="WebAjax.WebForm1" %><!DOCTYPE html><html xmlns="http://www.w3.org/1999/xhtml"><head runat="server"> <title></title> <script src="js/jquery-1.8.3.min.js"></script> <script> //1、调用后台方法SayHello $(function () { $("#btnOK").click(function () { $.ajax({ //要用post方式 type: "Post", //方法所在页面和方法名 url: "WebForm1.aspx/SayHello", contentType: "application/json; charset=utf-8", dataType: "json", success: function (data) { //返回的数据用data.d获取内容 alert(data.d); }, error: function (err) { alert(err); } }); //禁用按钮的提交 return false; }); }); //2、调用后台方法获取数据添加到table后面 $(function () { $("#BtnGetList").click(function () { $.ajax({ //要用post方式 type: "Post", //方法所在页面和方法名 url: "WebForm1.aspx/getlist", contentType: "application/json; charset=utf-8", dataType: "json", success: function (data) { //返回的数据用data.d获取内容 var html = ""; $.each(data.d, function (index, item) { var name = item.Name; var age = item.Age; html += "<tr><td>" + name + "</td><td>" + age + "</td></tr>"; }); $("table tr:eq(0)").after(html); }, error: function (err) { alert(err); } }); //禁用按钮的提交 return false; }); }); </script></head><body> <div> <button id="btnOK">SayHello to backend</button> <button id="BtnGetList">GetList from backend</button> <br /> <br /> <table id="mytable"> <tr> <td>Name</td> <td>Age</td> </tr> <tr> <td>Name</td> <td>Age</td> </tr> </table> <br /> <br /> </div></body></html> |
8、 源代码
9、参考
webHttpBinding、basicHttpBinding和wsHttpBinding区别
一、学习文章http://www.cnblogs.com/iamlilinfeng/archive/2012/09/25/2700049.html
二、步骤
学习WFC,按照大神的文章一步步学习,不过看似简单的过程,中间还会有各种莫名其妙的bug,自己记录了一下
1、新建空白解决方案 WcfServiceWeb
2、新建WcfService项目,类型为WCF应用程序。删除系统生成的两个文件IService1.cs与Service1.svc。

3、添加新项CalculatorService.svc

4、在自动生成的ICalculatorService.cs中添加契约代码
|
1
2
3
4
5
6
7
8
9
10
11
12
13
14
15
16
17
18
19
|
using System;using System.Collections.Generic;using System.Linq;using System.Runtime.Serialization;using System.ServiceModel;using System.Text;namespace WcfService{ // 注意: 使用“重构”菜单上的“重命名”命令,可以同时更改代码和配置文件中的接口名“ICalculatorService”。 [ServiceContract] public interface ICalculatorService { [OperationContract] void DoWork(); [OperationContract] string ShowName(string Name); }} |
5、在CalculatorService.cs中添加代码
|
1
2
3
4
5
6
7
8
9
10
11
12
13
14
15
16
17
18
19
20
21
22
23
|
using System;using System.Collections.Generic;using System.Linq;using System.Runtime.Serialization;using System.ServiceModel;using System.Text;namespace WcfService{ // 注意: 使用“重构”菜单上的“重命名”命令,可以同时更改代码、svc 和配置文件中的类名“CalculatorService”。 public class CalculatorService : ICalculatorService { public void DoWork() { } public string ShowName(string Name) { return Name; } }} |
6、此时Web.config配置文件如下,注意红字部分包含命名空间,要写对
|
1
2
3
4
5
6
7
8
9
10
11
12
13
14
15
16
17
18
19
20
21
22
23
24
25
|
<system.serviceModel> <services> <service behaviorConfiguration="WcfService.CalculatorServiceBehavior" name="WcfService.CalculatorService"> <endpoint address="" binding="wsHttpBinding" contract="WcfService.ICalculatorService"> <identity> <dns value="localhost" /> </identity> </endpoint> <endpoint address="mex" binding="mexHttpBinding" contract="IMetadataExchange" /> </service> </services> <behaviors> <serviceBehaviors> <behavior name="WcfService.Service1Behavior"> <serviceMetadata httpGetEnabled="true" /> <serviceDebug includeExceptionDetailInFaults="false" /> </behavior> <behavior name="WcfService.CalculatorServiceBehavior"> <serviceMetadata httpGetEnabled="true" /> <serviceDebug includeExceptionDetailInFaults="false" /> </behavior> </serviceBehaviors> </behaviors> </system.serviceModel> |
7、在文件CalculatorService.svc上右键-在浏览器中查看,如下图:

8、按照后面步骤三(1.3)发布网站,三(1.4)在发布到IIS中,三(1.3)、三(1.4)在后面会讲到
9、客户端测试,添加新项目WebApplication1

10、在WebApplication1--引用--添加服务引用,点击发现会列出服务,确定。

11、 在Default.aspx中添加一个按钮和一个文本框,添加代码如下:
|
1
2
3
4
5
6
7
8
9
10
11
12
13
14
15
16
17
18
19
20
21
22
23
24
|
using System;using System.Collections.Generic;using System.Linq;using System.Web;using System.Web.UI;using System.Web.UI.WebControls;using System.ServiceModel;namespace WebApplication1{ public partial class _Default : System.Web.UI.Page { protected void Page_Load(object sender, EventArgs e) { } protected void Button1_Click(object sender, EventArgs e) { ServiceReference.CalculatorServiceClient client = new ServiceReference.CalculatorServiceClient(); this.TextBox1.Text= client.ShowName("张三"); } }} |
12、点击按钮,测试结果

三、问题点记录
1、如何发布网站
1.1、开启IIS服务
1.2、将IIS注册到VS中
- 开始——运行中输入cmd——进入命令字符界面首先输入cd C:\Windows\Microsoft.NET\Framework\v4.0.30319—然后输入aspnet_regiis.exe -i。
1.3 发布项目,项目-右键-发布,发布到一个地址,如D:\Web发布


1.4 添加网站
计算机右键——管理——服务和应用程序——Internet信息服务(IIS)管理器——网站右键——添加网站,在出现的提示框中输入网站名称,选择物理路径(1.3中的路径),选择IP地址即可。
详细参见http://blog.csdn.net/zwk626542417/article/details/9796259
2、发布时遇到的问题(执行第一步时没注册aspnet_regiis.exe,因为不知道作用)
2.1 问题1
HTTP 错误 404.3 - Not Found
由于扩展配置问题而无法提供您请求的页面。如果该页面是脚本,请添加处理程序。如果应下载文件,请添加 MIME 映射。

原因:系统没有默认为IIS注册WCF服务的svc文件的MIME映射。
解决方法:管理员身份运行C:\Windows\Microsoft.NET\Framework\v3.0\Windows Communication Foundation\ServiceModelReg.exe -i
步骤:以管理员身份打开cmd.exe,cd 进入目录C:\Windows\Microsoft.NET\Framework\v3.0\Windows Communication Foundation
然后输入:ServiceModelReg.exe -i 回车
2.2、问题2
HTTP 错误 500.21 - Internal Server Error
处理程序“svc-Integrated”在其模块列表中有一个错误模块“ManagedPipelineHandler”

原因:没有注册.NET 4.0框架。
解决方法:管理员身份运行C:\Windows\Microsoft.NET\Framework\v4.0.30319\aspnet_regiis.exe -i
详细参见http://blog.csdn.net/mazhaojuan/article/details/7660657
3、试着将类CalculatorService改为Calculator,Calculator.svc--右键--浏览--报错

解决办法:

<%@ ServiceHost Language="C#" Debug="true" Service="WcfService.CalculatorService" CodeBehind="Calculator.svc.cs" %>
改为
<%@ ServiceHost Language="C#" Debug="true" Service="WcfService.Calculator" CodeBehind="Calculator.svc.cs" %>
注意,在修改服务类的时候,要 使用“重构”菜单上的“重命名”命令,可以同时更改代码、svc 和配置文件中的类名“CalculatorService”。
四 源代码下载

一、概述
Windows Communication Foundation(WCF)是由微软发展的一组数据通信的应用程序开发接口,可以翻译为Windows通讯接口,它是.NET框架的一部分。由 .NET Framework 3.0 开始引入。
WCF的最终目标是通过进程或不同的系统、通过本地网络或是通过Internet收发客户和服务之间的消息。
WCF合并了Web服务、.net Remoting、消息队列和Enterprise Services的功能并集成在Visual Studio中。
WCF专门用于面向服务开发。
二、基于Asp.net 的应用程序开发与面向服务开发

在基于Asp.net 的应用程序开发中,我们由客户机的浏览器访问应用程序服务器,然后通过应用程序服务器中的数据库连接去连接数据库服务器,读取或是操作数据,有时候可能会多一个文件服务器。大家可以观察到,基本上所有的应用都放在了一台服务器上,但对于一个,由于业务上的需要(如:与外部系统交互),一台服务器很难支持所有的应用。我们再看下面的图:

客户机使用浏览器访问服务器A,服务器A为了业务需要与其他各种应用部署在服务器B、C、D....再通过WCF技术互相通信,相互访问...然而面向服务的好处不仅仅在此,他还提供了不同语言不同操作系统的可交互性..由于本文不是介绍SOA的文章,感兴趣的同学可以参见:SOA
三、第一个WCF程序
1. 新建立空白解决方案,并在解决方案中新建项目,项目类型为:WCF服务应用程序。建立完成后如下图所示:

2.删除系统生成的两个文件IService1.cs与Service1.svc。
3.添加自定义的WCF【服务文件】User.svc,此时vs2010会自动生成WCF接口文件IUser.cs,我们在IUser中定义WCF方法ShowName,在User.svc.cs对该接口的方法进行实现。
代码如下:

 1 using System.ServiceModel;
 2
 3 namespace WCFService
 4 {
 5     [ServiceContract]
 6     public interface IUser
 7     {
 8         [OperationContract]
 9         string ShowName(string name);
10     }
11 }
12
13
14 namespace WCFService
15 {
16     public class User : IUser
17     {
18         public string ShowName(string name)
19         {
20             string wcfName = string.Format("WCF服务,显示姓名:{0}", name);
21             return wcfName;
22         }
23     }
24 }
大家可以看到,在WCF中的接口与普通接口的区别只在于两个上下文,其他的和我们正常学习的接口一样。定义这个上下文要添加System.ServiceModel的引用。
[ServiceContract],来说明接口是一个WCF的接口,如果不加的话,将不能被外部调用。
[OperationContract],来说明该方法是一个WCF接口的方法,不加的话同上。
此时我们的第一个WCF服务程序就建立好了,将User.svc“设为起始页”,然后F5运行一下试试,如下图所示,VS2010自动调用了WCF的客户端测试工具以便我们测试程序:

我们双击上图中的 ShowName() 方法,出现如下图:

在请求窗口中的值中输入参数“你的姓名”,然后点击“调用”,在响应窗口中会出现返回值“WCF服务,显示姓名:你的姓名”,说明测试成功,点击下面的XML也可以看到XML的数据传输。我们现在建立好了服务的应用程序和业务逻辑,即非常简单的打印姓名的方法,测试也成功了。那么我们怎么用呢?
四、场景
我们设计的场景是在生产中经常应用的场景,把WCF程序寄宿在IIS之上。假设场景如下:A服务器和B服务器。我们把我们刚刚建立的WCF程序“部署”在B服务器上(本教程的A,B服务器都放是我自己的一台机器),我们的目标是在A服务器的应用程序来访问B服务器的WCF程序,实现服务器端的应用程序通讯。
五、将WCF程序寄宿在B服务器的IIS之上
首先我们将WCF应用程序发布一下,然后部署在B服务器的IIS之上,如下图所示:

鼠标右键浏览Uesr.svc,在游览器中出现如下图所示,说明服务部署成功。

上图中的http://localhost/User.svc?wsdl即为我们要引用的服务地址。
六、在客户端[A服务器]创建服务的引用
我们这里以Web应用程序为例,建立地物理地址为本机,但是大家可以想像成B服务器是远程计算机,localhost为一个其他的IP地址。
新建解决方案,并且创建ASP.NET Web应用程序的项目。命名为:WCFClient,如下图所示:

(1)新建Asp.net页面,命名为:WcfTest.aspx。
(2)添加在第五步中部署的服务的引用。如下图所示:

此时弹出添加服务引用的窗体,如下图所示:

我们在地址里写上我们寄宿在IIS上的WCF服务的地址服务路径,此处为:http://localhost/User.svc?wsdl,在名称空间处填写WCFService[此名称空间要在下面的客户端中引用]然后点击“前往”-->“确定”按钮。此时我们完成了对服务的引用。我们再次查看解决方案,里面多了Service References的文件夹,通过资源管理器打开后里面多了些文件,这些文件用于客户端向服务端的调用,现在先不用管他。
七、使用WCF服务端的方法
WcfTest.aspx的代码如下:
 1 <%@ Page Language="C#" AutoEventWireup="true" CodeBehind="WCFTest.aspx.cs" Inherits="WCFClient.WCFTest" %>
 2
 3 <!DOCTYPE html PUBLIC "-//W3C//DTD XHTML 1.0 Transitional//EN" "http://www.w3.org/TR/xhtml1/DTD/xhtml1-transitional.dtd">
 4 <html xmlns="http://www.w3.org/1999/xhtml">
 5 <head runat="server">
 6     <title></title>
 7 </head>
 8 <body>
 9     <form id="form1" runat="server">
10     <asp:TextBox ID="txtName" runat="server"></asp:TextBox><br />
11     <asp:Button ID="btnSubmit" runat="server" Text="测试WCF服务" OnClick="btnClick" />
12     </form>
13 </body>
14 </html>
15
16 using System;
17 using System.Collections.Generic;
18 using System.Linq;
19 using System.Web;
20 using System.Web.UI;
21 using System.Web.UI.WebControls;
22
23 //引用WCF服务的名称空间
24 using WCFClient.WCFService;
25
26 namespace WCFClient
27 {
28     public partial class WCFTest : System.Web.UI.Page
29     {
30         protected void Page_Load(object sender, EventArgs e)
31         {
32
33         }
34
35         protected void btnClick(object sender, EventArgs e)
36         {
37             UserClient user = new UserClient();
38             string result = user.ShowName(this.txtName.Text);
39             Response.Write(result);
40         }
41     }
42 }
上面中的UserClient类是在添加引用的时候生成的服务端User类的客户端代理类,一般客户端代理类名称都会是**Client。我们运行一下看下效果。

通过以上的例子,我们完成了由A服务器的应用向B服务器中WCF提供的方法的调用。这个例子比较简单,对于经常开发B/S结构应用程序的同学们来说比较好理解。
八、说明:因为网上的入门教程比较少,本教程只做入门,后面会继续讲些其他入门的东西,深入的请看园子里:Artech 大哥的文章。
九、代码下载:
十、版权

 浙公网安备 33010602011771号