

python3 + requests + pytest + allure 登录禅道12.3.3-提交bug-编辑bug-确认bug-解决bug-关闭bug
前言
最近学习完了requests、pytest,实践出真知。下面以禅道为例。docker方式搭建禅道
一、Pycharm中创建项目结构
1.新建一个工程,工程名称自己定义,如:zentao
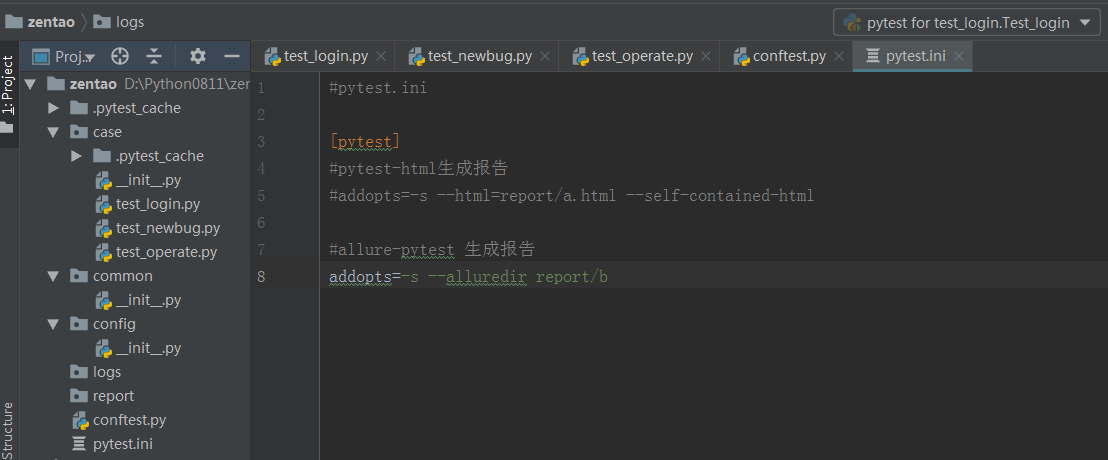
2.在工程的根目录下新建一个conftest.py(测试用例的一些fixture配置)和pytest.ini(改变pytest的运行方式)
3.在工程下创建以下package包:
--case:这个包放test开头的测试用例,也可以放一些非test开头的封装接口方法
--common:这个包放一些公共的方法,如:读取excel文件方法,读取mysql、oracle的脚本
--config:放一些配置文件,如邮箱的一些参数:收件人,发件人,密码等
4.在工程下创建以下文件夹:
--logs:这里存放日志信息
--report:这里存放测试报告
二、开始写脚本
思考:1.登录之后,需要提bug,然后操作bug,如何保持登录了?s=requests.session()可以实现保持会话;
2.假如登录,提bug,操作bug,都写在一个.py文件,可以使用s.get(...),s.post(...)操作所有请求,那若是这些操作在不同的.py文件呢?fixture自定义测试用例前置条件可以实现; 作用范围session(多个文件调用一次,可以跨.py文件调用),conftest.py文件在当前所在目录及以下目录生效;
3.若是请求地址写死,线下线上切换不方便,怎么办?当然fixture可以搞定了
2.1 由此,conftest.py脚本的内容确定了,如下:
#注意这里的ip改为自己服务器的ip哦
#conftest.py
import requests
import pytest
@pytest.fixture(scope="session")
def s():
    ss=requests.session()
    return ss
@pytest.fixture(scope="session")
def host():
    host="http://47.98.66.11:8899"
    return host
2.2 编写登录的脚本
# coding:utf-8
#test_login.py
import re
import pytest
import hashlib
import allure

@allure.severity("blocker")
@allure.epic("禅道登录,增删改查测试")
@allure.feature("禅道登录")
@allure.issue("http://47.98.66.11:8899/bug-browse-1-0-all.html")
class Test_login:
    @pytest.fixture()
    def getrand(self,s,host):
        while True:
            r = s.get(host+"/user-login.html")
            # print(r.text)
            rand = re.findall("id='verifyRand' value='(.+?)'", r.text)
            #print(rand)
            if len(rand[0])==10:
                #break
                print(rand[0])
                return rand[0]

    @pytest.fixture()
    def md5(self,getrand):
        first=hashlib.md5("P@ssw0rd".encode('utf-8')).hexdigest()+getrand
        print(first)
        pwd=hashlib.md5(first.encode('utf-8')).hexdigest()
        print(pwd)
        return (getrand,pwd)

    @allure.title("登录用例")
    def test_login(self,md5,s,host):
        data={"account":"admin",
              "password":md5[1],
              "passwordStrength":1,
              "referer":"/",
              "verifyRand":md5[0],
              "keepLogin":1}
        r=s.post(host+"/user-login.html",data=data)
        #print(r.__dict__)
        # print(dir(r))
        #         # print(r.text)
        r1=s.get(host+"/my/")
        #print(r1.text)
        assert '退出' in r1.text
2.3 提交bug
# coding:utf-8
#test_newbug.py
import pytest
import re
import random
import allure
@pytest.fixture()
def uppic_steps(s,host):#上传图片
    f={"localUrl":"D:\\ch.jpg",
       "imgFile":("ch.jpg",open("D:\\ch.jpg","rb"),"image/jpeg")}
    r=s.post(host+"/file-ajaxUpload-5f37e08f8d109.html?dir=image",files=f)
    #print(r.text)
    print(r.json())
    #picurl=re.findall(',"url":"(.+?)"}',r.text)[0].replace("\\","")
    picurl=r.json()["url"]
    print("上传图片地址:{}".format(picurl))
    return picurl

@pytest.fixture()
def get_uid(s,host):#获取uid
    r=s.get(host+"/bug-create-1-0-moduleID=0.html")
    uid=re.findall("kuid = '(.+?)'",r.text)
    return uid

@allure.severity("critical")
@allure.title("提bug")
def test_newbug(s,uppic_steps,host,get_uid):
    data={"product":1,
          "module":0,
          "project":1,
          "openedBuild[]":"trunk",
          "assignedTo":"admin",
          "type":"codeerror",
          "title":"接口自动化bug0815_15_附图片、附件:"+str(random.randint(0,1000)),
          "severity":3,
          "pri":3,
          "steps":"<p>[步骤]<img src={} alt="" /></p><br/><p>[结果]</p><br/><p>[期望]</p><br/>".format(uppic_steps),
          "oldTaskID":0,
          "status":"active",
          "uid":get_uid,
          "caseVersion":0,
          "case":0,
          "result":0,
          "testtask":0}
    f={
        ("files[]",("中国气候.jpg",open("D:\\中国气候.jpg","rb"),"image/jpeg")),
        ("labels[]","中国气候.jpg"),
        ("files[]",("hl.jpeg",open("D:\\hl.jpeg","rb"),"image/jpeg")),
        ("labels[]","hl.jpeg")
    }

    r=s.post(host+"/bug-create-1-0-moduleID=0.html",data=data,files=f)
    print("提交bug,响应内容:{}".format(r.text))
2.4 编辑bug-确认bug-解决bug-关闭bug
# coding:utf-8
#test_operate.py
import pytest
from lxml import etree
import re
import time
import allure
import random

@pytest.fixture()
def get_id(s,host):#查找未关闭状态的第一条bug的id
    r=s.get(host+"/bug-browse-1-0-unclosed-0-id_desc.html")
    er=etree.HTML(r.text)
    id=er.xpath('//*[@id="bugList"]/tbody/tr[1]/td[1]/a')[0].text #查找第一个的id
    print("提取第一个id为:{}".format(id))
    return id

def get_idstatus(s,get_id,host):#根据id,获取bug的状态
    r=s.get(host+"/bug-browse-1-0-all.html")
    er2=etree.HTML(r.text)
    idtitle=er2.xpath('//*[@id="bugList"]/tbody/tr[@data-id={}]/td[6]'.format(get_id))[0].get("title")
    print(get_id,idtitle)
    return idtitle

@allure.title("修改bug")
def test_edit(s,get_id,host):
    r=s.get(host+"/bug-edit-{}.html".format(get_id))
    kuid=re.findall("var kuid = '(.+?)'",r.text)
    lasted=re.findall("id='lastEditedDate' value='(.+?)'",r.text)
    data = {"product": 1,
            "module": 0,
            "project": 1,
            "openedBuild[]": "trunk",
            "duplicateBug":0,
            "assignedTo": "admin",
            "deadline":"0000-00-00",
            "type": "codeerror",
            "title": "0818bug:" + str(random.randint(0, 1000)),
            "severity": 3,
            "pri": 3,
            "steps": "<p>[步骤]</p><br/><p>[结果]</p><br/><p>[期望]</p><br/>",
            "status": "active",
            "lastEditedDate":lasted,
            "uid": kuid,
            "caseVersion": 0,
            "comment":"修改bug"}
    s.post(r.url,data=data)
    assert get_idstatus(s, get_id, host)=="激活"

@allure.title("确认bug")
def test_confirm(s,get_id,host):
    r=s.get(host+"/bug-confirmBug-{}.html?onlybody=yes".format(get_id))
    kuid = re.findall("var kuid = '(.+?)'", r.text)[0]
    data={
    "assignedTo":"admin",
    "type":"codeerror",
    "pri":3,
    "status":"active",
    "comment":"ok,稍后修复",
    "uid":kuid
    }
    r1 = s.post(r.url, data=data)
    print("确认后,响应内容:{}".format(r1.text))
    print(get_id)
    assert get_idstatus(s, get_id, host) == "激活"

@allure.title("解决bug")
def test_resolve(s,get_id,host):#解决bug
    r=s.get(host+"/bug-resolve-{}.html?onlybody=yes".format(get_id))
    kuid=re.findall("var kuid = '(.+?)'",r.text)[0]
    print(type(kuid),kuid,r.url)
    datas={"resolution":"bydesign",
           "resolvedBuild":"trunk",
           "resolvedDate":time.strftime("%Y-%m-%d %H:%M:%S",time.localtime()),
           "assignedTo":"admin",
           "status":"resolved",
           "comment":"不予修复",
           "uid":kuid
           }
    r1 = s.post(r.url, data=datas)
    print("修改为已解决,响应内容:{}".format(r1.text))
    print(get_id)
    assert get_idstatus(s,get_id,host)=="已解决"

@allure.title("关闭bug")
def test_close(s,host,get_id):#关闭bug
    url=host+"/bug-close-{}.html?onlybody=yes".format(get_id)
    r=s.get(url)
    kuid=re.findall("kuid = '(.+?)'",r.text)
    data={
        "status":"closed",
        "comment":"ok",
        "uid":"kuid"
    }
    r1=s.post(url,data=data)
    print(r1.text)
    assert get_idstatus(s,get_id,host)=='已关闭'
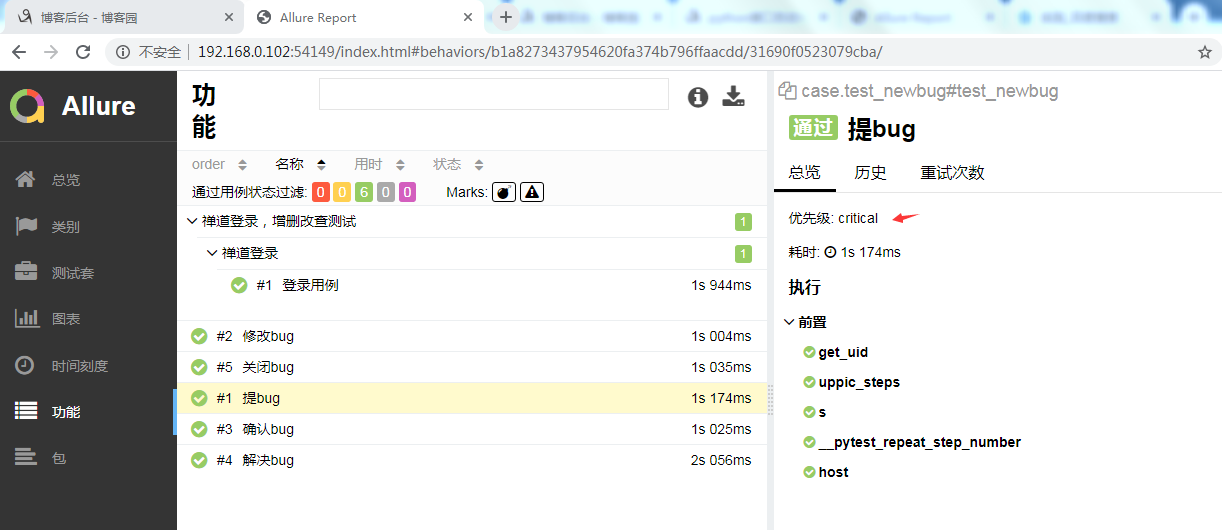
2.5 为了展示自己的劳动成果,报告是不可少的
#pytest.ini

[pytest]
#pytest-html生成报告
#addopts=-s --html=report/a.html --self-contained-html

#allure-pytest 生成报告
addopts=-s --alluredir report/b
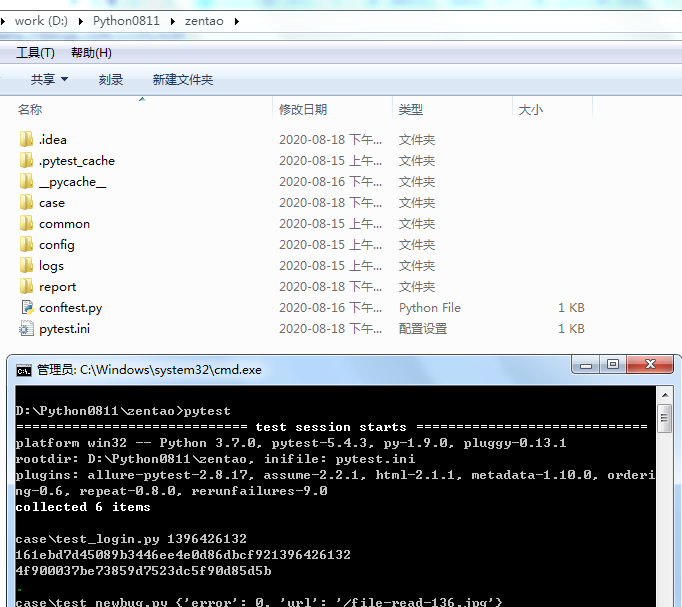
2.6 zentao文件下,打开cmd,执行pytest
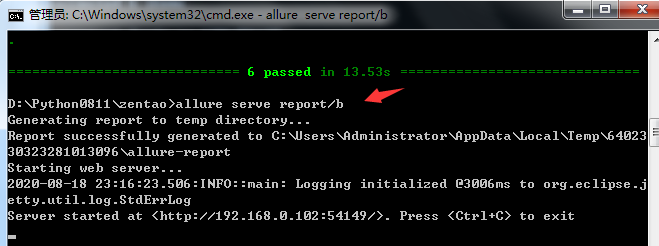
pytest执行完毕,继续输入allure serve report/b 自动展示html格式报告(注意:report/b可以随意命名,但必须与pytest.ini中的内容一致)
注意:pytest可以在zentao目录下执行,也可以在case目录下执行,但这样report/b所在的目录就不同了;根据pytest.ini,执行pytest会在pytest当前所在目录生成report/b目录,若是report/b不存在则直接创建,若是存在则使用已有的;
执行pytest时,一定要删除b目录,不然可能会产生冗余数据;
三、写代码过程中,想要调试某个脚本;如,提交bug;
那么需要执行登录脚本和提交bug脚本;
在case目录下,打开cmd,执行pytest -s test_login.py test_newbug.py
若是想要调试登录,那直接执行pytest -s test_login.py

 浙公网安备 33010602011771号