
Ozone数据读取过程分析
前言
上篇文章Ozone数据写入过程分析,笔者分享了关于Ozone数据写入的过程分析。本文,笔者来分享对应另外一个过程,数据读取过程的分析。总体来说,Ozone数据的读取和写入过程中,有着部分共同点,都涉及到了Block,Chunk,buffer的概念。论复杂度而言,读取过程还是比写入过程要简单,易懂一些。
Ozone数据的读取过程:基于Block,Chunk offset的数据读取
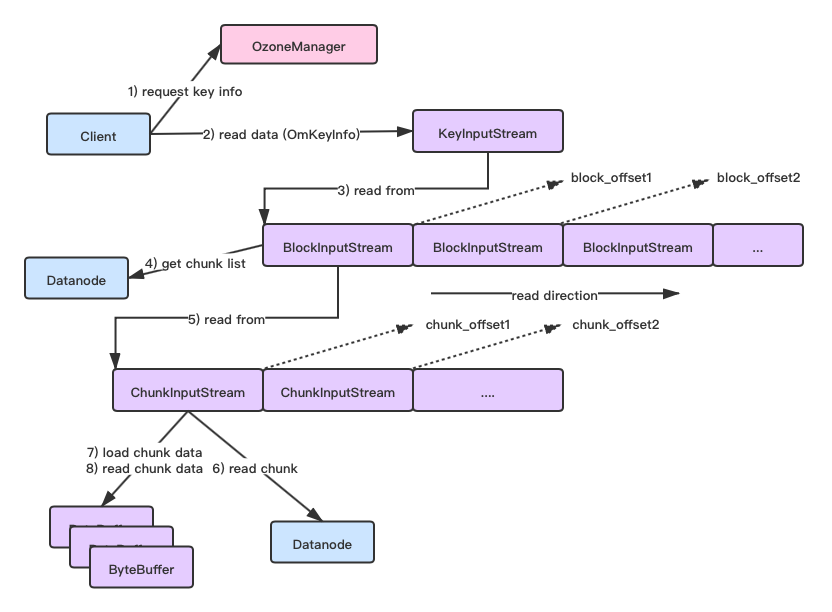
如果大家有细读过笔者上篇关于Ozone数据写入过程的文章,应该知道Ozone Key的数据是按照Block进行划分的,而每个Block则进一步按照Chunk单位进行数据写出的。一个Chunk对应一个Chunk文件。Block则是内部虚拟的概念,但是Datanode Container会存Block到其下所属Chunk列表的信息。
在一个Key下,数据按照分段,分为多个Block,每个Block数据的起始位置在全局模式下的偏移量自然是不同的。比如第二个Block的offset值等于上一个Block的长度。Block的下Chunk的数据组织也是同理。
除开数据的读取要依赖Offset外,这里还需要额外分别向其它服务读取Block,Chunk信息,毕竟Client事先并不知道这些信息,主要有如下3个操作:
- Client向OzoneManager发起查询key信息的请求,返回的key信息中包含有其下所有Block的信息
- Block Stream内部会向Datanode查询Container db中的Block数据,Block信息里包含有其所属的Chunk信息
- Chunk Stream向Datanode查询实际chunk数据文件信息,然后加载到自身buffer内供外部读取
综上所述,其上的整体过程图如下所示:
Ozone数据读取相关代码分析
下面我们来其中部分关键read相关方法的代码实现分析。
首先是Client向OM服务查询key信息操作,
  public OzoneInputStream readFile(String volumeName, String bucketName,
      String keyName) throws IOException {
    OmKeyArgs keyArgs = new OmKeyArgs.Builder()
        .setVolumeName(volumeName)
        .setBucketName(bucketName)
        .setKeyName(keyName)
        .setSortDatanodesInPipeline(topologyAwareReadEnabled)
        .build();
    // 1.client向OM查询给你key的metadata信息,里面包含有key下的block信息
    // 然后client用查询得到的key信息构造输入流对象.
    OmKeyInfo keyInfo = ozoneManagerClient.lookupFile(keyArgs);
    return createInputStream(keyInfo);
  }
然后会执行到后面KeyInputStream的初始化方法,创建多个Block Stream对象,
  private synchronized void initialize(String keyName,
      List<OmKeyLocationInfo> blockInfos,
      XceiverClientManager xceiverClientManager,
      boolean verifyChecksum) {
    this.key = keyName;
    this.blockOffsets = new long[blockInfos.size()];
    long keyLength = 0;
    // 2.KeyInputStream根据查询得到的key block信息构造对应BlockOutputStream对象
    for (int i = 0; i < blockInfos.size(); i++) {
      OmKeyLocationInfo omKeyLocationInfo = blockInfos.get(i);
      if (LOG.isDebugEnabled()) {
        LOG.debug("Adding stream for accessing {}. The stream will be " +
            "initialized later.", omKeyLocationInfo);
      }
      // 3.构造BlockOutputStream并加入到block stream列表中
      addStream(omKeyLocationInfo, xceiverClientManager,
          verifyChecksum);
      // 4.更新当前创建的BlockOutputStream在全局key文件下的偏移量值
      this.blockOffsets[i] = keyLength;
      // 5.更新当前的key len,此值将成为下一个BlockOutputStream的初始偏移量
      keyLength += omKeyLocationInfo.getLength();
    }
    this.length = keyLength;
  }
然后是基于Block offset的数据read操作,
  public synchronized int read(byte[] b, int off, int len) throws IOException {
    checkOpen();
    if (b == null) {
      throw new NullPointerException();
    }
    if (off < 0 || len < 0 || len > b.length - off) {
      throw new IndexOutOfBoundsException();
    }
    if (len == 0) {
      return 0;
    }
    int totalReadLen = 0;
    // 当还有剩余需要读取的数据时,继续进行block的数据读取
    while (len > 0) {
      // 当当前的block下标已经是最后一个block stream,并且最后一个block
      // stream的未读数据长度为0时,说明key文件数据已全部读完,操作返回.
      if (blockStreams.size() == 0 ||
          (blockStreams.size() - 1 <= blockIndex &&
              blockStreams.get(blockIndex)
                  .getRemaining() == 0)) {
        return totalReadLen == 0 ? EOF : totalReadLen;
      }

      // 1.获取当前准备读取的BlockInputStream对象
      BlockInputStream current = blockStreams.get(blockIndex);
      // 2.计算后面需要读取的数据长度,取剩余需要读取的数据长度和当前
      // BlockInputStream未读的数据长度间的较小值.
      int numBytesToRead = Math.min(len, (int)current.getRemaining());
      // 3.从BlockInputStream中读取数据到字节数组中
      int numBytesRead = current.read(b, off, numBytesToRead);
      if (numBytesRead != numBytesToRead) {
        // This implies that there is either data loss or corruption in the
        // chunk entries. Even EOF in the current stream would be covered in
        // this case.
        throw new IOException(String.format("Inconsistent read for blockID=%s "
                        + "length=%d numBytesToRead=%d numBytesRead=%d",
                current.getBlockID(), current.getLength(), numBytesToRead,
                numBytesRead));
      }
      // 4.更新相关指标,offset偏移量,剩余需要读取的数据长度更新
      totalReadLen += numBytesRead;
      off += numBytesRead;
      len -= numBytesRead;
      // 5.如果当前的Block数据读完了,则block下标移向下一个block
      if (current.getRemaining() <= 0 &&
          ((blockIndex + 1) < blockStreams.size())) {
        blockIndex += 1;
      }
    }
    return totalReadLen;
  }
上面再次调用的Block Stream的read操作,里面涉及到其实是Chunk stream的read操作,逻辑和上面方法基本一样。
另外一个读数据操作方法seek方法,
  public synchronized void seek(long pos) throws IOException {
    checkOpen();
    if (pos == 0 && length == 0) {
      // It is possible for length and pos to be zero in which case
      // seek should return instead of throwing exception
      return;
    }
    if (pos < 0 || pos > length) {
      throw new EOFException(
          "EOF encountered at pos: " + pos + " for key: " + key);
    }

    // 1. 更新Block的索引位置
    if (blockIndex >= blockStreams.size()) {
      // 如果Index超过最大值,则从blockOffsets中进行二分查找Index值
      blockIndex = Arrays.binarySearch(blockOffsets, pos);
    } else if (pos < blockOffsets[blockIndex]) {
      // 如果目标位置小于当前block的offset,则缩小范围到[0, blockOffsets[blockIndex]]
      // 进行查找
      blockIndex =
          Arrays.binarySearch(blockOffsets, 0, blockIndex, pos);
    } else if (pos >= blockOffsets[blockIndex] + blockStreams
        .get(blockIndex).getLength()) {
      // 否则进行剩余部分[blockOffsets[blockIndex+1], blockOffsets[blockStreams.size() - 1]]
      blockIndex = Arrays
          .binarySearch(blockOffsets, blockIndex + 1,
              blockStreams.size(), pos);
    }
    if (blockIndex < 0) {
      // Binary search returns -insertionPoint - 1  if element is not present
      // in the array. insertionPoint is the point at which element would be
      // inserted in the sorted array. We need to adjust the blockIndex
      // accordingly so that blockIndex = insertionPoint - 1
      blockIndex = -blockIndex - 2;
    }

    // 2.重置上次BlockOutputStream seek的位置
    blockStreams.get(blockIndexOfPrevPosition).resetPosition();

    // 3.重置当前Block下标后的block的位置
    for (int index =  blockIndex + 1; index < blockStreams.size(); index++) {
      blockStreams.get(index).seek(0);
    }
    // 4. 调整当前Block到目标给定的位置=给定位置-此block的全局偏移量
    blockStreams.get(blockIndex).seek(pos - blockOffsets[blockIndex]);
    blockIndexOfPrevPosition = blockIndex;
  }
因为Block Stream内部的读取逻辑和Key Stream的实现大体上一致,这里就略过了。我们直接来看Chunk Stream的buffer数据读取的过程。
Chunk Stream的read操作如下:
  public synchronized int read(byte[] b, int off, int len) throws IOException {
    // According to the JavaDocs for InputStream, it is recommended that
    // subclasses provide an override of bulk read if possible for performance
    // reasons.  In addition to performance, we need to do it for correctness
    // reasons.  The Ozone REST service uses PipedInputStream and
    // PipedOutputStream to relay HTTP response data between a Jersey thread and
    // a Netty thread.  It turns out that PipedInputStream/PipedOutputStream
    // have a subtle dependency (bug?) on the wrapped stream providing separate
    // implementations of single-byte read and bulk read.  Without this, get key
    // responses might close the connection before writing all of the bytes
    // advertised in the Content-Length.
    if (b == null) {
      throw new NullPointerException();
    }
    if (off < 0 || len < 0 || len > b.length - off) {
      throw new IndexOutOfBoundsException();
    }
    if (len == 0) {
      return 0;
    }
    checkOpen();
    int total = 0;
    while (len > 0) {
      // 1.准备读取len长度数据到Buffer中
      int available = prepareRead(len);
      if (available == EOF) {
        // There is no more data in the chunk stream. The buffers should have
        // been released by now
        Preconditions.checkState(buffers == null);
        return total != 0 ? total : EOF;
      }
      // 2.从buffer读数据到输入数组中,此过程buffer的position会往后移动available长度
      buffers.get(bufferIndex).get(b, off + total, available);
      // 3.更新剩余长度
      len -= available;
      total += available;
    }

    // 4.如果已经读到Chunk尾部了,则释放buffer空间
    if (chunkStreamEOF()) {
      // smart consumers determine EOF by calling getPos()
      // so we release buffers when serving the final bytes of data
      releaseBuffers();
    }

    return total;
  }
PrepareRead操作将会从Datanode中读取chunk数据加载到buffer中,
  private synchronized int prepareRead(int len) throws IOException {
    for (;;) {
      if (chunkPosition >= 0) {
        if (buffersHavePosition(chunkPosition)) {
          // The current buffers have the seeked position. Adjust the buffer
          // index and position to point to the chunkPosition.
          adjustBufferPosition(chunkPosition - bufferOffset);
        } else {
          // Read a required chunk data to fill the buffers with seeked
          // position data
          readChunkFromContainer(len);
        }
      }
      // 如果Chunk之前没有seek到某个位置,则获取当前buffer,判断是否包含数据
      if (buffersHaveData()) {
        // Data is available from buffers
        ByteBuffer bb = buffers.get(bufferIndex);
        return len > bb.remaining() ? bb.remaining() : len;
      } else  if (dataRemainingInChunk()) {
    	// 如果当前buffer不包含数据并且chunk有剩余数据需要被读,
    	// 则读取chunk数据到buffer中
        readChunkFromContainer(len);
      } else {
        // All available input from this chunk stream has been consumed.
        return EOF;
      }
    }
  }
在每个 loop结束时,上面的chunkStreamEOF方法会进行已读取位置的检查,
  /**
   * 检查是否已经抵达Chunk尾部.
   */
  private boolean chunkStreamEOF() {
    if (!allocated) {
      // Chunk data has not been read yet
      return false;
    }

    // 判断读取的位置是否已经达到Chunk末尾的2个条件:
    // 1)buffer中是否还有数据
    // 2)是否已经达到chunk的length长度
    if (buffersHaveData() || dataRemainingInChunk()) {
      return false;
    } else {
      Preconditions.checkState(bufferOffset + bufferLength == length,
          "EOF detected, but not at the last byte of the chunk");
      return true;
    }
  }
Chunk Stream利用ByteBuffer来减少频繁的IO读取操作,来提升效率。
OK,以上就是Ozone数据读取的过程分析,核心点是基于数据偏移量在Block,Chunk间进行数据的读取。

 浙公网安备 33010602011771号