Angular6 学习笔记——组件详解之组件通讯
angular6.x系列的学习笔记记录,仍在不断完善中,学习地址:
系列目录
(1)组件详解之模板语法
(2)组件详解之组件通讯
(3)内容投影, ViewChild和ContentChild
(4)指令
(5)路由
目录章节
1 前言
2 Angular组件间的通讯
2.1 父子组件间的通讯
2.1.1 父组件设置子组件属性
2.1.2 父组件调用子组件事件
2.1.3 子组件向父组件发射事件
2.2 非父子组件通讯
2.2.1 Service
2.2.2 路由传值
2.2.2.1 传递一个值
2.2.2.2 传递一个对象
3 通用方式实现通讯
3.1 localStorage
3.2 服务端
1前言
前端框架,例如extjs,vue,angular等,都是或趋于组件化,所以组件间的通讯,是一个亟需解决的问题
一般而且言,这些组件之间都会形成这种树形结构

图片来源:大漠穷秋
组件之间会有下列3种关系:
1父子关系
2兄弟关系
3没有直接关系
通常采用下列方式处理(某些方式是框架特有)组件间的通讯,如下:
1父子组件之间的交互(@Input/@Output/模板变量/@ViewChild)
2非父子组件(Service/localStorage)
3还可以利用Session等服务器端的解决方法
2Angular组件间的通讯
2.1父子组件之间的通讯
在父子组件之间通讯:
@Input:是属性绑定,父组件向子组件传递数据
@Output:是事件绑定,子组件向父组件传递数据的同时触发事件
2.1.1在父组件设置子组件上面的的属性
通过@input绑定子组件的属性,注意属性得是公开public的,私有private属性是无法传递的
es6新语法get/set.为属性提供了一个方便习惯的读/写方式, 拦截属性的存取行为。
在父组件设置该属性,就能够通过set方法来修改,从而实现在父组件设置子组件属性
代码如下


1 <h1>{{childTitle}}</h1>
 1 import { Component, OnInit, Input } from '@angular/core';
 2
 3 @Component({
 4   selector: 'app-child',
 5   templateUrl: './child.component.html',
 6   styleUrls: ['./child.component.sass']
 7 })
 8 export class ChildComponent implements OnInit {
 9
10   private _childTitle: string = '子组件标题';
11
12   @Input()
13   set childTitle(childTitle: string) {
14     this._childTitle = childTitle;
15   }
16   get childTitle(): string {
17     return this._childTitle;
18   }
19
20   constructor() { }
21
22   ngOnInit() {
23
24   }
25 }
1 <p>
2   parent-and-child works!
3 </p>
4 <app-child childTitle="可设置子组件标题"></app-child>
 1 import { Component, OnInit } from '@angular/core';
 2
 3 @Component({
 4   selector: 'app-parent',
 5   templateUrl: './parent-and-child.component.html',
 6   styleUrls: ['./parent-and-child.component.sass']
 7 })
 8 export class ParentAndChildComponent implements OnInit {
 9
10   constructor() { }
11
12   ngOnInit() {
13
14   }
15
16 }
2.1.2父组件直接调用子组件的方法
通过模板内部定义子组件变量,在父组件上可以直接调用子组件的方法,如下:
1 <p>child work</p>
 1 import { Component, OnInit, Input } from '@angular/core';
 2
 3 @Component({
 4   selector: 'app-child',
 5   templateUrl: './child.component.html',
 6   styleUrls: ['./child.component.sass']
 7 })
 8 export class ChildComponent implements OnInit {
 9   constructor() { }
10
11   ngOnInit() {
12
13   }
14
15   childPrint() {
16     alert("来自子组件的打印");
17   }
18 }
1 <p>
2   parent-and-child works!
3 </p>
4 <app-child #child></app-child>
5 <button (click)="child.childPrint()"></button>
 1 import { Component, OnInit } from '@angular/core';
 2
 3 @Component({
 4   selector: 'app-parent',
 5   templateUrl: './parent-and-child.component.html',
 6   styleUrls: ['./parent-and-child.component.sass']
 7 })
 8 export class ParentAndChildComponent implements OnInit {
 9
10   constructor() { }
11
12   ngOnInit() {
13
14   }
15
16 }
2.1.3父组件接受子组件派发的事件
通过@Output在子组件绑定一个事件发射器,在父组件通过事件绑定监听该事件
这样在子组件派发一个事件,父组件就能够收到
1 <p>child work</p>
 1 import { Component, OnInit, Output, EventEmitter } from '@angular/core';
 2
 3
 4 @Component({
 5   selector: 'app-child',
 6   templateUrl: './child.component.html',
 7   styleUrls: ['./child.component.sass']
 8 })
 9 export class ChildComponent implements OnInit {
10
11   @Output()
12   initEmit = new EventEmitter<string>();
13
14   constructor() { }
15
16   ngOnInit() {
17     this.initEmit.emit("子组件初始化成功");
18   }
19 }
1 <p>
2   parent-and-child works!
3 </p>
4 <app-child (initEmit)="accept($event)"></app-child>
 1 import { Component, OnInit, Output, EventEmitter } from '@angular/core';
 2
 3 @Component({
 4   selector: 'app-parent',
 5   templateUrl: './parent-and-child.component.html',
 6   styleUrls: ['./parent-and-child.component.sass']
 7 })
 8 export class ParentAndChildComponent implements OnInit {
 9
10   constructor() { }
11
12   ngOnInit() {
13
14   }
15   accept(msg:string) {
16     alert(msg);
17   }
18 }
2.2没有直接关系的组件
2.2.1service
做一个全局单例的service,然后多个组件共享这个实例,当然就可以共享其中的成员,来进行通讯
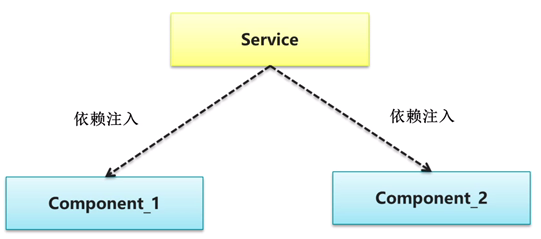
图片来源:大漠穷秋
具体代码如下
1 import { Component, Injectable, EventEmitter } from '@angular/core';
2 @Injectable()
3 export class myService {
4   public info:string = '';
5   constructor() {}
6 }
在app.module.ts文件的providers里添加这个服务
1 <p>child1 work</p>
2
3 <button (click)="showInfo()"></button>
 1 import { Component, OnInit} from '@angular/core';
 2 import { myService } from '../../../service/myService..service';
 3
 4
 5 @Component({
 6   selector: 'app-child',
 7   templateUrl: './child1.component.html',
 8   styleUrls: ['./child1.component.sass']
 9 })
10 export class Child1Component implements OnInit {
11
12   constructor(
13     public service: myService
14   ) { }
15
16   ngOnInit() {
17
18   }
19   showInfo() {
20     alert(this.service.info);
21   }
22 }
1 <p>
2   child2 works!
3 </p>
4 <button (click)="changeInfo()"></button>
 1 import { Component, OnInit} from '@angular/core';
 2 import { myService } from '../../service/myService..service';
 3
 4 @Component({
 5   selector: 'app-child2',
 6   templateUrl: './child2.component.html',
 7   styleUrls: ['./child2.component.sass']
 8 })
 9 export class Child2Component implements OnInit {
10
11   constructor(
12     public service: myService
13   ) { }
14
15   ngOnInit() {
16
17   }
18   changeInfo() {
19     this.service.info = this.service.info + "1234";
20   }
21 }
2.2.2路由传值
对于2个不同路由的组件,我们也可以通过路由传递信息
假设2个路由分别为~/home,~/about
补充下述代码路由的引用
1 import { Router } from '@angular/router';
2 import { ActivatedRoute, Params } from '@angular/router';
3
4   constructor(
5     private router: Router,
6     private route: ActivatedRoute,
7   ) { }
2.2.2.1传递一个值
假如从~/home路由向~/about路由传递一个字符串或数字
1先把~/about的路由地址改为~/about/:id, (:id 是一个路由参数的令牌(Token),比如~/home/42 这个URL中,“42”就是id参数的值)
2在/home写上路由跳转且传值的连接
1 <button [routerLink]="['/about',1]">跳转</button>
2 <button [routerLink]="['/about',"home"]">跳转</button>
3在跳至的页面~/about接受传入的值
1   id: string = '';
2
3   ngOnInit() {
4     //获取传入的值
5     this.id = this.route.snapshot.params['id'];
6   }
2.2.2.2传递一个对象
类似于上述的传递一个值,但是不需要再路由末尾加上/:id
代码也有些不同
1       this.router.navigate(['/about'], {
2         queryParams: {
3           id: '1',
4           status: true
5         }
6       });
接受传入的对象
1   id: number = 0;
2   status: boolean = false;
3   ngOnInit() {
4     this.route.queryParams
5       .subscribe((params: Params) => {
6         this.id = params['id'];
7         this.status = params['status'];
8       })
9   }
3通用方式实现通讯
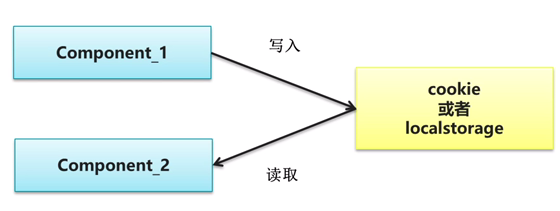
3.1localstorage处理
在angular中也可以使用本地存储这种比较通用的方式在组件间通讯,但本地存储有下列弊端:
1存储空间有限
2只能存储字符串
图片来源:大漠穷秋
具体的实现代码如下
 1 import { Component, OnInit } from '@angular/core';
 2
 3 @Component({
 4   selector: 'app-child1',
 5   templateUrl: './child1.component.html',
 6   styleUrls: ['./child1.component.sass']
 7 })
 8 export class Child1Component implements OnInit {
 9
10   constructor() { }
11
12   ngOnInit() {
13
14   }
15
16    setData(){
17     window.localStorage.setItem("test", JSON.stringify({ key: 'test', value: 1 }));
18   }
19 }
 1 import { Component, OnInit } from '@angular/core';
 2
 3 @Component({
 4   selector: 'app-child2',
 5   templateUrl: './child2.component.html',
 6   styleUrls: ['./child2.component.sass']
 7 })
 8 export class Child2Component implements OnInit {
 9
10   constructor() { }
11
12   ngOnInit() {
13
14   }
15
16    getData() {
17     var json = window.localStorage.getItem("test");
18     var obj = JSON.parse(json);
19     console.log(obj.key);
20     console.log(obj.value);
21   }
22 }
23
24
25
26
27
28
29
3.2服务端处理
也可以在服务端来处理组件间的通讯问题,这是一个思路,但是已经脱离讨论的主题,就不赘述
(终)
文档信息
- 发表作者: 半路独行
- 发表出处: 博客园
- 原文地址: https://www.cnblogs.com/banluduxing/p/9290569.html
- 版权信息:
 本作品采用知识共享署名-非商业性使用-相同方式共享 4.0 国际许可协议进行许可。
感谢您的阅读,如果您觉得阅读本文对您有帮助,请点一下“推荐”按钮。本文欢迎各位转载,但是转载文章之后必须在文章页面中给出作者和原文连接。

 浙公网安备 33010602011771号