[数字人] 从0开始的三维人脸重建入门 (四)
近些年来人脸三维重建的发展主要围绕数据表示来进行,从一开始的显式表示到探索线性参数化表示,到后来非线形参数化表示和神经场表示,表示能力越来越强。此外,还有些方法结合了参数化模型表示和GAN等生成模型,以优化参数化模型对细节的缺失。
本篇详细解析DECA代码,下篇解析NeRF.
从0开始的三维人脸重建入门 (四)
DECA代码解析
主要文件在decalib里,需要分析几个关键的文件:
FLAME.py — 了解FLAME数据集的结构使用
renderer.py — 可微渲染实现
deca.py — 框架
lbs.py — lbs
standard_rasterize_cuda_kernel.cu — 光栅化
trainer.py — 训练
我这里先假定关节链的根节点是世界系原点,好理解一些,实际上不一定是,但不影响。下面整个分析都是基于这样的假设。
FLAME.py
class Struct(object):
    def __init__(self, **kwargs):
        for key, val in kwargs.items():
            setattr(self, key, val)
FLAME模型存储是numpy存成pickle的,load进来之后转成一个obj方便访问,原来是字典型的访问,Struct化之后可以直接通过.属性访问。
class FLAME(nn.Module):
    """
    borrowed from https://github.com/soubhiksanyal/FLAME_PyTorch/blob/master/FLAME.py
    Given flame parameters this class generates a differentiable FLAME function
    which outputs the a mesh and 2D/3D facial landmarks
    """
    def __init__(self, config):
        super(FLAME, self).__init__()
        print("creating the FLAME Decoder")
        with open(config.flame_model_path, 'rb') as f:
            ss = pickle.load(f, encoding='latin1')
            flame_model = Struct(**ss)

        self.dtype = torch.float32
				#faces_tensor: 平面,list of vertex idx
        self.register_buffer('faces_tensor', to_tensor(to_np(flame_model.f, dtype=np.int64), dtype=torch.long))
        # The vertices of the template model
				# v_template: 平均脸的所有节点,坐标系是世界系
        self.register_buffer('v_template', to_tensor(to_np(flame_model.v_template), dtype=self.dtype))
        # The shape components and expression
        # 形状基底和表情基底,形状从300维中取前n_shape维,表情取n_exp维,然后cat到一起
        shapedirs = to_tensor(to_np(flame_model.shapedirs), dtype=self.dtype)
        shapedirs = torch.cat([shapedirs[:,:,:config.n_shape], shapedirs[:,:,300:300+config.n_exp]], 2)
        self.register_buffer('shapedirs', shapedirs)
        # The pose components
				# pose基
        num_pose_basis = flame_model.posedirs.shape[-1]
        # reshape了下(n,3,d) -> (n3, d).T -> (d, n3)
        # 事先reshape好是因为pose基的坐标(系数)是相对于joint点的旋转矩阵(是矩阵),而shape基的系数则是向量
        # 事先reshape好后面就直接乘对应的矩阵,而根据我们后面的注释,pose基的维度其实是n3,所以这样写反而是统一了。
				# 具体的在lbs.py里,对于这里的讲解,看下面。
        posedirs = np.reshape(flame_model.posedirs, [-1, num_pose_basis]).T
        self.register_buffer('posedirs', to_tensor(to_np(posedirs), dtype=self.dtype))
        # J_regressor 乘以点矩阵得到所有joint点的位置,一个简单的线性回归
        self.register_buffer('J_regressor', to_tensor(to_np(flame_model.J_regressor), dtype=self.dtype))
        # parents 关节链的父子关系
				parents = to_tensor(to_np(flame_model.kintree_table[0])).long(); parents[0] = -1
        self.register_buffer('parents', parents)
        # lbs_weights blend的权重
        self.register_buffer('lbs_weights', to_tensor(to_np(flame_model.weights), dtype=self.dtype))

        # Fixing Eyeball and neck rotation
				# 默认的eye_pose和neck_pose,0时没有旋转。
        default_eyball_pose = torch.zeros([1, 6], dtype=self.dtype, requires_grad=False)
        self.register_parameter('eye_pose', nn.Parameter(default_eyball_pose,
                                                         requires_grad=False))
        default_neck_pose = torch.zeros([1, 3], dtype=self.dtype, requires_grad=False)
        self.register_parameter('neck_pose', nn.Parameter(default_neck_pose,
                                                          requires_grad=False))

        # Static and Dynamic Landmark embeddings for FLAME
				# 一些人脸的关键点,FLAME是整个人头的点,需要有一些标注人脸的信息
				# 定义主要来自于RingNet这篇文章,想用这些2D点和3D点对应关系来做监督
				# FLAME里主要提供了平面idx和平面对应的重心坐标
				# 头的pose引起变化的是dynamic点,扭头一般不引起眼睛、鼻子嘴巴的变化,这些点是static点
        lmk_embeddings = np.load(config.flame_lmk_embedding_path, allow_pickle=True, encoding='latin1')
        lmk_embeddings = lmk_embeddings[()]
        self.register_buffer('lmk_faces_idx', torch.from_numpy(lmk_embeddings['static_lmk_faces_idx']).long())
        self.register_buffer('lmk_bary_coords', torch.from_numpy(lmk_embeddings['static_lmk_bary_coords']).to(self.dtype))
        self.register_buffer('dynamic_lmk_faces_idx', lmk_embeddings['dynamic_lmk_faces_idx'].long())
        self.register_buffer('dynamic_lmk_bary_coords', lmk_embeddings['dynamic_lmk_bary_coords'].to(self.dtype))
        self.register_buffer('full_lmk_faces_idx', torch.from_numpy(lmk_embeddings['full_lmk_faces_idx']).long())
        self.register_buffer('full_lmk_bary_coords', torch.from_numpy(lmk_embeddings['full_lmk_bary_coords']).to(self.dtype))

        neck_kin_chain = []; NECK_IDX=1
        curr_idx = torch.tensor(NECK_IDX, dtype=torch.long)
        while curr_idx != -1:
            neck_kin_chain.append(curr_idx)
            curr_idx = self.parents[curr_idx]
        self.register_buffer('neck_kin_chain', torch.stack(neck_kin_chain))
其forward的时候主要是调用了lbs函数得到参数化人脸。
lbs.py
主要是两个函数的理解:
lbs函数,我注释很详细了。
def lbs(betas, pose, v_template, shapedirs, posedirs, J_regressor, parents,
        lbs_weights, pose2rot=True, dtype=torch.float32):
    ''' Performs Linear Blend Skinning with the given shape and pose parameters

        Parameters
        ----------
        betas : torch.tensor BxNB
            The tensor of shape parameters
        pose : torch.tensor Bx(J + 1) * 3
            The pose parameters in axis-angle format
        v_template torch.tensor BxVx3
            The template mesh that will be deformed
        shapedirs : torch.tensor 1xNB
            The tensor of PCA shape displacements
        posedirs : torch.tensor Px(V * 3)
            The pose PCA coefficients
        J_regressor : torch.tensor JxV
            The regressor array that is used to calculate the joints from
            the position of the vertices
        parents: torch.tensor J
            The array that describes the kinematic tree for the model
        lbs_weights: torch.tensor N x V x (J + 1)
            The linear blend skinning weights that represent how much the
            rotation matrix of each part affects each vertex
        pose2rot: bool, optional
            Flag on whether to convert the input pose tensor to rotation
            matrices. The default value is True. If False, then the pose tensor
            should already contain rotation matrices and have a size of
            Bx(J + 1)x9
        dtype: torch.dtype, optional

        Returns
        -------
        verts: torch.tensor BxVx3
            The vertices of the mesh after applying the shape and pose
            displacements.
        joints: torch.tensor BxJx3
            The joints of the model
    '''

    batch_size = max(betas.shape[0], pose.shape[0])
    device = betas.device

    # Add shape contribution
    v_shaped = v_template + blend_shapes(betas, shapedirs)

    # Get the joints
    # NxJx3 array
    J = vertices2joints(J_regressor, v_shaped)

    # 3. Add pose blend shapes
    # N x J x 3 x 3
    ident = torch.eye(3, dtype=dtype, device=device)
    if pose2rot:
        rot_mats = batch_rodrigues(
            pose.view(-1, 3), dtype=dtype).view([batch_size, -1, 3, 3])
        # 为什么减去eye?
        # 因为初始pose(或者说没有pose的人脸)对应的基的系数是单位阵而不是0矩阵,所以这里减去
        # 单位阵就是offset,理论上其实应该在生成数据集的时候就减好。相比于shape的基,系数为0
        # 就是初始shape。
        pose_feature = (rot_mats[:, 1:, :, :] - ident).view([batch_size, -1])

        # P是什么? P = J*9 = 基的个数
        # (N x P) x (P, V * 3) -> N x V x 3
        pose_offsets = torch.matmul(pose_feature, posedirs) \
            .view(batch_size, -1, 3)
        # 这个矩阵乘并不能等价于 3x3的旋转矩阵乘以点的坐标,而是所有点的所有坐标的线形组合,
        # 因此pose基的"3"不能理解为坐标,仅仅是一个维度,V*3才是基的维度,把P原来应该是矩阵形式
        # 后来转化为了向量表示,统一到和shape一样的表示。旋转矩阵对基的作用其实并非常规理解上的对点的旋转,
        # 只是把旋转矩阵作为系数的一种表示而已。
    else:
        pose_feature = pose[:, 1:].view(batch_size, -1, 3, 3) - ident
        rot_mats = pose.view(batch_size, -1, 3, 3)

        pose_offsets = torch.matmul(pose_feature.view(batch_size, -1),
                                    posedirs).view(batch_size, -1, 3)

    v_posed = pose_offsets + v_shaped
    # 4. Get the global joint location
    # 得到整体pose的关节链变换矩阵,A是世界系到世界系的矩阵
    J_transformed, A = batch_rigid_transform(rot_mats, J, parents, dtype=dtype)

    # 5. Do skinning:
    # W is N x V x (J + 1)
    W = lbs_weights.unsqueeze(dim=0).expand([batch_size, -1, -1])
    # (N x V x (J + 1)) x (N x (J + 1) x 16)
    num_joints = J_regressor.shape[0]

    T = torch.matmul(W, A.view(batch_size, num_joints, 16)) \
        .view(batch_size, -1, 4, 4)

    homogen_coord = torch.ones([batch_size, v_posed.shape[1], 1],
                               dtype=dtype, device=device)
    # 把blend pose的点转到齐次系下
    v_posed_homo = torch.cat([v_posed, homogen_coord], dim=2)
    # 乘以世界系下整体的pose变换和权重w
    v_homo = torch.matmul(T, torch.unsqueeze(v_posed_homo, dim=-1))
    verts = v_homo[:, :, :3, 0]

    return verts, J_transformed
batch_rigid_transform函数,主要是返回根据关节链的变换矩阵。
def batch_rigid_transform(rot_mats, joints, parents, dtype=torch.float32):
    """
    Applies a batch of rigid transformations to the joints

    Parameters
    ----------
    rot_mats : torch.tensor BxNx3x3
        Tensor of rotation matrices
    joints : torch.tensor BxNx3
        Locations of joints
    parents : torch.tensor BxN
        The kinematic tree of each object
    dtype : torch.dtype, optional:
        The data type of the created tensors, the default is torch.float32

    Returns
    -------
    posed_joints : torch.tensor BxNx3
        The locations of the joints after applying the pose rotations
    rel_transforms : torch.tensor BxNx4x4
        The relative (with respect to the root joint) rigid transformations
        for all the joints
    """

    joints = torch.unsqueeze(joints, dim=-1)

    rel_joints = joints.clone()
    # 所有节点都转到其对应的父亲节点的坐标系下,转到joint系下再做变换,
    # 由于根节点是相对于世界系的变换,所以最终运动链的变换会直接变为世界系下的坐标,
    # 所以并不需要转回去。
    rel_joints[:, 1:] -= joints[:, parents[1:]]

    # transforms_mat = transform_mat(
    #     rot_mats.view(-1, 3, 3),
    #     rel_joints.view(-1, 3, 1)).view(-1, joints.shape[1], 4, 4)
    # 这里的旋转矩阵是有实际意义的,因为之后要对点做旋转
    transforms_mat = transform_mat(
        rot_mats.view(-1, 3, 3),
        rel_joints.reshape(-1, 3, 1)).reshape(-1, joints.shape[1], 4, 4)

    transform_chain = [transforms_mat[:, 0]]
    for i in range(1, parents.shape[0]):
        # Subtract the joint location at the rest pose
        # No need for rotation, since it's identity when at rest
        # 这里减去rest pose已经在上面做了,就是转到父亲节点坐标系下
        # 必然乘了transform_chain[0]也就是根节点的变换,而根节点的变换是
        # 将该坐标系转到世界系的变换
        curr_res = torch.matmul(transform_chain[parents[i]],
                                transforms_mat[:, i])
        transform_chain.append(curr_res)

    transforms = torch.stack(transform_chain, dim=1)

    # The last column of the transformations contains the posed joints
    # 得到变换之后的joints,齐次转非齐次,是世界系下的坐标
    posed_joints = transforms[:, :, :3, 3]
    # BN31 -> BN41
    joints_homogen = F.pad(joints, [0, 0, 0, 1])
    # transforms是在父亲坐标系下,将joint变换并且转到世界坐标系下的变换
    # rel_transforms是世界系下点到世界系下旋转后点的变换
    # Tx - TJx = T(E-J)x,可以E-J就是世界系到父亲坐标系下的变换矩阵,T就是transforms
    # 减去的 BJ44 * BJ41 -> BJ41 -pad-> BJ44
    rel_transforms = transforms - F.pad(
        torch.matmul(transforms, joints_homogen), [3, 0, 0, 0, 0, 0, 0, 0])

    return posed_joints, rel_transforms
OK,整个参数化人脸得到的过程搞定了,下一步就是渲染。
渲染主要集中在deca.py和renderer.py
renderer.py
这一块的结构主要是SRenderY这个类负责整个渲染,其渲染时调用StandardRasterizer或者Pytorch3dRasterizer进行光栅化,之后按照光照模型进行着色。先来看光栅化这一块。
StandardRasterizer,应该是自己cuda实现的一版光栅化:
def transform_points(points, tform, points_scale=None, out_scale=None):
points_2d = points[:,:,:2]
#'input points must use original range'
if points_scale:
assert points_scale[0]==points_scale[1]
# 平移到(0,0)在图像左上角
points_2d = (points_2d*0.5 + 0.5)*points_scale[0] # range (0,224)
# import ipdb; ipdb.set_trace()
batch_size, n_points, _ = points.shape
# tform 就是抠人脸并且scale
trans_points_2d = torch.bmm(
torch.cat([points_2d, torch.ones([batch_size, n_points, 1], device=points.device, dtype=points.dtype)], dim=-1),
tform
)
if out_scale: # h,w of output image size ; out_scale = 224
trans_points_2d[:,:,0] = trans_points_2d[:,:,0]/out_scale[1]*2 - 1
trans_points_2d[:,:,1] = trans_points_2d[:,:,1]/out_scale[0]*2 - 1
# 变成了(-1,1)
trans_points = torch.cat([trans_points_2d[:,:,:2], points[:,:,2:]], dim=-1)
return trans_points
class StandardRasterizer(nn.Module):
""" Alg: https://www.scratchapixel.com/lessons/3d-basic-rendering/rasterization-practical-implementation
Notice:
x,y,z are in image space, normalized to [-1, 1]
can render non-squared image
not differentiable
"""
def __init__(self, height, width=None):
"""
use fixed raster_settings for rendering faces
"""
super().__init__()
if width is None:
width = height
self.h = h = height; self.w = w = width
def forward(self, vertices, faces, attributes=None, h=None, w=None):
device = vertices.device
if h is None:
h = self.h
if w is None:
w = self.h;
bz = vertices.shape[0]
depth_buffer = torch.zeros([bz, h, w]).float().to(device) + 1e6
triangle_buffer = torch.zeros([bz, h, w]).int().to(device) - 1
baryw_buffer = torch.zeros([bz, h, w, 3]).float().to(device)
vert_vis = torch.zeros([bz, vertices.shape[1]]).float().to(device)
vertices = vertices.clone().float()
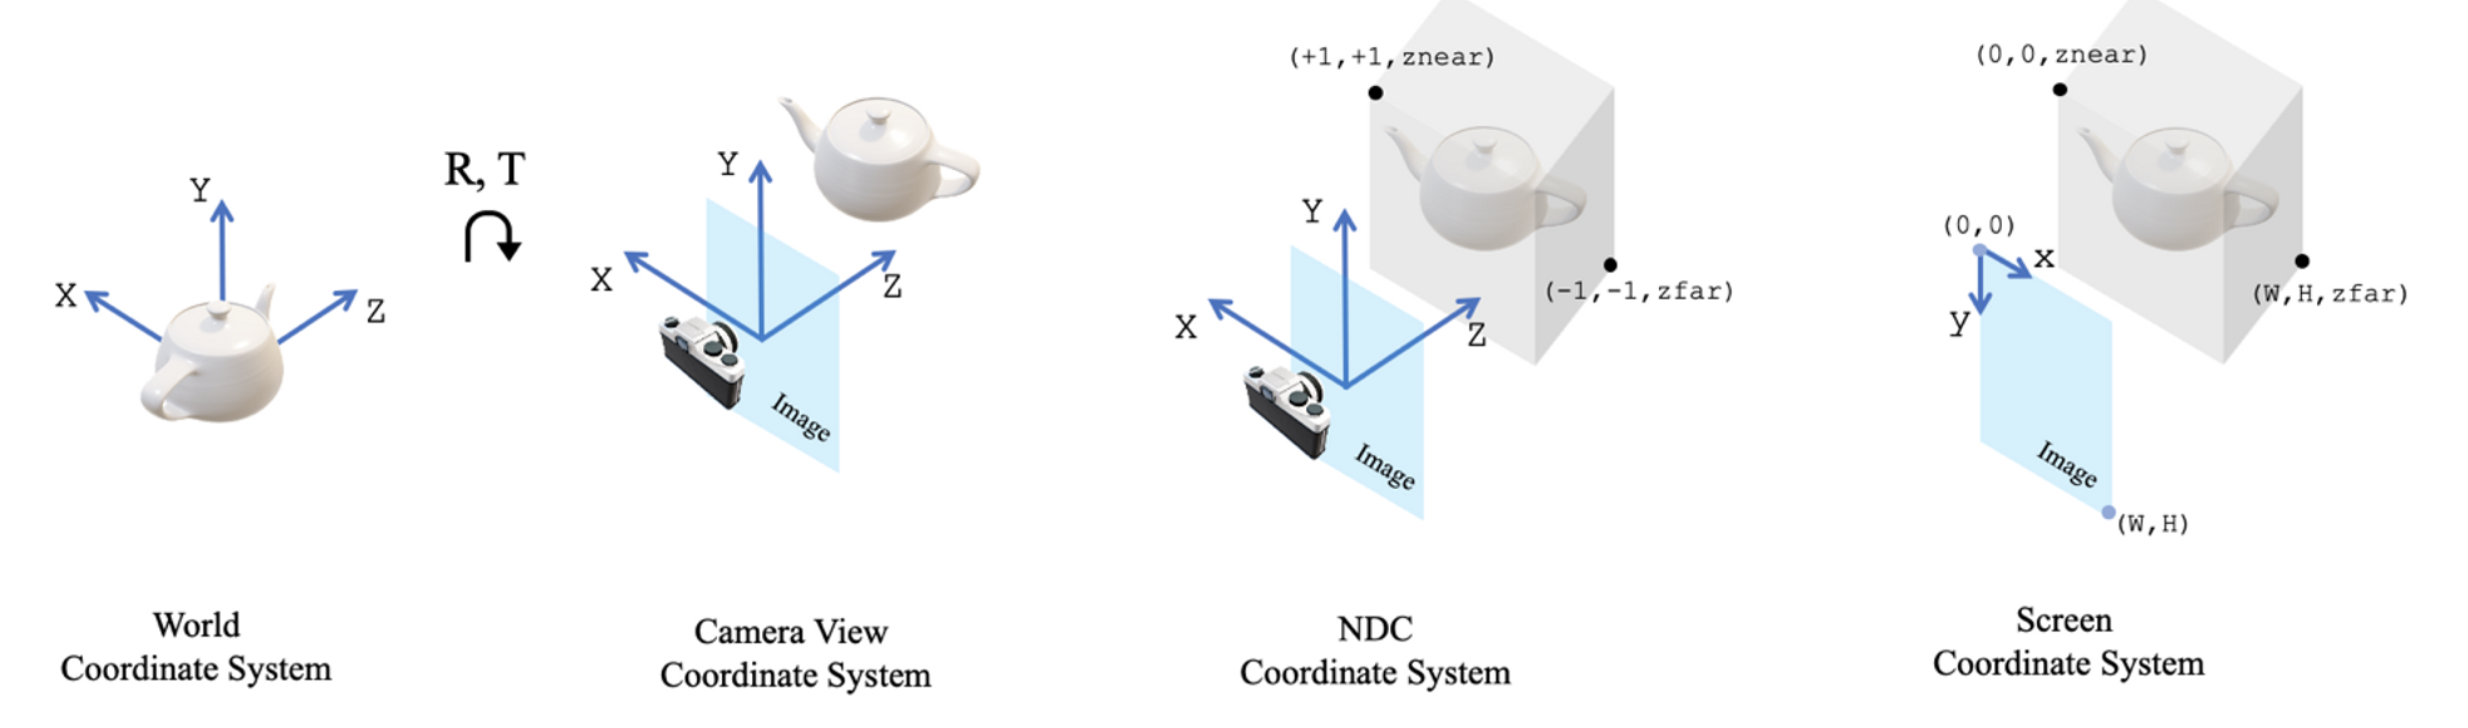
# compatibale with pytorch3d ndc, see https://github.com/facebookresearch/pytorch3d/blob/e42b0c4f704fa0f5e262f370dccac537b5edf2b1/pytorch3d/csrc/rasterize_meshes/rasterize_meshes.cu#L232
# 这里输入的vertices是transformed_vertices,
# 也就是经过正交投影后又trans_verts[:,:,1:] = -trans_verts[:,:,1:]
# 因为FLAME的世界系是以脑袋中心为原点人脸朝向为z轴的右手系,相机坐标系也是右手系
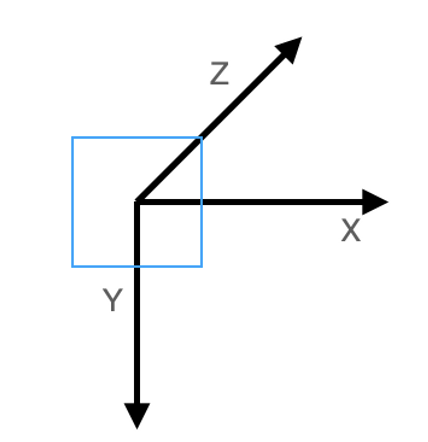
# 因此y和z取反后还是右手系,此时转到了图像坐标系,x轴向右,y轴指向下,z轴指向后脑勺
# 但是这时候还不能保证range是[-1,1],然后又经过了transform_points这个函数
# 下面我给出了坐标系的示意图
# 然后经过下面的代码转到屏幕系下
# 以x为例,把所有操作化简 ((w - [(-x) * w/2 + w/2])*2/w -1 )*w/2 + w/2 = w/2 *x + w/2
# x的range是[0,w]
vertices[...,:2] = -vertices[...,:2]
vertices[...,0] = vertices[..., 0]*w/2 + w/2
vertices[...,1] = vertices[..., 1]*h/2 + h/2
vertices[...,0] = w - 1 - vertices[..., 0]
vertices[...,1] = h - 1 - vertices[..., 1]
vertices[...,0] = -1 + (2*vertices[...,0] + 1)/w
vertices[...,1] = -1 + (2*vertices[...,1] + 1)/h
vertices = vertices.clone().float()
vertices[...,0] = vertices[..., 0]*w/2 + w/2
vertices[...,1] = vertices[..., 1]*h/2 + h/2
vertices[...,2] = vertices[..., 2]*w/2
f_vs = util.face_vertices(vertices, faces)
# 这个函数看下面的注释。
standard_rasterize(f_vs, depth_buffer, triangle_buffer, baryw_buffer, h, w)
pix_to_face = triangle_buffer[:,:,:,None].long()
bary_coords = baryw_buffer[:,:,:,None,:]
vismask = (pix_to_face > -1).float() # 像素没有对应的平面,idx为-1
D = attributes.shape[-1]
# (b,num_faces,3,3*4)
attributes = attributes.clone(); attributes = attributes.view(attributes.shape[0]*attributes.shape[1], 3, attributes.shape[-1])
N, H, W, K, _ = bary_coords.shape
mask = pix_to_face == -1
pix_to_face = pix_to_face.clone()
pix_to_face[mask] = 0 # 没有对应的对应到0号平面
idx = pix_to_face.view(N * H * W * K, 1, 1).expand(N * H * W * K, 3, D)
# 取出光栅化之后对应平面的attributes
pixel_face_vals = attributes.gather(0, idx).view(N, H, W, K, 3, D)
# attributes插值,对一些法向量、点插值(感觉在图像坐标系插值投影变换时有问题,存疑)
pixel_vals = (bary_coords[..., None] * pixel_face_vals).sum(dim=-2)
pixel_vals[mask] = 0 # Replace masked values in output.
# (n,h,w,1,3*4) -> (n,3*4,h,w)
pixel_vals = pixel_vals[:,:,:,0].permute(0,3,1,2)
# (n,3*4 + 1,h,w)
pixel_vals = torch.cat([pixel_vals, vismask[:,:,:,0][:,None,:,:]], dim=1)
return pixel_vals
transform_points后坐标系:
pytorch3d的坐标系:
standard_rasterize_cuda_kernel.cu光栅化的kernel function:
用pybind实现cpp然后python调用。
该函数本质上是需要得到每个像素对应的深度、平面(投影之后在最前面显示的),cuda函数看起来实现的相当简单。
// Ref: https://www.scratchapixel.com/lessons/3d-basic-rendering/rasterization-practical-implementation/overview-rasterization-algorithm
template <typename scalar_t>
__global__ void forward_rasterize_cuda_kernel(
        const scalar_t* __restrict__ face_vertices, //[bz, nf, 3, 3]
        scalar_t*  depth_buffer,
        int*  triangle_buffer,
        scalar_t*  baryw_buffer,
        int batch_size, int h, int w,
        int ntri) {

    const int i = blockIdx.x * blockDim.x + threadIdx.x;
    if (i >= batch_size * ntri) {
        return;
    }
    int bn = i/ntri;
    const scalar_t* face = &face_vertices[i * 9];
    scalar_t bw[3];
    point<scalar_t> p0, p1, p2, p;

    p0.x = face[0]; p0.y=face[1];
    p1.x = face[3]; p1.y=face[4];
    p2.x = face[6]; p2.y=face[7];

    int x_min = max((int)ceil(min(p0.x, min(p1.x, p2.x))), 0);
    int x_max = min((int)floor(max(p0.x, max(p1.x, p2.x))), w - 1);
    int y_min = max((int)ceil(min(p0.y, min(p1.y, p2.y))), 0);
    int y_max = min((int)floor(max(p0.y, max(p1.y, p2.y))), h - 1);

    for(int y = y_min; y <= y_max; y++) //h
    {
        for(int x = x_min; x <= x_max; x++) //w
        {
            p.x = x; p.y = y;
            // 三角形三个边为基的重心坐标
            barycentric_weight(bw, p, p0, p1, p2);
            // if(((bw[2] >= 0) && (bw[1] >= 0) && (bw[0]>0)) && check_face_frontside(face))
            // 在三角形内
            if((bw[2] >= 0) && (bw[1] >= 0) && (bw[0]>0))
            {
                // 插值: 1/z' = a * 1/z1 + b * 1/z2 + c * 1/z3,直接插值不准确因为透视投影挤压过了
                // 所以 z' = 1/(a * 1/z1 + b * 1/z2 + c * 1/z3)
                // perspective correct: https://www.scratchapixel.com/lessons/3d-basic-rendering/rasterization-practical-implementation/perspective-correct-interpolation-vertex-attributes
                scalar_t zp = 1. / (bw[0] / face[2] + bw[1] / face[5] + bw[2] / face[8]);
                // printf("%f %f %f \n", (float)zp, (float)face[2], (float)bw[2]);
                atomicMin(&depth_buffer[bn*h*w + y*w + x],  zp); // pixel的depth
                if(depth_buffer[bn*h*w + y*w + x] == zp)
                {
                    triangle_buffer[bn*h*w + y*w + x] = (int)(i%ntri); // pixel对应的平面idx
                    for(int k=0; k<3; k++){
                        baryw_buffer[bn*h*w*3 + y*w*3 + x*3 + k] = bw[k]; // pixel对应的重心
                    }
                }
            }
        }
    }

}
color的插值感觉有点问题,上面文献里面说了要除以z再插值,实际代码里却没有,目前对这里存疑,已提issue:
images[bn*h*w*3 + y*w*3 + x*3 + k]
	= bw[0]*cl[0][k] + bw[1]*cl[1][k] + bw[2]*cl[2][k];
Pytorch3d实现的rasterize_meshes类似,不赘述。
OK,在看看SRenderY这个类:
在Init的时候,Load了个平均人脸的template作为attributes之一,这玩意是有梯度的,意味着可以学习,最终学习的是纹理map的坐标,如果纹理map为空,那这玩意是啥一点影响都没有。
class SRenderY(nn.Module):
    def forward(self, vertices, transformed_vertices, albedos, lights=None, h=None, w=None, light_type='point', background=None):
        '''
        -- Texture Rendering
        vertices: [batch_size, V, 3], vertices in world space, for calculating normals, then shading
        transformed_vertices: [batch_size, V, 3], range:normalized to [-1,1], projected vertices in image space (that is aligned to the iamge pixel), for rasterization
        albedos: [batch_size, 3, h, w], uv map
        lights:
            spherical homarnic: [N, 9(shcoeff), 3(rgb)]
            points/directional lighting: [N, n_lights, 6(xyzrgb)]
        light_type:
            point or directional
        '''
        batch_size = vertices.shape[0]
        ## rasterizer near 0 far 100. move mesh so minz larger than 0
        transformed_vertices[:,:,2] = transformed_vertices[:,:,2] + 10
        # attributes
        face_vertices = util.face_vertices(vertices, self.faces.expand(batch_size, -1, -1))
        normals = util.vertex_normals(vertices, self.faces.expand(batch_size, -1, -1)); face_normals = util.face_vertices(normals, self.faces.expand(batch_size, -1, -1))
        transformed_normals = util.vertex_normals(transformed_vertices, self.faces.expand(batch_size, -1, -1)); transformed_face_normals = util.face_vertices(transformed_normals, self.faces.expand(batch_size, -1, -1))
        # self.face_uvcoords (b,num_faces,3,3)
        #  transformed_face_normals (b,num_faces,3,3)
        # face_vertices (b,num_faces,3,3)
        # face_normals (b,num_faces,3,3)
        # cat -> (b,num_faces,3,3*4)
        # face_uvcoords是有梯度的,所以可以训练
        attributes = torch.cat([self.face_uvcoords.expand(batch_size, -1, -1, -1),
                                transformed_face_normals.detach(),
                                face_vertices.detach(),
                                face_normals],
                                -1)
        # rasterize

        rendering = self.rasterizer(transformed_vertices, self.faces.expand(batch_size, -1, -1), attributes, h, w)

        ####
        # vis mask
        alpha_images = rendering[:, -1, :, :][:, None, :, :].detach()

        # albedo
        # 学习的face_uvcoords,是坐标
        uvcoords_images = rendering[:, :3, :, :]; grid = (uvcoords_images).permute(0, 2, 3, 1)[:, :, :, :2]
        # 有用纹理空间则albedos等于纹理map,否则全是0;用grid作为坐标在albedos里获取纹理
        # 没用纹理空间时albedo_images是空图
        albedo_images = F.grid_sample(albedos, grid, align_corners=False)

        # visible mask for pixels with positive normal direction
        transformed_normal_map = rendering[:, 3:6, :, :].detach()
        pos_mask = (transformed_normal_map[:, 2:, :, :] < -0.05).float()

        # shading
        # 插值之后的法向量
        normal_images = rendering[:, 9:12, :, :]
        if lights is not None:
            # 不同光照模型,生成阴影图
            if lights.shape[1] == 9:
                shading_images = self.add_SHlight(normal_images, lights)
            else:
                if light_type=='point':
                    vertice_images = rendering[:, 6:9, :, :].detach()
                    shading = self.add_pointlight(vertice_images.permute(0,2,3,1).reshape([batch_size, -1, 3]), normal_images.permute(0,2,3,1).reshape([batch_size, -1, 3]), lights)
                    shading_images = shading.reshape([batch_size, albedo_images.shape[2], albedo_images.shape[3], 3]).permute(0,3,1,2)
                else:
                    shading = self.add_directionlight(normal_images.permute(0,2,3,1).reshape([batch_size, -1, 3]), lights)
                    shading_images = shading.reshape([batch_size, albedo_images.shape[2], albedo_images.shape[3], 3]).permute(0,3,1,2)
            # 阴影乘以反射率,带阴影的反射率图,此时着色就完成了
            images = albedo_images*shading_images
        else:
            images = albedo_images
            shading_images = images.detach()*0.

        if background is not None:
            images = images*alpha_images + background*(1.-alpha_images)
            albedo_images = albedo_images*alpha_images + background*(1.-alpha_images)
        else:
            # 最后用zbuffer得到的depth mask过滤一下
            images = images*alpha_images
            albedo_images = albedo_images*alpha_images

        outputs = {
            'images': images,
            'albedo_images': albedo_images,
            'alpha_images': alpha_images,
            'pos_mask': pos_mask,
            'shading_images': shading_images,
            'grid': grid,
            'normals': normals,
            'normal_images': normal_images*alpha_images,
            'transformed_normals': transformed_normals,
        }

        return outputs
然后看看调用上面渲染的大类DECA,encode比较简单,网络forward,我们聚焦于decode。
class DECA(nn.Module):
	def displacement2normal(self, uv_z, coarse_verts, coarse_normals):
        ''' Convert displacement map into detail normal map
        '''
        # uv_z: decoded D
        batch_size = uv_z.shape[0]
        # 把verts光栅化到uv坐标系下
        uv_coarse_vertices = self.render.world2uv(coarse_verts).detach()
        uv_coarse_normals = self.render.world2uv(coarse_normals).detach()
        # uv_vertices: [bz, 3, h, w]
        # 只对mask的地方加强detail
        uv_z = uv_z*self.uv_face_eye_mask
        # 应用位移贴图(往法线方向移动,移动距离由网络预测的uv_z决定)
        uv_detail_vertices = uv_coarse_vertices + \
            uv_z*uv_coarse_normals + \
            self.fixed_uv_dis[None,None,:,:]*uv_coarse_normals.detach()
        dense_vertices = uv_detail_vertices.permute(0,2,3,1).reshape([batch_size, -1, 3])
        uv_detail_normals = util.vertex_normals(dense_vertices, self.render.dense_faces.expand(batch_size, -1, -1))
        uv_detail_normals = uv_detail_normals.reshape([batch_size, uv_coarse_vertices.shape[2], uv_coarse_vertices.shape[3], 3]).permute(0,3,1,2)
        uv_detail_normals = uv_detail_normals*self.uv_face_eye_mask + uv_coarse_normals*(1.-self.uv_face_eye_mask)
        return uv_detail_normals
	def decode(self, codedict, rendering=True, iddict=None, vis_lmk=True, return_vis=True, use_detail=True,
                render_orig=False, original_image=None, tform=None):
			# 前面是渲染过程,略过,这一块也就剩detail了,按照之前对论文的讲解,这里应该预测一个位移贴图
			if use_detail:
            uv_z = self.D_detail(torch.cat([codedict['pose'][:,3:], codedict['exp'], codedict['detail']], dim=1))
            if iddict is not None:
                uv_z = self.D_detail(torch.cat([iddict['pose'][:,3:], iddict['exp'], codedict['detail']], dim=1))
            # 在uv空间应用位移贴图
						uv_detail_normals = self.displacement2normal(uv_z, verts, ops['normals'])

						uv_shading = self.render.add_SHlight(uv_detail_normals, codedict['light'])
            uv_texture = albedo*uv_shading

            opdict['uv_texture'] = uv_texture
            opdict['normals'] = ops['normals']
            opdict['uv_detail_normals'] = uv_detail_normals
            opdict['displacement_map'] = uv_z+self.fixed_uv_dis[None,None,:,:]
最后,全局看一下训练流程:
trainer.py
def training_step(self, batch, batch_nb, training_type='coarse'):
	# 描述了训练过程
  '''
	省略
  '''
	#-- decoder
  shapecode = codedict['shape']
  expcode = codedict['exp']
  posecode = codedict['pose']
  texcode = codedict['tex']
  lightcode = codedict['light']
  detailcode = codedict['detail']
  cam = codedict['cam']

  # FLAME - world space
  verts, landmarks2d, landmarks3d = self.deca.flame(shape_params=shapecode, expression_params=expcode, pose_params=posecode)
  landmarks2d = util.batch_orth_proj(landmarks2d, codedict['cam'])[:,:,:2]; landmarks2d[:,:,1:] = -landmarks2d[:,:,1:] #; landmarks2d = landmarks2d*self.image_size/2 + self.image_size/2
  # world to camera
  trans_verts = util.batch_orth_proj(verts, cam)
  predicted_landmarks = util.batch_orth_proj(landmarks2d, cam)[:,:,:2]
  # camera to image space
  trans_verts[:,:,1:] = -trans_verts[:,:,1:]
  predicted_landmarks[:,:,1:] = - predicted_landmarks[:,:,1:]

  albedo = self.deca.flametex(texcode)

  #------ rendering
  ops = self.deca.render(verts, trans_verts, albedo, lightcode)
  # mask
  mask_face_eye = F.grid_sample(self.deca.uv_face_eye_mask.expand(batch_size,-1,-1,-1), ops['grid'].detach(), align_corners=False)
  # images
  predicted_images = ops['images']*mask_face_eye*ops['alpha_images']

  masks = masks[:,None,:,:]

  uv_z = self.deca.D_detail(torch.cat([posecode[:,3:], expcode, detailcode], dim=1))
  # render detail
  uv_detail_normals = self.deca.displacement2normal(uv_z, verts, ops['normals'])
  uv_shading = self.deca.render.add_SHlight(uv_detail_normals, lightcode.detach())
  uv_texture = albedo.detach()*uv_shading
  predicted_detail_images = F.grid_sample(uv_texture, ops['grid'].detach(), align_corners=False)

  #--- extract texture
  uv_pverts = self.deca.render.world2uv(trans_verts).detach()
  uv_gt = F.grid_sample(torch.cat([images, masks], dim=1), uv_pverts.permute(0,2,3,1)[:,:,:,:2], mode='bilinear', align_corners=False)
  uv_texture_gt = uv_gt[:,:3,:,:].detach(); uv_mask_gt = uv_gt[:,3:,:,:].detach()
  # self-occlusion
  normals = util.vertex_normals(trans_verts, self.deca.render.faces.expand(batch_size, -1, -1))
  uv_pnorm = self.deca.render.world2uv(normals)
  uv_mask = (uv_pnorm[:,[-1],:,:] < -0.05).float().detach()
  ## combine masks
  uv_vis_mask = uv_mask_gt*uv_mask*self.deca.uv_face_eye_mask

  #### ----------------------- Losses
  losses = {}
  ############################### details
  # if self.cfg.loss.old_mrf:
  #     if self.cfg.loss.old_mrf_face_mask:
  #         masks = masks*mask_face_eye*ops['alpha_images']
  #     losses['photo_detail'] = (masks*(predicted_detailed_image - images).abs()).mean()*100
  #     losses['photo_detail_mrf'] = self.mrf_loss(masks*predicted_detailed_image, masks*images)*0.1
  # else:
  pi = 0
  new_size = 256
  uv_texture_patch = F.interpolate(uv_texture[:, :, self.face_attr_mask[pi][2]:self.face_attr_mask[pi][3], self.face_attr_mask[pi][0]:self.face_attr_mask[pi][1]], [new_size, new_size], mode='bilinear')
  uv_texture_gt_patch = F.interpolate(uv_texture_gt[:, :, self.face_attr_mask[pi][2]:self.face_attr_mask[pi][3], self.face_attr_mask[pi][0]:self.face_attr_mask[pi][1]], [new_size, new_size], mode='bilinear')
  uv_vis_mask_patch = F.interpolate(uv_vis_mask[:, :, self.face_attr_mask[pi][2]:self.face_attr_mask[pi][3], self.face_attr_mask[pi][0]:self.face_attr_mask[pi][1]], [new_size, new_size], mode='bilinear')

  losses['photo_detail'] = (uv_texture_patch*uv_vis_mask_patch - uv_texture_gt_patch*uv_vis_mask_patch).abs().mean()*self.cfg.loss.photo_D
  losses['photo_detail_mrf'] = self.mrf_loss(uv_texture_patch*uv_vis_mask_patch, uv_texture_gt_patch*uv_vis_mask_patch)*self.cfg.loss.photo_D*self.cfg.loss.mrf

  losses['z_reg'] = torch.mean(uv_z.abs())*self.cfg.loss.reg_z
  losses['z_diff'] = lossfunc.shading_smooth_loss(uv_shading)*self.cfg.loss.reg_diff
  if self.cfg.loss.reg_sym > 0.:
      nonvis_mask = (1 - util.binary_erosion(uv_vis_mask))
      losses['z_sym'] = (nonvis_mask*(uv_z - torch.flip(uv_z, [-1]).detach()).abs()).sum()*self.cfg.loss.reg_sym
  opdict = {
      'verts': verts,
      'trans_verts': trans_verts,
      'landmarks2d': landmarks2d,
      'predicted_images': predicted_images,
      'predicted_detail_images': predicted_detail_images,
      'images': images,
      'lmk': lmk
  }

