

Orchestrator
MYSQL5.7下搭建Orchestrator
环境说明
在主机1,主机2,主机3上安装MySQL服务端和客户端。
|
|
主机1 |
主机2 |
主机3 |
|
操作系统 |
CentOS7.4 |
CentOS7.4 |
CentOS7.4 |
|
主机名 |
mydb1 |
mydb2 |
mydb3 |
|
IP |
192.168.1.101 |
192.168.1.102 |
192.168.1.103 |
|
角色 |
拓扑库 |
3306主,3307从 |
3306从,3307主,3308从 |
|
Orchestrator |
Orchestrator |
Orchestrator |
|
|
数据库软件版本 |
mysql5.7.22 |
mysql5.7.22 |
mysql5.7.22 |
|
MySQL配置文件 |
/app/mysqldata/3306/ my.cnf |
/app/mysqldata/3306/ my.cnf |
/app/mysqldata/3306/ my.cnf |
|
Orchestrator配置文件 |
/usr/local/orchestrator/orchestrator.conf.json |
/usr/local/orchestrator/orchestrator.conf.json |
/usr/local/orchestrator/orchestrator.conf.json |
|
Orchestrator安装包 |
orchestrator-3.0.11-1.x86_64.rpm orchestrator-client-3.0.11-1.x86_64.rpm |
orchestrator-3.0.11-1.x86_64.rpm orchestrator-client-3.0.11-1.x86_64.rpm |
orchestrator-3.0.11-1.x86_64.rpm orchestrator-client-3.0.11-1.x86_64.rpm |
一. 主从复制配置
Install_CentOS7_MySQL57_multi_instance.sh
MySQL5.7-GTID-mysqldump,xtrabackup搭建.txt
大规模插入数据.txt
做成快照Orchestrator
二.开始配置Orchestrator
mydb1上操作
https://github.com/github/orchestrator/releases/download/v3.0.11/orchestrator-3.0.11-1.x86_64.rpm
https://github.com/github/orchestrator/releases/download/v3.0.11/orchestrator-client-3.0.11-1.x86_64.rpm
安装:
# rpm -ivh orchestrator-3.0.11-1.x86_64.rpm
# rpm -ivh orchestrator-client-3.0.11-1.x86_64.rpm
安装完成后,目录在/usr/local/orchestrator
MySQL配置文件加一个report_host参数,report_host为只读参数,必须重启才可生效
report_host=192.168.1.102 //ip为自身的ip
说明:不加report_host ,show slave hosts 不会显示host,会导致程序报错的
"DiscoverByShowSlaveHosts": false 也可以,这样就不需要设置report_host了
拓扑库上
CREATE DATABASE IF NOT EXISTS orchestrator;
GRANT ALL PRIVILEGES ON `orchestrator`.* TO 'orche'@'192.168.1.%' IDENTIFIED BY 'msds007';
mydb2,mydb3上操作
主从复制上,3306和3307上分别操作
GRANT SUPER, PROCESS, REPLICATION SLAVE, RELOAD ON *.* TO 'orche'@'192.168.1.%' IDENTIFIED BY 'msds007';
GRANT SELECT ON mysql.slave_master_info TO 'orche'@'192.168.1.%';
mydb1上操作
配置文件
# cd /usr/local/orchestrator/
# cp orchestrator-sample.conf.json orchestrator.conf.json
"MySQLTopologyUser": "orche",
"MySQLTopologyPassword": "msds007",
"MySQLOrchestratorHost": "192.168.1.101",
"MySQLOrchestratorPort": 3306,
"MySQLOrchestratorDatabase": "orchestrator",
"MySQLOrchestratorUser": "orche",
"MySQLOrchestratorPassword": "msds007",
启动orchestrator
# cd /usr/local/orchestrator/
# ./orchestrator --debug http &
发现实例
# ./orchestrator -c discover -i mydb2:3306
# ./orchestrator -c discover -i mydb3:3306
# ./orchestrator -c discover -i mydb3:3307
# ./orchestrator -c discover -i mydb2:3307
# ./orchestrator -c discover -i mydb3:3308
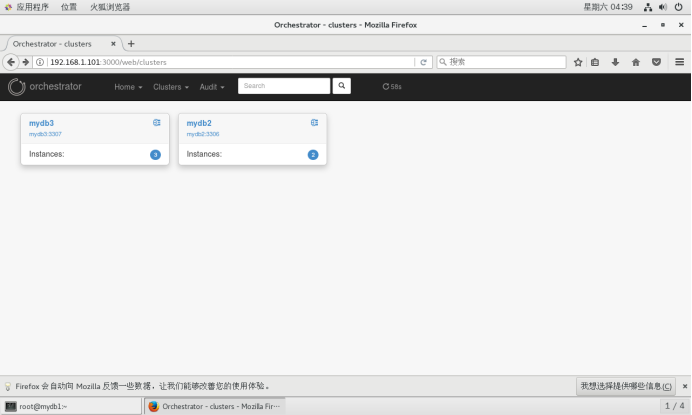
# ./orchestrator -c clusters
Web页面:http://192.168.1.101:3000
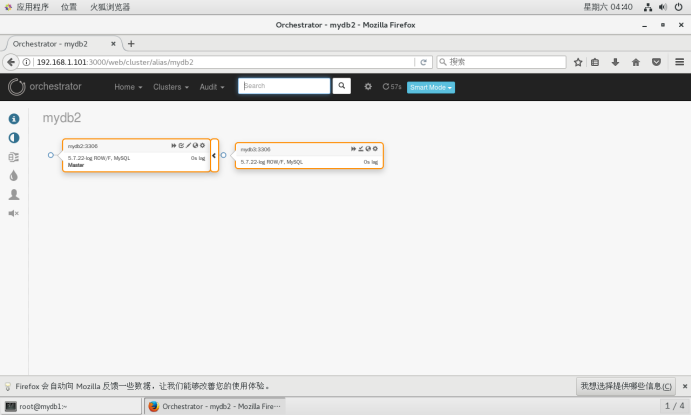
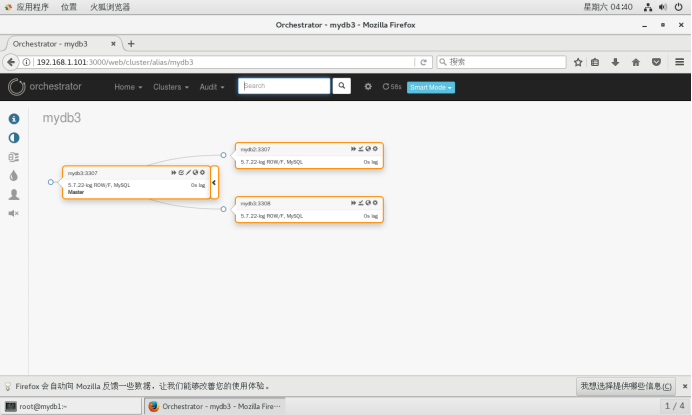
打印拓扑树
# ./orchestrator -c topology -i mydb2:3306
# ./orchestrator -c topology -i mydb3:3307
使用relocate移动一个副本,如:有A-B-C可以变为 A-B、A-C
# ./orchestrator -c relocate -i mydb3:3308 -d mydb2:3307
# ./orchestrator -c relocate -i mydb3:3308 -d mydb3:3307
使实例只读或者只写
# ./orchestrator -c set-read-only -i mydb2:3307
# ./orchestrator -c set-writeable -i mydb2:3307
Start/stop slave
# ./orchestrator -c stop-slave -i mydb3:3308
# ./orchestrator -c start-slave -i mydb3:3308
配置orchestrator-client(mydb1,mydb2,mydb3都可)
配置环境
# export ORCHESTRATOR_API=http://192.168.1.101:3000/api
linux下安装json解析工具jq
# wget https://github.com/stedolan/jq/releases/download/jq-1.5/jq-1.5.tar.gz
# tar zxvf jq-1.5.tar.gz
# cd jq-1.5
# ./configure && make && make install
基础命令
# orchestrator-client -c help
# orchestrator-client -c which-api
# orchestrator-client -c clusters
# orchestrator-client -c all-clusters-masters
# orchestrator-client -c all-instances
# orchestrator-client -c api -path clusters
# orchestrator-client -c api -path leader-check
故障转移
不管主库是否正常,强制主从切换,-i指定集群中任一实例,-d 指定新主库, 注意切换后旧主库不会指向新主库,需要手动操作
# orchestrator-client -c force-master-takeover -i mydb2:3306 -d mydb3:3306
主从切换,旧主库会指向新主库,但是复制线程是停止的,需要人工手动执行start slave,恢复复制。
# orchestrator-client -c graceful-master-takeover -i mydb2:3306 -d mydb3:3306
自动故障切换
Orchestrator能够配置成自动检测主库故障,并完成故障切换。
以http方式启动后台Web服务
./orchestrator --config=./orchestrator.conf.json --debug http &
成功启动后,可通过浏览器访问Web页面:
http://192.168.1.101:3000
参数配置
"RecoverMasterClusterFilters": ["*"],
"RecoverIntermediateMasterClusterFilters": ["*"],
"FailureDetectionPeriodBlockMinutes": 60,
"RecoveryPeriodBlockSeconds": 3600
RecoverMasterClusterFilters 和 RecoverIntermediateMasterClusterFilters 必须配置为["*"],否则自动切换不会触发。
FailureDetectionPeriodBlockMinutes 和 RecoveryPeriodBlockSeconds 参数默认值为1个小时,也就是如果发生了故障切换,在1个小时之内,该主库再次出现故障,将不会被监测到,也不会触发故障切换。
三.高可用Orchestrator
Orchestrator多节点部署,通过raft一致性协议实现自身高可用。
例如在如下3台机器部署Orchestrator节点:
192.168.1.101
192.168.1.102
192.168.1.103
在每个节点上修改orchestrator.conf.json配置文件:
"RaftEnabled": true,
"RaftDataDir": "/var/lib/orchestrator",
"RaftBind": "192.168.1.101",
"DefaultRaftPort": 10008,
"RaftNodes": [ "192.168.1.101", "192.168.1.102", "192.168.1.103" ],
RaftBind配置为当前节点ip,在每个节点上启动orchestrator服务:
./orchestrator --config=./orchestrator.conf.json --debug http
在浏览器中访问:
http://192.168.1.101:3000/api/leader-check
返回 "OK",当前leader为192.168.1.101
http://192.168.1.101:3000/api/raft-health
返回 "healthy"
http://192.168.1.102:3000/api/leader-check
返回 "Not leader"
http://192.168.1.102:3000/api/raft-health
返回 "healthy"
关闭192.168.1.101节点上的orchestrator服务,leader自动切换到192.168.1.102或者192.168.1.103,如果192.168.1.101重新启动后,加入集群,它将作为follower。
https://segmentfault.com/u/lindaling 可以学很多东西
https://segmentfault.com/a/1190000017838535 很重要
https://riverdba.github.io/ 可以学很多东西
https://riverdba.github.io/2019/03/19/orchestrator/
https://www.jianshu.com/p/62e95a131028 很重要
https://github.com/outbrain/orchestrator/wiki/Orchestrator-Manual

 浙公网安备 33010602011771号