爬虫系列之第5章-scrapy框架
scrapy框架
一 简介
Scrapy一个开源和协作的框架,其最初是为了页面抓取 (更确切来说, 网络抓取 )所设计的,使用它可以以快速、简单、可扩展的方式从网站中提取所需的数据。但目前Scrapy的用途十分广泛,可用于如数据挖掘、监测和自动化测试等领域,也可以应用在获取API所返回的数据(例如 Amazon Associates Web Services ) 或者通用的网络爬虫。Scrapy 是基于twisted框架开发而来,twisted是一个流行的事件驱动的python网络框架。因此Scrapy使用了一种非阻塞(又名异步)的代码来实现并发。
整体架构大致如下:
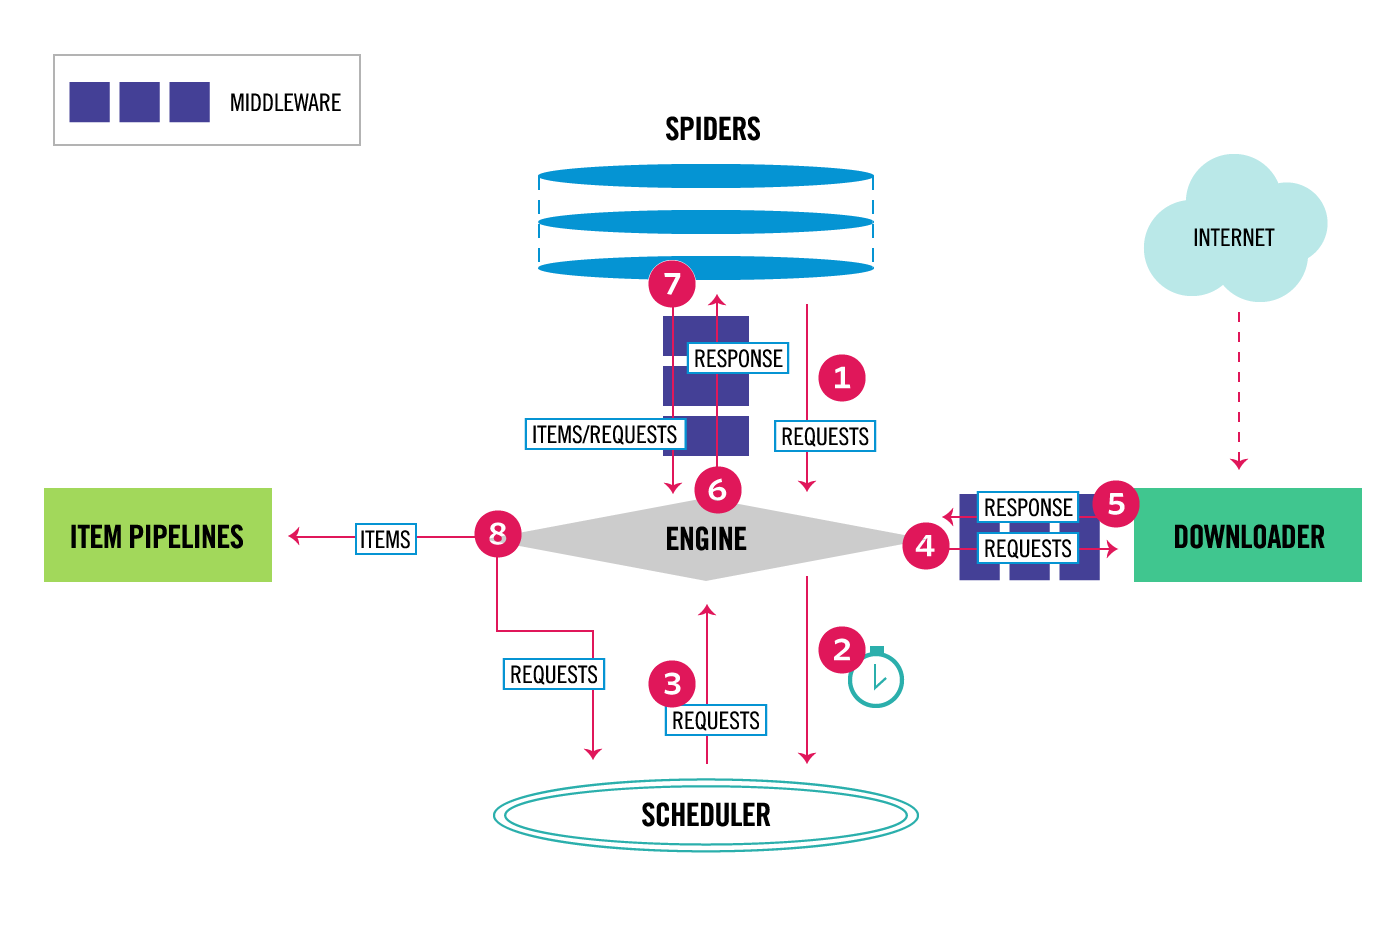
'''
Components:

1、引擎(EGINE)
引擎负责控制系统所有组件之间的数据流,并在某些动作发生时触发事件。有关详细信息,请参见上面的数据流部分。

2、调度器(SCHEDULER)
用来接受引擎发过来的请求, 压入队列中, 并在引擎再次请求的时候返回. 可以想像成一个URL的优先级队列, 由它来决定下一个要抓取的网址是什么, 同时去除重复的网址

3、下载器(DOWLOADER)
用于下载网页内容, 并将网页内容返回给EGINE,下载器是建立在twisted这个高效的异步模型上的

4、爬虫(SPIDERS)
SPIDERS是开发人员自定义的类,用来解析responses,并且提取items,或者发送新的请求

5、项目管道(ITEM PIPLINES)
在items被提取后负责处理它们,主要包括清理、验证、持久化(比如存到数据库)等操作
下载器中间件(Downloader Middlewares)位于Scrapy引擎和下载器之间,主要用来处理从EGINE传到DOWLOADER的请求request,已经从DOWNLOADER传到EGINE的响应response,
你可用该中间件做以下几件事:
    (1) process a request just before it is sent to the Downloader (i.e. right before Scrapy sends the request to the website);
    (2) change received response before passing it to a spider;
    (3) send a new Request instead of passing received response to a spider;
    (4) pass response to a spider without fetching a web page;
    (5) silently drop some requests.

6、爬虫中间件(Spider Middlewares)
位于EGINE和SPIDERS之间,主要工作是处理SPIDERS的输入(即responses)和输出(即requests)
'''
二 安装
#Windows平台
    1、pip3 install wheel #安装后,便支持通过wheel文件安装软件,wheel文件官网:https://www.lfd.uci.edu/~gohlke/pythonlibs
    3、pip3 install lxml
    4、pip3 install pyopenssl
    5、下载并安装pywin32:https://sourceforge.net/projects/pywin32/files/pywin32/
    6、下载twisted的wheel文件:http://www.lfd.uci.edu/~gohlke/pythonlibs/#twisted
    7、执行pip3 install 下载目录\Twisted-17.9.0-cp36-cp36m-win_amd64.whl
    8、pip3 install scrapy

#Linux平台
    1、pip3 install scrapy
三 命令行工具
# 1 查看帮助
    scrapy -h
    scrapy <command> -h

# 2 有两种命令:其中Project-only必须切到项目文件夹下才能执行,而Global的命令则不需要
    Global commands:
        startproject #创建项目
        genspider    #创建爬虫程序
        settings     #如果是在项目目录下,则得到的是该项目的配置
        runspider    #运行一个独立的python文件,不必创建项目
        shell        #scrapy shell url地址  在交互式调试,如选择器规则正确与否
        fetch        #独立于程单纯地爬取一个页面,可以拿到请求头
        view         #下载完毕后直接弹出浏览器,以此可以分辨出哪些数据是ajax请求
        version      #scrapy version 查看scrapy的版本,scrapy version -v查看scrapy依赖库的版本
    Project-only commands:
        crawl        #运行爬虫,必须创建项目才行,确保配置文件中ROBOTSTXT_OBEY = False
        check        #检测项目中有无语法错误
        list         #列出项目中所包含的爬虫名
        edit         #编辑器,一般不用
        parse        #scrapy parse url地址 --callback 回调函数  #以此可以验证我们的回调函数是否正确
        bench        #scrapy bentch压力测试

# 3 官网链接
    https://docs.scrapy.org/en/latest/topics/commands.html
四 目录结构
'''
project_name/
   scrapy.cfg
   project_name/
       __init__.py
       items.py
       pipelines.py
       settings.py
       spiders/
           __init__.py
           爬虫1.py
           爬虫2.py
           爬虫3.py

'''
文件说明:
- scrapy.cfg 项目的主配置信息,用来部署scrapy时使用,爬虫相关的配置信息在settings.py文件中。
- items.py 设置数据存储模板,用于结构化数据,如:Django的Model
- pipelines 数据处理行为,如:一般结构化的数据持久化
- settings.py 配置文件,如:递归的层数、并发数,延迟下载等。强调:配置文件的选项必须大写否则视为无效,正确写法USER_AGENT='xxxx'
- spiders 爬虫目录,如:创建文件,编写爬虫规则
注意:
1、一般创建爬虫文件时,以网站域名命名
2、默认只能在终端执行命令,为了更便捷操作:
#在项目根目录下新建:entrypoint.py
from scrapy.cmdline import execute
execute(['scrapy', 'crawl', 'xiaohua'])
框架基础:spider类,选择器,
五 Spider类
Spiders是定义如何抓取某个站点(或一组站点)的类,包括如何执行爬行(即跟随链接)以及如何从其页面中提取结构化数据(即抓取项目)。换句话说,Spiders是您为特定站点(或者在某些情况下,一组站点)爬网和解析页面定义自定义行为的地方。
Spiders会循环做如下事情:
'''
1、 生成初始的Requests来爬取第一个URLS,并且标识一个回调函数
     第一个请求定义在start_requests()方法内默认从start_urls列表中获得url地址来生成Request请求,
     默认的回调函数是parse方法。回调函数在下载完成返回response时自动触发

2、 在回调函数中,解析response并且返回值
     返回值可以4种:
          包含解析数据的字典
          Item对象
          新的Request对象(新的Requests也需要指定一个回调函数)
          或者是可迭代对象(包含Items或Request)

3、在回调函数中解析页面内容
   通常使用Scrapy自带的Selectors,但很明显你也可以使用Beutifulsoup,lxml或其他你爱用啥用啥。

4、最后,针对返回的Items对象将会被持久化到数据库
   通过Item Pipeline组件存到数据库:https://docs.scrapy.org/en/latest/topics/item-pipeline.html#topics-item-pipeline)
   或者导出到不同的文件(通过Feed exports:https://docs.scrapy.org/en/latest/topics/feed-exports.html#topics-feed-exports)

'''
六 选择器
为了解释如何使用选择器,我们将使用Scrapy shell(提供交互式测试)和Scrapy文档服务器中的示例页面,
这是它的HTML代码:
<html>
 <head>
  <base href='http://example.com/' />
  <title>Example website</title>
 </head>
 <body>
  <div id='images'>
   <a href='image1.html'>Name: My image 1 <br /><img src='image1_thumb.jpg' /></a>
   <a href='image2.html'>Name: My image 2 <br /><img src='image2_thumb.jpg' /></a>
   <a href='image3.html'>Name: My image 3 <br /><img src='image3_thumb.jpg' /></a>
   <a href='image4.html'>Name: My image 4 <br /><img src='image4_thumb.jpg' /></a>
   <a href='image5.html'>Name: My image 5 <br /><img src='image5_thumb.jpg' /></a>
  </div>
 </body>
</html>
首先,让我们打开shell:
scrapy shell https://doc.scrapy.org/en/latest/_static/selectors-sample1.html
然后,在shell加载之后,您将获得响应作为response shell变量,并在response.selector属性中附加选择器。
让我们构建一个XPath来选择title标签内的文本:
>>> response.selector.xpath('//title/text()')
[<Selector (text) xpath=//title/text()>]
使用XPath和CSS查询响应非常常见,响应包括两个便捷快捷方式:response.xpath()和response.css():
>>> response.xpath('//title/text()')
[<Selector (text) xpath=//title/text()>]
>>> response.css('title::text')
[<Selector (text) xpath=//title/text()>]
正如你所看到的,.xpath()并且.css()方法返回一个 SelectorList实例,这是新的选择列表。此API可用于快速选择嵌套数据:
>>> response.css('img').xpath('@src').extract()
[u'image1_thumb.jpg',
 u'image2_thumb.jpg',
 u'image3_thumb.jpg',
 u'image4_thumb.jpg',
 u'image5_thumb.jpg']
要实际提取文本数据,必须调用selector .extract() 方法,如下所示:
>>> response.xpath('//title/text()').extract()
[u'Example website']
如果只想提取第一个匹配的元素,可以调用选择器 .extract_first()
>>> response.xpath('//div[@id="images"]/a/text()').extract_first()
u'Name: My image 1 '
现在我们将获得基本URL和一些图像链接:
>>> response.xpath('//base/@href').extract()
[u'http://example.com/']

>>> response.css('base::attr(href)').extract()
[u'http://example.com/']

>>> response.xpath('//a[contains(@href, "image")]/@href').extract()
[u'image1.html',
 u'image2.html',
 u'image3.html',
 u'image4.html',
 u'image5.html']

>>> response.css('a[href*=image]::attr(href)').extract()
[u'image1.html',
 u'image2.html',
 u'image3.html',
 u'image4.html',
 u'image5.html']

>>> response.xpath('//a[contains(@href, "image")]/img/@src').extract()
[u'image1_thumb.jpg',
 u'image2_thumb.jpg',
 u'image3_thumb.jpg',
 u'image4_thumb.jpg',
 u'image5_thumb.jpg']

>>> response.css('a[href*=image] img::attr(src)').extract()
[u'image1_thumb.jpg',
 u'image2_thumb.jpg',
 u'image3_thumb.jpg',
 u'image4_thumb.jpg',
 u'image5_thumb.jpg']
作者:Allen丶—— 在南方的北方少年郎
签名:当你的才华还撑不起你的野心的时候,你就应该静下心来学习
出处:http://www.cnblogs.com/allen-w
本文版权归作者和博客园共有,欢迎转载,但未经作者同意必须保留此段声明,且在文章页面明显位置给出原文连接,否则保留追究法律责任的权利。
