HPM5301EVKlite windows下上手使用
HPM5301介绍
HPM5301是先辑半导体出的一款300Mhz的riscV芯片,售价7.99,开发板售价39.99,性价比超高
资源获取
evklite基本不需要原理图,下载SDK和ENV即可
SDK连接:https://github.com/hpmicro/hpm_sdk
hpm5301还需要打下patch: https://github.com/hpmicro/hpm_sdk/releases/download/v1.3.0/hpm_sdk_v1.3.0_patch-hpm5301evklite.zip
ENV连接:https://github.com/hpmicro/sdk_env
注:国内gitee上也有相同仓库
环境搭建
windows下,官方的SDK_ENV提供了所有的依赖文件,通过GUI配置即可。
-
解压HPM_SDK,然后将sdk下的所有文件复制或移动到SDK_ENV下的HPM_SDK中
-
运行START_GNU.EXE
-
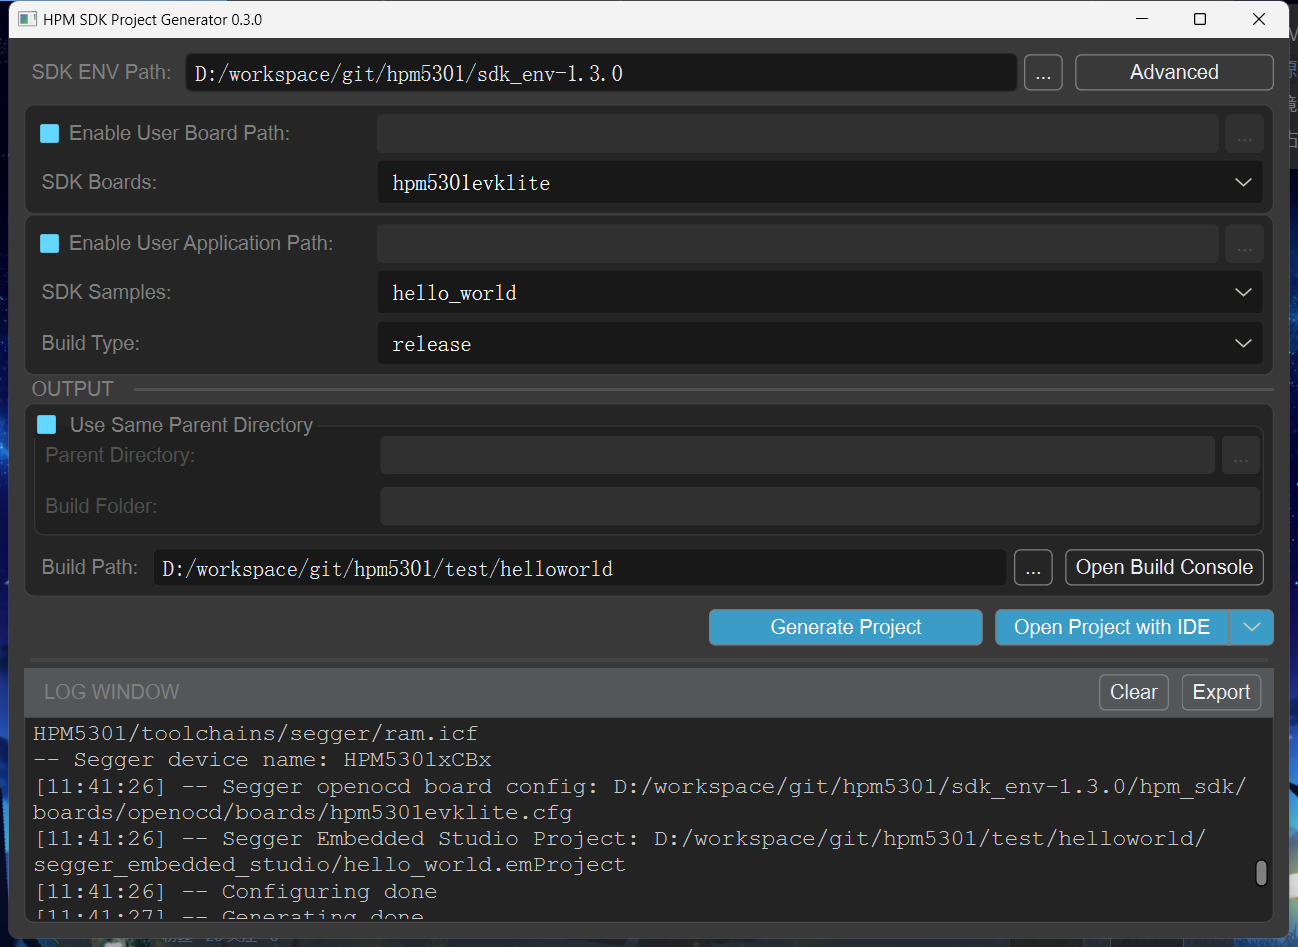
选择board,选择example
-
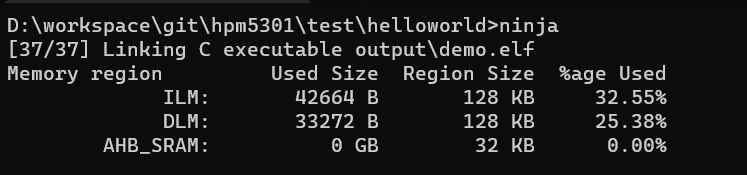
generateProject,成功后 open build console,输入ninja编译
-
通过openocd下载
下载
CHIP有两种方式,一种是使用标准的jtag下载调试,另外一种是使用ISP下载。
JTAG
jtag目前可以用jlink,ft232,ft2332,标准的DAP-Link(某阉割jtag协议的WCH-link就别尝试了)。如果使用jlink的话,需要用jlinkV10以上版本,不然无法通过jlink-gdb-sever进行调试。使用openocd的话,还要注意替换驱动,不然openocd无法识别jlink。
这里使用openocd+gdb的方式进行调试下载。
在hpm_sdk/board/openocd里有所需的cfg,切换到该目录下,执行openocd -f probes\jlink.cfg -f soc\hpm5300.cfg -f boards\hpm5301evklite.cfg
结果如下:
D:\workspace\git\hpm5301\sdk_env-1.3.0\hpm_sdk\boards\openocd>openocd -f probes\jlink.cfg -f soc\hpm5300.cfg -f boards\hpm5301evklite.cfg
Open On-Chip Debugger 0.11.0+dev-02365-g488108c93 (2023-09-18-18:58)
Licensed under GNU GPL v2
For bug reports, read
        http://openocd.org/doc/doxygen/bugs.html
srst_only separate srst_gates_jtag srst_open_drain connect_deassert_srst

Info : Listening on port 6666 for tcl connections
Info : Listening on port 4444 for telnet connections
Info : J-Link V9 compiled May  7 2021 16:26:12
Info : Hardware version: 9.50
Info : VTarget = 3.282 V
Info : clock speed 10000 kHz
Info : JTAG tap: hpm5361.cpu tap/device found: 0x1000563d (mfg: 0x31e (Andes Technology Corporation), part: 0x0005, ver: 0x1)
Info : [hpm5361.cpu0] datacount=4 progbufsize=8
Info : Examined RISC-V core; found 1 harts
Info :  hart 0: XLEN=32, misa=0x4090112f
[hpm5361.cpu0] Target successfully examined.
Info : starting gdb server for hpm5361.cpu0 on 3333
Info : Listening on port 3333 for gdb connections
然后再open build console,开启GDB:riscv32-unknown-elf-gdb
D:\workspace\git\hpm5301\sdk_env-1.3.0\toolchains\rv32imac-ilp32-multilib-win\bin\riscv32-unknown-elf-gdb.exe: warning: Couldn't determine a path for the index cache directory.
GNU gdb (GDB) 10.1
Copyright (C) 2020 Free Software Foundation, Inc.
License GPLv3+: GNU GPL version 3 or later <http://gnu.org/licenses/gpl.html>
This is free software: you are free to change and redistribute it.
There is NO WARRANTY, to the extent permitted by law.
Type "show copying" and "show warranty" for details.
This GDB was configured as "--host=x86_64-w64-mingw32 --target=riscv32-unknown-elf".
Type "show configuration" for configuration details.
For bug reporting instructions, please see:
<https://www.gnu.org/software/gdb/bugs/>.
Find the GDB manual and other documentation resources online at:
    <http://www.gnu.org/software/gdb/documentation/>.

For help, type "help".
Type "apropos word" to search for commands related to "word".
(gdb)
输入以下指令下载程序并运行
  gdb> file output\demo.elf
  gdb> target remote localhost:3333
  gdb> load
  gdb> b main
  gdb> c
输出如下:
(gdb) file output/demo.elf
Reading symbols from output/demo.elf...
(gdb) target remote localhost:3333
Remote debugging using localhost:3333
0x20017a10 in ?? ()
(gdb) load
Loading section .nor_cfg_option, size 0x10 lma 0x80000400
Loading section .boot_header, size 0x90 lma 0x80001000
Loading section .start, size 0x3e lma 0x80003000
Loading section .vectors, size 0x2a0 lma 0x8000303e
Loading section .text, size 0xa4aa lma 0x800032de
Loading section .data, size 0x1d8 lma 0x8000d788
Start address 0x80003000, load size 43520
Transfer rate: 14 KB/sec, 5440 bytes/write.
(gdb) c
Continuing.
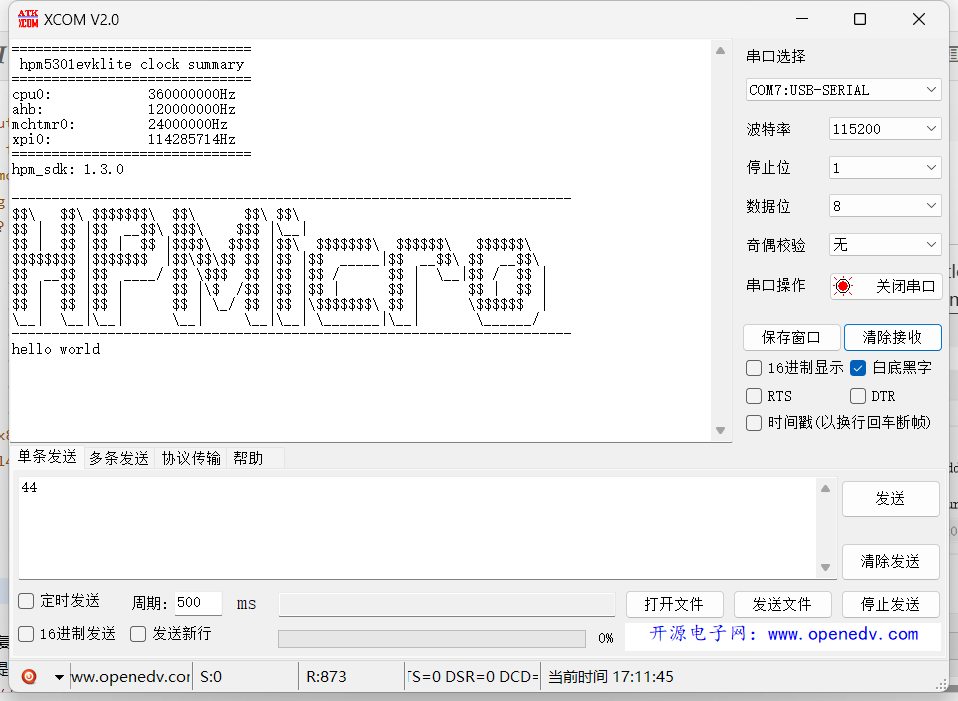
运行效果如图:
ISP下载
按住boot键后按下复位,chip会进入bootloader模式,此时可以通过用户手册提供的指令进行下载,或是使用官方提供的HPMpragrammer

进入bootloader模式后,需要通过串口转USB链接TX0/RX0,选择对应的COM口后,点击Attach,此时左下角会提示设备连接成功。
20231130_1453 貌似此软件暂时未适配53xx系列,始终下载失败。

 浙公网安备 33010602011771号