

【UE客户端/技术策划】- 引擎扩展篇:拓展角色移动模式 #UE5水体游泳(漂浮和潜泳) #攀岩 #翻越
本文在博客园原创,转载请标注出处
前言
在GamePlay中博主对3C的关键部分进行了解读,本文默认读者已经了解UE原生的3C相关,因此只回顾部分细节。在GamePlay的设计环节中,经常能够有对UE原生移动模式扩展的需求,一般有攀爬/翻越,跑酷/机动,滑索,滑翔等需求。同时根据项目需求不同,引擎有源码版和发行版的区别。
文章实现源码大约4k行,基于UE5.3发行版引擎,因为文章篇幅限制只放出核心思路代码,目的是提供读者在较短的时间内快速完成对基础框架的拓展思路。需要读者有较好的cpp/upp水平
需求
- 基于原有UE框架的基础上拓展角色移动模式,均需要适配网络
- 扩展攀爬,翻越功能。扩展的模式要能完美融合在原有模式的基础上,过渡要显得自然
- 修改游泳模式,适配UE5新水体,同时兼容旧水体。并且实现漂浮和潜水两种模式
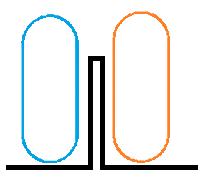
白盒搭建
既然做功能测试必然少不了白盒场景

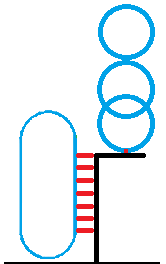
工程拆解
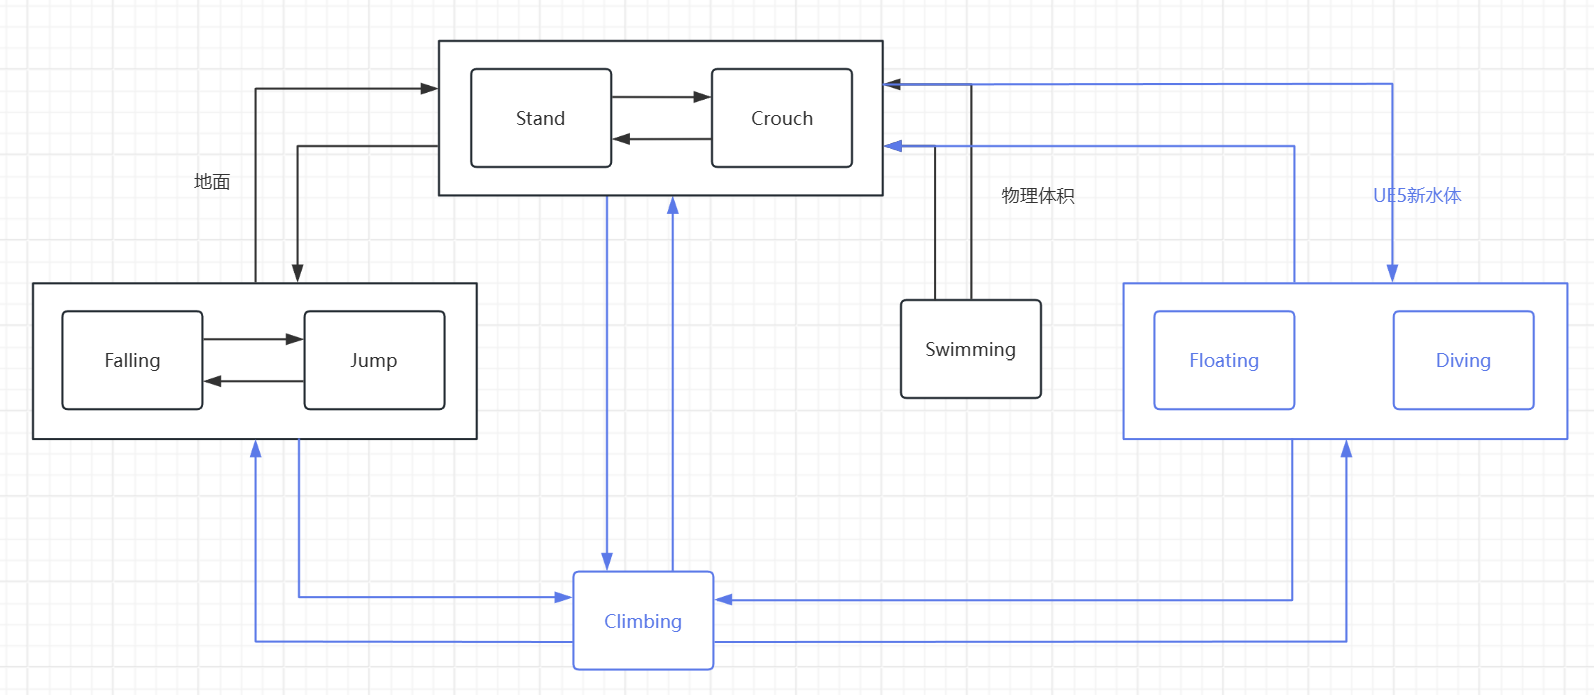
图中浅紫色则是我们要对UE原生拓展的状态。
QA:为什么并没有将Climbing单独拆分翻越和攀岩。这和我们思路相关
工程实现可能落地思路分析:
UE原生的3C框架中,UCharacterMovementComponent占据了绝大部分的逻辑,同时内移动模式内耦合性做的非常高,难以直接在源码中进行拆解或者介入。同时部分移动模式存在时间子步,我们直接修改源码可能会导致原有设计好的子步因为消耗时间则无法继续,进而导致隐形的bug出现。
原生3C中不存在攀爬,翻越功能,同时UE提供了PhysCustom自定义模式钩子供我们扩展。
UE5新水体无法触发游泳模式,是因为UE的游泳模式需要获取物理体积,而新水体并不是物理体积类,而且要满足漂浮和潜水两种子模式,显然在UE原本的游泳模式中进行重载扩展无法满足需求,更可能是我们要重新做一个完全基于UE5新水体的游泳模式,通过版本号或者检测水体来切换新旧两种游泳模式
UE原生移动模式中,存在Fall Swim Walk三种模式的相互转换,由于我们需要加入攀爬,翻越,新水体的功能,所以我们要单独去适配这两种模式的转换,同时,只有翻越能够做到直接进入水中(可能翻越一个泳池护栏),也就是我们要在Fall,Walk,climbover,newswim三者建立新的过渡链接.当然还有walk中的蹲伏,我们也要考虑进去
PhysClimbing
攀岩/翻越与Walking的原理非常类似,核心都是使其胶囊体紧贴在目标基座上,而Walking的目标是地板,Climbing的目标是墙壁。
对于开放世界来说,攀岩无疑是阻碍运动流畅性的因素之一(因为通常存在体力,速度限制,并且可能有天气系统额外修改的无法攀爬),因此我们在这里将翻越融合进攀岩,当遇到阻挡墙壁时,优先尝试进行翻越(优先保证玩家在大世界中的流畅运动),如果翻越无法进行则转入尝试攀岩模式,进而如果无法攀岩,则依旧维持原有模式。
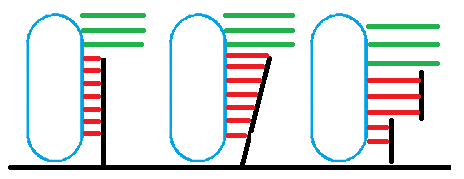
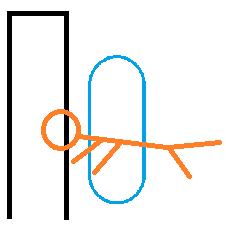
最终我们可以绘制出关于攀岩/翻越的运动目标图
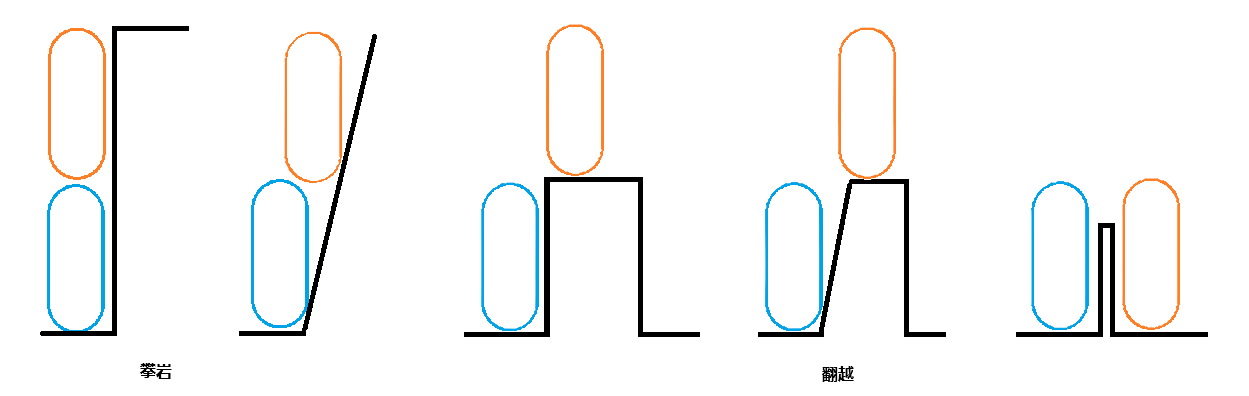
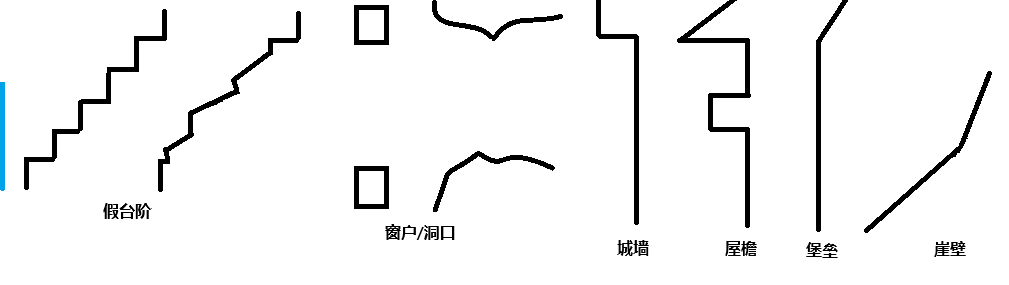
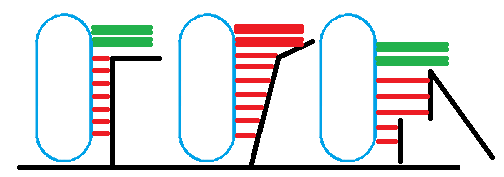
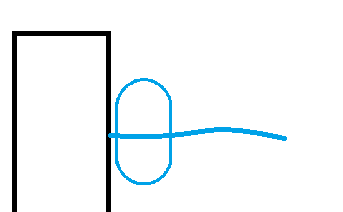
但是大世界中的墙壁/崖壁并不会像是图中如此完整,更多的可能如图下所示(蓝色为大概胶囊体高度)
在前方我们拆解了扩展后的状态机架构,那么Climbing应与Walking中的步升逻辑上具有相似性,进出状态的核心流程都与前方是否符合攀岩/翻越的墙体有关,同时Climbing对三种状态均有过渡,Climbing->Falling,Climbing->Walking,Climbing->Swimming.那么可以得出,我们在获取攀岩检测时,其检测并不与“脚下状态”相关,只与“当前期望方向”/“当前速度方向”上的墙体有关。
翻越
在尝试翻越时,我们工程中既可以使用动画来做(UE5.4之后的运动扭曲),也可以使用程序进行移动(老版本ALSV4做法).静态墙体下两种方式均需要在首次检测时就确定好位移后的位置,而检测栖息点需要我们综合墙体信息继续
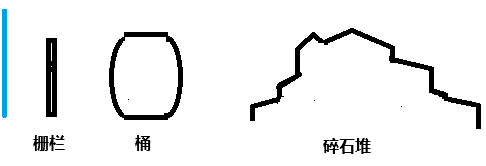
在墙壁图中可以看出,如果我们类似Walking中的FindFloor胶囊体检测方法,向前并且向上扫描胶囊体,多半无法正确掌握墙体规则并且查询过程极度消耗资源,尤其是假台阶以及碎石堆这种。同时由于UE中的胶囊体检测默认也是垂直于世界水平面。所以我们横向检测的时候,大多数情况并不能准确反应整个墙面信息。因此我们要采用射线横向扫描整个墙面。
整个翻越逻辑和FindFloor相似,最高会进行4次检测,
翻越/越障尝试
越障首先会检测墙壁厚度,随后第一次进行栖息点检测,检测后会再次做一次简单的“步下”机制,即Forward -> Down.如果这一步失败则退化为翻越,只寻找第一次栖息点,如果第一次栖息点也寻找失败(墙壁无连续的未阻挡信息)则进入攀岩模式
栖息点检测
第一步先使用射线横向扫描整个墙面,其中包括
- 扫描方向 :最好与加速度方向相关
- 扫描高度 : 需要设定最大翻越高度 (注意跳跃并不会增加这个高度,细节需要读者自己去匹配项目中的变量)
- 扫描长度 :需要设定最长翻越长度 (一般推荐30cm-50cm,差不多就是人手扒拉到窗沿的距离)
通常情况下会如下扫描到墙体
如果连续产生未命中信息(可以根据项目情况自行决定,为了防止过早进入下一检测环节,避免只有中间几根连续射线命中窄缝导致多次进入下一阶段检测栖息),说明我们需要探明墙体上方的构造,是否初步满足可栖息面(IsWalkable)
第二子步,取第一和第二未命中射线,转换成矩形向前Sweep,是为了判定如下状态
第二子步的目的是判定墙体上方是否有具体的落脚位置,如果当前未命中的时候(例如1,3),我们需要补充一个命中信息

因此第二子步中,我们要求获取一个完整的墙壁上方命中信息(如果当前未命中也可以进入第三子步),随后进入第三子步
如果刚才获取到了命中信息,由命中信息的点位垂直向上取胶囊体半高,在这个位置做一个略大于胶囊体半球的球形,并将下重新检测"落脚点"
检测过后如果有命中,由命中后的球形向上检测一个完整胶囊体高度,用来检测是否足够胶囊体容纳自身
第三子步可以直接照搬Walking中的FindFloor,或者手写一个以便获得更多后续的数据。以下是笔者提供的一个简单的检测函数供参考
bool UEnhancedCharacterMovementComponent::CheckCapsuleFitOnFloor(const FVector& PutLocation, float ExpectHalfHeight,float ExpectRadius, FVector& OutFitLocation)
{
// 从放置位置向下检测球体 找寻碰撞
FVector Center = PutLocation;
FVector Down = Center - UpdatedComponent->GetUpVector() * (ExpectHalfHeight - ExpectRadius);
//向下探测
FHitResult DownHit;
bool bDownHit = UKismetSystemLibrary::SphereTraceSingle(
GetWorld(),
Center,
Down,
ExpectRadius,
UEngineTypes::ConvertToTraceType(ECC_Visibility),
false,
TArray<AActor*>(),
EDrawDebugTrace::ForOneFrame,
DownHit,
true
);
//如果下边的阻挡了 很有可能可以接触到地
if (bDownHit && IsWalkable(DownHit))
{
constexpr float MaxFloorDist = 4.0f;
constexpr float MinFloorDist = 1.9f;
//应该根据当前的坡度设置容错
const float SlopeCos = FVector::DotProduct(DownHit.ImpactNormal.GetSafeNormal(), UpdatedComponent->GetUpVector());
const float AdOffset = FMath::Clamp(1.0f / FMath::Max(SlopeCos, 0.1f), MinFloorDist, MaxFloorDist);
//依据碰撞重新制作中心位置
Center = DownHit.Location + UpdatedComponent->GetUpVector() * (ExpectHalfHeight - ExpectRadius + AdOffset);
FVector Top = Center + UpdatedComponent->GetUpVector() * (ExpectHalfHeight - ExpectRadius);
//向上进行探查 必须保证有足够的空间恢复胶囊体大小
FHitResult TopHit;
bool bTopHit = UKismetSystemLibrary::SphereTraceSingle(
GetWorld(),
Center,
Top,
ExpectRadius,
UEngineTypes::ConvertToTraceType(ECC_Visibility),
false,
TArray<AActor*>(),
EDrawDebugTrace::ForOneFrame,
TopHit,
true
);
if (!bTopHit)
{
OutFitLocation = Center;
return true;
}
}
return false;
}
攀岩
攀岩对比翻越,少了一些高消耗的墙壁检测,换来的是定点的检测,其主要目的就是在不可行走面上进行攀附移动,主要设计三个方面,输入向量转换,移动面以及速度转换,碰撞.
核心流程代码如下
void UEnhancedCharacterMovementComponent::PhysCustom(float deltaTime, int32 Iterations)
{
	if (CustomMovementMode == EEnhancedCustomMovementMode::CMOVE_Climbing)
	{
		PhysClimbing(deltaTime, Iterations);
	}

	Super::PhysCustom(deltaTime, Iterations);
}

void UEnhancedCharacterMovementComponent::OnMovementModeChanged(EMovementMode PrevMovementMode, uint8 NewMovementMode)
{
	//进入攀爬时
	if (MovementMode == MOVE_Custom && CustomMovementMode == CMOVE_Climbing && PrevMovementMode != MOVE_Custom)
	{
		UE_LOG(LogTemp, Log, TEXT("MOVE_Custom"));

		bOrientRotationToMovement = false;
		bMovementCanCrouch = false;//攀爬时禁止蹲伏
		UCapsuleComponent* Capsule = CharacterOwner->GetCapsuleComponent();
		Capsule->SetCapsuleHalfHeight(Capsule->GetUnscaledCapsuleHalfHeight() - ClimbingCollisionShrinkAmount);
	}

	//退出攀爬时
	if (MovementMode != MOVE_Custom && PrevMovementMode == MOVE_Custom && NewMovementMode == CMOVE_Climbing)
	{
		bOrientRotationToMovement = true;
		bMovementCanCrouch = true;//攀爬时禁止蹲伏
		const FRotator StandRotation = FRotator(0,  UpdatedComponent->GetComponentRotation().Yaw, 0);
		UpdatedComponent->SetRelativeRotation(StandRotation);

		UCapsuleComponent* Capsule = CharacterOwner->GetCapsuleComponent();
		Capsule->SetCapsuleHalfHeight(Capsule->GetUnscaledCapsuleHalfHeight() + ClimbingCollisionShrinkAmount);

		// After exiting climbing mode, reset velocity and acceleration
		StopMovementImmediately();
	}

	Super::OnMovementModeChanged(PrevMovementMode, NewMovementMode);

}

void UEnhancedCharacterMovementComponent::PhysClimbing(float deltaTime, int32 Iterations)
{
	if (deltaTime < MIN_TICK_TIME)
	{
		return;
	}

	PhysClimbOver(deltaTime, Iterations);

	SweepAndStoreWallHits();

	ComputeSurfaceInfo();

	if (ShouldStopClimbing())
	{
		CancelClimbing();
	}

	//计算攀爬速度
	ComputeClimbingVelocity(deltaTime);

	const FVector OldLocation = UpdatedComponent->GetComponentLocation();
	//跟随攀岩表面移动
	MoveAlongClimbingSurface(deltaTime);

	if (!HasAnimRootMotion() && !CurrentRootMotion.HasOverrideVelocity())
	{
		Velocity = (UpdatedComponent->GetComponentLocation() - OldLocation) / deltaTime;
	}

	//离壁距离
	SnapToClimbingSurface(deltaTime);
}
在引擎留有的钩子中设置我们的攀岩,并且在模式切换时对胶囊体,输入等进行一系列设置.
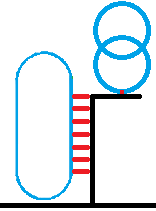
攀附面检测

关于攀附面的检测,我们只需要满足这两个变量即可,具体形式可由读者自己依据项目需求进行,以下放出读者思路

右方是我们进入攀岩模式后矮化的胶囊体,其有六个检测点,中间靠上约等于“眼睛”的位置,中间靠近中心的是“胸口”,四周四个则代表四肢。胸口检测是CurrentClimbingNormal的核心提供者,其余五个点是为了脱离攀岩使用的。例如下方两个"脚"未命中时,我们可以看作下方腾空,可以判定无法抓地而转入Falling。而眼睛的部分则代表我们可能攀上了可行走面。此时我们会进行翻越的检测使其脱离攀岩状态.
输入向量重映射
前方我们基于“胸口”的检测获取了墙面的法线。由此我们可以做到将输入向量转换。制作一个基于墙壁法线重构的矩阵。
在原有的角色Move函数中,修改直接从控制器拿取旋转的方式:
FMatrix UEnhancedCharacterMovementComponent::GetClimbingMovementMatrix()
{
	FVector RightDirection = FVector::CrossProduct(CurrentClimbingNormal,FVector::UpVector);
	FVector ForwardDirection = FVector::CrossProduct(CurrentClimbingNormal, -RightDirection);

	const FMatrix ClimbBasis = FRotationMatrix::MakeFromXY(ForwardDirection, RightDirection);

	return ClimbBasis;
}

FRotator AEnhancedCharacter::GetEffectiveMovementRotation()
{
	FRotator Rotation;

	if (GetEnhancedCharacterMovement()->MovementMode == MOVE_Walking || MOVE_Falling)
	{
		Rotation = FRotator(0, Controller->GetControlRotation().Yaw, 0);
	}

	if (GetEnhancedCharacterMovement()->IsClimbing())
	{
		Rotation = GetEnhancedCharacterMovement()->GetClimbingMovementMatrix().Rotator();
	}

	//游泳有两个分支 水下和水面不通用
	if (GetEnhancedCharacterMovement()->MovementMode == MOVE_Swimming)
	{
		Rotation = GetEnhancedCharacterMovement()->GetSwimmingMovementMatrix().Rotator();
	}

	return Rotation;
}

void ADebugEnhancedCharacter::Move(const FInputActionValue& Value)
{
	// input is a Vector2D
	FVector2D MovementVector = Value.Get<FVector2D>();

	if (Controller != nullptr)
	{

		FRotator Rotation = GetEffectiveMovementRotation();

		// get forward vector
		FVector ForwardDirection = FRotationMatrix(Rotation).GetUnitAxis(EAxis::X);

		// get right vector
		FVector RightDirection = FRotationMatrix(Rotation).GetUnitAxis(EAxis::Y);

		// add movement
		AddMovementInput(ForwardDirection, MovementVector.Y);
		AddMovementInput(RightDirection, MovementVector.X);
	}
}
速度计算与位移
由于源码中这部分相对来说代码量巨大,且不一定适用读者的项目,因此在这里我缩减为了基本框架,保留了最关键的方法,读者按照自己的项目提供方法即可。
void UEnhancedCharacterMovementComponent::ComputeClimbingVelocity(float deltaTime)
{
	RestorePreAdditiveRootMotionVelocity();

	if (!HasAnimRootMotion() && !CurrentRootMotion.HasOverrideVelocity())
	{
		constexpr float Friction = 0.0f;
		constexpr bool bFluid = false;
		CalcVelocity(deltaTime, Friction, bFluid, BrakingDecelerationClimbing);
	}

	ApplyRootMotionToVelocity(deltaTime);
}


FQuat UEnhancedCharacterMovementComponent::GetClimbingRotation(float deltaTime) const
{
	const FQuat Current = UpdatedComponent->GetComponentQuat();
	const FQuat Target = FRotationMatrix::MakeFromX(-CurrentClimbingNormal).ToQuat();

	return FMath::QInterpTo(Current, Target, deltaTime, ClimbingRotationSpeed);
}

void UEnhancedCharacterMovementComponent::MoveAlongClimbingSurface(float deltaTime)
{
	const FVector Adjusted = Velocity * deltaTime;

	FHitResult Hit(1.f);

	SafeMoveUpdatedComponent(Adjusted, GetClimbingRotation(deltaTime), true, Hit);

	if (Hit.Time < 1.f)
	{
		HandleImpact(Hit, deltaTime, Adjusted);
		SlideAlongSurface(Adjusted, (1.f - Hit.Time), Hit.Normal, Hit, true);
	}
}
离壁安全距离
跟Walking相似,最后我们要将胶囊体拉出墙壁,防止复杂情况下的初始碰撞
void UEnhancedCharacterMovementComponent::SnapToClimbingSurface(float deltaTime)
{
	const FVector Forward = UpdatedComponent->GetForwardVector();
	const FVector Location = UpdatedComponent->GetComponentLocation();
	const FQuat Rotation = UpdatedComponent->GetComponentQuat();

	const FVector ForwardDifference = (CurrentClimbingPosition - Location).ProjectOnTo(Forward);
	const FVector Offset = -CurrentClimbingNormal * (ForwardDifference.Length() - DistanceFromSurface);

	const FVector Adjusted = Offset * ClimbingSnapSpeed * deltaTime;

	FHitResult Hit(1.f);
	SafeMoveUpdatedComponent(Adjusted, Rotation, true, Hit);
	if (Hit.Time < 1.f)
	{
		HandleImpact(Hit, deltaTime, Adjusted);
		SlideAlongSurface(Adjusted, (1.f - Hit.Time), Hit.Normal, Hit, true);
	}
}
总结
攀岩的逻辑基本上难度不大,很多代码都能在walking中寻找到类似,只要仿照思路和结构就能做出一个比较完善的原型,同时通过迭代就能产出一个商业项目中的攀岩了。其核心还是要根据项目需求来,项目需求可能存在仿真抑或是性能约束,对代码中的检测性能可能要求比较严格
PhysSwimming
新的游泳模式分为漂浮水面上和潜泳,相对来说要复杂一些。因为水下阻挡物一般来说不固定,且游泳时角色身体会保持一个水平-垂直之间的来回过渡,我们需要额外附加碰撞添加移动.
在这里我们先屏蔽掉原游泳模式,读者同样需要根据自己项目情况决定对老水体的兼容性
void UEnhancedCharacterMovementComponent::OnMovementModeChanged(EMovementMode PrevMovementMode, uint8 NewMovementMode)
{

	//进入游泳
	if (MovementMode == MOVE_Swimming && PrevMovementMode != MOVE_Swimming)
	{
		UCapsuleComponent* Capsule = CharacterOwner->GetCapsuleComponent();
		Capsule->SetCapsuleHalfHeight(Capsule->GetUnscaledCapsuleHalfHeight() - SwimmingCollisionShrinkAmount);
		bMovementCanCrouch = false;//游泳时禁止蹲伏

	}
	//退出游泳
	if (MovementMode != MOVE_Swimming && PrevMovementMode == MOVE_Swimming)
	{
		bMovementCanCrouch = true;
		UCapsuleComponent* Capsule = CharacterOwner->GetCapsuleComponent();
		Capsule->SetCapsuleHalfHeight(Capsule->GetUnscaledCapsuleHalfHeight() + SwimmingCollisionShrinkAmount);
	}
}

void UEnhancedCharacterMovementComponent::PhysSwimming(float deltaTime, int32 Iterations)
{
	//Super::PhysSwimming()
	//游泳状态和常规状态一样 一定假设世界Z轴为上方向,否则无法进行
	//进入游泳状态缩小其胶囊体,这是因为防止利用胶囊体顶出出水状态

	if (deltaTime < MIN_TICK_TIME)
	{
		return;
	}

	FVector OldLocation = UpdatedComponent->GetComponentLocation();
	float RemainingTime = deltaTime;
	const int32 MaxSubSteps = 5;
	int32 LocalSubstepCount = 0;

	while (RemainingTime >= MIN_TICK_TIME && LocalSubstepCount < MaxSubSteps && Iterations < MaxSimulationIterations)
	{
		++LocalSubstepCount;
		++Iterations;

		float TimeTick = GetSimulationTimeStep(RemainingTime, Iterations);
		RemainingTime -= TimeTick;

		// 子步内完整逻辑
		UpdateWaterValues(TimeTick);
		UpdateInWaterMovementMode();
		ComputeSwimmingVelocity(TimeTick);

		if (MovementModeSwimmingSubMode == EEnhancedSwimmingMovementMode::Floating)
		{
			PhysFloating(TimeTick);
		}
		else if (MovementModeSwimmingSubMode == EEnhancedSwimmingMovementMode::Diving)
		{
			PhysDiving(TimeTick);
		}
	}

	if (TryExitSwimming())
	{
		ExitSwimming(MOVE_Falling);
	}

	// Velocity based on distance traveled.
	if( !bJustTeleported && !HasAnimRootMotion() && !CurrentRootMotion.HasOverrideVelocity() )
	{
		Velocity = (UpdatedComponent->GetComponentLocation() - OldLocation) / deltaTime;
	}

}
水体数据
UE5的新水体采用了AWaterBody类作为基体,而并不是UE4Z中的物理体积,它并不能够触发原本UE4的游泳模式。但是新水体只要进入水体则会触发碰撞响应,要比原有的旧水体包围盒方便许多,且内部包含很多相关数据(水面位置等),同时关于水体我们也只需准备这样几个变量即可。
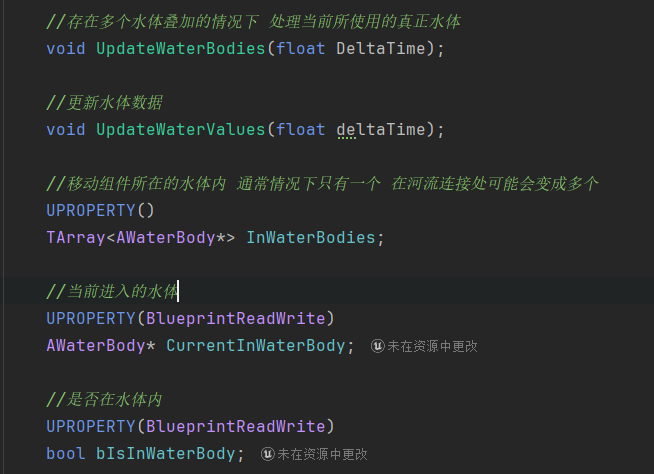
CurrentInWaterBody->GetWaterBodyComponent()->GetWaterSurfaceInfoAtLocation(UpdatedComponent->GetComponentLocation(),
		WaterSurfaceLocation,WaterSurfaceNormal,WaterVelocity,WaterDepth);
关于新水体需要注意的就是河流的连接处:
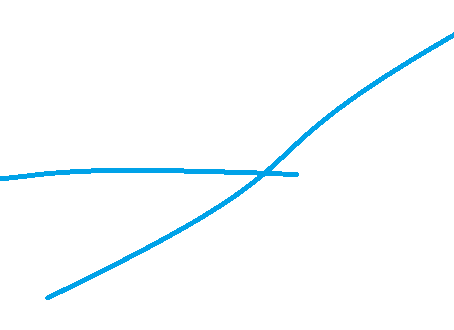
如图所示,这种情况下当进入新水体时,你需要单独处理当前到底使用哪个水体信息,尤其是我们的需求中有漂浮和潜水两种状态
PhysWading 入水过渡
在Walking和Falling碰到水体但是还没有满足进入水体时,博主将其作为“涉水状态”,提供对应的降速动力学(我们在此只计算速度,并不计算位移。防止影响主更新逻辑)
同时处理Walking蹲伏状态下的涉水(涉及到游泳检查点)
同时对Falling和Walking两种状态提供二阶摩檫力方程,用于计算减速度(Falling状态下减速,且根据最末速度判定是否直接进入水下(如果允许),否则进入漂浮)
void UEnhancedCharacterMovementComponent::PhysWalking(float deltaTime, int32 Iterations)
{
	Super::PhysWalking(deltaTime, Iterations);

	//附加处理过度状态
	if (bIsInWaterBody && CurrentInWaterBody)
	{
		PhysWading(deltaTime,MOVE_Walking);
	}
}

void UEnhancedCharacterMovementComponent::PhysFalling(float deltaTime, int32 Iterations)
{
	Super::PhysFalling(deltaTime, Iterations);

	//附加处理过度状态
	if (bIsInWaterBody && CurrentInWaterBody)
	{
		PhysWading(deltaTime,MOVE_Falling);
	}
}

void UEnhancedCharacterMovementComponent::PhysWading(float DeltaSeconds,EMovementMode Oldmovementmode)
{

	//重做 根据离地高度来计算

	if (!CurrentInWaterBody) return;

	UpdateWaterValues(DeltaSeconds);

	const FVector InWaterPoint = InSwimmingLocation;
	//计算涉水深度 根据表面漂浮点计算
	const FVector OutWaterSurfaceLocation = WaterSurfaceLocation;
	const FVector OutWaterSurfaceNormal = WaterSurfaceNormal;

	//以入水点去更新深度信息
	const FVector Delta = OutWaterSurfaceLocation  - InWaterPoint;
	//入水点到水平面位置的深度
	const float DepthBelowSurface = -FVector::DotProduct(Delta,OutWaterSurfaceNormal);

	//相对于水平面的垂直速度 小于0是下潜 大于0是上升
	const float DivespeedZ = Velocity.Dot(OutWaterSurfaceNormal);

	if (Oldmovementmode == MOVE_Falling)
	{
		FVector FallAcceleration = GetFallingLateralAcceleration(DeltaSeconds);
		const FVector GravityRelativeFallAcceleration = RotateWorldToGravity(FallAcceleration);
		FallAcceleration = RotateGravityToWorld(FVector(GravityRelativeFallAcceleration.X, GravityRelativeFallAcceleration.Y, 0));
		const float MaxDecel = GetMaxBrakingDeceleration();
		TGuardValue<FVector> RestoreAcceleration(Acceleration, FallAcceleration);

		//二阶摩檫力方程
		float Friction = (LinearDragCoefficient / Mass) + (QuadraticDragCoefficient / Mass) * Velocity.Size();
		CalcVelocity(DeltaSeconds, WaterResistanceToVelocity + Friction,  true, MaxDecel);
		//NewFallVelocity(DeltaSeconds, WaterResistance + Friction,  true, MaxDecel)
	}


	if (Oldmovementmode == MOVE_Walking)
	{

		bMovementCanCrouch = true;
		//当步行涉水时拒绝蹲伏的高度
		FVector BottomPoint = GetCapsuleBottomWorldLocation();
		FVector PreCrouchLocation = BottomPoint + UpdatedComponent->GetUpVector() * WadingUnCrouchHalfHeight;
		const FVector PreCrouchDelta = OutWaterSurfaceLocation - PreCrouchLocation;
		const float PreCrouchDepthBelowSurface = -FVector::DotProduct(PreCrouchDelta,OutWaterSurfaceNormal);

		DrawDebugPoint(GetWorld(),BottomPoint,20,FColor::Green);
		DrawDebugPoint(GetWorld(),PreCrouchLocation,20,FColor::Orange);

		if (PreCrouchDepthBelowSurface < InWaterStateDev)
		{
			if (IsCrouching())
			{
				//如果蹲伏状态就取消
				bWantsToCrouch = false;
			}
			else
			{
				//没有蹲伏就禁止蹲伏
				bMovementCanCrouch = false;
				bWantsToCrouch = false;
			}
		}

	}


	if ( !HasAnimRootMotion() && !CurrentRootMotion.HasOverrideVelocity() && !bJustTeleported )
	{
		EEnhancedSwimmingMovementMode PredictedSwimmingSubMode = EEnhancedSwimmingMovementMode::None;
		if (DepthBelowSurface < -InWaterStateDev)
		{

			if (Oldmovementmode == MOVE_Falling)
			{
				if (DivespeedZ < FallingUnderWaterSpeed) //当前速度满足跨状态条件直接进入潜水
				{
					bCanDiving ? PredictedSwimmingSubMode = EEnhancedSwimmingMovementMode::Diving :PredictedSwimmingSubMode = EEnhancedSwimmingMovementMode::Floating ;
				}
				else
				{
					PredictedSwimmingSubMode = EEnhancedSwimmingMovementMode::Floating;
				}
			}

			if (Oldmovementmode == MOVE_Walking)
			{
				PredictedSwimmingSubMode = EEnhancedSwimmingMovementMode::Floating;
			}
			EnterSwimming();
			SetSwimmingSubMode(PredictedSwimmingSubMode);
		}
	}

}
入水检测
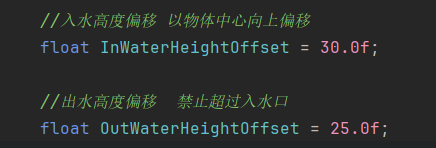
入水检测大体可以分为两种,一种是绑定到角色颈骨,用这个骨骼位置做检测,还有一种就是设定在胶囊体上。使用骨骼实际上会出现问题,特别是角色游泳动画如果是平行于水面游泳时,很容易出现检测错误,为了保证能够同时兼容这两种,我采用了提供入水偏移,以胶囊体中心为中点,进行偏移。不管是采取哪种方式只要在外部计算位置,而我们会检测位置是否到达偏移标准(可以看作深度)
由于Walking状态中具有蹲伏可能会改动原有的游泳检测点位,所以过渡中会提前进行检测是否蹲伏

附加横向碰撞
前边我们提到过,游泳时胶囊体竖直,但是角色模型游泳动作通常都是水平的,因此经常会出现如下这种情况。所以我们要做一个附加碰撞。其功能是提供横向的碰撞。
提供横向的阻挡,以及处理上方可能存在的下压

	//如果开启附加碰撞
	if (bAdditionalSphereCollision)
	{
		FHitResult AddHit = AdditionalSphereCollision();
		if (AddHit.Time < 1.f)
		{
			FVector MoveRollback = PreMoveLocation - UpdatedComponent->GetComponentLocation();

			//MoveRollback = FVector(MoveRollback.X, MoveRollback.Y,0); //取消在漂浮状态下对向上的挤压
			//回退到合法位置重新检测
			SafeMoveUpdatedComponent(MoveRollback, UpdatedComponent->GetComponentQuat(), false, Hit);
			HandleImpact(Hit, deltaTime, Adjusted);

			SlideAlongAddCollisionTraceSurface(Adjusted, AddHit, deltaTime);

			float DotUp = FVector::DotProduct(AddHit.ImpactNormal, -OutWaterSurfaceNormal); // 与上方向的对比
			if (DotUp > 0.6f) // 明确是从上方压下来的
			{
				SetSwimmingSubMode(EEnhancedSwimmingMovementMode::Diving);
			}

		}
	}
PhysFloating
上方我们提到过,游泳被分为了两种子模式,其中速度的计算是不同的。漂浮模式下,我们定义一个漂浮点,同时使漂浮点与水面位置吻合,并且将速度投影到水面。同时要提供插值
void UEnhancedCharacterMovementComponent::PhysFloating(float deltaTime)
{
	const FVector OutWaterSurfaceLocation = WaterSurfaceLocation;
	const FVector OutWaterSurfaceNormal = WaterSurfaceNormal;
	const FVector OldLocation = UpdatedComponent->GetComponentLocation();

	// 1. 投影角色当前速度到水面上,仅保留水面上的分量
	const FVector ProjectedVelocity = FVector::VectorPlaneProject(Velocity, OutWaterSurfaceNormal);
	const FVector Adjusted = ProjectedVelocity * deltaTime;
	const FVector TargetLocation = OldLocation + Adjusted;

	// 2. 将目标位置投影回水面,贴合表面
	const FVector FlattenedTargetLocation = FVector::PointPlaneProject(TargetLocation, OutWaterSurfaceLocation, OutWaterSurfaceNormal) - OutWaterSurfaceNormal * InWaterHeightOffset;

	// --- A. 方式1:瞬移式贴合水面 ---
	bool bUseLerpHeight = true; // 切换是否启用Lerp插值浮动
	FVector FinalDelta;

	if (!bUseLerpHeight)
	{
		FinalDelta = FlattenedTargetLocation - OldLocation;
	}
	else
	{
		// --- B. 方式2:Lerp插值贴合水面 ---
		FVector HorizontalTarget = OldLocation + Adjusted;
		FVector SurfaceTarget = FVector::PointPlaneProject(HorizontalTarget, OutWaterSurfaceLocation, OutWaterSurfaceNormal) - OutWaterSurfaceNormal * InWaterHeightOffset;

		FVector CurrentToSurface = SurfaceTarget - OldLocation;
		float VerticalDistance = FVector::DotProduct(CurrentToSurface, OutWaterSurfaceNormal);
		float InterpSpeed = 3.0f;
		float DeltaHeight = FMath::FInterpTo(0.0f, VerticalDistance, deltaTime, InterpSpeed);
		FVector SmoothedVertical = OutWaterSurfaceNormal * DeltaHeight;

		FinalDelta = Adjusted + SmoothedVertical;
	}

	FVector PreMoveLocation = UpdatedComponent->GetComponentLocation();

	// 最终移动
	FHitResult Hit(1.f);
	SafeMoveUpdatedComponent(FinalDelta, UpdatedComponent->GetComponentQuat(), true, Hit);

	// If Hit.Time >= 1.f, didn't hit anything.
	if (Hit.Time < 1.f)
	{
		//如果是上方受到的阻挡 那么返回潜水模式
		FVector HitDir = Hit.ImpactNormal;
		float DotUp = FVector::DotProduct(HitDir, -OutWaterSurfaceNormal); // 与上方向的对比
		if (DotUp > 0.6f) // 明确是从上方压下来的(阈值可调)
		{
			SetSwimmingSubMode(EEnhancedSwimmingMovementMode::Diving);
		}

		HandleImpact(Hit, deltaTime, Adjusted);

		SlideAlongSurface(Adjusted, (1.f - Hit.Time), Hit.Normal, Hit, true);

		//漂浮状态下如果受到来自下方的阻挡 撤回移动
	}

	//如果开启附加碰撞
	if (bAdditionalSphereCollision)
	{
		FHitResult AddHit = AdditionalSphereCollision();
		if (AddHit.Time < 1.f)
		{
			FVector MoveRollback = PreMoveLocation - UpdatedComponent->GetComponentLocation();

			//MoveRollback = FVector(MoveRollback.X, MoveRollback.Y,0); //取消在漂浮状态下对向上的挤压
			//回退到合法位置重新检测
			SafeMoveUpdatedComponent(MoveRollback, UpdatedComponent->GetComponentQuat(), false, Hit);
			HandleImpact(Hit, deltaTime, Adjusted);

			SlideAlongAddCollisionTraceSurface(Adjusted, AddHit, deltaTime);

			float DotUp = FVector::DotProduct(AddHit.ImpactNormal, -OutWaterSurfaceNormal); // 与上方向的对比
			if (DotUp > 0.6f) // 明确是从上方压下来的(阈值可调)
			{
				SetSwimmingSubMode(EEnhancedSwimmingMovementMode::Diving);
			}

		}
	}

}
PhysDiving
而在潜水模式中,我们只需要考虑实现一个近乎自由的移动即可,与Flying高度类似
void UEnhancedCharacterMovementComponent::PhysDiving(float deltaTime)
{
	FVector OldLocation = UpdatedComponent->GetComponentLocation();
	const FVector Adjusted = Velocity * deltaTime;
	FHitResult Hit(1.f);
	SafeMoveUpdatedComponent(Adjusted, UpdatedComponent->GetComponentQuat(), true, Hit);

	//附加碰撞

	if (bAdditionalSphereCollision)
	{
		FHitResult AddHit = AdditionalSphereCollision();
		if (AddHit.Time < 1.f)
		{
			FVector MoveRollback = OldLocation - UpdatedComponent->GetComponentLocation();
			//回退到合法位置重新检测
			SafeMoveUpdatedComponent(MoveRollback, UpdatedComponent->GetComponentQuat(), false, Hit);
			HandleImpact(Hit, deltaTime, Adjusted);
			SlideAlongAddCollisionTraceSurface(Adjusted, AddHit, deltaTime);
		}

	}

	if (Hit.Time < 1.f)
	{
		// Handles blocking/physics interaction.
		HandleImpact(Hit, deltaTime, Adjusted);

		// Slides along collision. Specially important for climbing to feel good.
		SlideAlongSurface(Adjusted, (1.f - Hit.Time), Hit.Normal, Hit, true);

	}

}
TryExitSwimming
尝试退出游泳,这是处理游泳退出到不同模式中的函数。
	if ( !HasAnimRootMotion() && !CurrentRootMotion.HasOverrideVelocity() && !bJustTeleported )
	{
		//首先想到就是出水位置高于水平面

		//判断现实状态 计算当前状态下的深度信息
		const FVector OutWaterPoint = OutSwimmingLocation;
		FVector OutWaterSurfaceLocation = WaterSurfaceLocation;
		FVector OutWaterSurfaceNormal = WaterSurfaceNormal;

		const FVector Delta = OutWaterSurfaceLocation - OutWaterPoint;
		float DepthBelowSurface = -FVector::DotProduct(Delta,OutWaterSurfaceNormal);

		//UE_LOG(LogTemp, Warning, TEXT("DepthBelowSurface %f"),DepthBelowSurface);
		if (DepthBelowSurface >InWaterStateDev)
		{
			return true;
		}

	}
	return false;
浅水区

因为我们前方缩减了胶囊体的高度,所以如果在此直接走出水体(出水检测),那么胶囊体会突然回复原来大小并且有突兀的摄像机抖动(因为胶囊体基准被抬高了),
所以在临近浅水区我们会向下检测一个原有胶囊体高度,当满足误差时会直接回复胶囊体并且退出水体到步行
崖壁
同时我们还有可能利用翻越离开游泳状态,这些都需要根据项目原本的思路做合理的处理,本文就不再列举详细代码
合并网络
因为目前我们只做前期的框架,因此简单搭建网络做测试即可,
最终表现
攀岩表现(由于现在没有装动画,所以无法触发翻越,仅展示攀岩):

水体测试:


 浙公网安备 33010602011771号