
mysql基础
MySQL
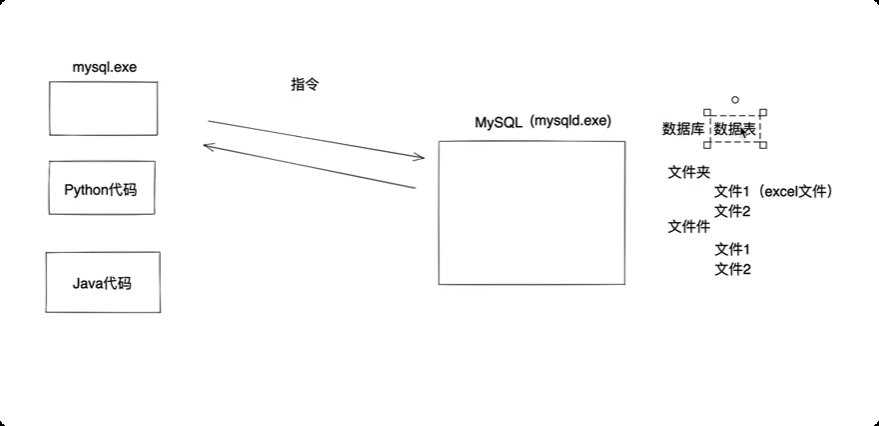
mysql , 软件, 帮助我们实现对电脑上文件/文件夹进行管理
1.安装&配置&启动
从官方网站下载mysql 安装包,安装完成后, 会在后台启动一个 mysqld 的服务
在安装目录下的 bin 目录下有一个 mysqld.exe 和 mysql .exe
比如 : C:\Program Files\MySQL\MySQL Server 8.0\bin
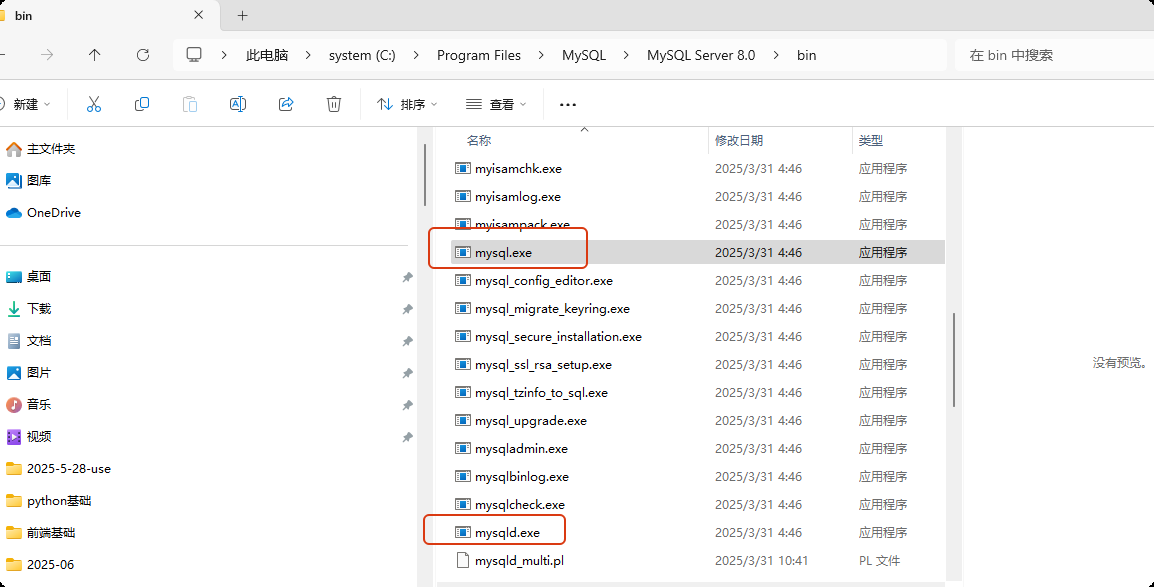
mysqld.exe 是mysql 的服务应用, mysql.exe 是 mysql 自带的一个 连接 mysql 服务的 客户端
可以使用 mysql.exe 的绝对路径 加一些参数 连接mysql, 例如:
"C:\Program Files\MySQL\MySQL Server 8.0\bin\mysql.exe" -h 127.0.0.1 -P 3306 -u root -p

然后输入密码

也可以将 mysql 安装目录的bin 文件夹加入到环境变量中, 以后可以直接使用
mysql -h 127.0.0.1 -p 3306 -u root -p 登录
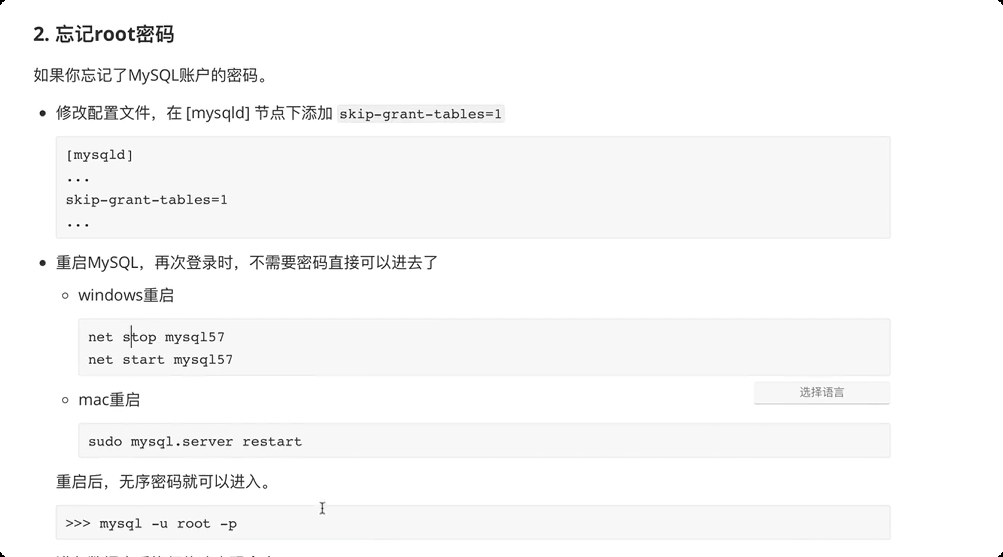
2.关于密码


3.数据库管理

通过 python 代码发送请求并让MySQL帮助我们对数据库进行操作。
pip install pymysql
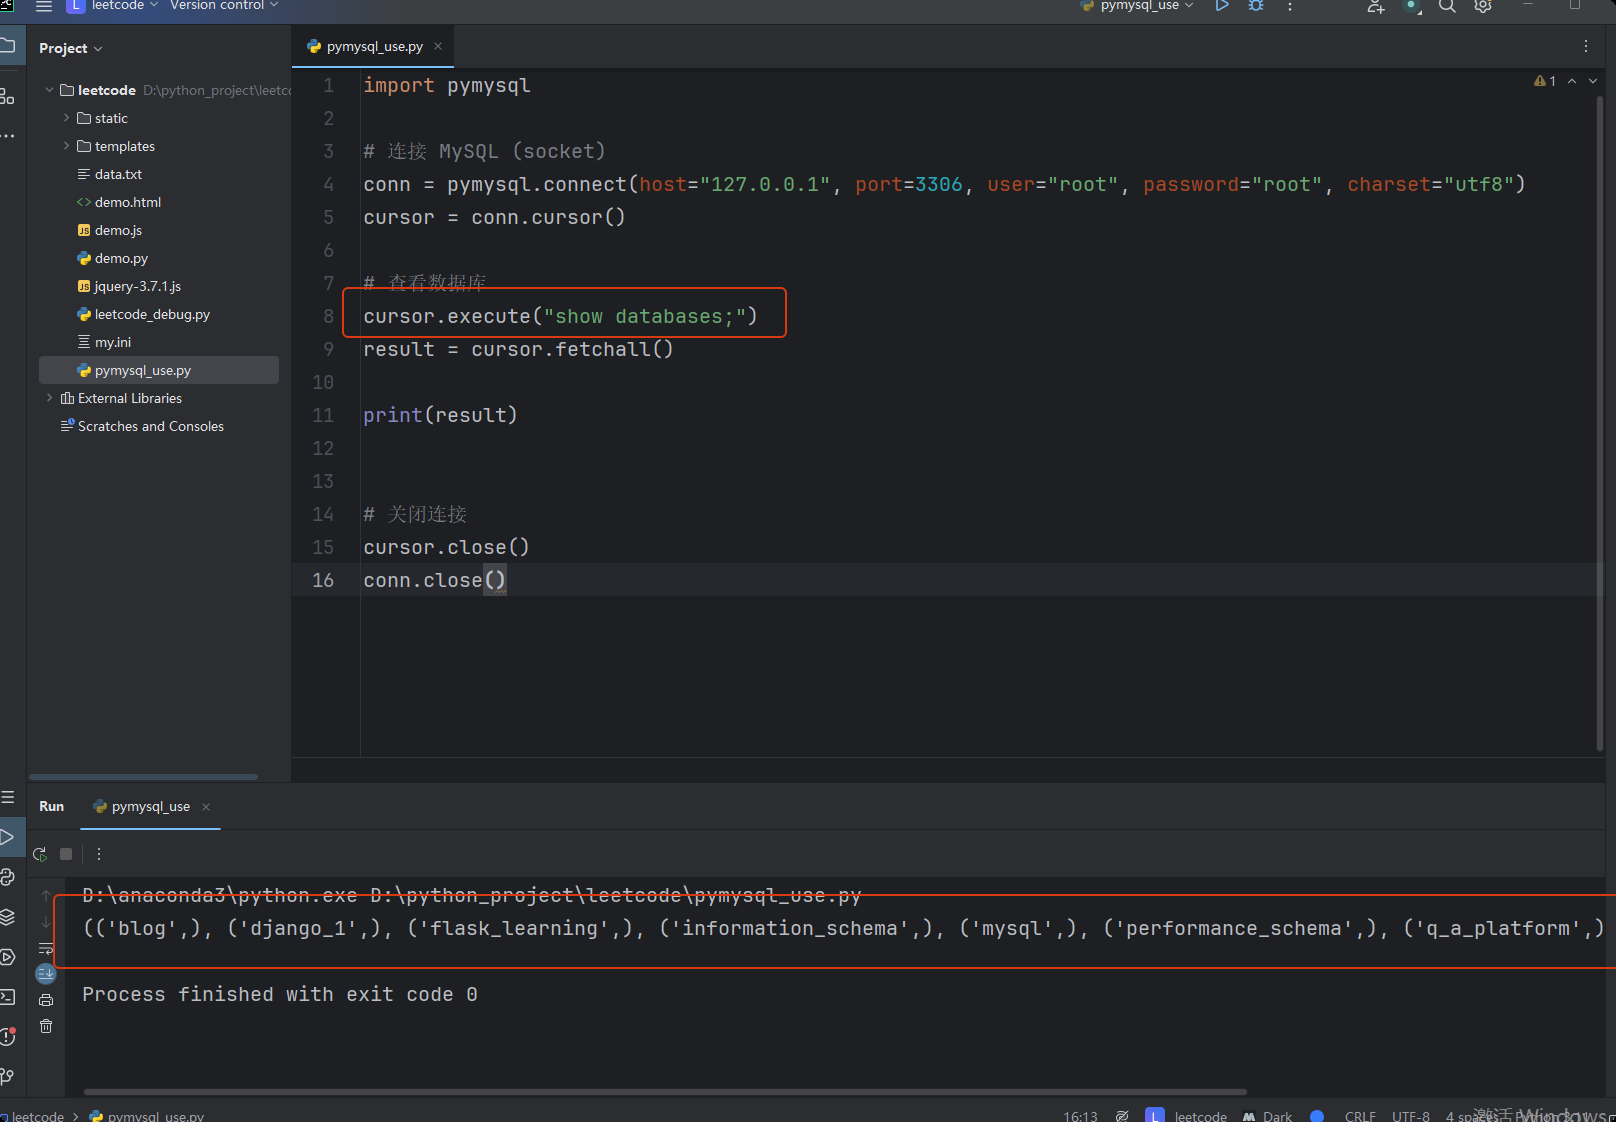
import pymysql
# 连接 MySQL (socket)
conn = pymysql.connect(host="127.0.0.1", port=3306, user="root", password="root", charset="utf8")
cursor = conn.cursor()
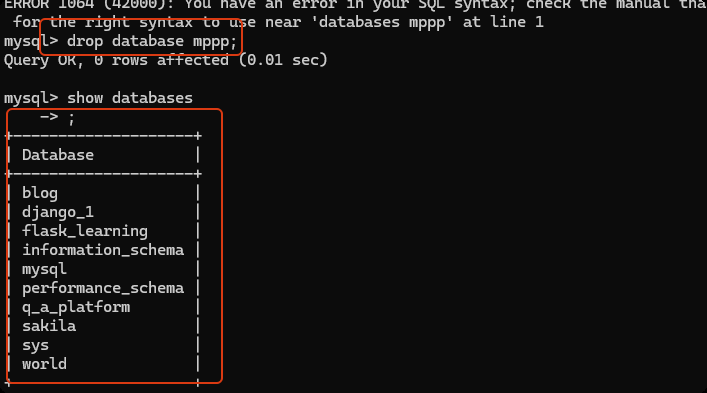
# 查看数据库
cursor.execute("show databases;")
result = cursor.fetchall()
print(result)
# 关闭连接
cursor.close()
conn.close()
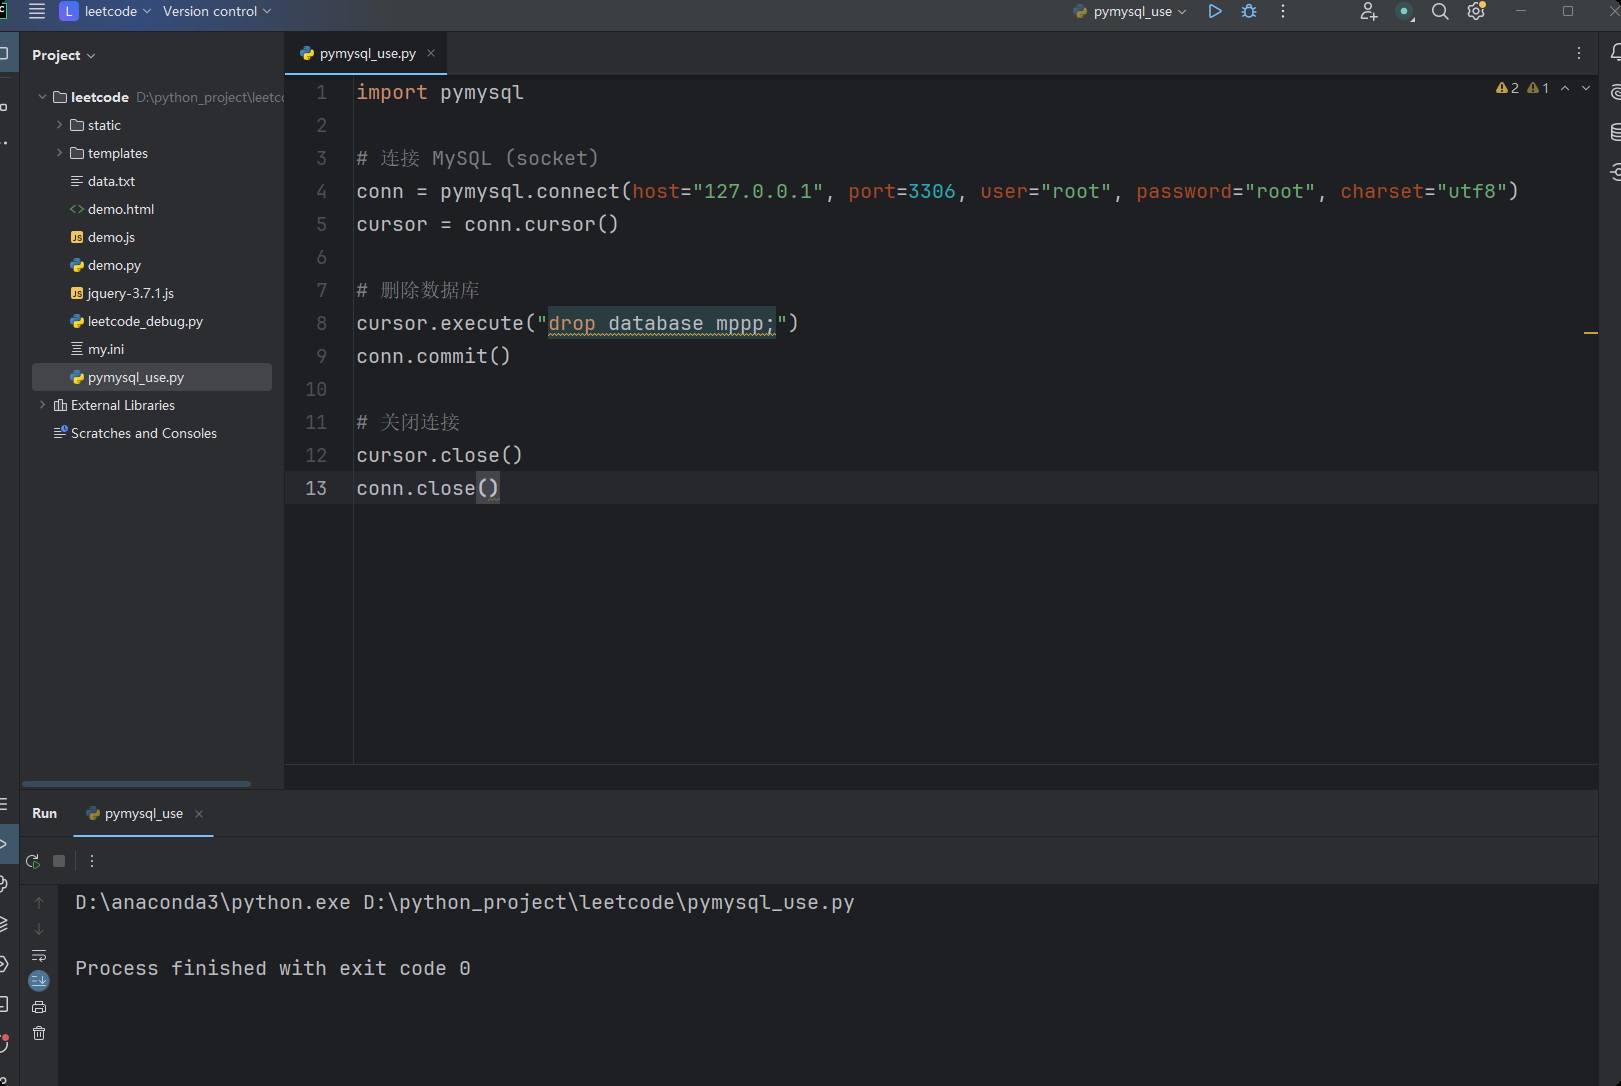
import pymysql

# 连接 MySQL (socket)
conn = pymysql.connect(host="127.0.0.1", port=3306, user="root", password="root", charset="utf8")
cursor = conn.cursor()

# 删除数据库
cursor.execute("drop database mppp;")
conn.commit()

# 关闭连接
cursor.close()
conn.close()
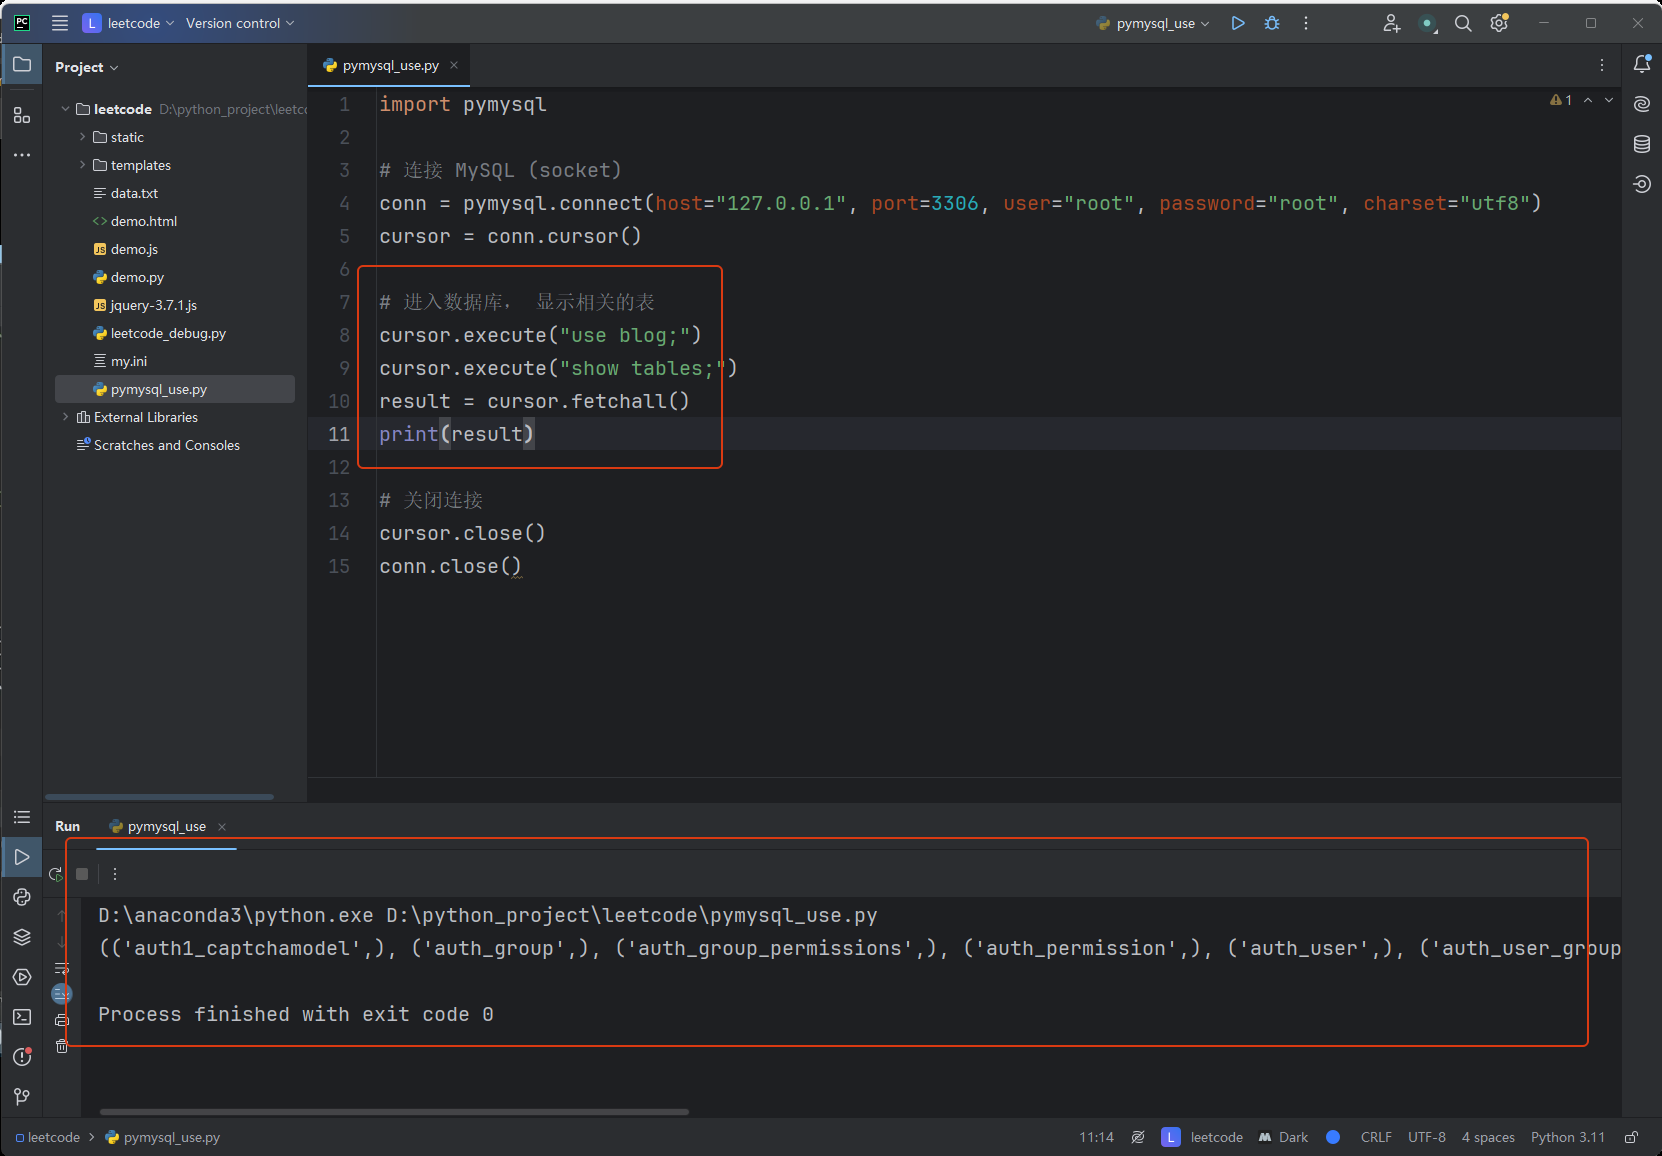
import pymysql
# 连接 MySQL (socket)
conn = pymysql.connect(host="127.0.0.1", port=3306, user="root", password="root", charset="utf8")
cursor = conn.cursor()
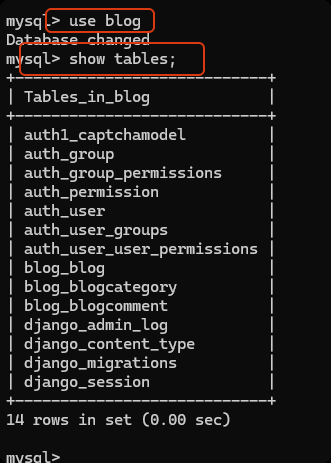
# 进入数据库, 显示相关的表
cursor.execute("use blog;")
cursor.execute("show tables;")
result = cursor.fetchall()
print(result)
# 关闭连接
cursor.close()
conn.close()
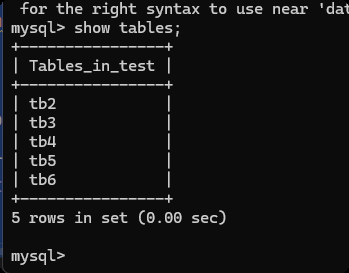
4.数据表管理
- 进入数据库
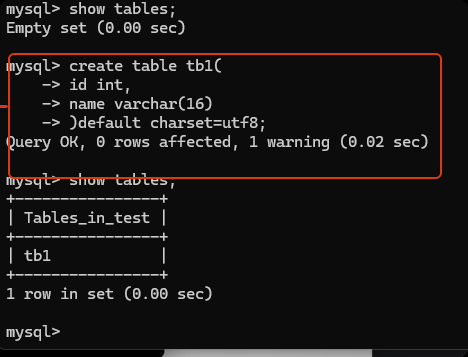
user 数据库名称; - 查看当前所有的数据表:
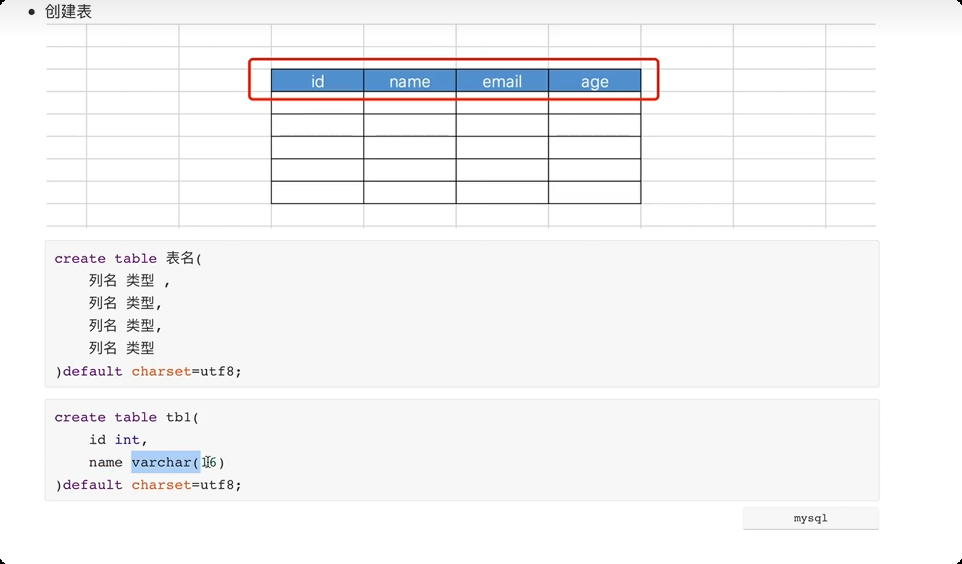
show tables; - 创建数据表
create table 表名(
    列名 类型,
    列名 类型,
    列名 类型,
    列名 类型
)default charset=utf8;
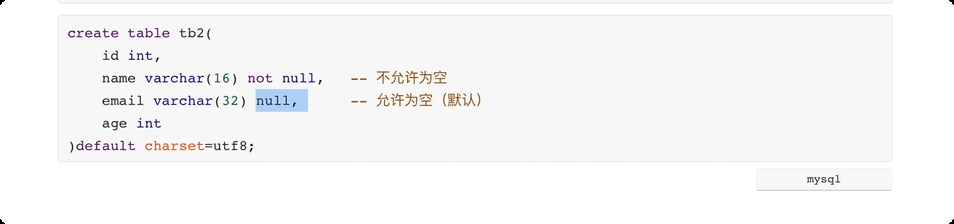
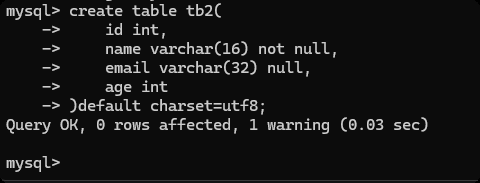
create table tb2(
    id int,
    name varchar(16) not null, -- 不允许为空
    email varchar(32) null,    -- 允许为空(默认)
    age int
)default charset=utf8;
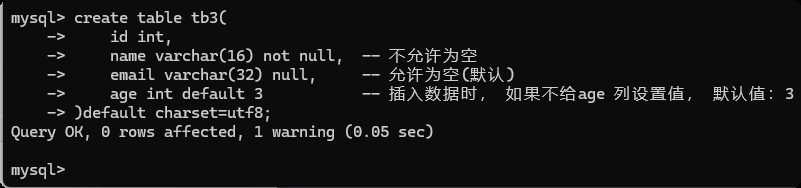
create table tb3(
    id int,
    name varchar(16) not null,  -- 不允许为空
    email varchar(32) null,     -- 允许为空(默认)
    age int default 3           -- 插入数据时, 如果不给age 列设置值, 默认值:3
)default charset=utf8;

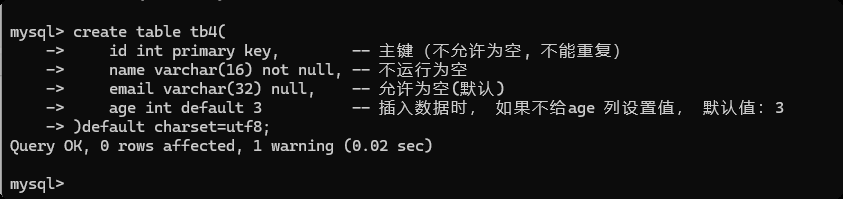
create table tb4(
    id int primary key,        -- 主键(不允许为空, 不能重复)
    name varchar(16) not null, -- 不运行为空
    email varchar(32) null,    -- 允许为空(默认)
    age int default 3          -- 插入数据时, 如果不给age 列设置值, 默认值:3
)default charset=utf8;
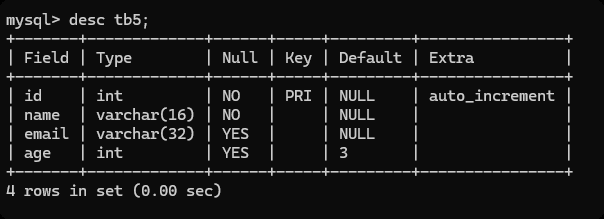
create table tb5(
    id int not null auto_increment primary key,   -- 不运行为空& 主键 & 自增
    name varchar(16) not null,                    -- 不运行为空
    email varchar(32) null,                       -- 允许为空(默认)
    age int default 3                             -- 插入数据时, 如果不给age列设置值, 默认:3
)default charset=utf8;

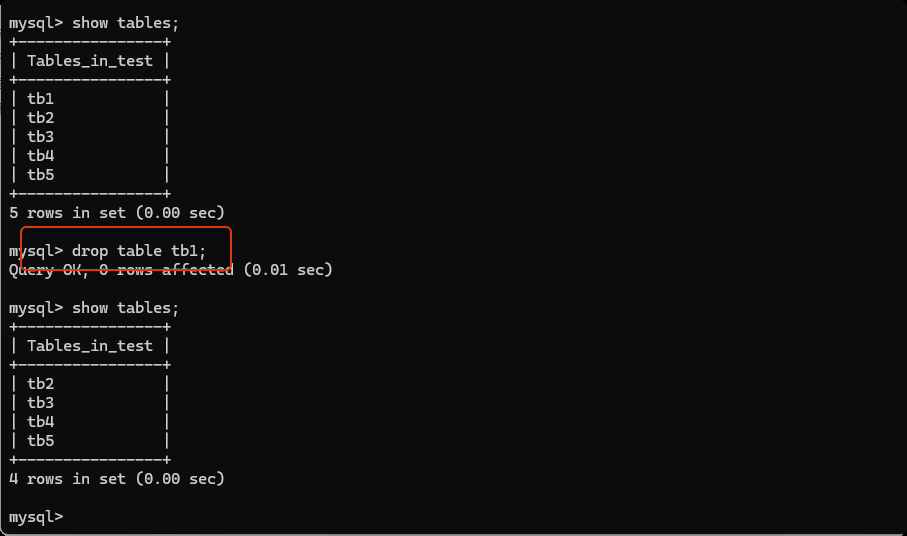
删除数据表
drop table 表名;
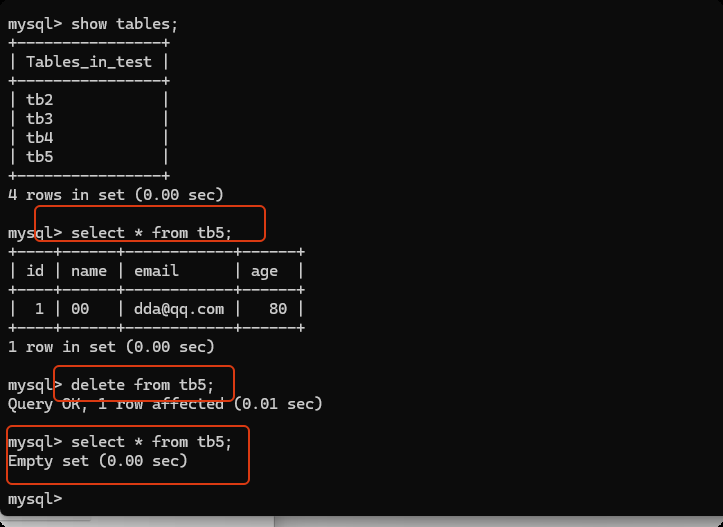
清空表
delete from 表名;
truncate table 表名;   --(速度快, 无法回滚撤销等)
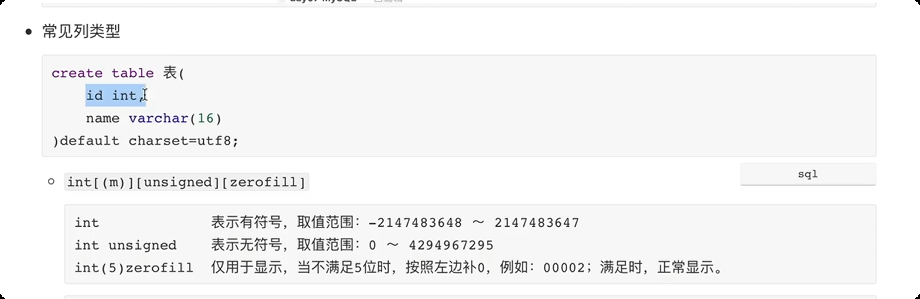
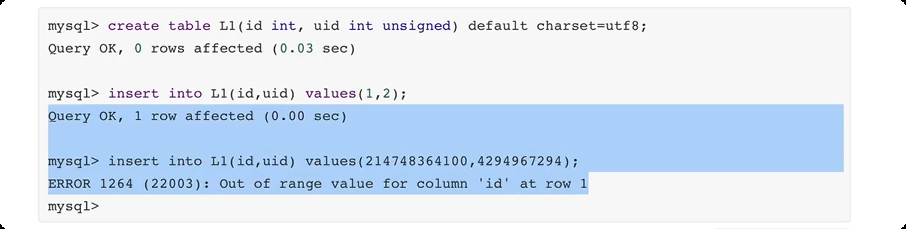
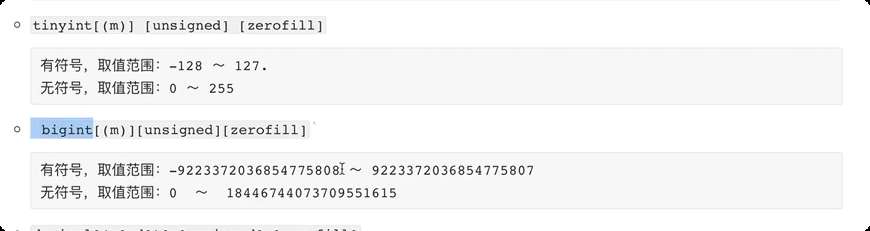
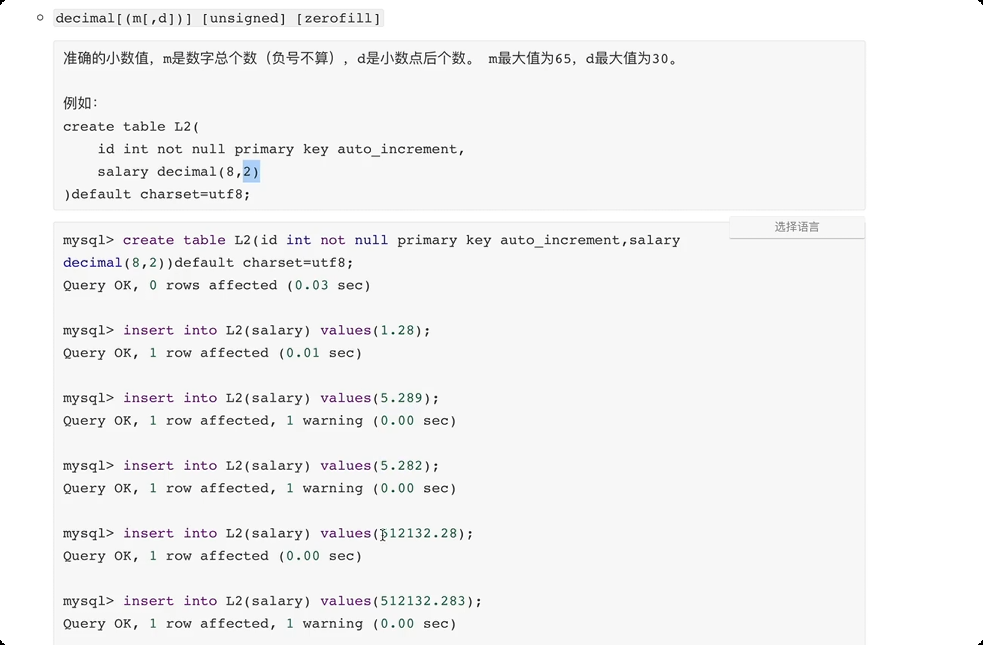
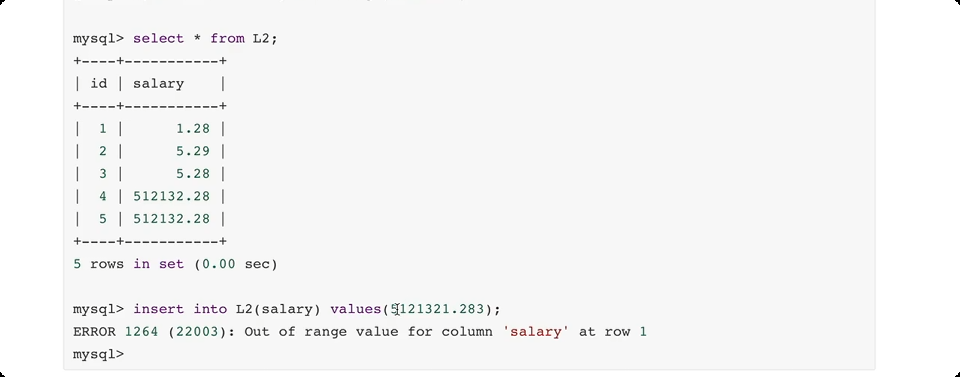
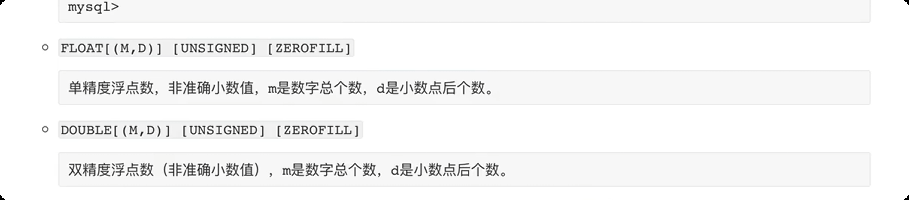
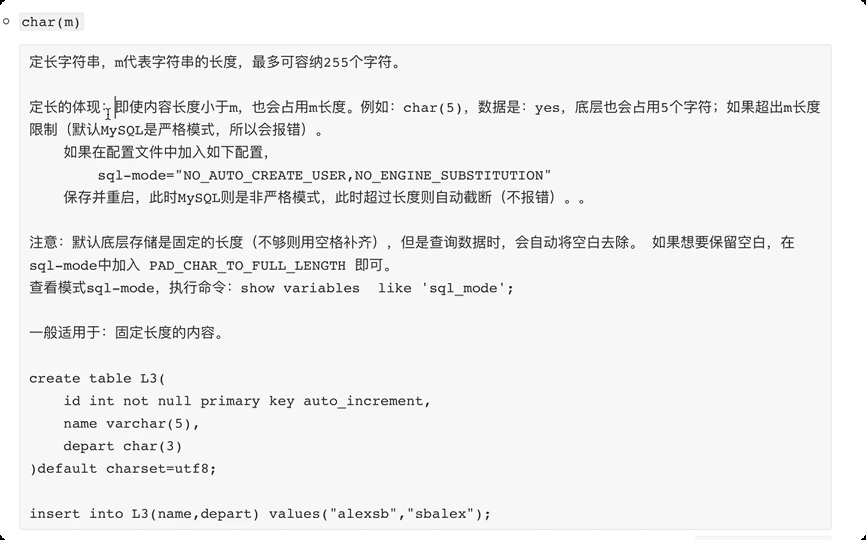
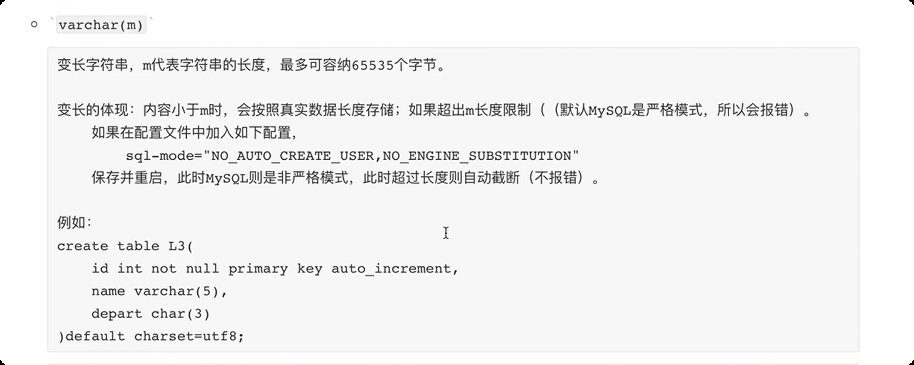
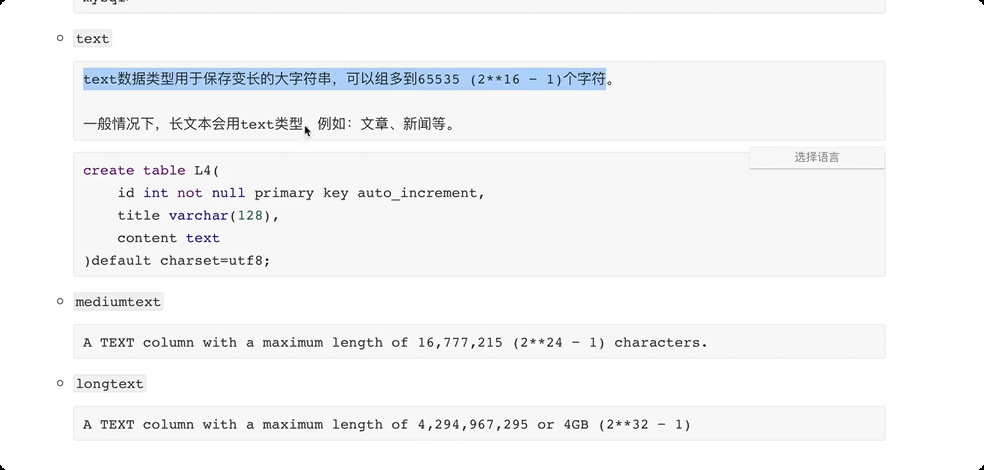
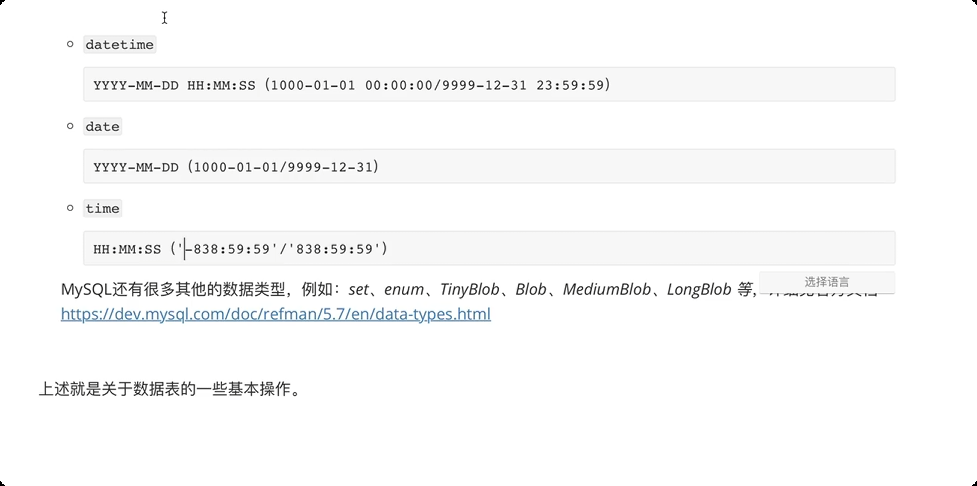
常见数据类型

通过python 代码对数据表进行操作
# 创建数据表
import pymysql

# 连接 MySQL (socket)
conn = pymysql.connect(host="127.0.0.1", port=3306, user="root", password="root", charset="utf8", db="test")
cursor = conn.cursor()

# 创建表
sql = """
create table tb6(
    id int not null auto_increment primary key,
    name varchar(16) not null,
    email varchar(32) null,
    age int default 3
)default charset=utf8;
"""

cursor.execute(sql)
result = cursor.fetchall()
print(result)

# 关闭连接
cursor.close()
conn.close()
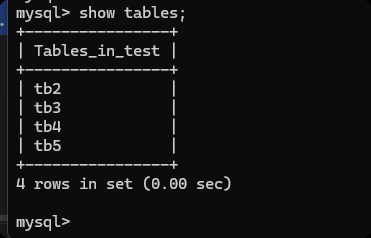
删除表
import pymysql

# 连接 MySQL (socket)
conn = pymysql.connect(host="127.0.0.1", port=3306, user="root", password="root", charset="utf8", db="test")
cursor = conn.cursor()

# 删除表
sql = "drop table tb6;"
cursor.execute(sql)
result = cursor.fetchall()
print(result)

# 关闭连接
cursor.close()
conn.close()
清空表
import pymysql

# 连接 MySQL (socket)
conn = pymysql.connect(host="127.0.0.1", port=3306, user="root", password="root", charset="utf8", db="test")
cursor = conn.cursor()

# 清空表
sql = "delete from tb5;"
cursor.execute(sql)
result = cursor.fetchall()
print(result)

# 关闭连接
cursor.close()
conn.close()
5.数据行管理
新增 根据表结构添加相关的数据
desc 表名 -- 显示数据库的表结构
-- 添加一条数据
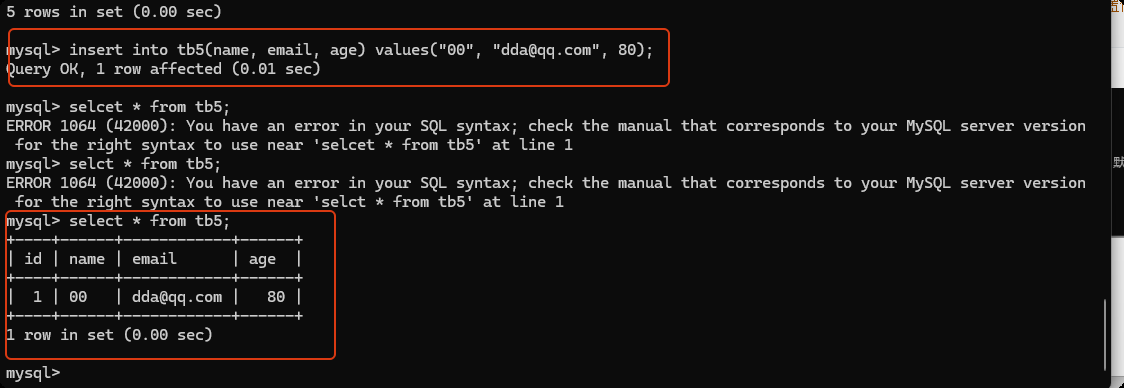
insert into tb5(name, email, age) values('x', 'x', 19); -- 添加数据
-- 添加多条数据
insert into tb5(name, email, age) values("xx", "xxx", 20), ("oo", "99@qq.com", 20), ("mpp", "77@qq.com",38);
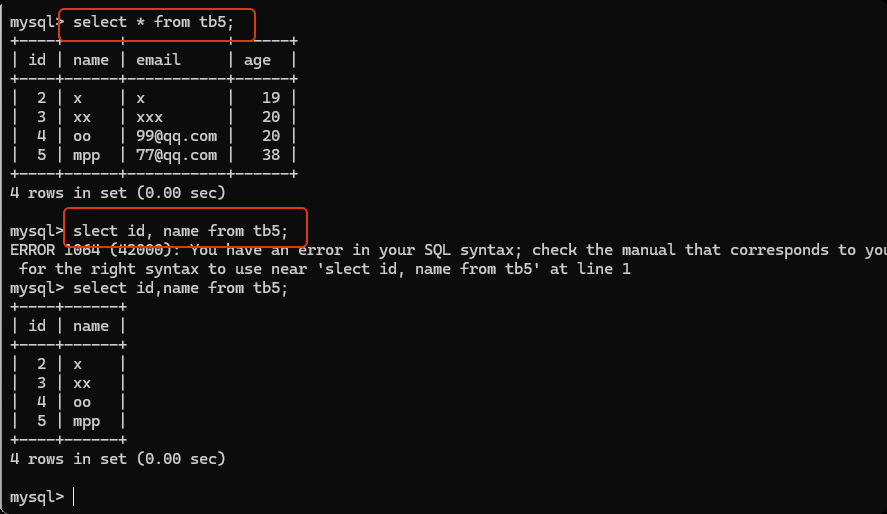
查看
-- select * from 数据表名    查看数据表中的所有数据
select * from tb5;

-- 查看 指定列的内容
select id, name from tb5;
查询数据时增加筛选条件
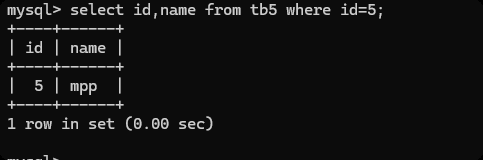
select id,name from tb5 where id=5;
select id,name from tb5 where id>1;
select id,name from tb5 where age=38;
select * from tb5 id>1 and age=30;
删除
delete from tb5 where id=2;
修改
update tb5 set age=10;   -- 把数据表的age 列所有的值都变成10了

update tb5 set age=20 where id=3;   -- 加条件, 设置id=3 的数据行的 age 为20

update tb5 set name="aaa", email="1312@qq.com" where id=3;
在python 代码中对数据行进行操作
import pymysql

# 连接 MySQL (socket)
conn = pymysql.connect(host="127.0.0.1", port=3306, user="root", password="root", charset="utf8", db="test")
cursor = conn.cursor()

# 删除数据
sql = "insert into tb5(name, email, age) values('mpp', 'ii', 50);"
cursor.execute(sql)
conn.commit()


# 关闭连接
cursor.close()
conn.close()
删除
import pymysql

# 连接 MySQL (socket)
conn = pymysql.connect(host="127.0.0.1", port=3306, user="root", password="root", charset="utf8", db="test")
cursor = conn.cursor()

# 新增数据
sql = "delete from tb5 where id=4;"
cursor.execute(sql)
conn.commit()


# 关闭连接
cursor.close()
conn.close()
更新
import pymysql

# 连接 MySQL (socket)
conn = pymysql.connect(host="127.0.0.1", port=3306, user="root", password="root", charset="utf8", db="test")
cursor = conn.cursor()

# 更新数据
sql = "update tb5 set age=25 where id=5;"
cursor.execute(sql)
conn.commit()


# 关闭连接
cursor.close()
conn.close()
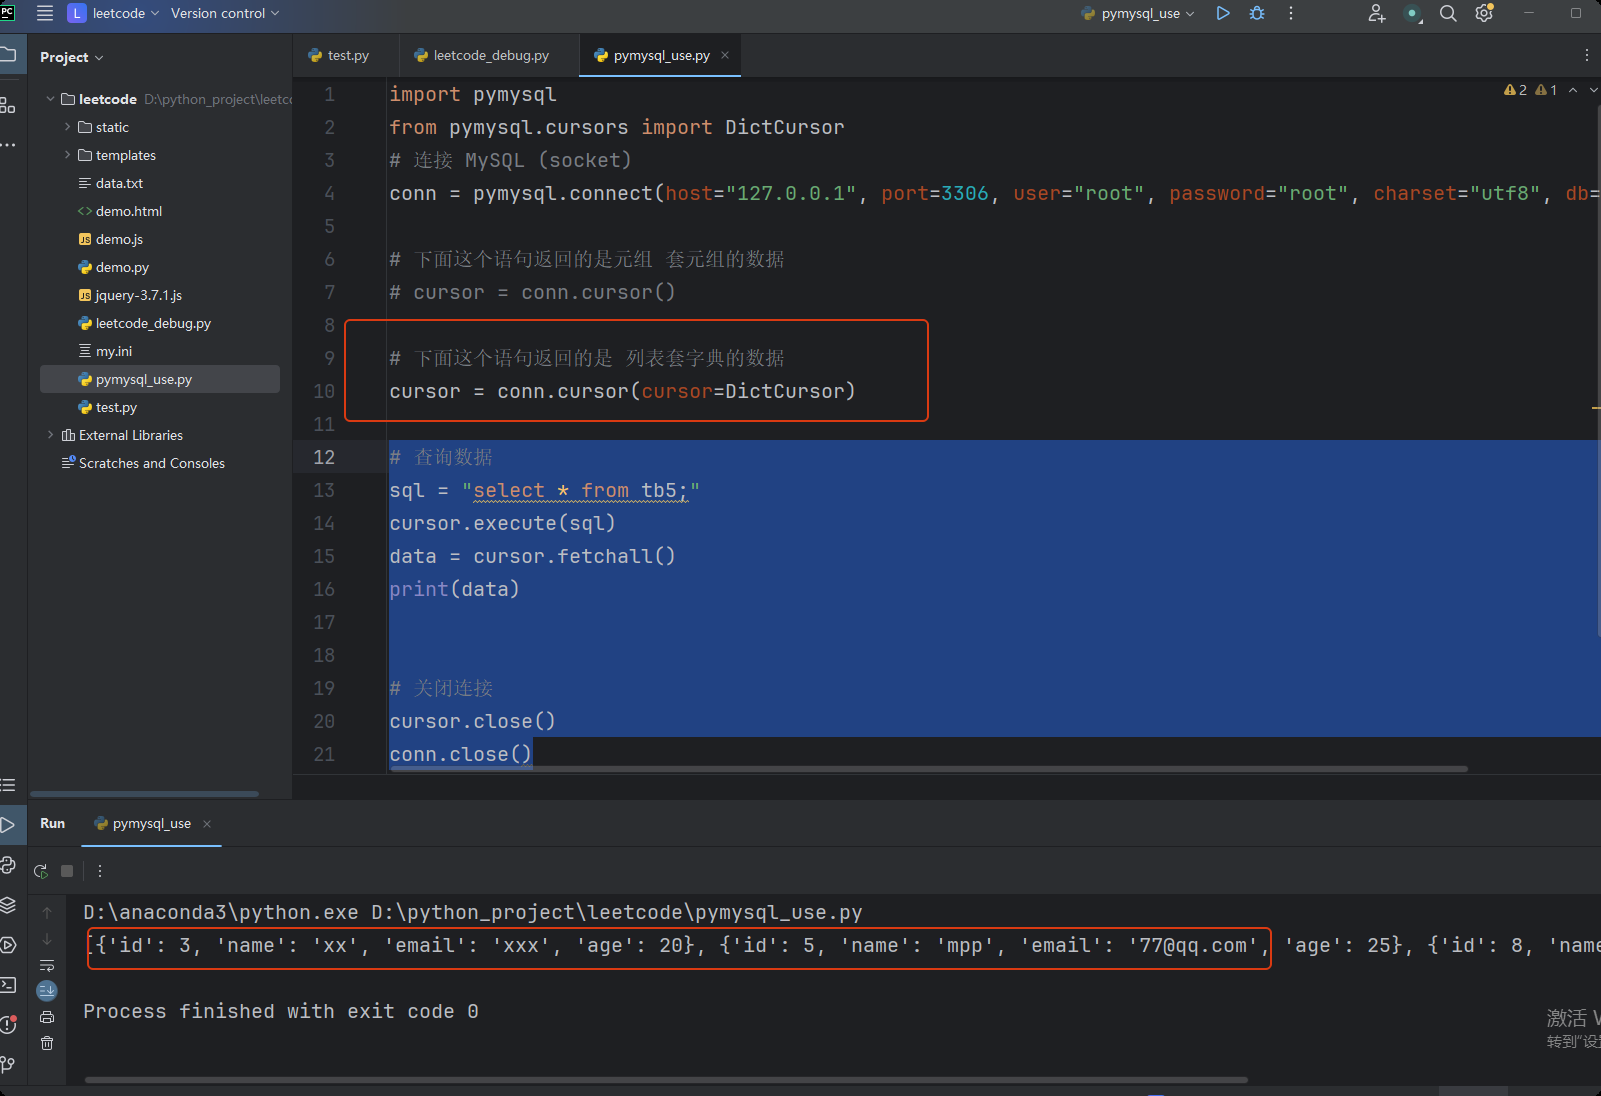
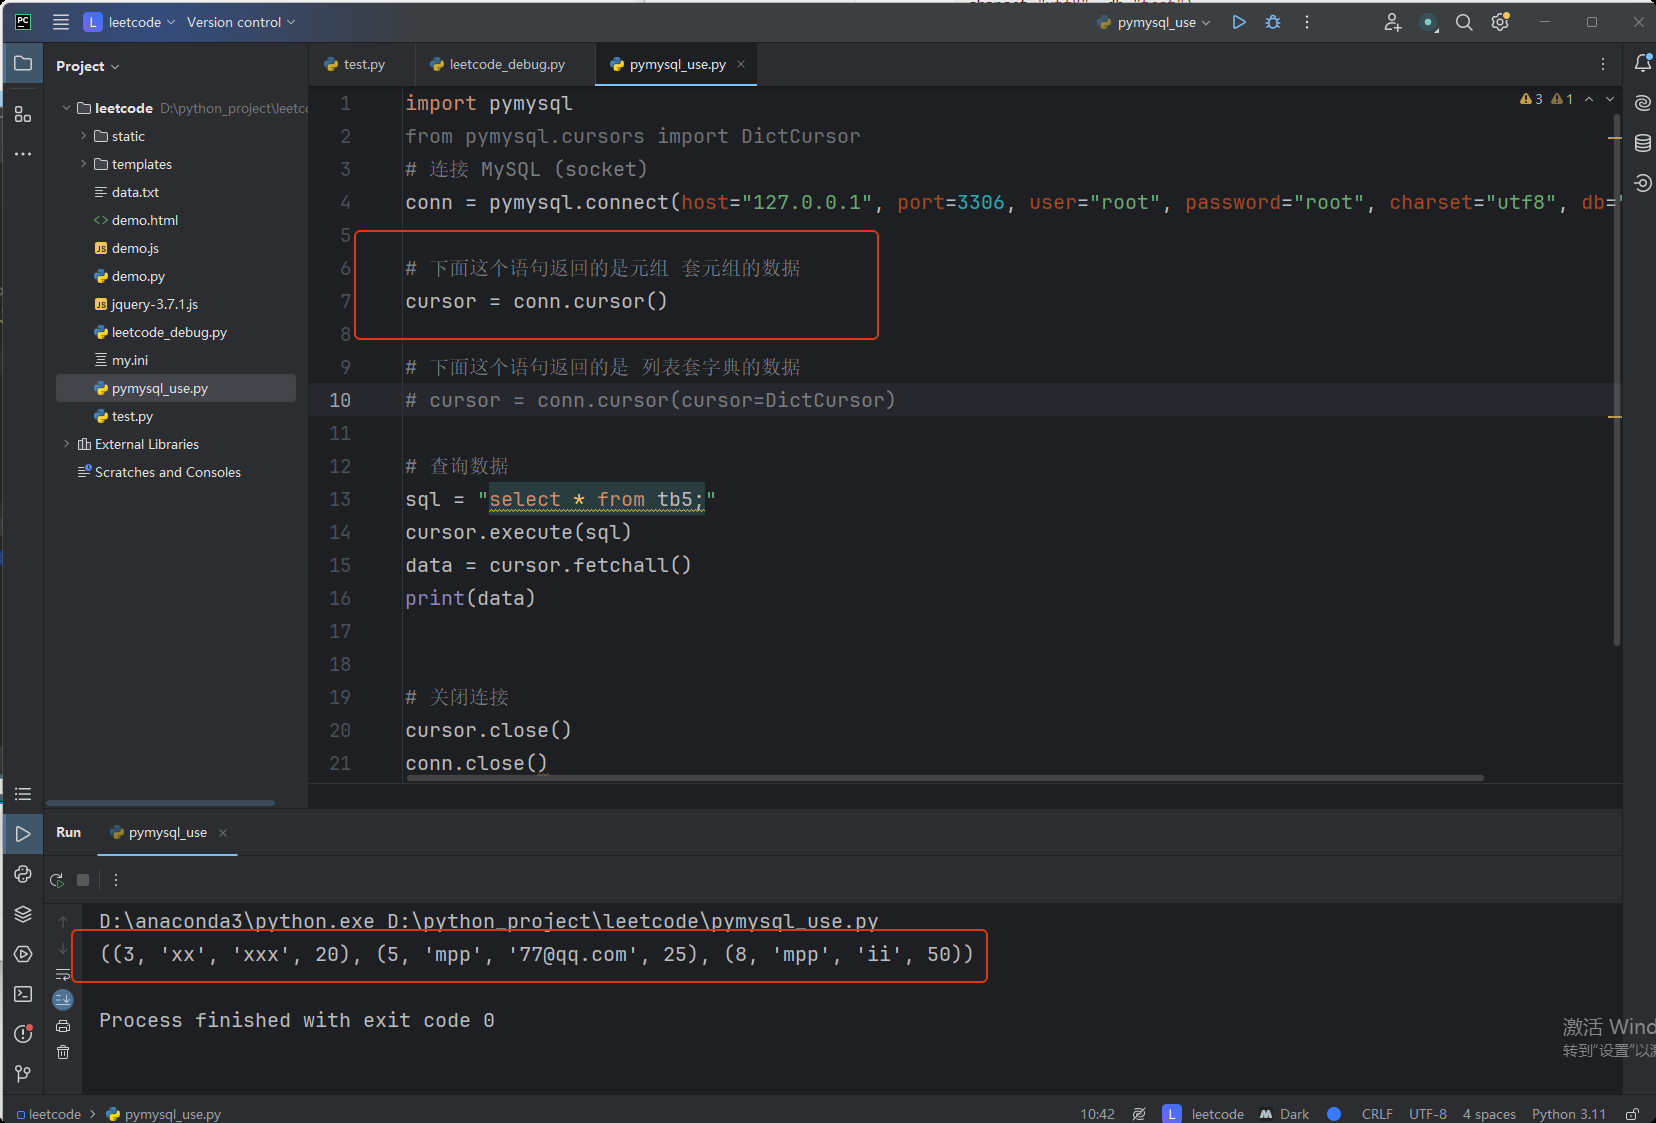
import pymysql
from pymysql.cursors import DictCursor
# 连接 MySQL (socket)
conn = pymysql.connect(host="127.0.0.1", port=3306, user="root", password="root", charset="utf8", db="test")

# 下面这个语句返回的是元组 套元组的数据
cursor = conn.cursor()

# 下面这个语句返回的是 列表套字典的数据
# cursor = conn.cursor(cursor=DictCursor)

# 查询数据
sql = "select * from tb5;"
cursor.execute(sql)
data = cursor.fetchall()

# data = cursor.fetchone()    # 获取第一条数据
print(data)


# 关闭连接
cursor.close()
conn.close()
6.小案例
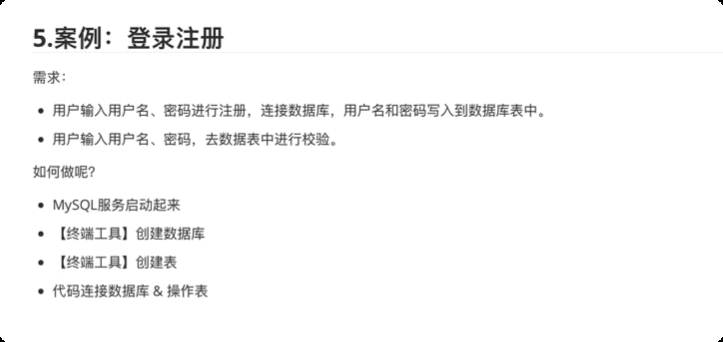
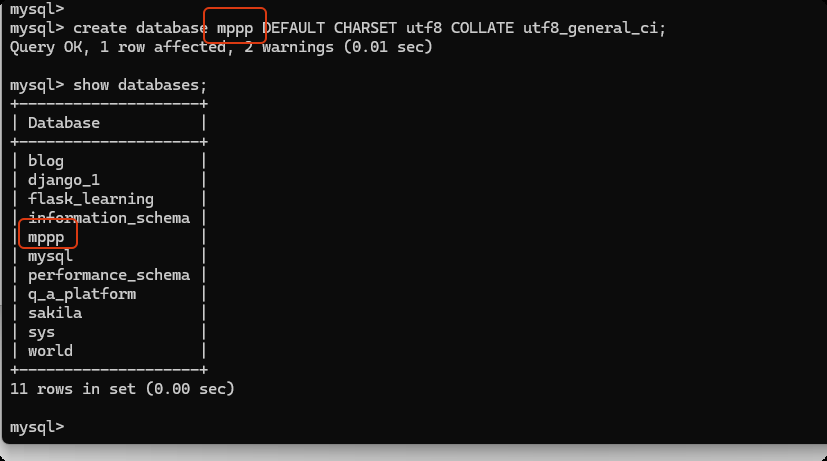
创建数据库
create database user DEFAULT CHARSET utf8 COLLATE utf8_general_ci;

创建数据表
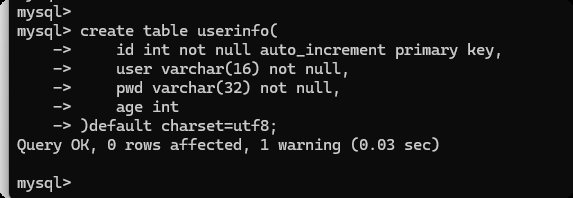
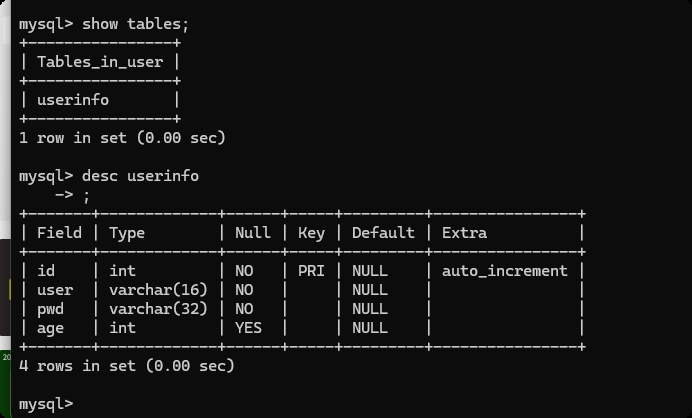
create table userinfo(
    id int not null auto_increment primary key,
    user varchar(16) not null,
    pwd varchar(32) not null,
    age int
)default charset=utf8;
代码连接数据库 & 操作表
注册
import pymysql
from pymysql.cursors import DictCursor

username = input("用户名:")
password = input("密码:")
age = input("年龄:")


# 连接 MySQL (socket)
conn = pymysql.connect(host="127.0.0.1", port=3306, user="root", password="root", charset="utf8", db="user")

cursor = conn.cursor(cursor=DictCursor)

# 执行 sql 语句
# 注意: SQL 语句不要用之前的字符串格式化来进行操作。 防止sql 注入。

cursor.execute("insert into userinfo(user, pwd, age) values(%s, %s, %s);",[username, password, age])
conn.commit()

# 关闭连接
cursor.close()
conn.close()
登录
import pymysql
from pymysql.cursors import DictCursor

username = input("用户名:")
password = input("密码:")


# 连接 MySQL (socket)
conn = pymysql.connect(host="127.0.0.1", port=3306, user="root", password="root", charset="utf8", db="user")

cursor = conn.cursor(cursor=DictCursor)

# 执行 sql 语句
# 注意: SQL 语句不要用之前的字符串格式化来进行操作。 防止sql 注入。

cursor.execute("select * from userinfo where user=%s and pwd=%s",[username, password])
data = cursor.fetchone()
if data:
    print("登录成功!")
else:
    print("登录失败!")

# 关闭连接
cursor.close()
conn.close()
7.SQL 注入问题
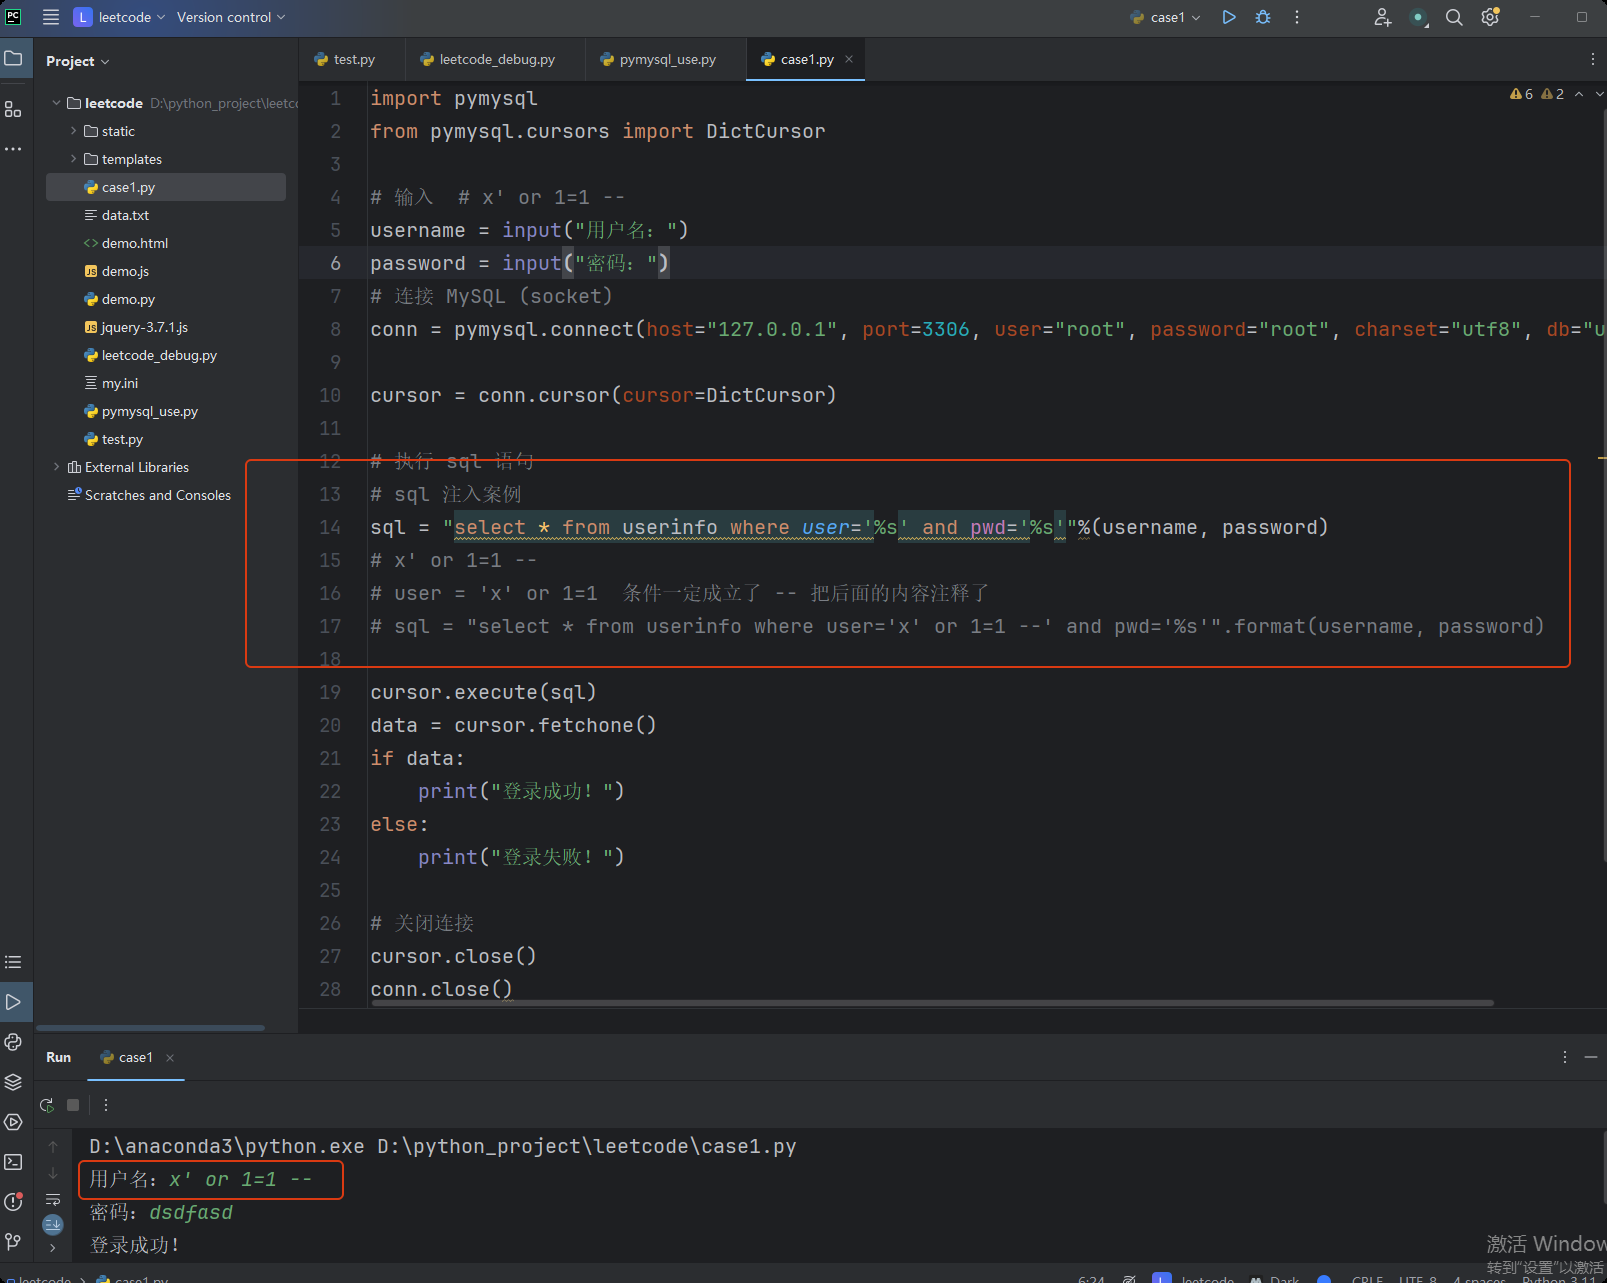
import pymysql
from pymysql.cursors import DictCursor

# 输入  # x' or 1=1 --
username = input("用户名:")
password = input("密码:")
# 连接 MySQL (socket)
conn = pymysql.connect(host="127.0.0.1", port=3306, user="root", password="root", charset="utf8", db="user")

cursor = conn.cursor(cursor=DictCursor)

# 执行 sql 语句
# sql 注入案例
sql = "select * from userinfo where user='%s' and pwd='%s'"%(username, password)
# x' or 1=1 --
# user = 'x' or 1=1  条件一定成立了 -- 把后面的内容注释了
# sql = "select * from userinfo where user='x' or 1=1 --' and pwd='%s'".format(username, password)

cursor.execute(sql)
data = cursor.fetchone()
if data:
    print("登录成功!")
else:
    print("登录失败!")

# 关闭连接
cursor.close()
conn.close()
8.常见SQL-条件
平常开发过程中,经常会使用到的指令(SQL语句)。
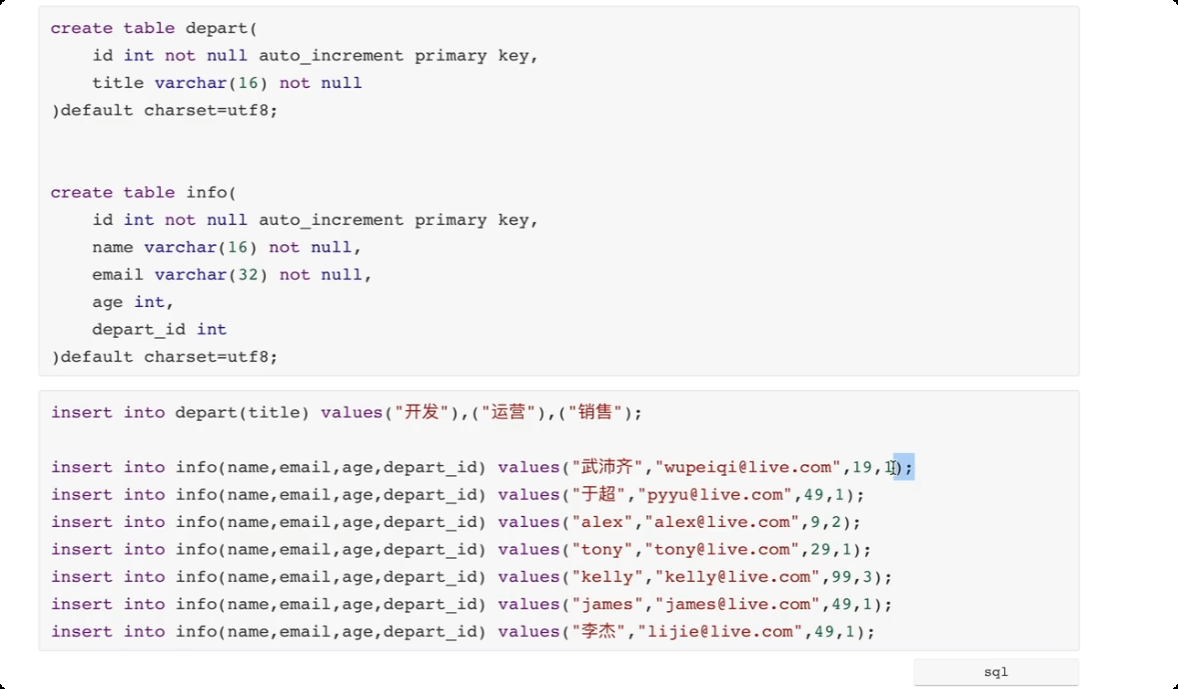
select * from info where age > 30;
select * from info where id >= 3;
select * from info where id != 3;
select * from info where id != 3 and name="mmp";

-- 条件选择 id >=2 且 id <= 4 的数据
select * from info where id between 2 and 4;

-- 条件选择 id  在某个范围内的数据
select * from info where id in (1,5,7,10);

select * from info where (name="mpp" and email="eqw1@lo.com") or id=9;
9.常见SQL-通配符
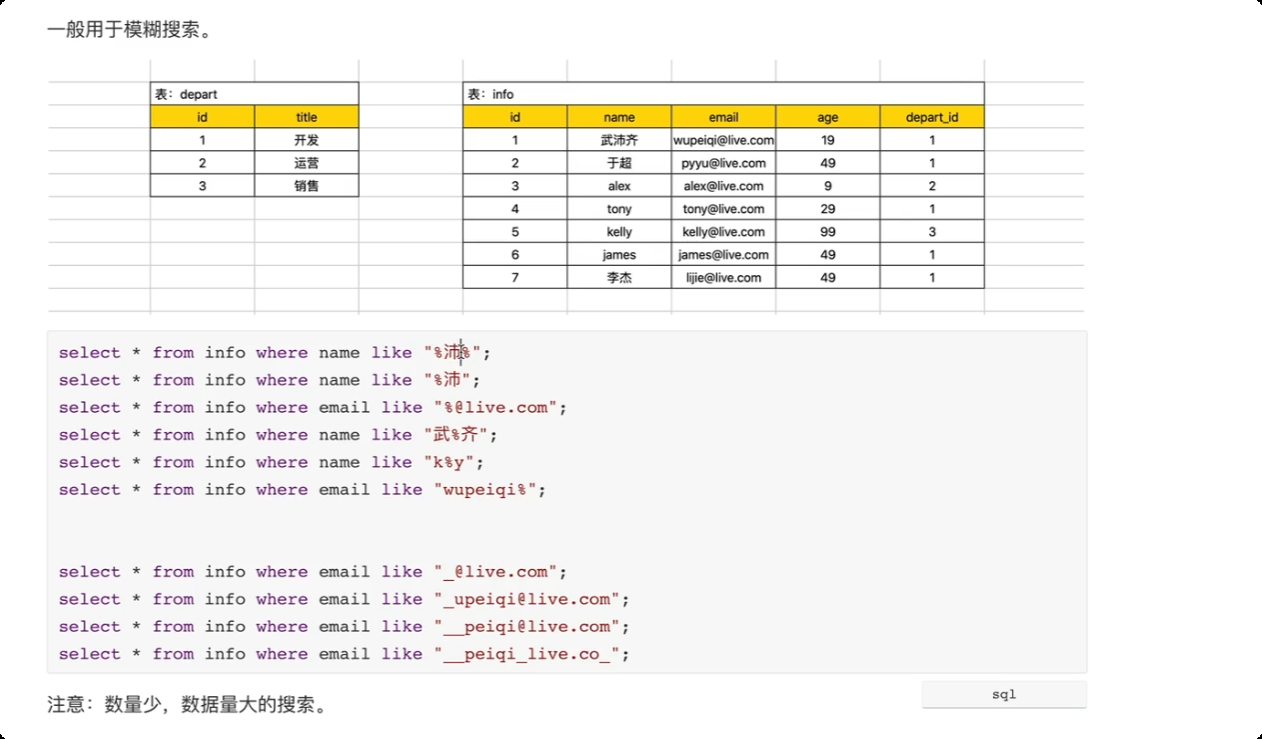
--  % 代表任意字符
--  _  一个下划线 代指一个 任意字符
10.常见SQL-列
映射
select * from info;
select id, name from info;
select id, name as n1 from info;
# 建议, 不要用 *
11.常见SQL-排序
select * from info order by id desc;  -- 从大到小, 倒序排序
select * from info order by id asc;    -- 从小到大, 顺序排列

-- 多维度进行排序
select * from info order by age asc, id desc; -- 先根据 age 从小到大排序,如果 age 相同,根据id 从大到小排序
12.常见SQL-部分数据
-- 取前三条数据
select * from info limit 3;

-- 先排序, 再取前三条数据
select * from info order by id desc limit 3;

-- 先取 id > 2 的数据, 然后 将 id > 2 的数据 id 从大到小排序 ,然后取前三条
select * from info id>2 order by id desc limit 3;


-- 从第2条数据开始,取两条数据, 数据是从 0条 开始的
selct * from info limit 2 offset 2;
13.常见SQL-分组
-- 根据 age 列进行分组, count(id) 统计有 多少个相同年龄的
select age, count(id) from info group by age;

-- 统计每个部门有多少人
select depart_id, count(id) from info group by depart_id;

slect depart_id, count(id), sum(age), avg(age) from info group by depart_id;

-- 先 筛选 id > 3 的数据信息, 然后 再进行分组
select depart_id, count(id) from info where id>3 group by depart_id


-- 分组之后 根据聚合条件再次搜索 having
# 先分组
# 分组结构筛选
select depart_id, count(id) from info group by depart_id having count(id) > 1;
14.常见SQL-连表
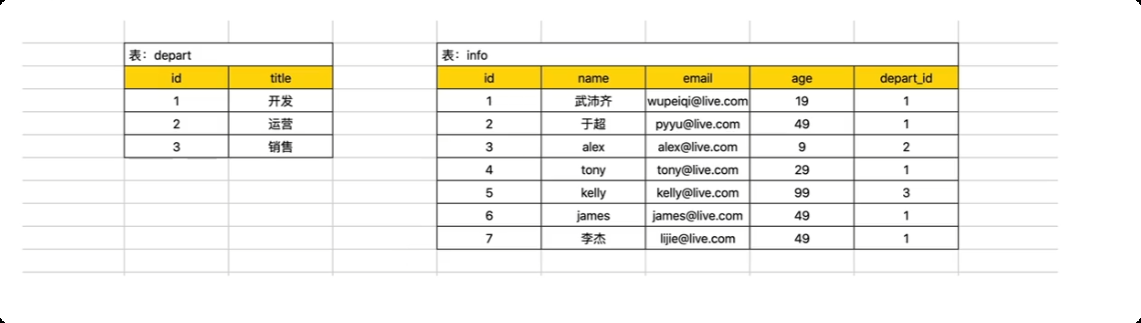
主表 left outer join 从表 on 主表.x = 从表.x

-- 以主表中的数据为基础,和 从表连接, right join 主表在 右边
select * from info left outer join depart on info.depart_id = depart.id;

表 inner join 表 on 表.x = 表.x
-- 关联不上的数据不显示
select * from info inner join depart on info.depart_id = depart.id;
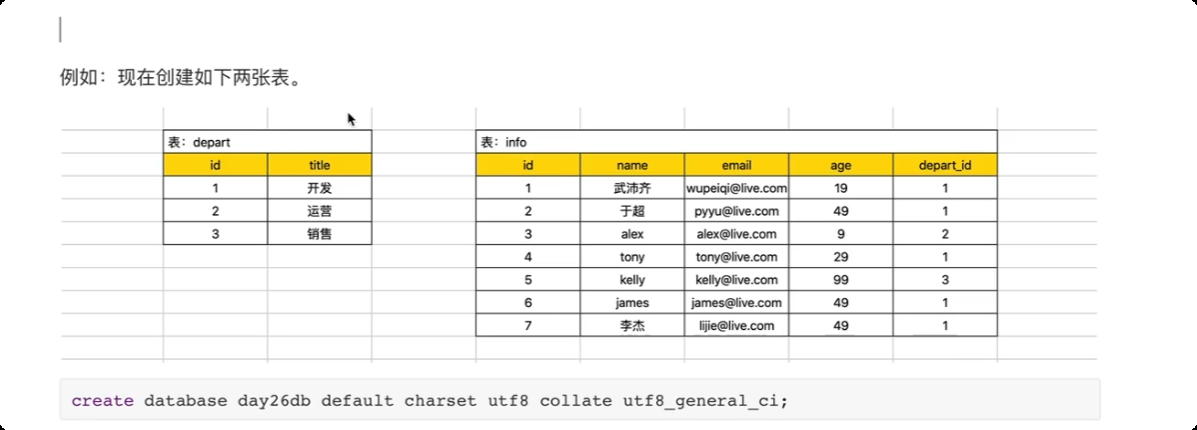
连表操作的目的是什么? 展示两张表中的数据。例如: 查询所有的用户信息` 姓名 , 部门名称。
select info.name, depart.title from info left join depart on info.depart_id=depart.id;
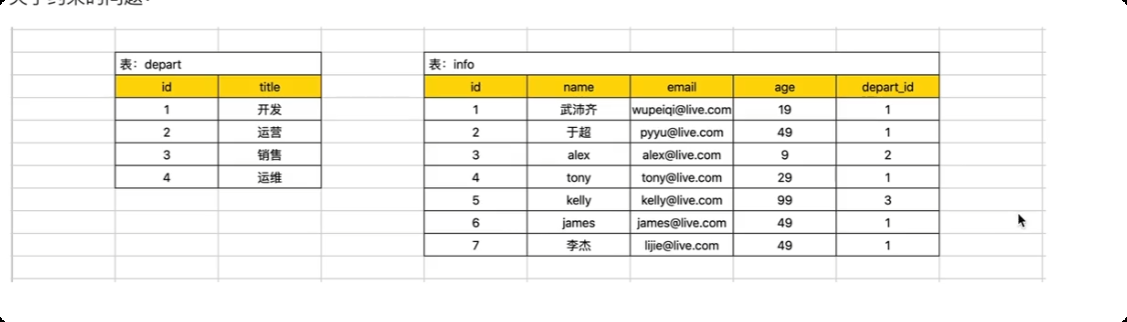
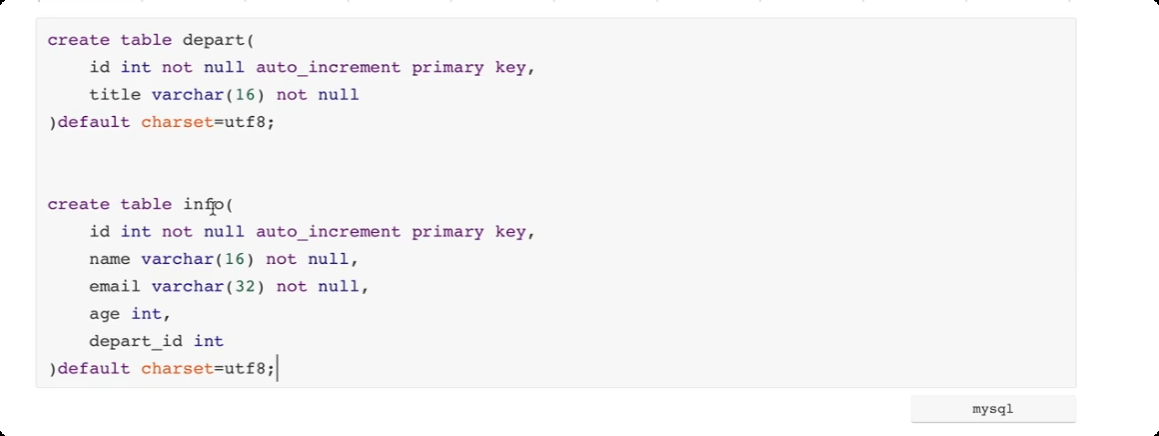
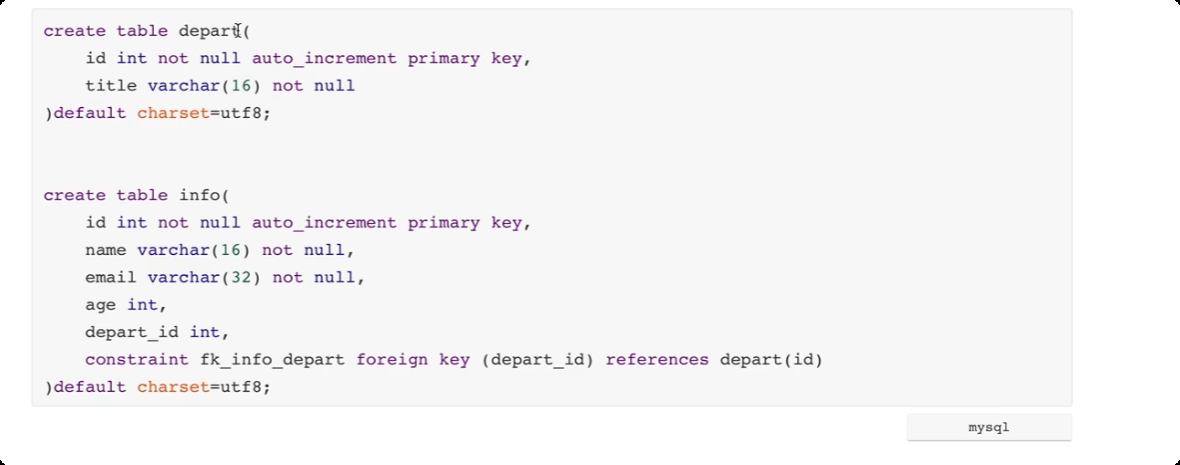
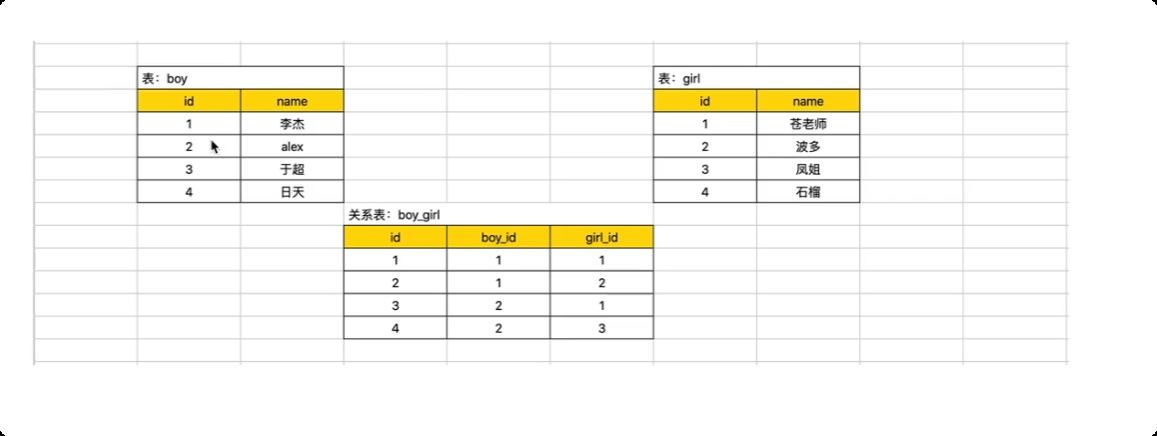
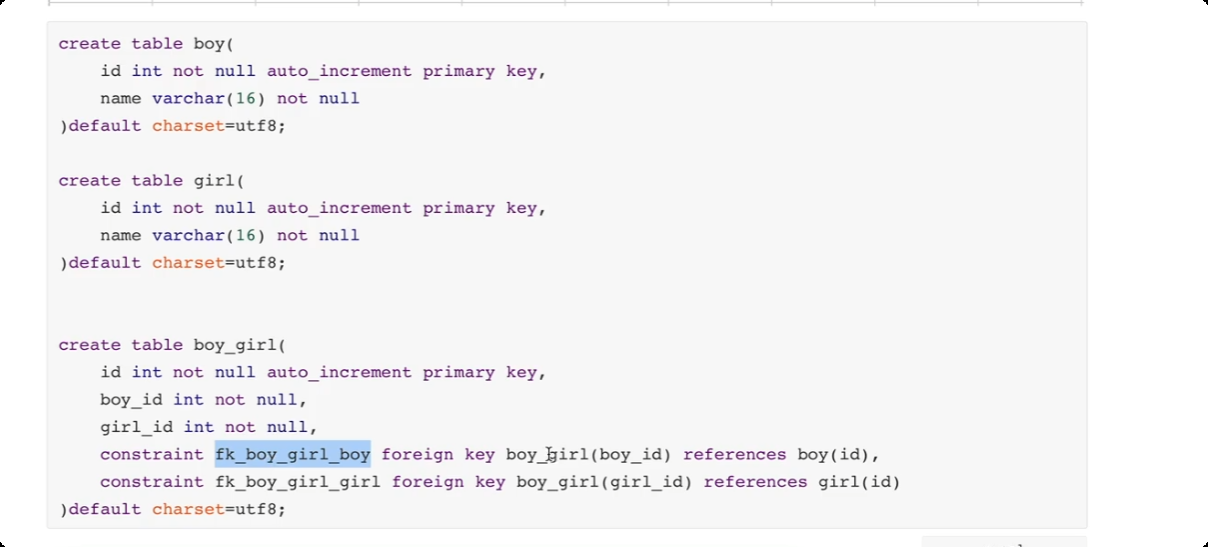
15.表关系
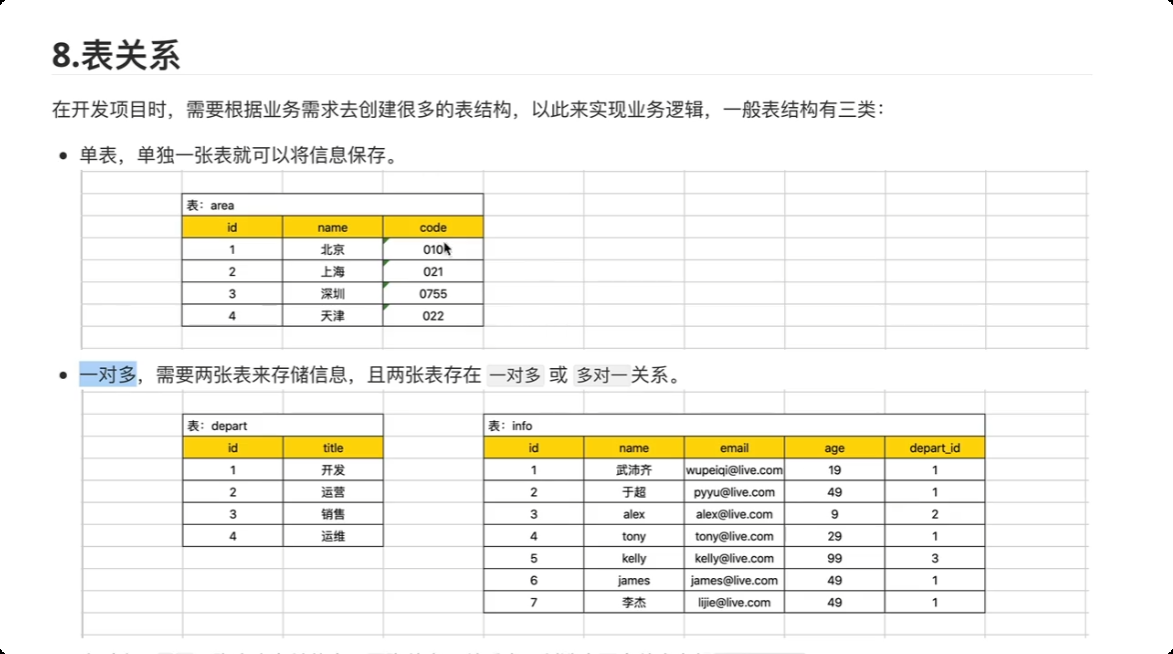
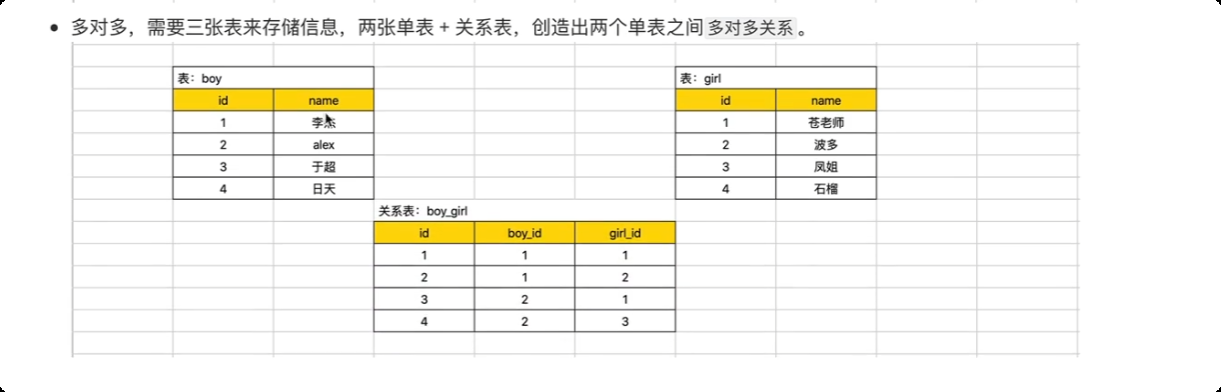
一对一 关系 用户表 和用户扩展信息表
关于约束的问题。(约束, depart_id 值, 必须是depart表中已存在id) --> 外键约束。
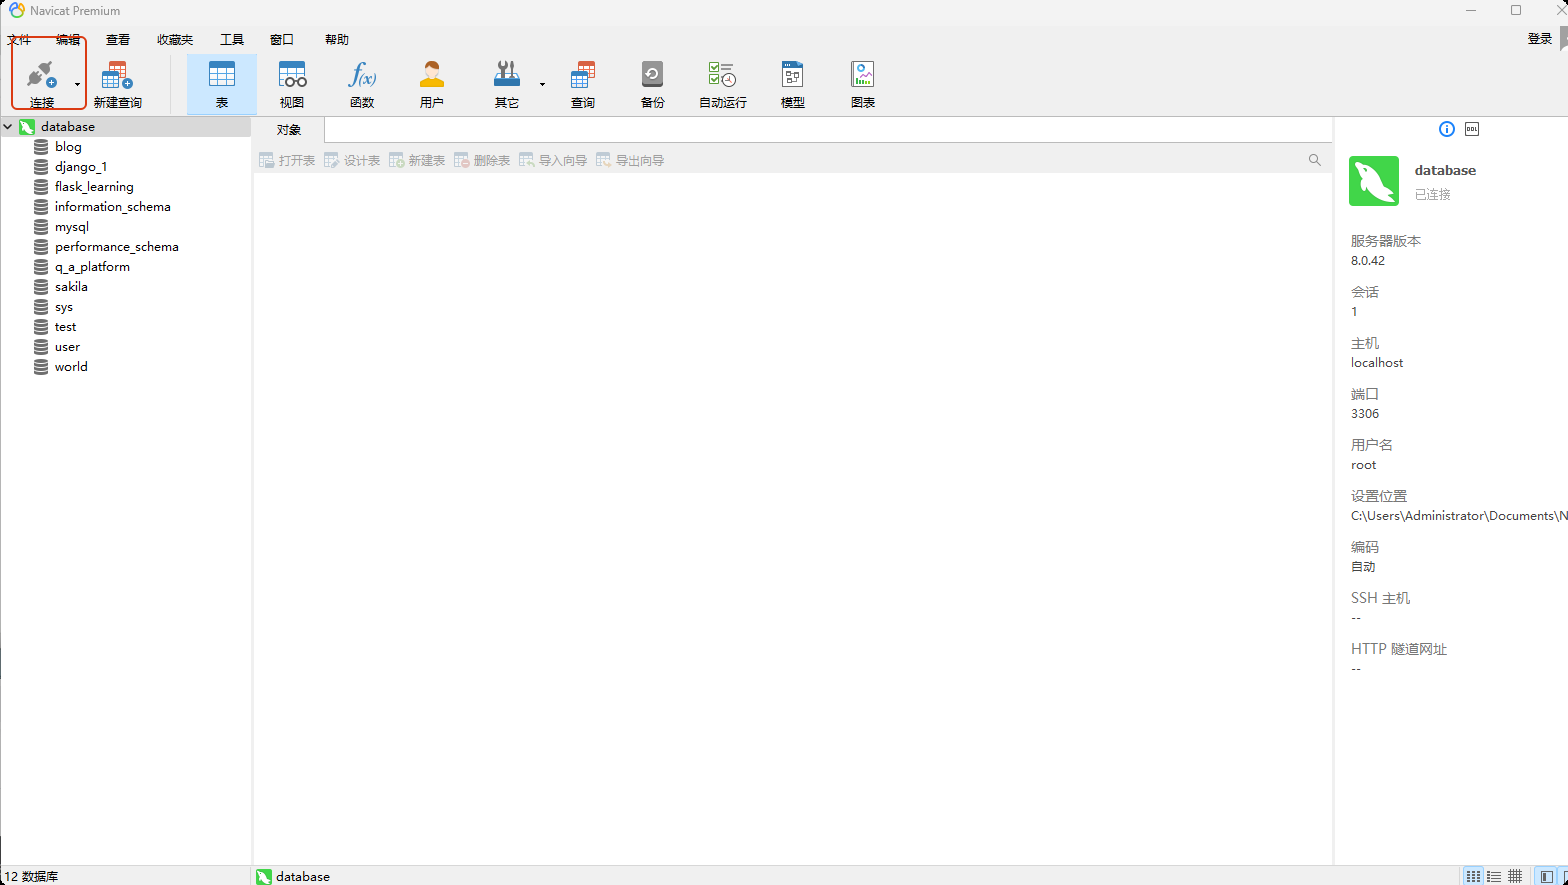
16.navicat 工具
-
navicat 可视化工具。
-
终端,利用 mysql.exe 连接MySql 并执行 SQL 语句。
-
python 代码。

17.关于授权
默认情况下,我们连接mysql 时用的是root 账号。

- 用户管理
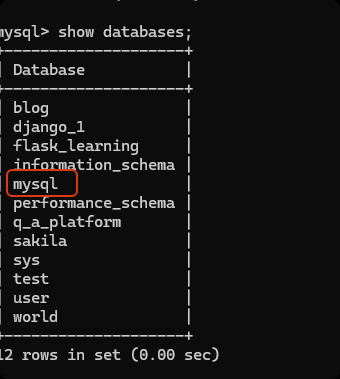
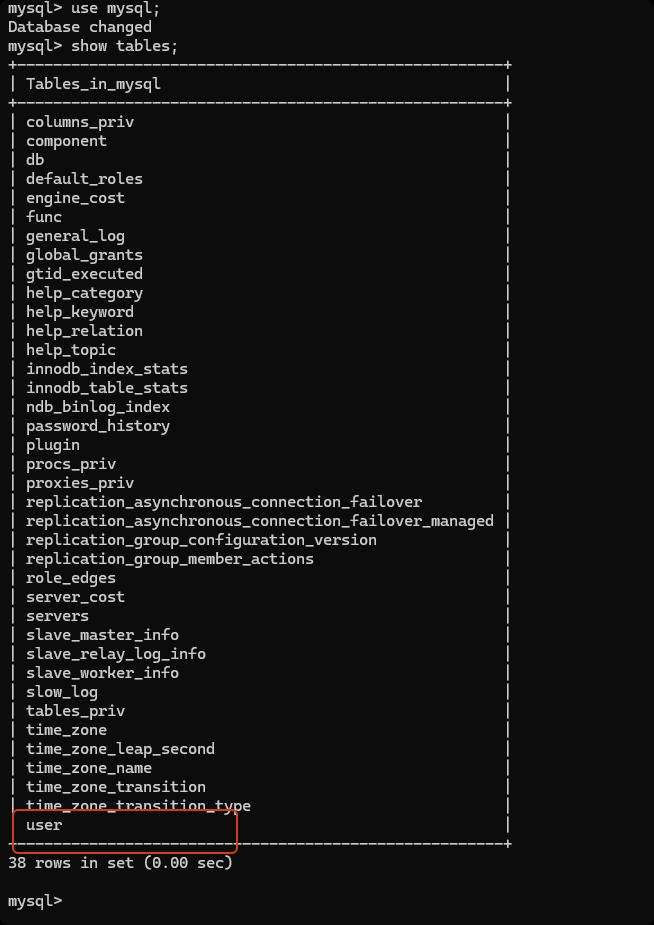
mysql 数据库 -> user 数据表中存储了所有的 用户信息。
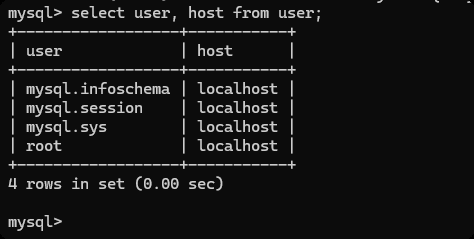
host 如果是 localhost 只能在本机上访问, 如果是% 任意的ip 都可以访问。
-
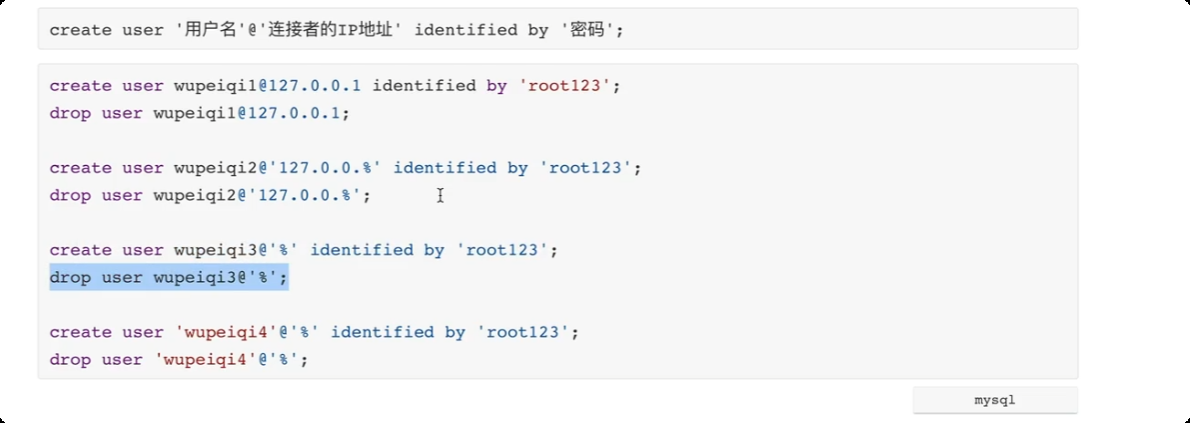
创建用户
create user '用户名' @ '连接者的IP地址' identified by '密码';
-
删除用户
drop user 'mpp'@'%';
示例
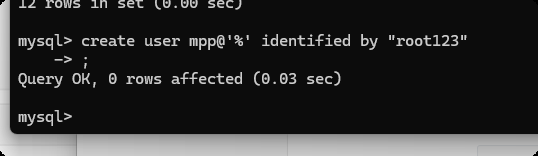
创建用户
 create user 'mpp'@'%' identified by "root123";

  create user 'moo'@'%' identified by "root123";
授权
grant 权限 on 数据库.表 to '用户'@ 'IP地址'
-- all privileges  所有权限
-- test.*  test 数据库中的所有表的权限,   *.*  任何的数据库的任何的表
grant all privileges on test.* TO 'moo'@'%';
flush privileges;

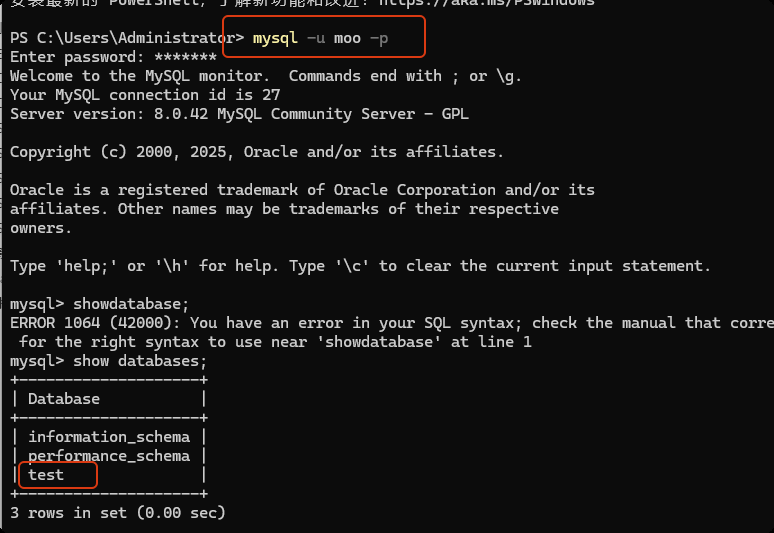
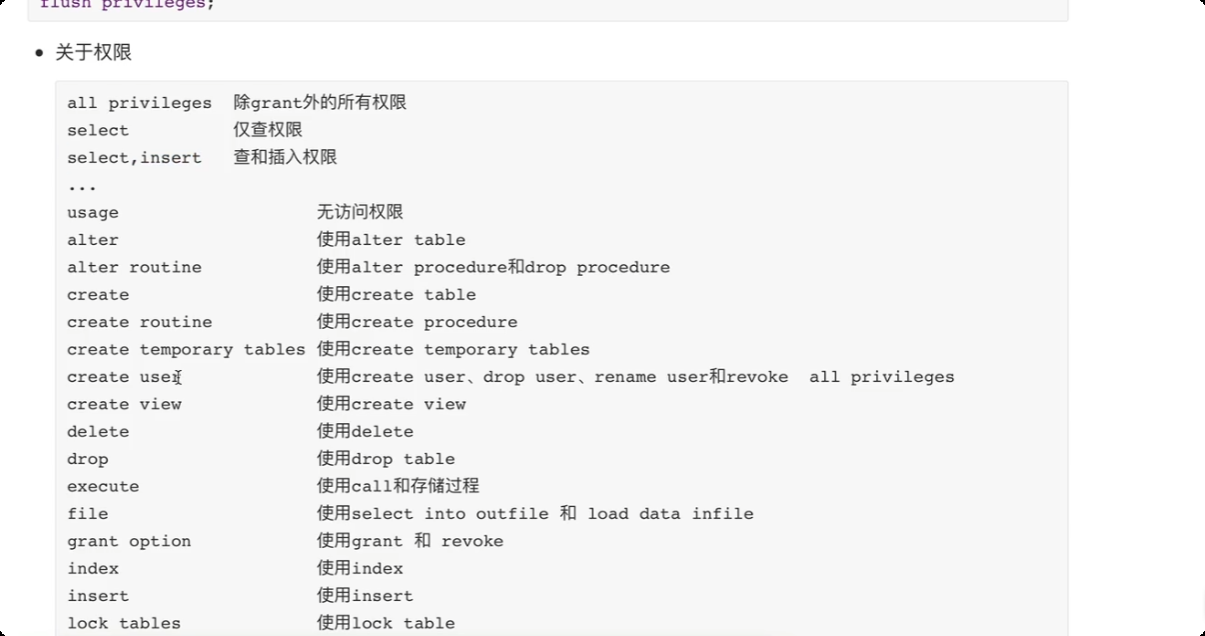
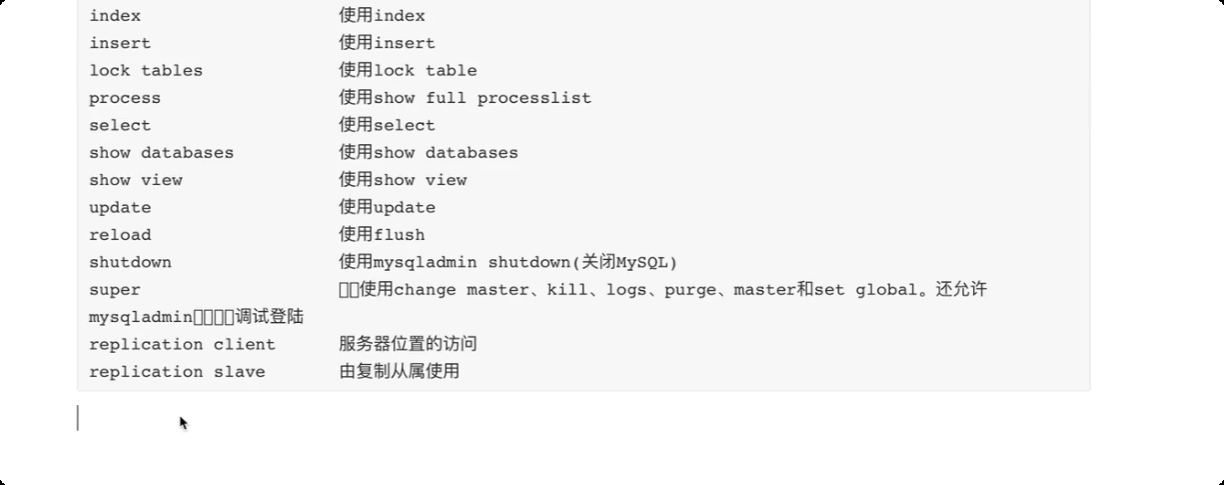
关于权限
关于数据库
-- 只有对 test 数据库下的tb5表有权限
grant all privileges on test.tb5 TO 'moo'@'%';

 浙公网安备 33010602011771号