
第二次作业:卷积神经网络 part1
Part one视频学习心得及问题总结
1 深度学习的数学基础
1.1 自编码器变种
- 正则自编码器
使提取的特征表达符合某种性质 - 稀疏自编码器
提取稀疏特征表达 - 去噪自编码器
提取鲁棒特征表达,能够对被破坏的原始数据编码、解码,还能恢复真正的原始数据 - 变分自编码器
基于隐层特征表达空间,通过解码层,生成样本
应用:数据生成、缺失数据填补、图像超分辨率
1.2 机器学习三部分:模型、策略、算法
2 卷积神经网络
深度学习三部曲:
- 搭建神经网络结构
- 找到一个合适的损失函数
- 找到一个合适的优化函数,更新参数
2.1 CNN的基本结构
一个典型的卷积网络是由卷积层、池化层、全连接层交叉堆叠而成
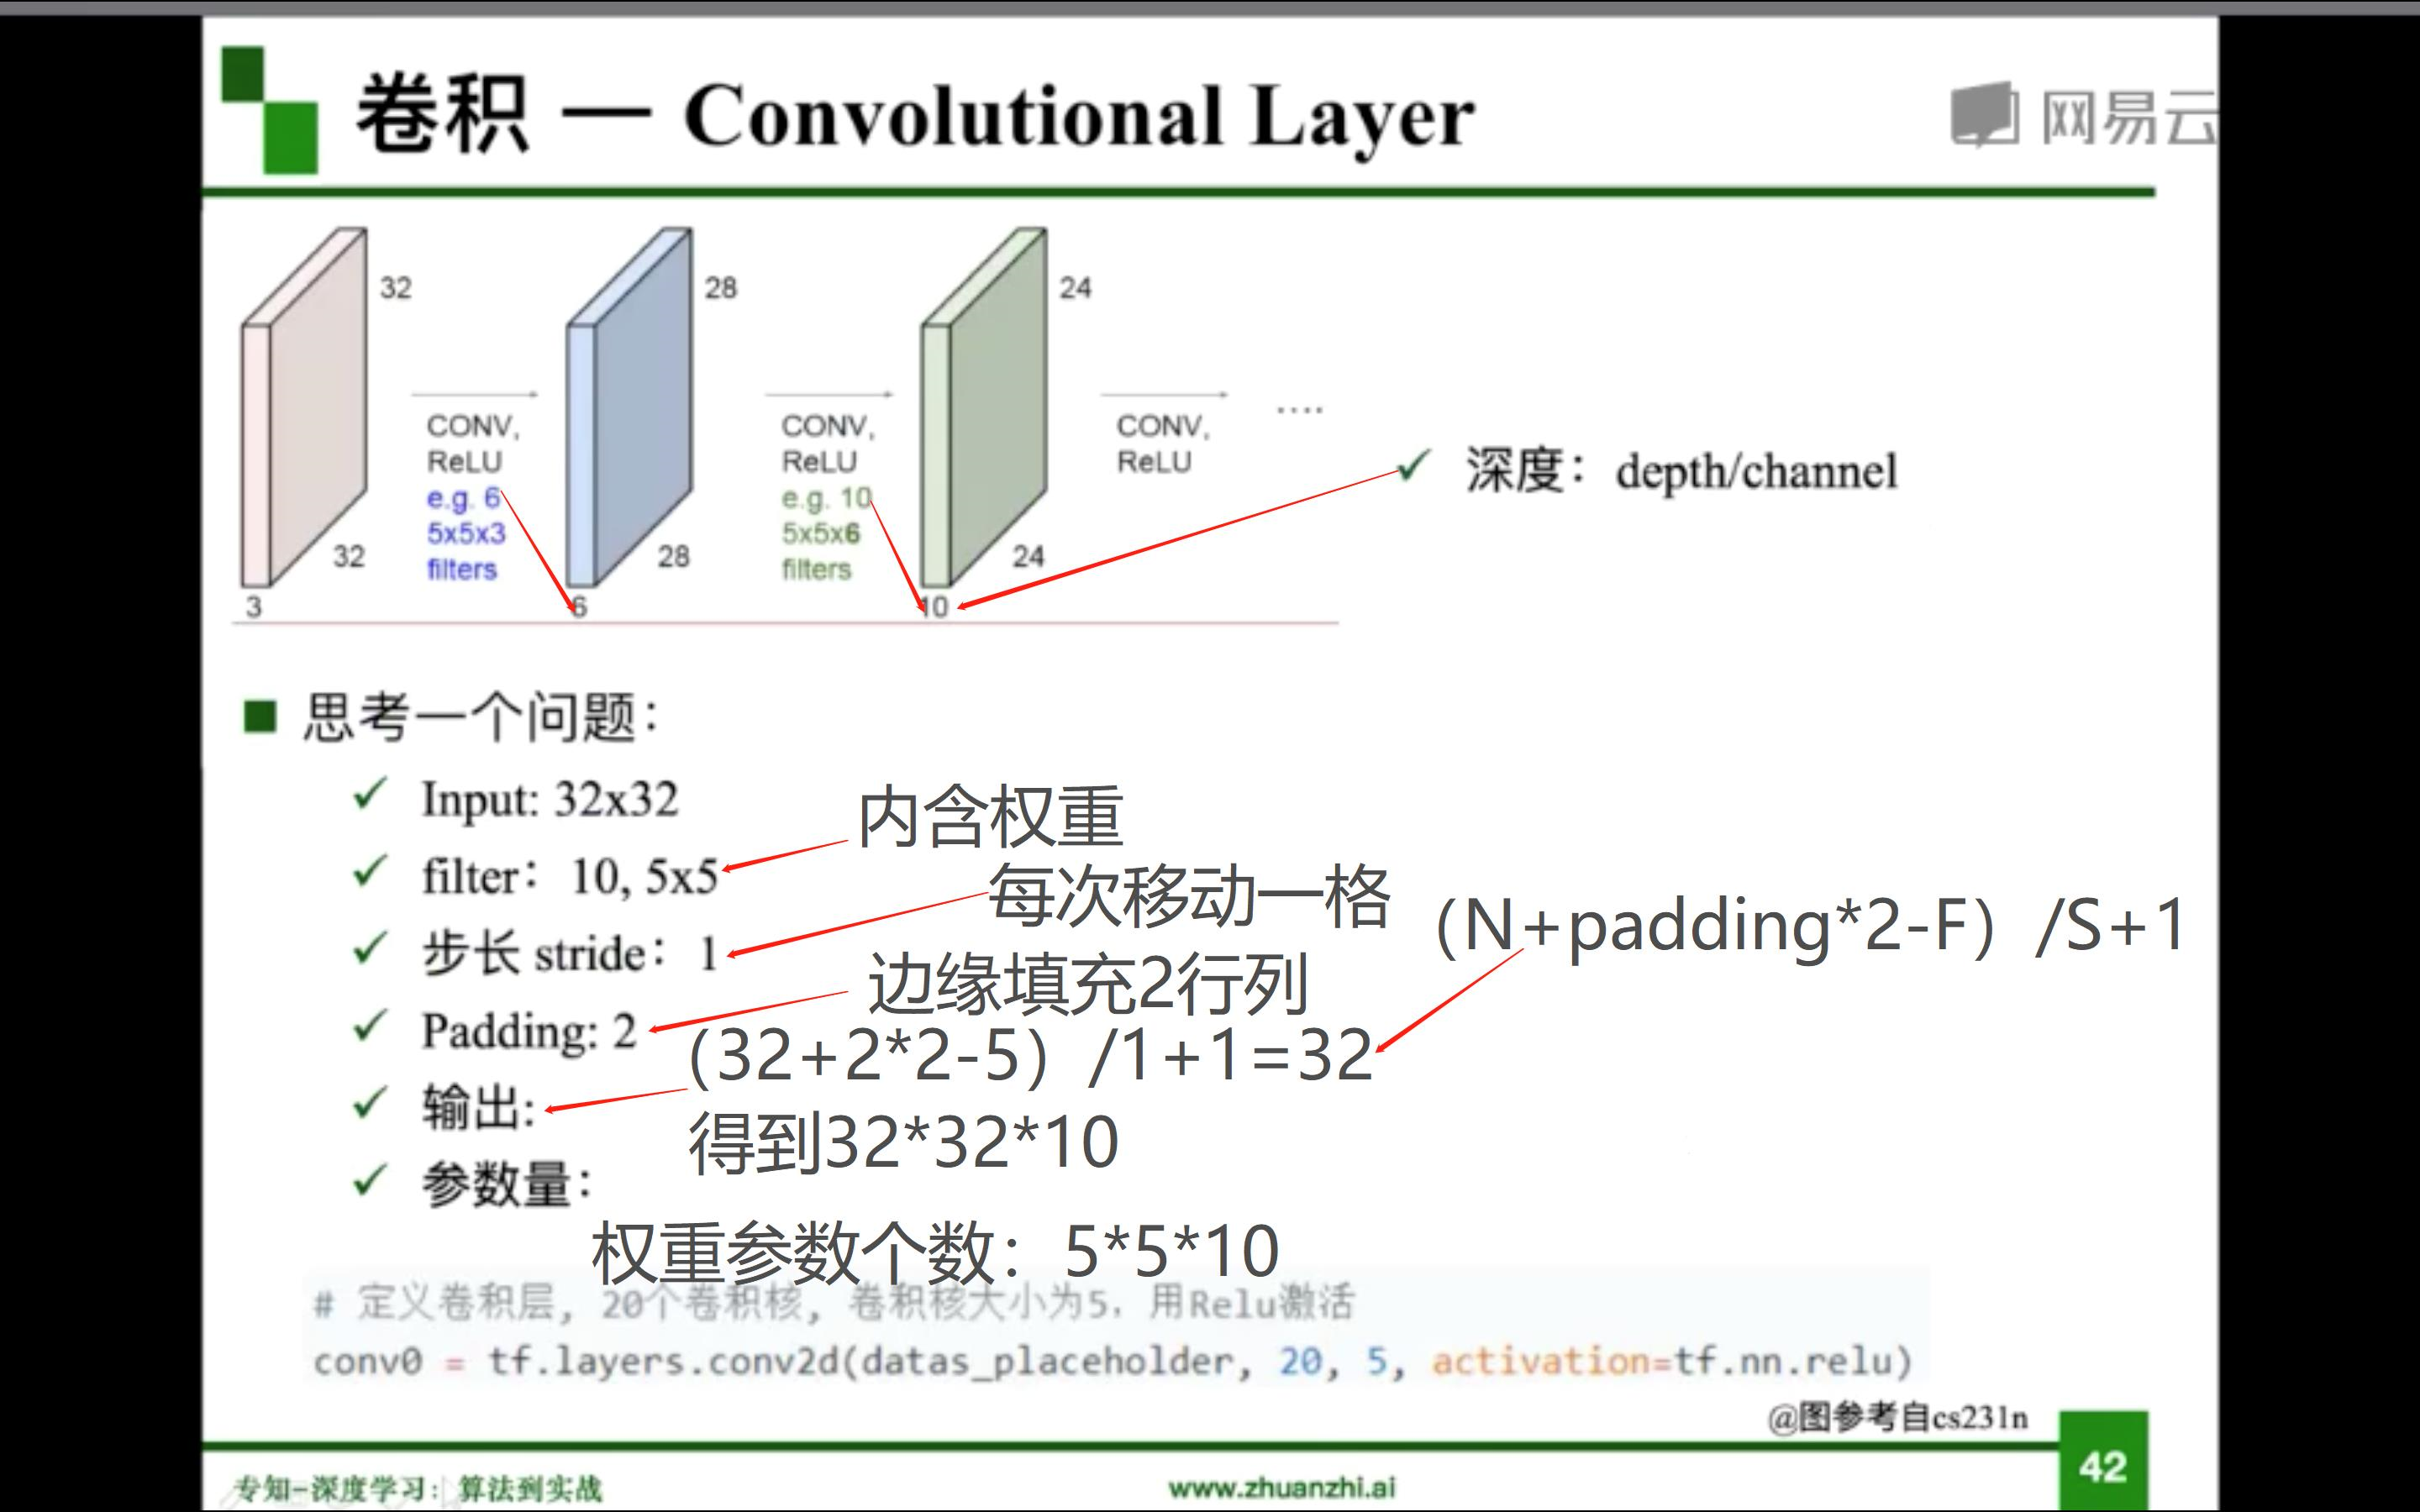
2.1.1 卷积
- 概念:对两个实变函数的一种数学操作。在图像处理中,图像是以二维矩阵的形式输入到神经网络的,因此需要二维卷积(两个矩阵的内积)。
- 基本概念
输入(input)、卷积核/过滤器(kernel/filter)、权重(weights)、步长(stride)、感受野(receptive field)、特征图(feature map)、填充(padding)、深度(channel)、输出(output)
![]()
- 局部关联,参数共享
2.1.2 池化
- 池化的特点:首先,保留了主要特征的同时减少参数和计算量,防止过拟合,提高泛化能力;其次,它一般处于卷积层与卷积层之间,全连接层与全连接层之间
- 池化的类型:最大值池化(分类问题更倾向);平均池化
![]()

2.1.3 全连接
- 全连接的特点:两层之间所有神经元都有权重连接;通常全连接层在卷积神经网络尾部;全连接层参数量通常最大
2.2 典型网格结构

2.2.1 AlexNet
- 基本结构
第一层:卷积-Relu-池化
第二层:卷积-Relu-池化
第三层:卷积-Relu
第四层:卷积-Relu
第五层:卷积-Relu-池化
第六层:全连接-Relu-Dropout
第七层:全连接-Relu-Dropout
第八层:全连接-SoftMax - Dropout(随机失活):训练时随机关闭部分神经元,测试时整合所有神经元,避免过拟合。
- 数据增强:对于图像数据,主要采用两种方式进行增强:第一,对图片进行平移、翻转、对称、裁剪;第二,改变rgb通道强度。
2.2.2 VGG
- VGG是一个更深网络
- 在AlexNet的基础上,在深度方面进行加深,但也只是简单叠加层。
2.2.3 GoogleNet
2.2.4 ResNet
- 残差学习网络,深度有152层
- 残差的思想:去掉相同的主体部分,从而突出微小的变化
![]()
传统结构中,误差传递是通过复合求导的形式。在这个复合求导链中,中间某一个导数为0,就会造成梯度消失的问题。
而在残差结构中,在函数的基础上添加了一个x,有效的避免了导数为0的问题。

3 京东专家结合pytorch代码讲解Resnet
3.1 RexNet结构
一个RexNet由5个stage组成,一个stage由若干个block组成,一个block由若干那个卷积层组成。下图为RexNet结构图,根据此图,对RexNet进行设计编程。
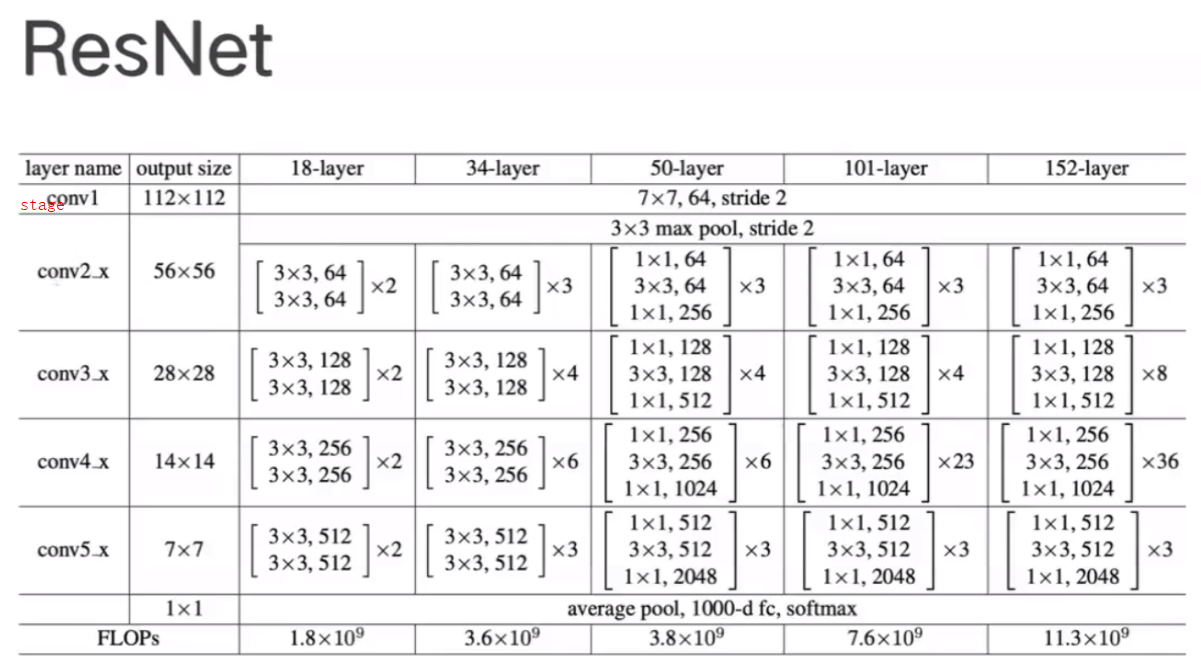
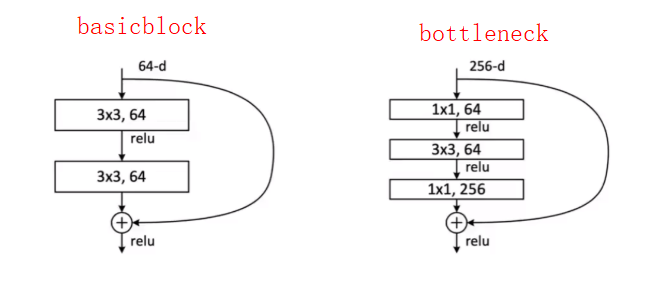
50层以上与50层以下的组成结构最大的差异:bottleneck。其中,bottleneck的作用:降维。下图为basicblock和bottleneck结构之间的区别。
3.2 代码构建
import torch
import torch.nn as nn
from torch.hub import load_state_dict_from url#引入pytorch中已经预训练的权重
model_urls = {
    'resnet18': 'https://download.pytorch.org/models/resnet18-5c106cde.pth',
    'resnet34': 'https://download.pytorch.org/models/resnet34-333f7ec4.pth',
    'resnet50': 'https://download.pytorch.org/models/resnet50-19c8e357.pth',
    'resnet101': 'https://download.pytorch.org/models/resnet101-5d3b4d8f.pth',
    'resnet152': 'https://download.pytorch.org/models/resnet152-b121ed2d.pth',
    'resnext50_32x4d': 'https://download.pytorch.org/models/resnext50_32x4d-7cdf4587.pth',
    'resnext101_32x8d': 'https://download.pytorch.org/models/resnext101_32x8d-8ba56ff5.pth',
    'wide_resnet50_2': 'https://download.pytorch.org/models/wide_resnet50_2-95faca4d.pth',
    'wide_resnet101_2': 'https://download.pytorch.org/models/wide_resnet101_2-32ee1156.pth',
}
#封装卷积,使用方便
def conv3*3(in_planes,out_planes,stride=1,padding=1):
  return nn.Conv2d(in_planes,out_planes,kernel_size=3,stride=stride,padding=padding,bias=Flase)

def conv1*1(in_planes,out_planes,stride=1):
  return nn.Conv2d(in_planes,out_planes,kernel_size=1,stride=stride,padding=padding,bias=Flase)#为什么不需要bias?因为在卷积层之后有bn层,所以就不需要bias
class BasicBlock(nn.Module):
      expansion=1
      #初始化函数,定义这个层
      def __init__(self,inplanes,planes,stride=1,downsample=None,norm_layer=None):
        super(BasicBlock,self).__init__()
        if norm_layer is None:
          norm_layer=nn.BatchNorm2d #BatchNormalization ?
        #第一层
        self.cnnv1=conv3*3(inplanes,planes,stride)#inplanes->planes通道数
        self.bn1=norm_layer(planes)
        self.relu=nn.ReLU(inplace=True)
        #第二层
        self.conv2=conv3*3(planes,planes)#planes->planes通道数
        self.bn2=norm_layer(planes)
        self.downsample=downsample
        self.strid=stride
      #网络的前向传播过程
      def forward(self,x):
        identify =x

        out=self.cnnv1(x)
        out=self.bn1(out)
        out=self.relu(out)

        out=self.conv2(out)
        out=self.bn2(out)
        #需要进行下采样,因为在网络的某些位置,网络的尺寸发生变化,所以需要进行下采样
        if self.downsample is not None:
          identify=self.downsample(x)#相当于图中虚线的位置

        #先融合,再调用激活函数(看图)
        out +=identify
        out=self.relu(out)

        return out

class BottleNeck(nn.Moudle):
   expansion=4#bottleneck的特点是输出通道较输入通道放大了四倍
   def __init__(self,inplanes,planes,stride=1,downsample=None,norm_layer=None):
     super(BottleNeck,self).__init__()
     if norm_layer is None:
       norm_layer=nn.BatchNorm2d

     #第一层
     self.conv1=conv1*1(inplanes,planes)
     self.bn1=norm_layer(planes)
     self.conv2=conv3*3(inplanes,planes,stride)
     self.bn2=norm_layer(planes)
     self.conv3=conv1*1(planes,planes*self.expansion)
     self.bn3=norm_layer(planes*self.expansion)
     self.relu=nn.ReLU(inplace=True)
     self.downsample=downsample
     self.stride=stride

   def forward(self,x):
     identify=x

     out=self.conv1(x)
     out=self.bn1(out)
     out=self.relu(out)

     out=self.conv2(out)
     out=self.bn2(out)
     out=self.relu(out)

     out=self.conv3(out)
     out=self.bn3(out)

     if self.downsample is not None:
       identify=self.downsample(x)

     out+=identify
     out=self.relu(out)

     return out

#组装网络
class ResNet(nn.Module):
  def __init__(self,block,layers,num_class=1000,norm_layer=None):
    super(ResNet,self).__init__()
    if norm_layer is None:
      norm_layer=nn.BatchNorm2d
    self.inplanes=64 #传入数据的通道是64

    #根据图纸搭建网络
    self.conv1=nn.Conv2d(3,self.inplanes,kernel_size=7,stride=2,padding=3,bias=False)
    self.bn1=norm_layer(self.inplanes)
    self.relu=nn.ReLU(inplace=True)

    self.maxpool=nn.MaxPool2d(kernel_size=3,stride=2,padding=1)
    #layer对应stage,看图进行构造
    self.layer1=self._make_layer(block,64,layers[0])
    self.layer2=self._make_layer(block,128,layers[1],stride=2)
    self.layer3=self._make_layer(block,256,layers[2],stride=2)
    self.layer4=self._make_layer(block,512,layers[3],stride=2)
    self.avgpool=nn.AdaptiveAvgPool2d((1,1))
    self.fc=nn.Linear(512*block.expansion,num_class)
    #参数初始化
    for m in self.modules():
      if isinstance(m,nn.Conv2d):
        nn.init.kaiming_normal_(m.weight,mode='fan_out',nonlinearity='relu')
      elif isinstance(m,(nn.BatchNorm2d,nn.GroupNorm)):
        nn.init.constant_(m.weight,1)
        nn.init.constant_(m.weight,0)


   def _make_layer(self,block,planes,blocks,stride=1):
     norm_layer=self._norm_layer
     downsample=None
     #判断需不需要下采样
     if stride !=1 or self.inplanes !=planes*block.expansion:
       downsample=nn.Sequential(
           conv1*1(self.inplanes,planes*block.expansion,stride)
           norm_layer(planes*block.expansion)
       )
     3
     layers=[]
     layers.append(block(self.inplanes,planes,stride,downsample,norm_layer))
     self.inplanes=planes*self.expansion
     for _ in range(1,blocks):
       layers.append(block(self.inplanes,planes,norm_layer=norm_layer))
     return nn.Sequential(*layers)

   def forward(self,x):
     x=self.conv1(x)
     x=self.bn1(x)
     x=self.relu(x)
     x=self.maxpool(x)

     x=self.layer1(x)
     x=self.layer2(x)
     x=self.layer3(x)
     x=self.layer4(x)

     x=self.avgpool(x)
     x=torch.flattern(x,1)
     x=self.fc(x)

     return x

def _resnet(arch,block,layers,pretrained,progress,**kwargs):
  model=ResNet(block,layers,**kwargs)
  if pretrained:
    state_dict =load_state_dict_from_url(model_urls[arch],progress=progress)
    model.load_state_dict(state_dict)
  return model

def resnet152(preteained=False,progress=True,**kwargs):
  return _resnet("resnet152",BottleNeck,[3,8,36,3],pretrained,progress,**kwargs)

model=resnet152(pretained=True)
model.eval()
Part three展望学习
1 Inception解析
GoogLeNet 对网络中的传统卷积层进行了修改,提出了被称为 Inception 的结构,用于增加网络深度和宽度,提高深度神经网络性能。
1.1 InceptionV1

- 考虑多个不同 size 的卷积核能够增强网络的适应力,paper 中分别使用11、33、55卷积核,同时加入33 max pooling。
- 跨通道组织信息,提高网络的表达能力,同时可以对输出有效进行降维
1.2 InceptionV2
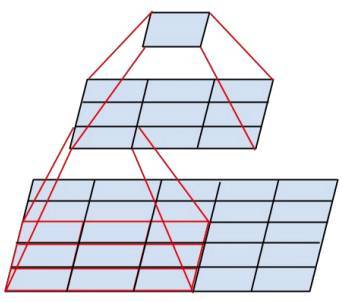
- Inception V2 学习了VGG用两个33的卷积代替55的大卷积,在降低参数的同时建立了更多的非线性变换,使得CNN对特征的学习能力更强
- 两个33的卷积层功能类似于一个55的卷积层
![]()
- Batch Normalization(简称BN)方法:BN是一个非常有效的正则化方法,可以让大型卷积网络的训练速度加快很多倍,同时收敛后的分类准确率也可以得到大幅提高。BN在用于神经网络某层时,会对每一个mini-batch数据的内部进行标准化(normalization)处理,使输出规范化到 N(0,1) 的正态分布,减少了Internal Covariate Shift(内部神经元分布的改变)。
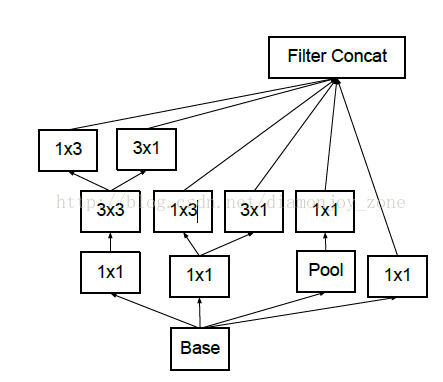
1.3 InceptionV3
- 将一个33卷积拆成13卷积和3*1卷积
![]()
![]()
- 将一个较大的二维卷积拆成两个较小的一维卷积,比如将77卷积拆成17卷积和71卷积,或者将33卷积拆成13卷积和31卷积,如上图所示
- 节约了大量参数,加速运算并减轻了过拟合(比将77卷积拆成17卷积和71卷积,比拆成3个33卷积更节约参数)
- 增加了一层非线性扩展模型表达能力

热爱学习,拒绝划水

 浙公网安备 33010602011771号