光线追踪和球体追踪
光线追踪和球体追踪
#光线追踪 #球体追踪
参考:
《The Unity Shader Bible》
光线追踪的概念
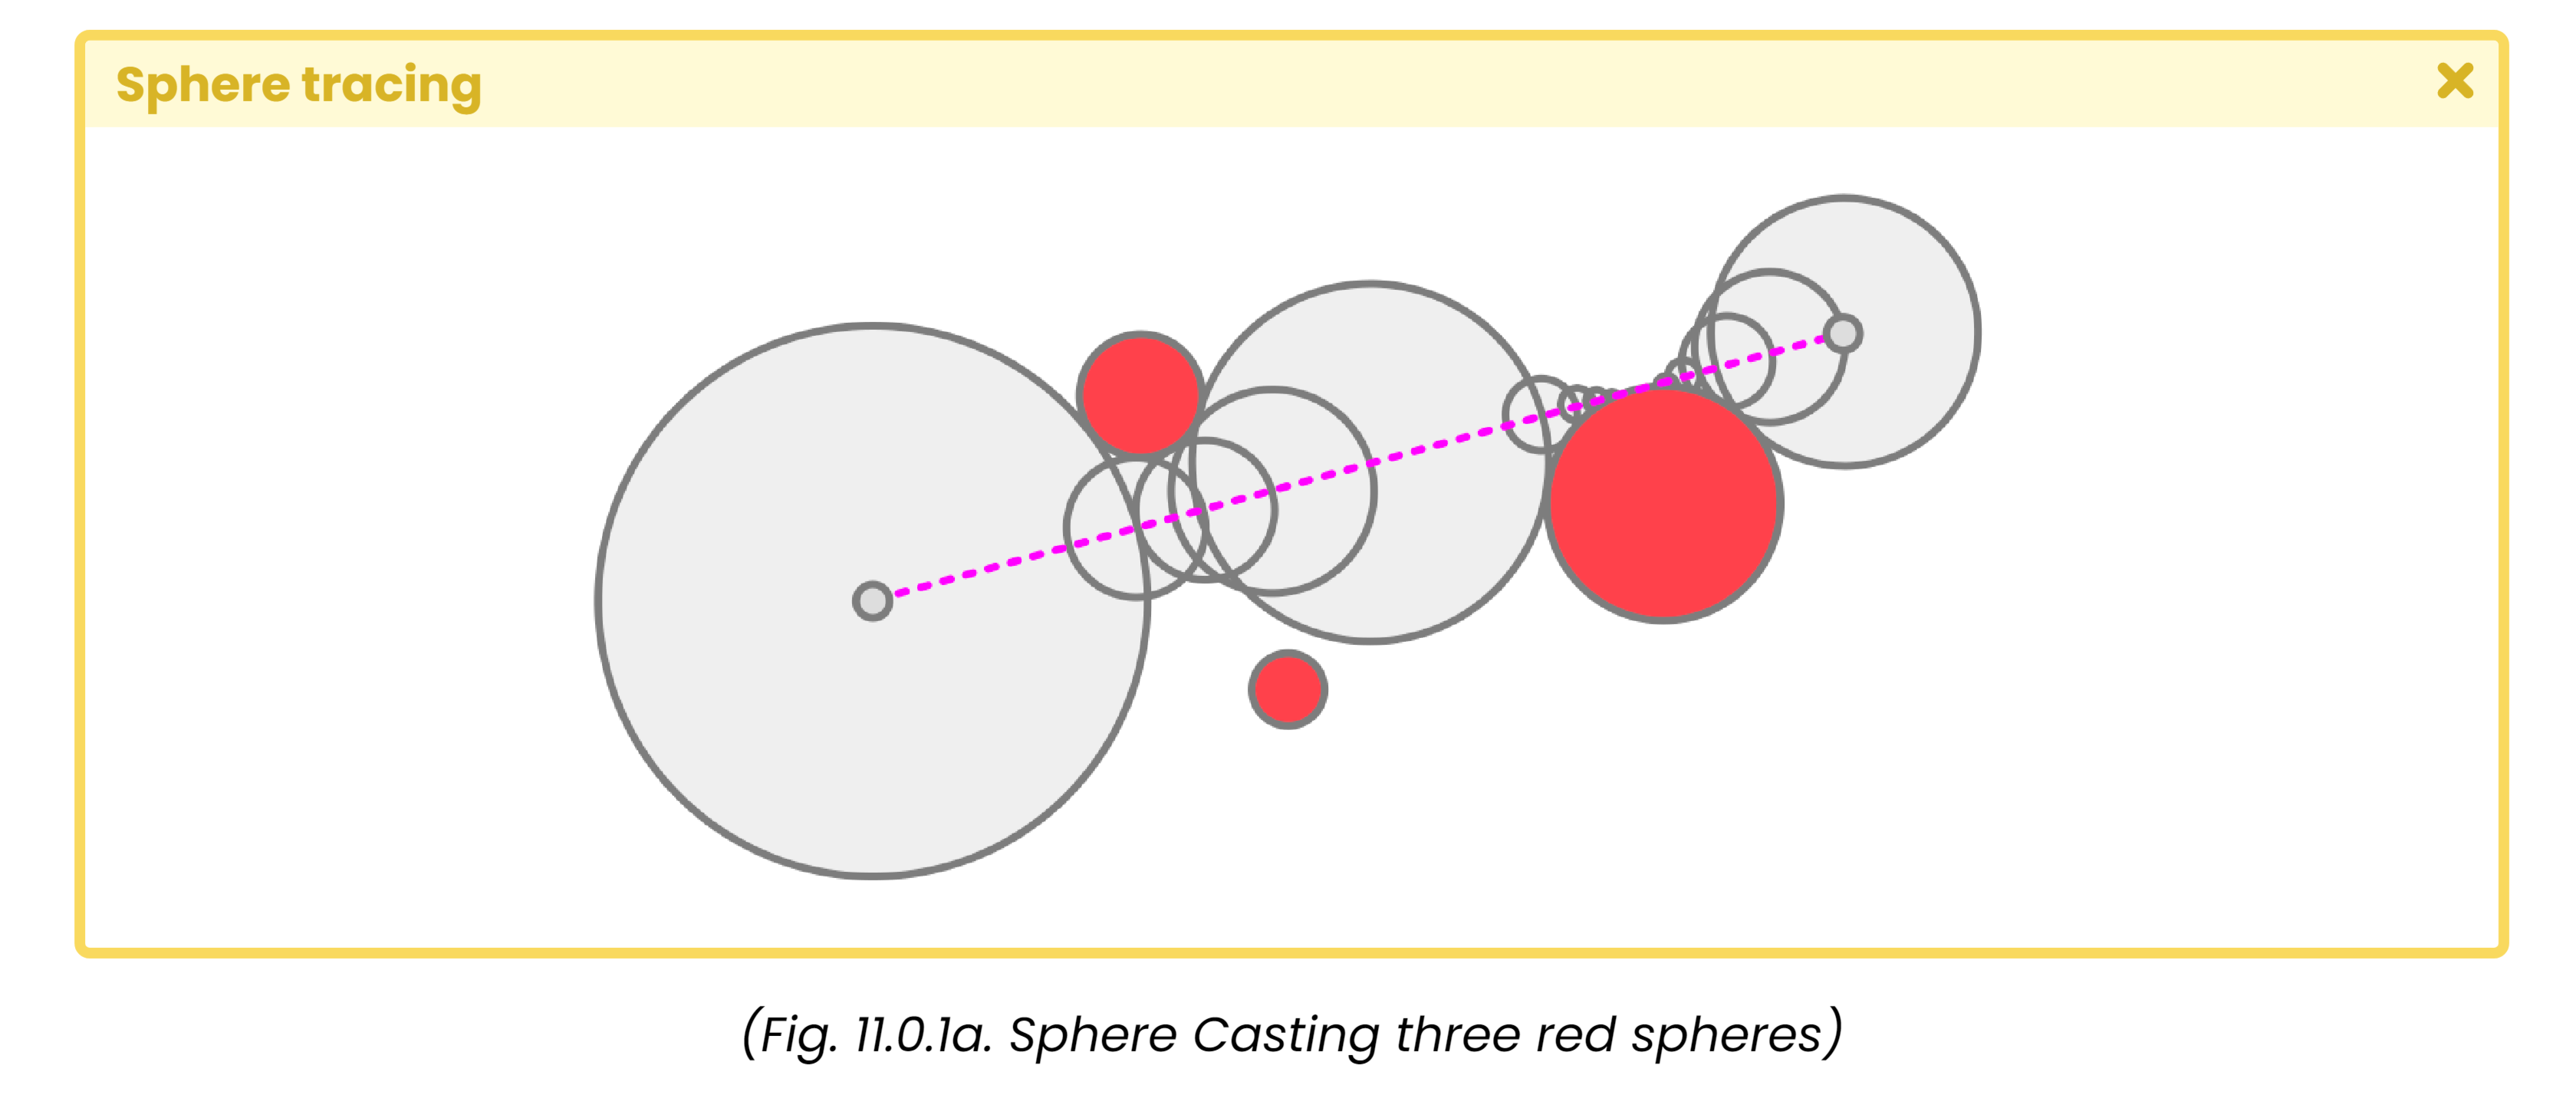
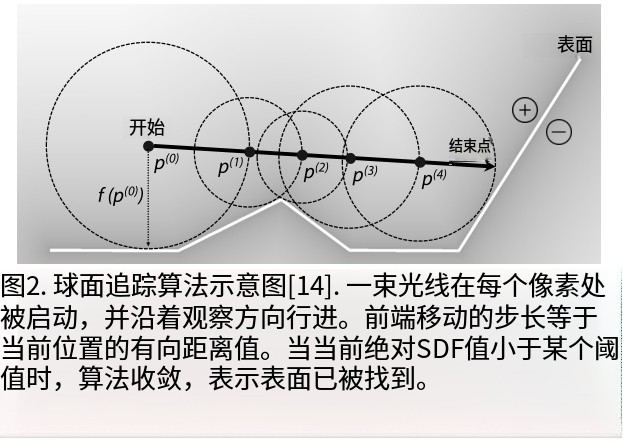
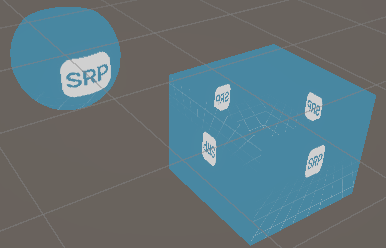
光线从摄像机出发,穿过像素点,直到击中表面以达到目标。这个概念被称为“光线投射(Ray Marching)” ,即沿着光线找到最近物体的过程,因此得名“球面追踪(Sphere Tracing)”。 RayMarching就是光线行进,从摄像机向屏幕上的每一个像素发射一条光线,光线按照一定步长前进,检测当前光线距离物体表面的距离,并且根据这个距离调整光线的步长,直到抵达物体表面。
SDF
我们需要根据即将生成的曲面形状来确定射线的终点。在此场景中,这类名为SDF(有符号距离函数)的函数会以点为输入,返回该点与图形表面之间的最短距离。若返回值为正,则射线继续前进;若返回值为零,则射线将与曲面发生碰撞。
xxxxxxxxxx
float sphereSDF(float3 p, float radius) {
float sphere = length(p) - radius;
return sphere;
}
球体追踪
着色器应用
为了正确使用该技术,我们需要在着色器中定义至少两个函数。为此,需要考虑以下因素: • 一个用于确定曲面类型的sdf函数. • 另一个用于计算球体追踪的函数.
流程图
核心Shader代码
球体追踪就是用场景的 SDF(signed distance function)告诉你从当前位置到最近表面的最小距离,然后用这个距离作为步长向前跳——仿佛每一步放一个贴紧场景的球体,球体刚好不穿透物体,直到球体接触表面或超过上限。
//平面SDF方程
float planeSDF(float3 ray_position) {
// subtract the edge to the “Y” ray position to increase
//or decrease the plane position
float plane = ray_position.y - _Edge;
return plane;
}
#define MAX_MARCHING_STEPS 50
#define MAX_DISTANCE 10
#define SURFACE_DISTANCE 0.001
//球体追踪函数
float sphereCasting(float3 ray_origin, float3 ray_direction)
{
float distance_origin = 0;
for (int i = 0; i < MAX_MARCHING_STEPS; i++)
{
float3 ray_position = ray_origin + ray_direction * distance_origin;
float distance_scene = planeSDF(ray_position);
distance_origin += distance_scene;
if (distance_scene < SURFACE_DISTANCE || distance_origin > MAX_MARCHING_STEPS)
break;
}
return distance_origin;
}
“射线起始点”向量对应“射线的起点”,即相机在局部空间中的位置;而“射线方向”则等于“网格顶点的位置”,也就是我们正在处理的球体所在位置。由于我们需要根据边生成图元划分,因此必须确保sdf平面的位置与三维物体的位置保持一致。 💁在该示例中,相机到平面的距离即float plane = ray_position.y - _Edge; 为射线步进的长度 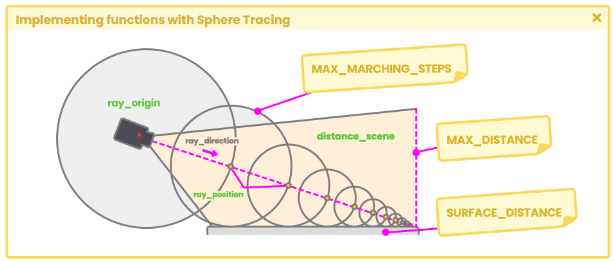
这段代码是一个 Sphere Tracing(球面追踪 / Ray Marching) 的核心片段,用来做 基于 SDF(有符号距离函数) 的光线行进算法。我们逐行拆解:
🔎 核心概念
-
ray_origin
光线的起点(比如相机位置)。 -
ray_direction
光线的方向(归一化向量)。 -
distance_origin
当前光线走了多远。 -
planeSDF(ray_position)
- SDF = Signed Distance Function(有符号距离函数)。
- 返回当前位置到场景表面的最近距离。
- 如果 >0 → 在表面外;
如果 <0 → 穿进去了(通常表示点在物体内部)。
-
Sphere Tracing 原理
因为 SDF 告诉我们“离物体最近的距离”,所以每次可以大胆走这么远,而不会穿过物体。
这就像拿着一个“安全半径球”在前进,保证不会撞墙。
🌀 循环逻辑
-
计算当前位置:
xxxxxxxxxxray_position = ray_origin + ray_direction * distance_origin; -
计算到物体的最近距离:
xxxxxxxxxxdistance_scene = planeSDF(ray_position); -
向前走这么远:
xxxxxxxxxxdistance_origin += distance_scene; -
收敛条件:
- 如果
distance_scene < SURFACE_DISTANCE,说明非常接近表面,可以认为击中了物体。 - 如果
distance_origin > MAX_MARCHING_STEPS,说明走太远还没碰到 → 判定为空。
- 如果
🎮 类比理解
想象你在 漆黑的房间里摸墙:
- 你知道离墙大概多远(SDF 提供的距离)。
- 于是你可以一下子走这段距离(安全前进)。
- 如果你发现已经非常接近墙面,就停下(命中)。
- 如果走了很久还没遇到墙 → 前面啥也没有。
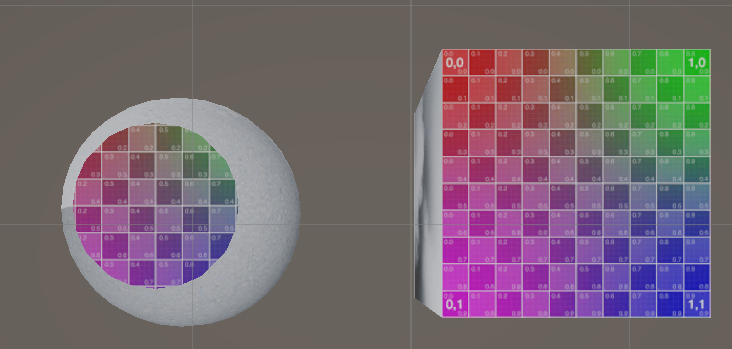
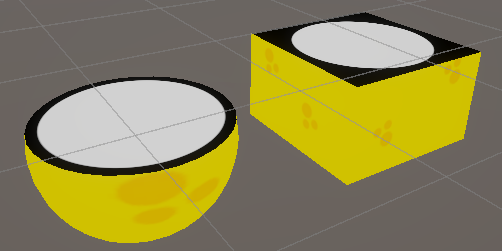
如前所述,需要剔除球体平面上的像素点。要实现这种评估,我们需要获取球体y轴上顶点在物体空间中的坐标位置。通过使用“discard”语句,我们可以剔除位于边缘的像素点,具体操作如下所示。
xxxxxxxxxx
if(vertexPosition.y>_Edge)
discard;
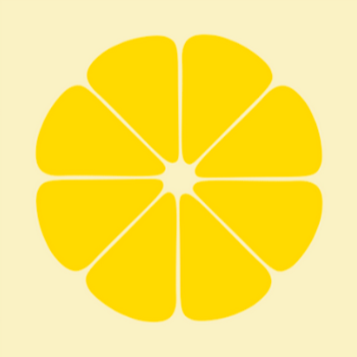
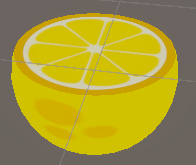
示例:橘子瓤
基础绘制
xxxxxxxxxx
Shader "Unlit/FruitSDF"
{
Properties
{
_MainTex ("Texture", 2D) = "white" {}
_Edge("Edge", Range(-0.5, 0.5))=0.0
}
SubShader
{
Pass
{
CGPROGRAM
#pragma vertex vert
#pragma fragment frag
#include "UnityCG.cginc"
struct appdata
{
float4 vertex : POSITION;
float2 uv : TEXCOORD0;
};
struct v2f
{
float2 uv : TEXCOORD0;
float4 vertex : SV_POSITION;
float3 hitPos : TEXCOORD1;
};
sampler2D _MainTex;
float4 _MainTex_ST;
float _Edge;
// declare the function for the plane
float planeSDF(float3 ray_position)
{
// subtract the edge to the “Y” ray position to increase
// // or decrease the plane position
float plane = ray_position.y - _Edge;
return plane;
}
#define MAX_MARCHING_STEPS 50
#define MAX_DISTANCE 10
#define SURFACE_DISTANCE 0.001
float sphereCasting(float3 ray_origin, float3 ray_direction)
{
float distance_origin = 0;
for (int i = 0; i < MAX_MARCHING_STEPS; i++)
{
float3 ray_position = ray_origin + ray_direction * distance_origin;
float distance_scene = planeSDF(ray_position);
distance_origin += distance_scene;
if (distance_scene < SURFACE_DISTANCE || distance_origin > MAX_MARCHING_STEPS)
break;
}
return distance_origin;
}
v2f vert(appdata v)
{
v2f o;
o.vertex = UnityObjectToClipPos(v.vertex);
o.uv = TRANSFORM_TEX(v.uv, _MainTex);
o.hitPos = v.vertex;
return o;
}
fixed4 frag(v2f i) : SV_Target
{
// sample the texture
fixed4 col = tex2D(_MainTex, i.uv);
//最后,我们可以丢弃位于边缘属性上的像素。
if (i.hitPos.y > _Edge)
discard;
return col;
}
ENDCG
}
}}
开启双面显示
xxxxxxxxxx
SubShader
{
...
//关闭裁剪,显示双面
cull Off
...
Pass {
...
}
获取切面
我们可以将球体的像素投影到其背面,对于平面,可以使用sv_isfrontface语义将其投影到正面。
xxxxxxxxxx
fixed4 frag (v2f i, bool face: SV_IsFrontFace) : SV_Target
{
// sample the texture
fixed4 col = tex2D(_MainTex, i.uv);
//将相机位置转换到物体空间
float3 ray_origin = mul(unity_WorldToObject, float4(_WorldSpaceCameraPos, 1));
//计算射线方向
float3 ray_direction = normalize(i.hitPos - ray_origin);
//调用球体投射函数
float t = sphereCasting(ray_origin, ray_direction);
float3 p= ray_origin+ ray_direction*t;
//最后,我们可以丢弃位于边缘属性上的像素。
if(i.hitPos.y>_Edge)
discard;
return face?col:float4(p,1);
}

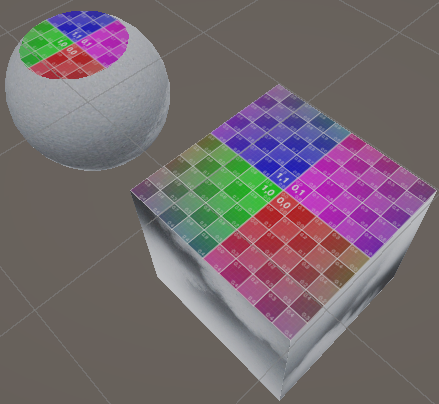
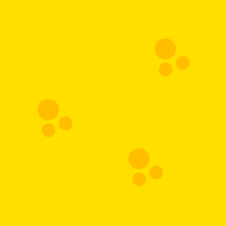
UV和贴图
在这种情况下,如果要在sdf平面上投影纹理,就需要考虑sdf平面背面的位置和方向——记住这个平面是朝向正y轴的。因此,纹理的方向需要与之相反。 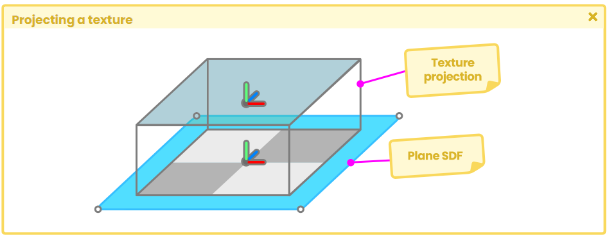
为此,我们可以使用点“p.xz.”计算最大球面投射区域内的uv坐标。 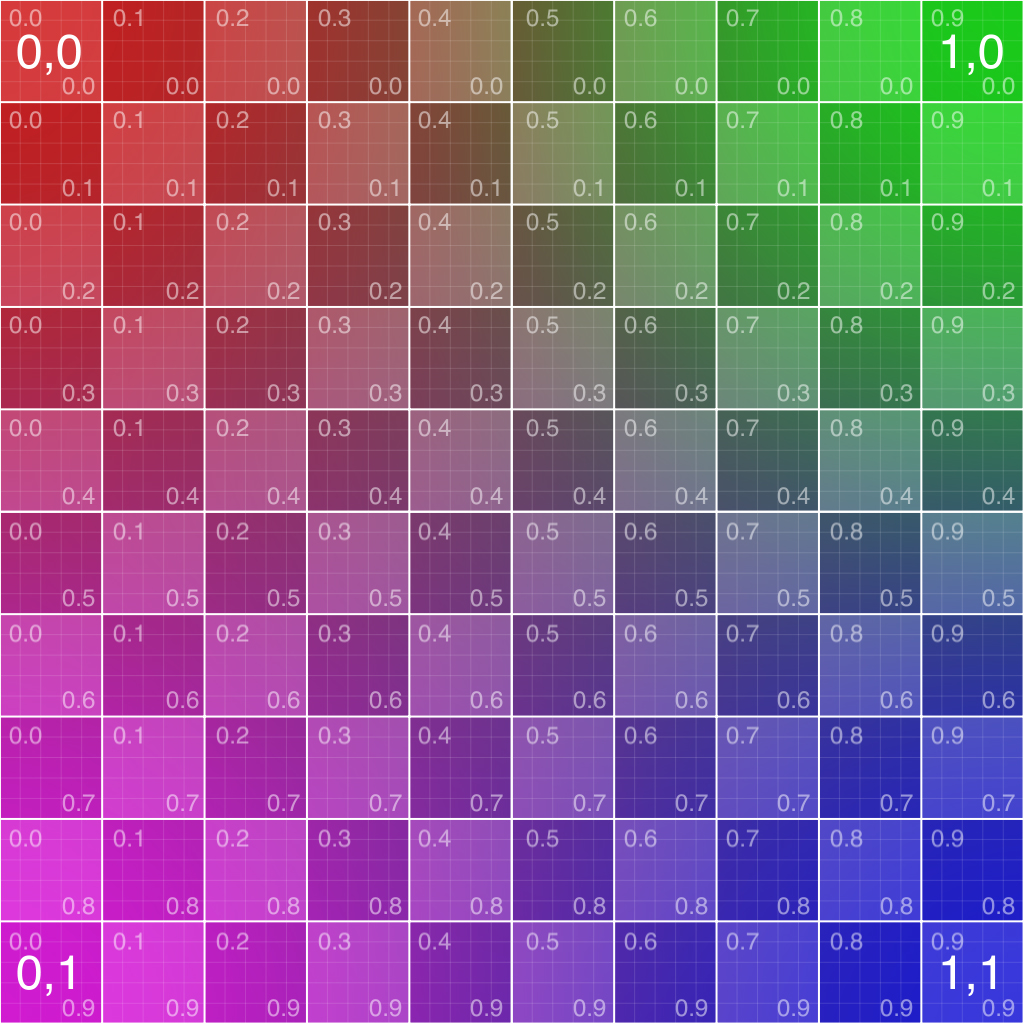
⚛交点局部坐标映射为UV坐标
- 交点 = 相机位置 + 射线方向 × 距离
- 交点坐标的投影(如 x-z)可以作为 UV 变换的初始值
xxxxxxxxxx
fixed4 frag (v2f i, bool face: SV_IsFrontFace) : SV_Target
{
// sample the texture
fixed4 col = tex2D(_MainTex, i.uv);
//将相机位置转换到物体空间
float3 ray_origin = mul(unity_WorldToObject, float4(_WorldSpaceCameraPos, 1));
//计算射线方向
float3 ray_direction = normalize(i.hitPos - ray_origin);
//调用球体投射函数
float t = sphereCasting(ray_origin, ray_direction);
float4 planeCol=0;
if(t<MAX_DISTANCE)
{ //计算交点位置
float3 plane_pos = ray_origin+ ray_direction*t;
float2 uv_plane = float2(plane_pos.x, plane_pos.z);
planeCol = tex2D(_PlaneTex, uv_plane);
}
//最后,我们可以丢弃位于边缘属性上的像素。
if(i.hitPos.y>_Edge)
discard;
return face?col:planeCol;
}
进一步,将UV居中
xxxxxxxxxx
planeCol = tex2D(_PlaneTex, uv_plane-0.5);
_Edge=0.43
_Edge=0.02 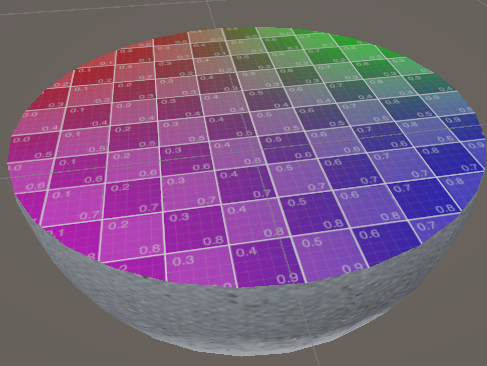
让UV适配球体
xxxxxxxxxx
float uvScale= sqrt(1-pow((_Edge*2),2));
修改边属性值后,我们将看到平面的纹理投影会根据球体的体积而逐渐减小。
xxxxxxxxxx
if(t<MAX_DISTANCE)
{
//计算交点位置
float3 plane_pos = ray_origin+ ray_direction*t;
//黑洞
//float uvScale= sqrt(1-pow((i.hitPos.y-0.05)*2,2));
float uvScale= sqrt(1-pow((_Edge*2),2));
float2 uv_plane= (plane_pos.xz/uvScale)+0.5;
planeCol = tex2D(_PlaneTex, uv_plane);
}
边缘绘制
xxxxxxxxxx
float4 planeCol=0;
float4 circleCol=0;
if(t<MAX_DISTANCE)
{
//计算交点位置
float3 plane_pos = ray_origin+ ray_direction*t;
//黑洞
//float uvScale= sqrt(1-pow((i.hitPos.y-0.05)*2,2));
//利用平面参数调整uv缩放 float uvScale= sqrt(1-pow((_Edge*2),2));
float c= length(plane_pos.xz);
circleCol= smoothstep(c-0.001,c+0.01,_CircleRad-abs(pow(_Edge*(1*0.5),2)));
float2 uv_plane= (plane_pos.xz/uvScale)+0.5;
//planeCol = tex2D(_PlaneTex, uv_plane);
planeCol = circleCol;
}
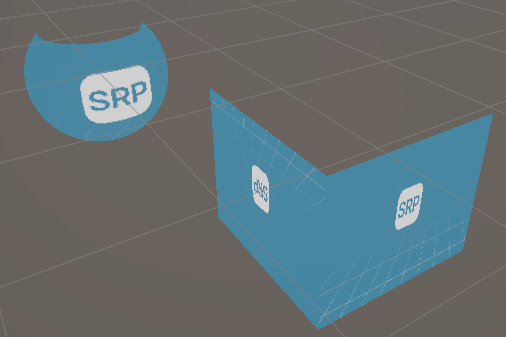
最终效果
Shader "Unlit/FruitSDF"
{
Properties
{
_MainTex ("Texture", 2D) = "white" {}
// plane texture
_PlaneTex ("Plane Texture", 2D) = "white" {}
// edge color projection
_CircleCol ("Circle Color", Color) = (1, 1, 1, 1)
// edge radius projection
_CircleRad ("Circle Radius", Range(0.0, 0.5)) = 0.45
_Edge("Edge", Range(-0.5, 0.5))=0.0
}
SubShader
{
cull Off
Pass {
CGPROGRAM
struct appdata
{
float4 vertex : POSITION;
float2 uv : TEXCOORD0;
};
struct v2f
{
float2 uv : TEXCOORD0;
float4 vertex : SV_POSITION;
float3 hitPos : TEXCOORD1;
};
sampler2D _MainTex;
float4 _MainTex_ST;
sampler2D _PlaneTex;
float4 _CircleCol;
float _CircleRad;
float _Edge;
// declare the function for the plane
float planeSDF(float3 ray_position) {
// subtract the edge to the “Y” ray position to increase
// // or decrease the plane position float plane = ray_position.y - _Edge;
return plane;
}
float sphereCasting(float3 ray_origin, float3 ray_direction)
{ float distance_origin = 0;
for (int i = 0; i < MAX_MARCHING_STEPS; i++)
{ float3 ray_position = ray_origin + ray_direction * distance_origin;
float distance_scene = planeSDF(ray_position);
distance_origin += distance_scene; if (distance_scene < SURFACE_DISTANCE || distance_origin > MAX_MARCHING_STEPS)
break;
} return distance_origin;
}
v2f vert (appdata v)
{ v2f o;
o.vertex = UnityObjectToClipPos(v.vertex);
o.uv = TRANSFORM_TEX(v.uv, _MainTex);
o.hitPos= v.vertex;
return o;
}
fixed4 frag (v2f i, bool face: SV_IsFrontFace) : SV_Target
{
// sample the texture
fixed4 col = tex2D(_MainTex, i.uv);
//将相机位置转换到物体空间
float3 ray_origin = mul(unity_WorldToObject, float4(_WorldSpaceCameraPos, 1));
//计算射线方向(相机指向片元 i.hitPos顶点着色器顶点信息传入片元)
float3 ray_direction = normalize(i.hitPos - ray_origin);
//调用球体投射函数
float t = sphereCasting(ray_origin, ray_direction);
float4 planeCol=0;
float4 circleCol=0;
if(t<MAX_DISTANCE)
{ //计算交点位置
float3 plane_pos = ray_origin+ ray_direction*t;
//黑洞
//float uvScale= sqrt(1-pow((i.hitPos.y-0.05)*2,2));
//利用平面参数调整uv缩放 float uvScale= sqrt(1-pow((_Edge*2),2));
//计算圆形边缘颜色
float c= length(plane_pos.xz);
circleCol= smoothstep(c-0.001,c+0.01,_CircleRad-abs(pow(_Edge*(1*0.5),2)));
float2 uv_plane= (plane_pos.xz/uvScale)+0.5;
planeCol = tex2D(_PlaneTex, uv_plane);
planeCol*= circleCol;
//叠加
planeCol+= (1-circleCol)*_CircleCol;
}
//最后,我们可以丢弃位于边缘属性上的像素。
if(i.hitPos.y>_Edge)
discard;
//正面返回模型纹理;背面返回平面纹理
return face?col:planeCol;
} ENDCG
}
}}
作者:世纪末的魔术师
出处:https://www.cnblogs.com/Firepad-magic/
Unity最受欢迎插件推荐:点击查看
本文版权归作者和博客园共有,欢迎转载,但未经作者同意必须保留此段声明,且在文章页面明显位置给出原文连接,否则保留追究法律责任的权利。

 浙公网安备 33010602011771号