PCL1.141 PCLSharp编译及Unity下使用
PCL1.141 PCLSharp编译及Unity下使
PCL安装及PCLSharp编译
-
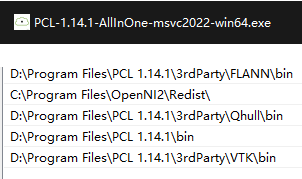
第一步下载pcl最新版1.14.1,安装后,配置环境变量
-
下载PclSharp源码GitHub - jbruening/PclSharp: Point Cloud Library pinvoke binding for c#,找到src文件夹下的PclSharp.Extern 这个封装c++版本的工程,最终输出pclsharp.extern.dll,这个为c++工程,原本是vs2022工程配置的,使用属性表配置跑出来,设置项目繁琐
①这里改为cmake来配置;PclSharp.Extern.Vis这个可视化部分比较简单,也和PclSharp.Extern合并了。
CMakeLists.txt
注意!:
将该cmake置于PclSharp-master\src\PclSharp.Extern
1.注意其中指定的PCL安装路径
2.类似visualizer.cpp没有的可以从中删除
3.CMake生成结束后,在PclSharp-master\bin 打开.sln编译即可,生成 PclSharp.Extern.dll
xxxxxxxxxx
cmake_minimum_required(VERSION 3.0)
project(PclSharp.Extern)
find_package(PCL REQUIRED )
set(CMAKE_BUILD_TYPE Release)
include_directories(${PCL_INCLUDE_DIRS})
include_directories("C:/Program Files/PCL 1.14.1/3rdParty/FLANN/include")
message(${PCL_INCLUDE_DIRS})
link_directories(${PCL_LIBRARY_DIRS})
add_definitions(${PCL_DEFINITIONS})
file(GLOB POINTCLOUD_SRC ./pointcloud/*.cpp)
file(GLOB SAMPLECONSENSUS_SRC ./sampleconsensus/*.cpp)
file(GLOB STD_SRC ./std/*.cpp)
file(GLOB REGISTRATION_SRC ./registration/*.cpp)
file(GLOB SEGMENTATION_SRC ./segmentation/*.cpp)
add_library( PclSharp.Extern SHARED PointSizes.cpp visualizer.cpp
"common/ModelCoefficients.generated.cpp"
"common/PCAOfXYZ.generated.cpp" "common/PclBaseOfXYZ.generated.cpp"
common/PclBaseOfXYZRGBA.generated.cpp
common/PointIndices.generated.cpp
filters/ExtractIndicesXYZ.generated.cpp
filters/Heightmap2DOfXYZ.generated.cpp
filters/StatisticalOutlierRemovalOfXYZ.generated.cpp
filters/VoxelGridOfXYZ.generated.cpp
${POINTCLOUD_SRC}
${SAMPLECONSENSUS_SRC}
${STD_SRC}
${REGISTRATION_SRC}
${SEGMENTATION_SRC}
search/KdTreeOfXYZ.generated.cpp
search/OrganizedNeighborOfXYZ.generated.cpp
features/FPFHEstimationOfPointXYZAndNormal.generated.cpp
features/IntegralImageNormalEstimationOfPointXYZAndNormal.generated.cpp
io/PCDReader.generated.cpp
io/PCDWriter.generated.cpp
"eigen/Matrix4f.generated.cpp"
"eigen/VectorXf.generated.cpp"
algrithom/detectAnomaly.cpp
)
target_link_libraries(PclSharp.Extern ${PCL_LIBRARIES})
②使用vscode配置更方便,如果添加自定义的pcl算法,需要编写代码,visual studio 变量提示不太方便,vscode可以配置c_cpp_properties.json文件:
xxxxxxxxxx
{
"configurations": [
{
"name": "Win32",
"includePath": [
"${workspaceFolder}/**",
"C:/Program Files/PCL 1.14.1/include/pcl-1.14",
"C:/Program Files/PCL 1.14.1/3rdParty/Eigen3/include/eigen3",
"C:/Program Files/PCL 1.14.1/3rdParty/Boost/include/boost-1_84",
"C:/Program Files/OpenNI2/Include",
"C:/Program Files/PCL 1.14.1/3rdParty/FLANN/include"
],
"defines": [
"_DEBUG",
"UNICODE",
"_UNICODE"
],
"windowsSdkVersion": "10.0.22000.0",
"compilerPath": "cl.exe",
"cStandard": "c17",
"cppStandard": "c++17",
"intelliSenseMode": "windows-msvc-x64"
}
],
"version": 4
}
最后生成vs工程,可以到输出目录找到sln工程文件,用vs2022打开,编译即可
其中pcl最新版智能指针已全部使用标准库std::shared_ptr这个了,所以在工程中查找boost::shared_ptr,全部替换为std::shared_ptr
boost::const_pointer_cast替换为std::const_pointer_cast
- 编译pclsharp这个csharp工程
- 测试csharp调用
- 高级部分:如何封装自己的算法,并实现调用?
有的是直接想在csharp上开发pcl算法,但存在一定的弊端:
1)源代码得不到保护
2)托管内存释放存在延时,对程序性能有一定影响
所以最好的方式是使用c++ 进行开发,csharp只负责上位机调用即可。
代码下载地址,包含所有源代码和可以执行的文件
版权声明:上文为博主原创文章,遵循 CC 4.0 BY-SA 版权协议,转载请附上原文出处链接和本声明。 上文链接:https://blog.csdn.net/u011660055/article/details/139338601
编译器是:vs2022pcl版本:1.14.1
Unity下使用
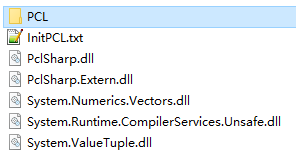
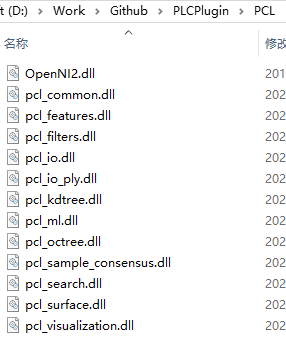
- 为了其他人直接能使用,无需安装PCL及环境,将PCL下需要的库和编译好的PCLSharp和PclSharp.Extern.dll一并放入Unity工程下的Plugins文件夹下
- 将Unity工程指定到PATH
using UnityEngine;
using System;
public class InitPCL : MonoBehaviour
{
void Awake(){
System.Environment.SetEnvironmentVariable("PATH",Application.dataPath + "/Plugins/" + ";" + System.Environment.GetEnvironmentVariable("PATH"));
}
}
Unity调用PCLSharp示例
读取点云并向下取样
x
public class TestPCL : MonoBehaviour
{
public string savePath;
private PointCloudOfXYZ pclBase=new PointCloudOfXYZ();
public Text text;
public Button button;
void Start()
{
button.onClick.AddListener(TestPointCloud);
}
[ContextMenu("TestPointCloud")]
public void TestPointCloud()
{
savePath= Application.streamingAssetsPath + "/input.pcd";
PCDReader reader = new PCDReader();
var data=reader.Read(savePath, pclBase);
text.text = "status: "+data+"/n points: :"+pclBase.Count;
DownSamplePointCloud(pclBase, 0.1f);
}
public void DownSamplePointCloud(PointCloudOfXYZ cloud, float leafSize)
{
var voxelGrid = new VoxelGridOfXYZ();
voxelGrid.SetInputCloud(cloud);
voxelGrid.LeafSize= new PointXYZ() { X=leafSize, Y=leafSize, Z=leafSize };
var filteredCloud = new PointCloudOfXYZ();
voxelGrid.filter(filteredCloud);
text.text+="\n filtered points: "+filteredCloud.Count;
// save xyz file
string path = Application.streamingAssetsPath + "/output.xyz";
using (var writer = new StreamWriter(path))
{
foreach (var point in filteredCloud.Points)
{
writer.WriteLine(point.X + " " + point.Y + " " + point.Z);
}
}
Debug.Log(filteredCloud.Count);
}
}
结果
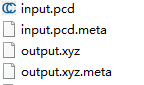
白色点云为彩色点云采样后的结果

作者:世纪末的魔术师
出处:https://www.cnblogs.com/Firepad-magic/
Unity最受欢迎插件推荐:点击查看
本文版权归作者和博客园共有,欢迎转载,但未经作者同意必须保留此段声明,且在文章页面明显位置给出原文连接,否则保留追究法律责任的权利。

 浙公网安备 33010602011771号