所遇到问题和解决情况总结(已开放)
写在前面
作者原先以为复现论文代码的过程中不会遇到太多报错,只是需要环境进行配置即可,但是没想到遇到的路径修改问题一条接着一条,所以以后作者与遇到任何论文项目复现都会从头开始每一次都悉心记录下每次解决问题的过程和 一开始的想法。
接下来是作者在正式进行实验前对项目的代码的理解和实验思路:
自己运行的整体项目文件结构
-
config: 下面只有一个py文件
-
configs:有许多文件夹,每个文件夹对应一个数据集的名称,并且每个数据集的处理流程结构是一样的,里面看起来就像是定制了对应模型的当前数据集的输出路径,只有 VeRI vevhicleID 这两个车辆重识别 这两个数据集比较少
-
datasets:文加下的所有文件都是处理configs文件下的所有数据集对应的指定处理方法的python文件
-
figs:存放着整个项目的网络结构图和运行框架图
-
grad_cam: 最重要的只有一个配置文件
-
logs: 存放着模型每次的运行结果测试结果的图片还有评估结果表格,在这个文件夹的子目录中包含了所有模型当前运行的配置文件 和 当前运行的最佳结果
-
loss:存放着不同损失函数的具体脚本文件,写成类的形式方便后续调用。
-
model:存放着所有训练模型的脚本,在文件的最上面是init.py文件,还有backbone的torch搭建的模型框架文件,但这些都仅仅只是脚本不是真正的主函数训练文件
-
processor: 包含了训练的时候调用不同文件和类的流程,并且成果将不同文件夹下的文件import进来了,这个之中包含了两个主要函数文件 ,其中一个包含了作者的对每一步代码执行过程的注释,解释了运行到那个地方是在调用那个函数,传入参数是什么,返回的参数是什么,并且还包含了作者对于项目运行时代码训练结果大幅度偏离正常情况的理解
-
solver:中间存放着模型训练会用到的所有学习率优化器,优化器等各种优化类的代码脚本,其中每个函数也是都写成类的形式进行调用。主要还是从make_optimizer.py还有 lr_scheduler 这两个文件中作为函数调用接口进行调用
-
utils: 文件在训练模型中会用到的各种训练工具,包含文件读写脚本,产生log的脚本,进行重排序的各种工具脚本
模型训练脚本
train.py: 就是模型训练的脚本
python train.py --config_file /root/xihaobo-a23nmp/TransREID_irt_wr/configs/Prcc/vit_transreid_stride_384.yml MODEL.DEVICE_ID "('0')"

python train.py --config_file /root/xihaobo-a23nmp/TransREID_irt_wr/configs/Prcc/vit_base.yml MODEL.DEVICE_ID "('0')"


python train.py --config_file /disk/wr/TransReID_transfg_irt/configs/Prcc/vit_transreid_stride_384.yml MODEL.DEVICE_ID "('2')"
模型测试脚本
test.py 就是模型进行测试的脚本
核心流程:
- 加载配置文件(通过 --config_file 参数)
- 创建数据加载器(测试集)
- 创建模型架构
- 加载训练好的权重文件 → model.load_param(cfg.TEST.WEIGHT)
- 执行推理测试 → do_inference()
- 输出测试结果(mAP、Rank-1、Rank-5、Rank-10)
需要事先自己准备数据集文件
# 1. 确保数据集路径正确(在配置文件中或命令行修改)
# 2. 运行测试命令
python test.py \
    --config_file configs/<数据集名>/vit_transreid_stride.yml \
    MODEL.DEVICE_ID "('0')" \
    TEST.WEIGHT "../logs/<数据集名>/transformer_best.pth"

# 3. 查看输出日志获取测试结果
模型配置文件和文件路径对应的关系
-
DATASETS.NAMES: 数据集名称(严格按照configs文件夹下的各个数据集文件夹名称进行配置) VehicleID ,Prcc,LTCC
-
DATASET-ROOT_DIR : 根目录路径 ../../data
-
TEST-WEIGHT : 命令行中指定的要进行测试的权重文件
-
OUTPUT_DIR: 测试结果输出路径
-
MODEL-TRANSFOMER_TYPE : 预训练模型地址
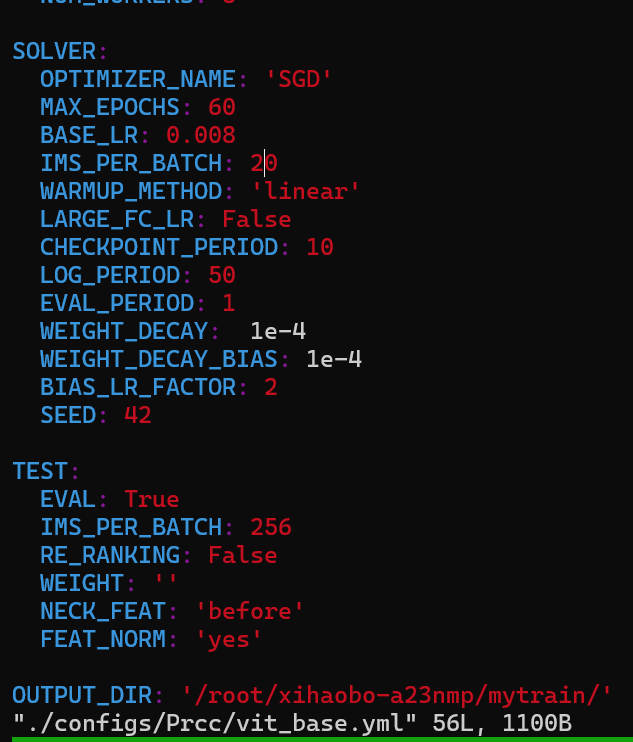
configs 文件下不同yml文件的作用
vit_base.yml 基础模型 没有添加任何模块
vit_jpm.yml 测试JPM模块
vit_sie.yml 测试SIE模块
vit_transreid.yml 包含两个模块的完整测试方法 可以复现第一个表格
vit_transreid_stride.yml 高性能版本
vit_transreid_stride_384.yml 输入尺寸改变 最佳性能
理解这个项目的配置文件的最好方式
原先作者给出的数据集有DukeMTMC,MSMT17...
我直接用:VehicleID 进行对比,这个里面原先路径中出现heshuting的地方发现全部被原封不动的都替换为了wr(wangran) 也就是作者的名字。
其他所有改动路径的地方就是我们需要修改的地方,其他的完全不需要修改
正确测试模型流程
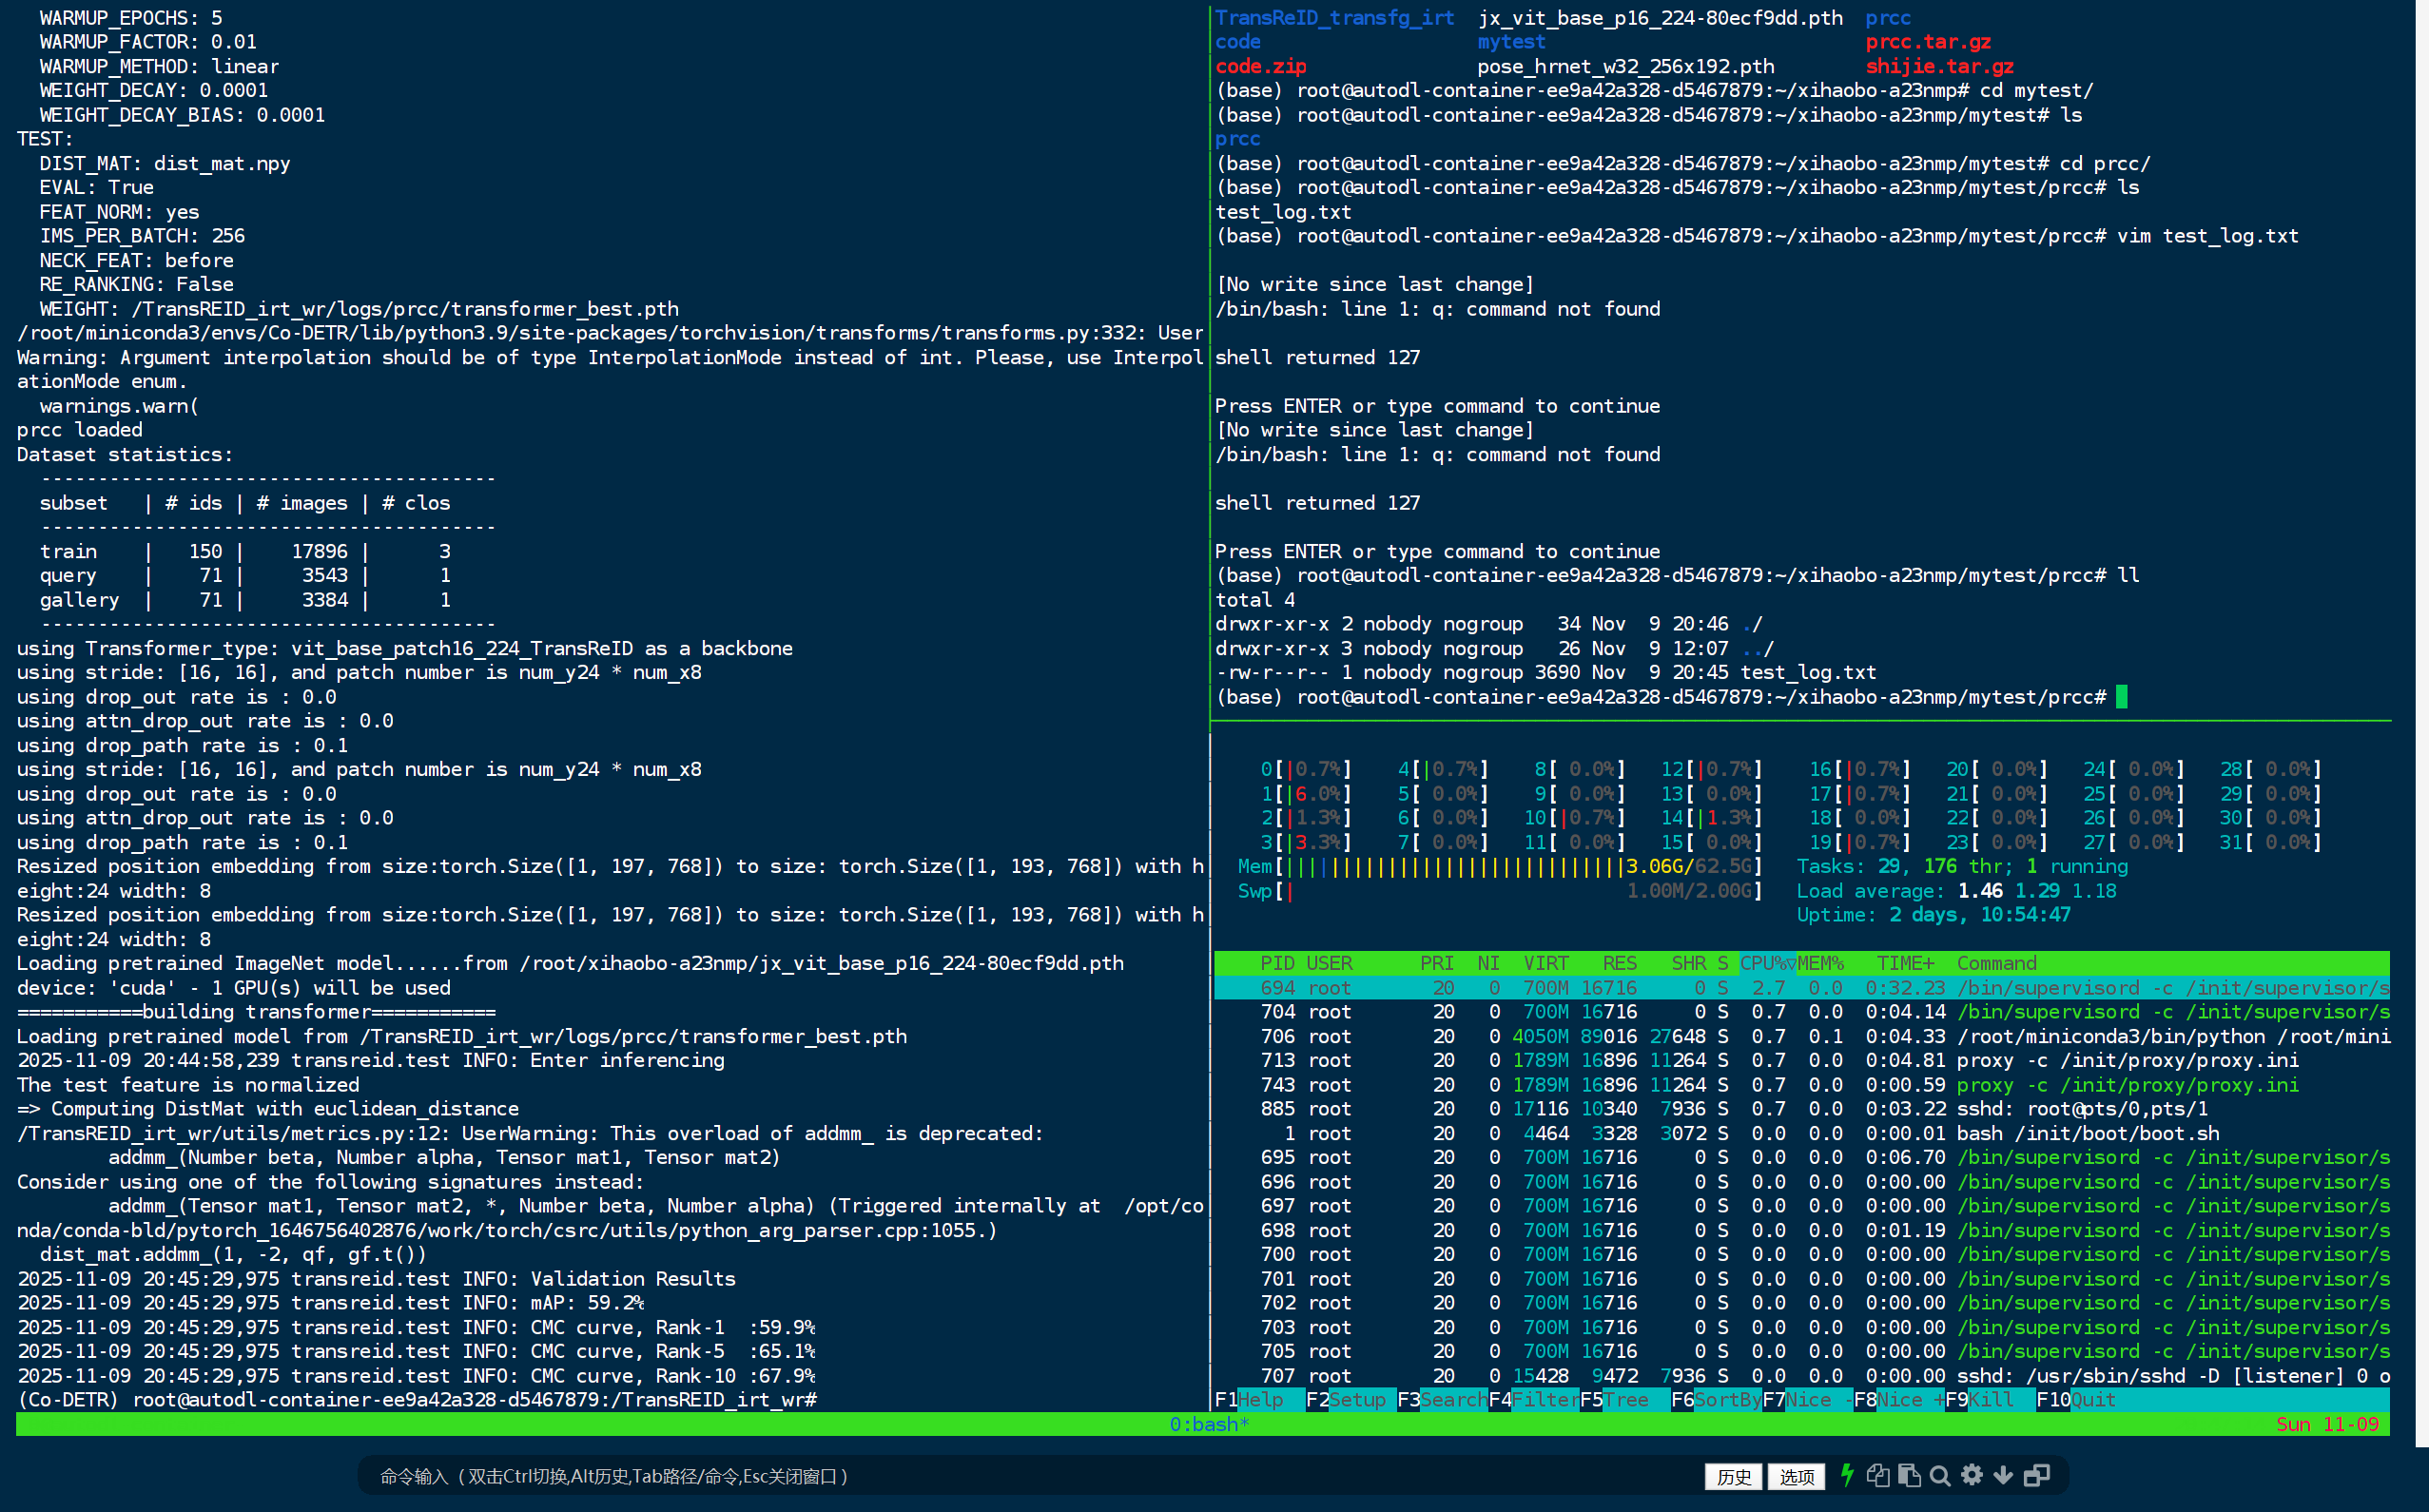
以 prcc 且使用最好的效果 进行测试 ,先所使用/root/xihaobo-a23nmp/TransReID_transfg_irt/configs/Prcc/vit_transreid_384.yml 进行初步测试
-
可以先备份一个测试用的yml文件 也就是 vit_transreid_stride_test.yml
-
首先修改:DEVICE_ID 因为是测试所以使用单卡进行推理了就行
-
修改DATASETS:
NAMES: 就是下面在这个路径文件夹中你给数据集文件夹所起的名字
ROOT_DIR: 所有数据集文件夹的根目录 -
修改TEST参数
WEIGHT:'../logs/xxx.pth'(指定好所需要测试的最佳模型)
IMS_PER_BATCH:xxx 设置batchsize -
OUTPUT_DIR:设置输出模型的路径
-
使用指令运行test.py(可以参考readme文件给出的指令模式):
python test.py --config_file configs/Market/vit_transreid_stride_test.yml


python test.py --config_file /root/xihaobo-a23nmp/TransREID_irt_wr/configs/Prcc/vit_base.yml MODEL.DEVICE_ID "('0')"  TEST.WEIGHT '/root/xihaobo-a23nmp/TransREID_irt_wr/logs/prcc111111111/transformer_60.pth'

python test.py --config_file /root/xihaobo-a23nmp/TransREID_irt_wr/configs/Prcc/vit_transreid_stride_384.yml MODEL.DEVICE_ID "('0')"  TEST.WEIGHT '/root/xihaobo-a23nmp/TransREID_irt_wr/logs/prcc111111111/transformer_60.pth'


python test.py --config_file /root/xihaobo-a23nmp/TransREID_irt_wr/configs/Prcc/vit_transreid_stride_384.yml MODEL.DEVICE_ID "('0')"  TEST.WEIGHT '/root/xihaobo-a23nmp/TransREID_irt_wr/logs/prcc/transformer_best.pth'


python test.py --config_file /disk/wr/TransReID_transfg_irt/configs/Prcc/vit_transreid_stride_384.yml MODEL.DEVICE_ID "('2')"  TEST.WEIGHT '/home/wr/251111/logs/prcc/transformer_best.pth'

python test.py --config_file /disk/wr/TransReID_transfg_irt/configs/Prcc/vit_transreid_stride_384.yml MODEL.DEVICE_ID "('2')"  TEST.WEIGHT '/disk/wr/TransReID_transfg_irt/logs/prcc/transformer_best.pth'

python test.py --config_file /disk/wr/TransReID_transfg_irt/configs/Prcc/vit_transreid_stride_384.yml MODEL.DEVICE_ID "('2')"  TEST.WEIGHT '/disk/wr/TransReID_transfg_irt/logs/prcc111111111/transformer_60.pth'


python test.py --config_file /root/xihaobo-a23nmp/TransREID_irt_wr/configs/NKUP/vit_base.yml MODEL.DEVICE_ID "('0')"  TEST.WEIGHT '/root/xihaobo-a23nmp/TransREID_irt_wr/logs/nkup111111111111/transformer_60.pth'


python test.py --config_file /root/xihaobo-a23nmp/TransREID_irt_wr/configs/LTCC/vit_base.yml MODEL.DEVICE_ID "('0')"  TEST.WEIGHT '/root/xihaobo-a23nmp/TransREID_irt_wr/logs/ltcc/transformer_best.pth'


python test.py --config_file /root/xihaobo-a23nmp/TransREID_irt_wr/configs/NKUP/vit_transreid_stride_384.yml MODEL.DEVICE_ID "('0')" TEST.WEIGHT '/root/xihaobo-a23nmp/TransREID_irt_wr/logs/nkup/transformer_best.pth'
- 如果没能成功就直接显式指定文件参数:
python test.py \
    --config_file configs/Market/vit_transreid_stride.yml \
    MODEL.DEVICE_ID "('0')" \
    DATASETS.ROOT_DIR "('G:/my_datasets')" \
    TEST.WEIGHT "../logs/market_transreid/transformer_best.pth" \
    OUTPUT_DIR "../logs/market_test_results"
错误解决过程
1. 文章使用了多个预训练模型进行训练,首先是:VIT-base
ViT-Base
这个需要在配置文件yml中指定好:

2. 依赖预训练模型报错:
当作者认为不存在其他问题的时候,作者发现了这个问题:
Loading pretrained ImageNet model......from /root/xihaobo-a23nmp/jx_vit_base_p16_224-80ecf9dd.pth
Traceback (most recent call last):
  File "/TransREID_irt_wr/test.py", line 45, in <module>
    model = make_model(cfg, num_class=num_classes, camera_num=camera_num, view_num = view_num)
  File "/TransREID_irt_wr/model/make_model.py", line 657, in make_model
    model = build_transformer(num_class, camera_num, view_num, cfg, __factory_T_type)
  File "/TransREID_irt_wr/model/make_model.py", line 322, in __init__
    self.pose = SimpleHRNet(32,
  File "/TransREID_irt_wr/model/pose_net.py", line 525, in __init__
    checkpoint = torch.load(checkpoint_path, map_location=self.device)
  File "/root/miniconda3/envs/Co-DETR/lib/python3.9/site-packages/torch/serialization.py", line 699, in load
    with _open_file_like(f, 'rb') as opened_file:
  File "/root/miniconda3/envs/Co-DETR/lib/python3.9/site-packages/torch/serialization.py", line 231, in _open_file_like
    return _open_file(name_or_buffer, mode)
  File "/root/miniconda3/envs/Co-DETR/lib/python3.9/site-packages/torch/serialization.py", line 212, in __init__
    super(_open_file, self).__init__(open(name, mode))
FileNotFoundError: [Errno 2] No such file or directory: '/home/wr/.cache/torch/checkpoints/pose_hrnet_w32_256x192.pth'
出现了项目readme文件中没有提到的预训练模型文件,需要下载作者终于找到了这个模型的论文和项目地址。
https://github.com/HRNet/HRNet-Human-Pose-Estimation?tab=readme-ov-file
在readme文件中终于找到了作者提供的readme文件地址:https://drive.google.com/drive/folders/1nzM_OBV9LbAEA7HClC0chEyf_7ECDXYA
3. 路径报错
在意味所有模型应该都下载完的时候,新的问题出现了:
Traceback (most recent call last):
  File "/root/miniconda3/envs/Co-DETR/lib/python3.9/site-packages/scipy/io/matlab/mio.py", line 39, in _open_file
    return open(file_like, mode), True
FileNotFoundError: [Errno 2] No such file or directory: '/disk/wr/TransReID_transfg_irt/logs/SIEN-vcclothes-pytorch_result.mat'

During handling of the above exception, another exception occurred:

Traceback (most recent call last):
  File "/TransREID_irt_wr/test.py", line 65, in <module>
    do_inference(cfg,
  File "/TransREID_irt_wr/processor/processor.py", line 328, in do_inference
    cmc, mAP, _, _, _, _, _ = evaluator.compute()
  File "/TransREID_irt_wr/utils/metrics.py", line 134, in compute
    scipy.io.savemat('/disk/wr/TransReID_transfg_irt/logs/SIEN-vcclothes-pytorch_result.mat', result)
  File "/root/miniconda3/envs/Co-DETR/lib/python3.9/site-packages/scipy/io/matlab/mio.py", line 285, in savemat
    with _open_file_context(file_name, appendmat, 'wb') as file_stream:
  File "/root/miniconda3/envs/Co-DETR/lib/python3.9/contextlib.py", line 119, in __enter__
    return next(self.gen)
  File "/root/miniconda3/envs/Co-DETR/lib/python3.9/site-packages/scipy/io/matlab/mio.py", line 17, in _open_file_context
    f, opened = _open_file(file_like, appendmat, mode)
  File "/root/miniconda3/envs/Co-DETR/lib/python3.9/site-packages/scipy/io/matlab/mio.py", line 45, in _open_file
    return open(file_like, mode), True
FileNotFoundError: [Errno 2] No such file or directory: '/disk/wr/TransReID_transfg_irt/logs/SIEN-vcclothes-pytorch_result.mat'
查看报错可知,这个报错是 metrics.py 的路径指定错误导致;因此修改这个报错就应该可以解决
大功告成
项目默认固定了代码的batch是多少 采用了硬编码的方式进行固定实现
报错:
Traceback (most recent call last):
  File "/root/xihaobo-a23nmp/TransREID_irt_wr/train.py", line 76, in <module>
    do_train(
  File "/root/xihaobo-a23nmp/TransREID_irt_wr/processor/processor.py", line 196, in do_train
    feat, score , cloth_feat ,score_fore,fore_feat,score_transfg ,score_pose= model(img_cat, target, cam_label=target_cam, view_label=target_view )
  File "/root/miniconda3/envs/Co-DETR/lib/python3.9/site-packages/torch/nn/modules/module.py", line 1110, in _call_impl
    return forward_call(*input, **kwargs)
  File "/root/xihaobo-a23nmp/TransREID_irt_wr/model/make_model.py", line 430, in forward
    transfg_feat=self.transfg(x[64:])
  File "/root/miniconda3/envs/Co-DETR/lib/python3.9/site-packages/torch/nn/modules/module.py", line 1110, in _call_impl
    return forward_call(*input, **kwargs)
  File "/root/xihaobo-a23nmp/TransREID_irt_wr/model/backbones/TransFG.py", line 299, in forward
    part_tokens = self.transformer(x)
  File "/root/miniconda3/envs/Co-DETR/lib/python3.9/site-packages/torch/nn/modules/module.py", line 1110, in _call_impl
    return forward_call(*input, **kwargs)
  File "/root/xihaobo-a23nmp/TransREID_irt_wr/model/backbones/TransFG.py", line 285, in forward
    part_encoded = self.encoder(embedding_output)
  File "/root/miniconda3/envs/Co-DETR/lib/python3.9/site-packages/torch/nn/modules/module.py", line 1110, in _call_impl
    return forward_call(*input, **kwargs)
  File "/root/xihaobo-a23nmp/TransREID_irt_wr/model/backbones/TransFG.py", line 270, in forward
    parts = torch.stack(parts).squeeze(1)
RuntimeError: stack expects a non-empty TensorList
所以:
采用动态batch_size 计算;
def forward(self, x, label=None, cam_label=None, view_label=None):
    global_feat = self.base(x, cam_label=cam_label, view_label=view_label)
    feat = self.bottleneck(global_feat)

    if self.training:
        B = global_feat.shape[0]  # 获取实际总 batch size
        bs = B // 2  # 动态计算一半的 batch size

        #  使用动态 bs 而不是硬编码 64
        transfg_feat = self.transfg(x[bs:])
        fused_features = attention(transfg_feat, global_feat[:bs])
        cloth_feat = self.org(global_feat[:bs], global_feat[bs:])
这样就可以实现任意的batch_size进行计算
自动配置文件设置
不会出现空tensor
- TransFG 防御性编程
def forward(self, hidden_states):
    attn_weights = []
    for layer in self.layer:
        hidden_states, weights = layer(hidden_states)
        attn_weights.append(weights)

    part_num, part_inx = self.part_select(attn_weights)
    part_inx = part_inx + 1
    parts = []
    B, num = part_inx.shape

    # ✅ 添加防御性检查
    if num == 0:
        # 如果没有选中任何 part,使用 CLS token 作为 fallback
        parts = hidden_states[:, 0:1]  # [B, 1, hidden_size]
        print(" Warning: No parts selected by Part_Attention, using CLS token as fallback")
    else:
        for i in range(B):
            parts.append(hidden_states[i, part_inx[i,:]])
        parts = torch.stack(parts).squeeze(1)

    concat = torch.cat((hidden_states[:,0].unsqueeze(1), parts), dim=1)
    part_states, part_weights = self.part_layer(concat)
    part_encoded = self.part_norm(part_states)

    return part_encoded
即使part_select 返回结果为空也不会崩溃
自动使用CLS token 作为备用特征
找不到预训练模型
Traceback (most recent call last):
  File "/root/xihaobo-a23nmp/TransREID_irt_wr/train.py", line 68, in <module>
    model = make_model(cfg, num_class=num_classes, camera_num=camera_num, view_num = view_num)
  File "/root/xihaobo-a23nmp/TransREID_irt_wr/model/make_model.py", line 658, in make_model
    model = build_transformer(num_class, camera_num, view_num, cfg, __factory_T_type)
  File "/root/xihaobo-a23nmp/TransREID_irt_wr/model/make_model.py", line 322, in __init__
    self.pose = SimpleHRNet(32,
  File "/root/xihaobo-a23nmp/TransREID_irt_wr/model/pose_net.py", line 525, in __init__
    checkpoint = torch.load(checkpoint_path, map_location=self.device)
  File "/root/miniconda3/envs/Co-DETR/lib/python3.9/site-packages/torch/serialization.py", line 713, in load
    return _legacy_load(opened_file, map_location, pickle_module, **pickle_load_args)
  File "/root/miniconda3/envs/Co-DETR/lib/python3.9/site-packages/torch/serialization.py", line 938, in _legacy_load
    typed_storage._storage._set_from_file(
RuntimeError: unexpected EOF, expected 380299 more bytes. The file might be corrupted
没别的办法, 只能去找到模型才能继续训练
怎么将原先的项目是写死batchsize的情况下,怎么进行一步步调试实现,对所有的报错batch 参数的定位
经过一系列大量的报错调试之后最后定位到这几个文件进行修改batch 就可以实现 基础模型的训练:

- vit_base.yml
slover 下的:ims per batch
- /model/make_model.py

所有20的地方进行替换
3. "loss/make_loss.py"
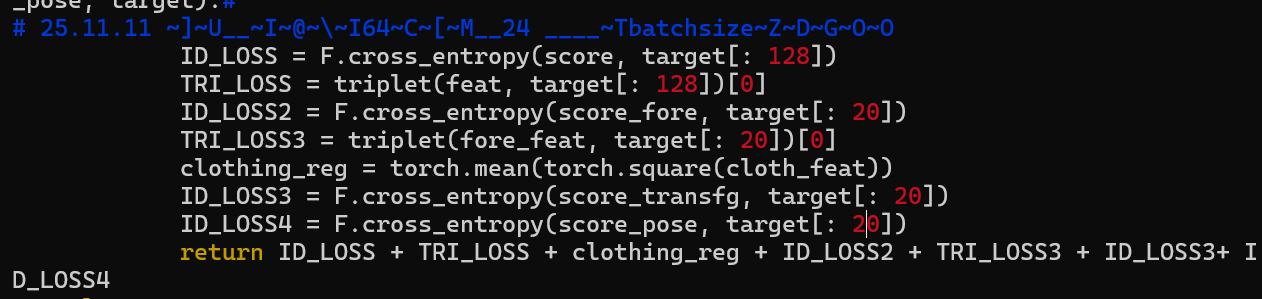
同上
作者在尝试了24 发现不够用 还差22MB
尝试了12 发现是 11G显存
最终16 G 对应的是 20 batch_size
在寻找使用 20 21 22 那个更好的时候中间出现了这个报错,很奇怪 只有 21 22 会出现这个问题 但是20 就没有问题
中间出现了这个报错:
Traceback (most recent call last):
  File "/root/xihaobo-a23nmp/TransREID_irt_wr/train.py", line 76, in <module>
    do_train(
  File "/root/xihaobo-a23nmp/TransREID_irt_wr/processor/processor.py", line 197, in do_train
    loss = loss_fn(feat, score, cloth_feat,score_fore,fore_feat,score_transfg,score_pose,target_cat)
  File "/root/xihaobo-a23nmp/TransREID_irt_wr/loss/make_loss.py", line 106, in loss_func
    TRI_LOSS = triplet(feat, target[: 128])[0]
  File "/root/xihaobo-a23nmp/TransREID_irt_wr/loss/triplet_loss.py", line 125, in __call__
    dist_ap, dist_an = hard_example_mining(dist_mat, labels)
  File "/root/xihaobo-a23nmp/TransREID_irt_wr/loss/triplet_loss.py", line 79, in hard_example_mining
    dist_mat[is_pos].contiguous().view(N, -1), 1, keepdim=True)
RuntimeError: shape '[42, -1]' is invalid for input of size 324
作者使用了随机裁剪,随机旋转,随机擦除,Shuffle
作者很多地方都使用了 shuffle,那么最佳的方式就是:直接将所有的shuffle设置为false。


我们要做的就是在任何地方,都使用相同的seed进行设置。
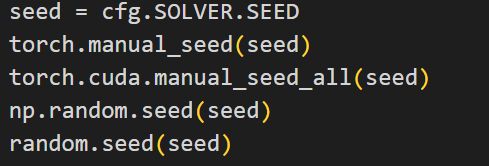
这样就可以将所有随机去除,并且不会影响到原先的性能

 浙公网安备 33010602011771号