
- 【Spring学习笔记-MVC-3】SpringMVC返回Json数据-方式1:http://www.cnblogs.com/ssslinppp/p/4528892.html
- 【Spring学习笔记-MVC-4】返回Json数据-方式2:http://www.cnblogs.com/ssslinppp/p/4530002.html
- 【Spring学习笔记-MVC-3.1】SpringMVC返回Json数据-方式1-扩展:http://www.cnblogs.com/ssslinppp/p/4675495.html
文章的内容主要如下:
- 方式1:讲解如果返回单个对象的json;==>使用@ResponseBody来实现;注解方式
- 方式2:讲解如果返回多个对象的json;==>使用MappingJacksonJsonView来实现;xml配置方式
- 方式1-扩展:讲解如果返回多个对象的json;==>使用@ResponseBody来实现;注解方式
个人认为,使用@ResponseBody方式来实现json数据的返回比较方便,推荐使用。
摘要
使用Spring MVC,实现json数据的返回。
主要步骤:
- 额外添加2个jar包;
- 使用 @ResponseBody声明返回值;
- 配置<mvc:annotation-driven />;==>需要引入:xmlns:mvc="http://www.springframework.org/schema/mvc";
@ResponseBody:
作用:
该注解用于将Controller方法返回的对象,通过适当的HttpMessageConverter转换为指定格式后(如:json格式),写入到Response对象的body数据区。
使用时机:
返回的数据不是html标签的页面,而是其他某种格式的数据时(如json、xml等)使用;
<mvc:annotation-driven /> :
<mvc:annotation-driven /> 会自动注册
- DefaultAnnotationHandlerMapping
- AnnotationMethodHandlerAdapter
两个bean,这两个bean是spring MVC为@Controllers分发请求所必须的。并提供了数据绑定支持,@NumberFormatannotation支持,@DateTimeFormat支持,@Valid支持,读写XML的支持(JAXB),读写JSON的支持(Jackson)。
需要的jar包
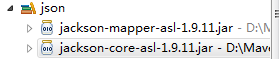
上面两个都是必须的。

项目结构
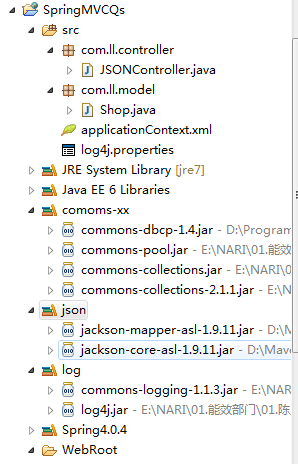
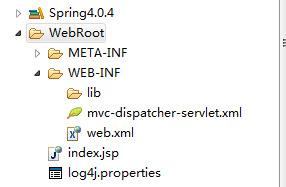
程序代码
Shop.java
package com.ll.model;public class Shop {String name;String staffName[];public String getName() {return name;}public void setName(String name) {this.name = name;}public String[] getStaffName() {return staffName;}public void setStaffName(String[] staffName) {this.staffName = staffName;}}
JSONController.java
package com.ll.controller;import org.springframework.stereotype.Controller;import org.springframework.web.bind.annotation.PathVariable;import org.springframework.web.bind.annotation.RequestMapping;import org.springframework.web.bind.annotation.RequestMethod;import org.springframework.web.bind.annotation.ResponseBody;import com.ll.model.Shop;@Controller@RequestMapping("/kfc/brands")public class JSONController {@RequestMapping(value="{name}", method = RequestMethod.GET)public @ResponseBody Shop getShopInJSON(@PathVariable String name) {System.out.println("-----请求json数据--------");Shop shop = new Shop();shop.setName(name);shop.setStaffName(new String[]{"mkyong1", "mkyong2"});return shop;}}
添加: @ResponseBody作为返回值。
web.xml
<web-app id="WebApp_ID" version="2.4"xmlns="http://java.sun.com/xml/ns/j2ee" xmlns:xsi="http://www.w3.org/2001/XMLSchema-instance"xsi:schemaLocation="http://java.sun.com/xml/ns/j2eehttp://java.sun.com/xml/ns/j2ee/web-app_2_4.xsd"><display-name>Spring Web MVC Application</display-name><context-param><param-name>contextConfigLocation</param-name><param-value>classpath:applicationContext.xml</param-value></context-param><listener><listener-class>org.springframework.web.context.ContextLoaderListener</listener-class></listener><servlet><servlet-name>mvc-dispatcher</servlet-name><servlet-class>org.springframework.web.servlet.DispatcherServlet</servlet-class><load-on-startup>1</load-on-startup></servlet><servlet-mapping><servlet-name>mvc-dispatcher</servlet-name><url-pattern>/rest/*</url-pattern></servlet-mapping></web-app>
mvc-dispatcher-servlet.xml
<beans xmlns="http://www.springframework.org/schema/beans"xmlns:context="http://www.springframework.org/schema/context"xmlns:mvc="http://www.springframework.org/schema/mvc" xmlns:xsi="http://www.w3.org/2001/XMLSchema-instance"xsi:schemaLocation="http://www.springframework.org/schema/beanshttp://www.springframework.org/schema/beans/spring-beans-3.0.xsdhttp://www.springframework.org/schema/contexthttp://www.springframework.org/schema/context/spring-context-3.0.xsdhttp://www.springframework.org/schema/mvchttp://www.springframework.org/schema/mvc/spring-mvc-3.0.xsd"><context:component-scan base-package="com.ll.controller" /><mvc:annotation-driven /></beans>
开启:<mvc:annotation-driven />
applicationContext.xml
<?xml version="1.0" encoding="UTF-8" ?><beans xmlns="http://www.springframework.org/schema/beans"xmlns:xsi="http://www.w3.org/2001/XMLSchema-instance" xmlns:p="http://www.springframework.org/schema/p"xmlns:context="http://www.springframework.org/schema/context"xmlns:aop="http://www.springframework.org/schema/aop" xmlns:tx="http://www.springframework.org/schema/tx"xsi:schemaLocation="http://www.springframework.org/schema/beanshttp://www.springframework.org/schema/beans/spring-beans-3.0.xsdhttp://www.springframework.org/schema/contexthttp://www.springframework.org/schema/context/spring-context-3.0.xsdhttp://www.springframework.org/schema/txhttp://www.springframework.org/schema/tx/spring-tx-3.0.xsdhttp://www.springframework.org/schema/aophttp://www.springframework.org/schema/aop/spring-aop-3.0.xsd"><!-- 扫描类包,将标注Spring注解的类自动转化Bean,同时完成Bean的注入 --><context:component-scan base-package="com.ll.model"/></beans>
运行
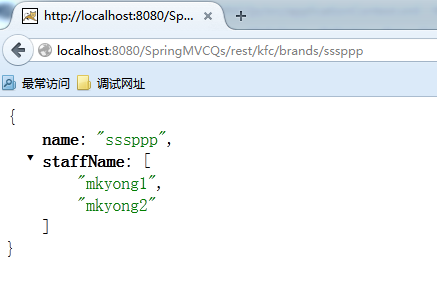
参考网站
http://www.mkyong.com/spring-mvc/spring-3-mvc-and-json-example/
在《【Spring学习笔记-MVC-3】返回Json数据-方式1》中介绍了通过:
- @ResponseBody声明返回值;
- 配置<mvc:annotation-driven />;
来返回json数据。效果如下:
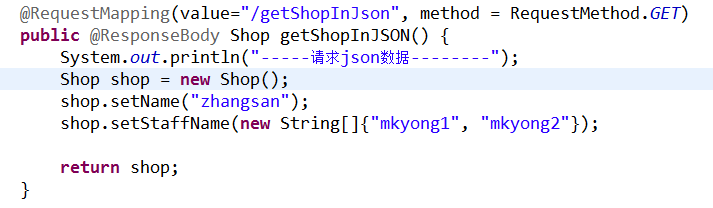 ==>
==>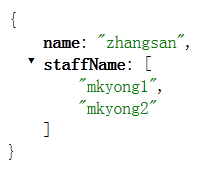 ,
,从上面的效果看,只能返回一个对象,不能返回多个对象,不能做到形如下图的返回结果,
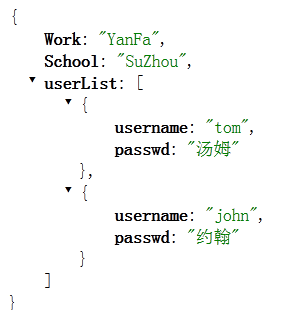
存在局限性(可能可以返回多个,自己不知道如何实现)。
下面介绍的方式2,利用spring mvc返回json数据,可以实现同时返回多个对象的json数据
特别说明:
使用@ResponseBody可以实现同样的效果,实现同时返回多个对象的Json数据,而且使用@ ResponseBody方式更简洁。具体请参考《【Spring学习笔记-MVC-4】返回Json数据-方式1-kuozh》。
spring mvc实现json数据返回
具体步骤:
- 引入额外jar包:
![]() ;
; - 使用bean视图解析器: org.springframework.web.servlet.view.BeanNameViewResolver;
- 使用 org.springframework.web.servlet.view.json.MappingJacksonJsonView配置需要返回的对象;
- 声明:<mvc:annotation-driven />; 经测试,不添加这个声明,将出错;
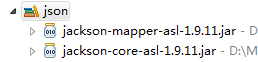 ;
;说明:
spring mvc默认的最常用的视图解析器为org.springframework.web.servlet.view.InternalResourceViewResolver,

它的优先级默认是最低的,spring mvc还提供了许多其他类型的视图解析器,比如bean视图解析器

等,每个视图解析器的优先级都是可以手动设置的。在进行视图解析时,按照视图解析器优先级的顺序去解析视图,直到有视图解析器可以进行解析,解析过程就停止。
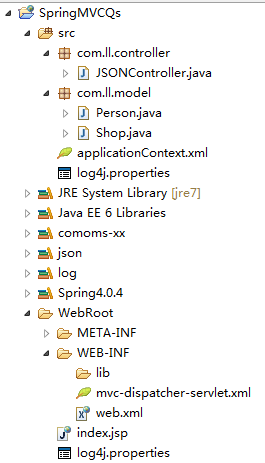
项目结构
配置web.xml

<web-app id="WebApp_ID" version="2.4"xmlns="http://java.sun.com/xml/ns/j2ee" xmlns:xsi="http://www.w3.org/2001/XMLSchema-instance"xsi:schemaLocation="http://java.sun.com/xml/ns/j2eehttp://java.sun.com/xml/ns/j2ee/web-app_2_4.xsd"><display-name>Spring Web MVC Application</display-name><context-param><param-name>contextConfigLocation</param-name><param-value>classpath:applicationContext.xml</param-value></context-param><listener><listener-class>org.springframework.web.context.ContextLoaderListener</listener-class></listener><servlet><servlet-name>mvc-dispatcher</servlet-name><servlet-class>org.springframework.web.servlet.DispatcherServlet</servlet-class><load-on-startup>1</load-on-startup></servlet><servlet-mapping><servlet-name>mvc-dispatcher</servlet-name><url-pattern>/rest/*</url-pattern></servlet-mapping></web-app>
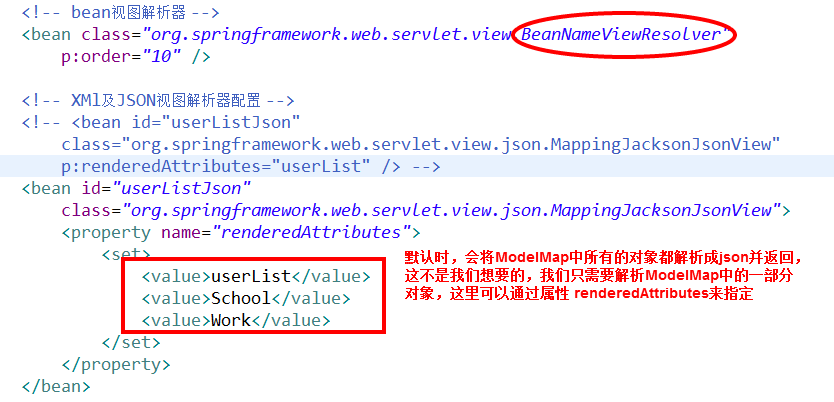
配置mvc-dispatcher-servlet.xml



<beans xmlns="http://www.springframework.org/schema/beans"xmlns:context="http://www.springframework.org/schema/context"xmlns:p="http://www.springframework.org/schema/p"xmlns:mvc="http://www.springframework.org/schema/mvc" xmlns:xsi="http://www.w3.org/2001/XMLSchema-instance"xsi:schemaLocation="http://www.springframework.org/schema/beanshttp://www.springframework.org/schema/beans/spring-beans-3.0.xsdhttp://www.springframework.org/schema/contexthttp://www.springframework.org/schema/context/spring-context-3.0.xsdhttp://www.springframework.org/schema/mvchttp://www.springframework.org/schema/mvc/spring-mvc-3.0.xsd"><context:component-scan base-package="com.ll.controller" /><mvc:annotation-driven /><!-- bean视图解析器 --><bean class="org.springframework.web.servlet.view.BeanNameViewResolver"p:order="10" /><!-- XMl及JSON视图解析器配置 --><!-- <bean id="userListJson"class="org.springframework.web.servlet.view.json.MappingJacksonJsonView"p:renderedAttributes="userList" /> --><bean id="userListJson"class="org.springframework.web.servlet.view.json.MappingJacksonJsonView"><property name="renderedAttributes"><set><value>userList</value><value>School</value><value>Work</value></set></property></bean></beans>
说明:
如果仅仅返回一个对象的json数据,可以使用简写配置:

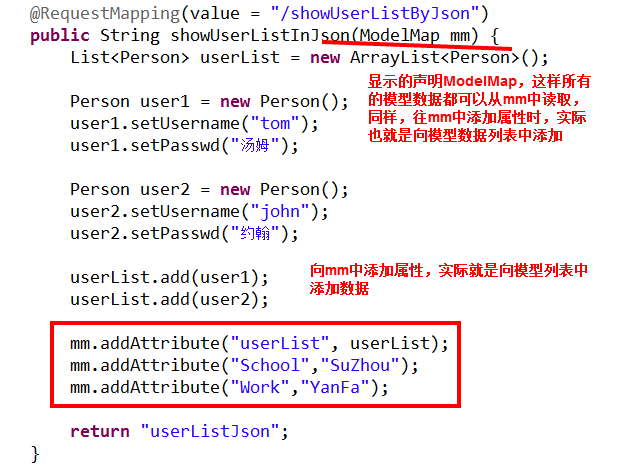
JSONController.java
执行过程解析
1. 在mvc-dispatcher-servlet.xml文件中我们配置了bean视图解析器,并设置器优先级为10,![]() ,
,
 ,
,它的优先级是高于
 ;
;2.逻辑视图返回值为:userListJson,![]()

它首先会被bean视图解析器解析,解析发现 userListJson对应的bean为:userListJson,其对应的视图为:MappingJacksonJsonView;
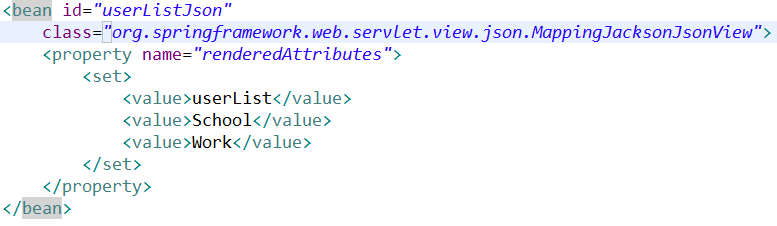
这样,便将userlist、School和work转化为json数据,并返回前台。
运行
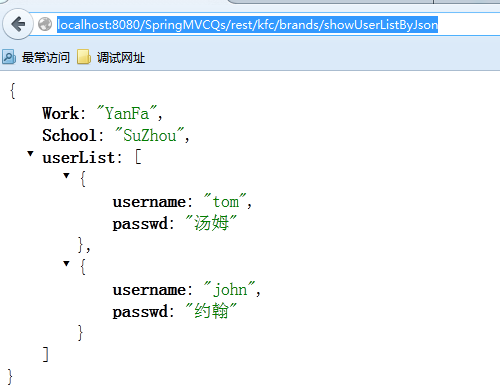
浏览器: http://localhost:8080/SpringMVCQs/rest/kfc/brands/showUserListByJson
完整程序
JSONController.java
package com.ll.controller;import java.util.ArrayList;import java.util.List;import org.springframework.stereotype.Controller;import org.springframework.ui.ModelMap;import org.springframework.web.bind.annotation.RequestMapping;import org.springframework.web.bind.annotation.RequestMethod;import org.springframework.web.bind.annotation.ResponseBody;import com.ll.model.Person;import com.ll.model.Shop;@Controller@RequestMapping("/kfc/brands")public class JSONController {@RequestMapping(value="/getShopInJson", method = RequestMethod.GET)public @ResponseBody Shop getShopInJSON() {System.out.println("-----请求json数据--------");Shop shop = new Shop();shop.setName("zhangsan");shop.setStaffName(new String[]{"mkyong1", "mkyong2"});return shop;}@RequestMapping(value = "/showUserListByJson")public String showUserListInJson(ModelMap mm) {List<Person> userList = new ArrayList<Person>();Person user1 = new Person();user1.setUsername("tom");user1.setPasswd("汤姆");Person user2 = new Person();user2.setUsername("john");user2.setPasswd("约翰");userList.add(user1);userList.add(user2);mm.addAttribute("userList", userList);mm.addAttribute("School","SuZhou");mm.addAttribute("Work","YanFa");return "userListJson";}}
