Spring.zzh
Spring介绍
1.什么是spring框架
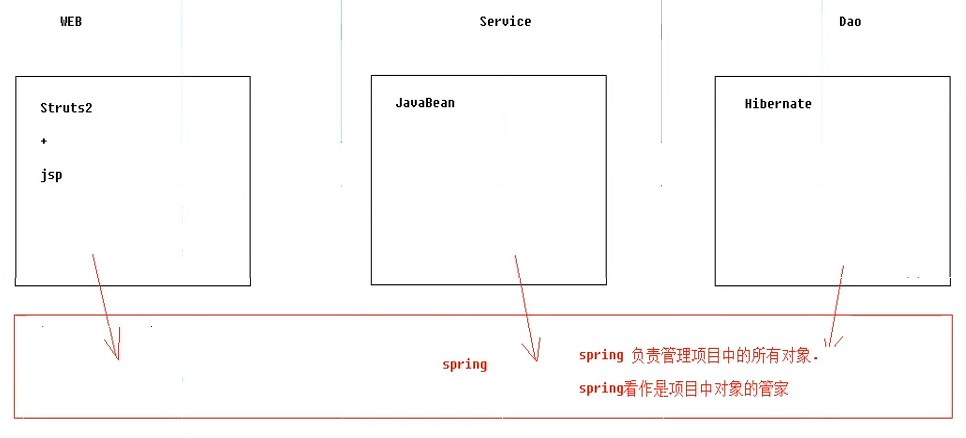
Spring是一个开放源代码的设计层面框架,是一站式框架,spring框架性质是属于容器性质的,容器中装什么对象,就有什么功能.Spring的核心是控制反转(IoC)和面向切面(AOP),他解决的是业务逻辑层和其他各层的松耦合问题,因此它将面向接口的编程思想贯穿整个系统应用
EE开发分成三层架构:
WEB层:Spring MVC
业务层:Bean管理(IOC)
持久层:Spring的JDBC模板,ORM模板用于整合其他的持久层框架
2.三层架构中spring的位置
Spring搭建
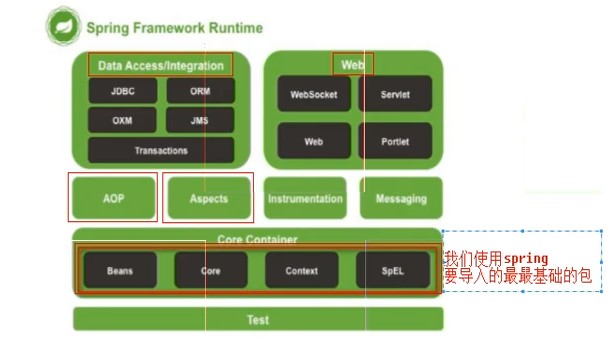
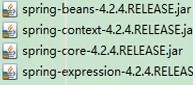
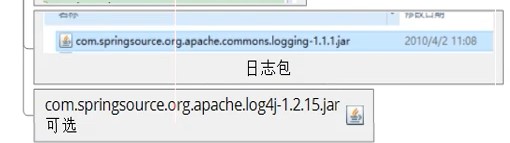
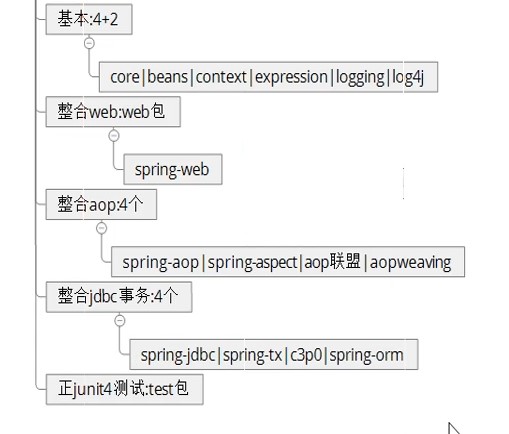
1.导包
2.创建一个对象
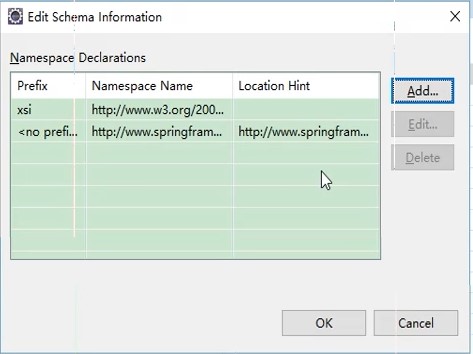
3.书写配置注册对象到容器
①位置任意(建议放到src下)
②配置文件名任意(建议applicationContext.xml)
<?xml version="1.0" encoding="UTF-8"?>
<beans xmlns:xsi="http://www.w3.org/2001/XMLSchema-instance" xmlns="http://www.springframework.org/schema/beans" xsi:schemaLocation="http://www.springframework.org/schema/beans http://www.springframework.org/schema/beans/spring-beans-4.2.xsd ">
	<bean name="user" class="com.zzh.spring.bean.User">

	</bean>
</beans>
6
1
2
<beans xmlns:xsi="http://www.w3.org/2001/XMLSchema-instance" xmlns="http://www.springframework.org/schema/beans" xsi:schemaLocation="http://www.springframework.org/schema/beans http://www.springframework.org/schema/beans/spring-beans-4.2.xsd ">3
<bean name="user" class="com.zzh.spring.bean.User">4
5
</bean>6
</beans>4.导入约束
5.代码测试
package com.zzh.spring.hello;

import org.junit.Test;
import org.springframework.context.ApplicationContext;
import org.springframework.context.support.ClassPathXmlApplicationContext;

import com.zzh.spring.bean.User;

public class Demo {
	@Test
	public void fun1() {
		//1.创建容器对象
		ApplicationContext ac = new ClassPathXmlApplicationContext("applicationContext.xml");
		//2.向容器"拿"user对象
		User u = (User) ac.getBean("user");
		//3.打印user对象
		System.out.println(u);
	}
}
20
1
package com.zzh.spring.hello;2
3
import org.junit.Test;4
import org.springframework.context.ApplicationContext;5
import org.springframework.context.support.ClassPathXmlApplicationContext;6
7
import com.zzh.spring.bean.User;8
9
public class Demo {10
11
public void fun1() {12
//1.创建容器对象13
ApplicationContext ac = new ClassPathXmlApplicationContext("applicationContext.xml");14
//2.向容器"拿"user对象15
User u = (User) ac.getBean("user");16
//3.打印user对象17
System.out.println(u);18
}19
}20
Spring概念
思想
IOC:Inverser Of Control反转控制,将我们创建对象的方式反转了,以前对象的创建是由我们开发人员维护,包括依赖关系也是自己注入,使用spring后,对象的创建以及依赖关系可以由spring完成创建以及注入,反转控制就是反转了对象的创建方式,从我们自己创建反转给了程序(spring)
DI:Dependency Injection依赖注入,实现IOC思想需要DI做支持,
注入方式有:set方法注入,构造方法注入,字段注入
注入类型:值类型注入---8大基本数据类型,引用类型注入---将依赖对象注入
applicationContext&BeanFactory
BeanFactory接口:spring原始接口,针对原始接口的实现类功能较为单一.BeanFactory接口实现类的容器,特点是每次在获得对象时才会创建对象
ApplicationContext:每次容器启动时就会创建容器中配置的所有对象,并提供更多功能
从类路径下加载配置文件:ClassPathXmlApplicationContext
从硬盘绝对路径下加载配置文件:FileSystemXmlApplicationContext
结论:web开发中,使用applicationContext,在资源匮乏的环境可以使用BeanFactory
配置详解
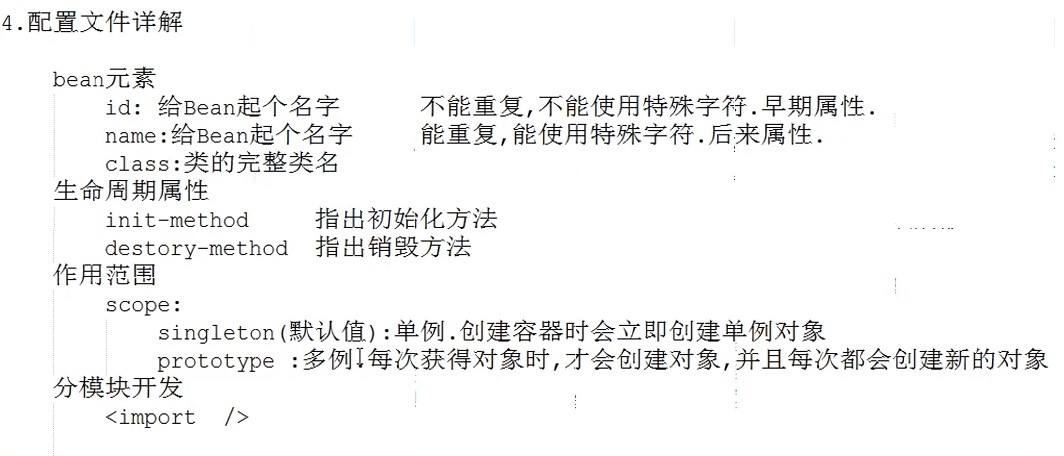
1.Bean元素
<?xml version="1.0" encoding="UTF-8"?>
<beans xmlns:xsi="http://www.w3.org/2001/XMLSchema-instance" xmlns="http://www.springframework.org/schema/beans" xsi:schemaLocation="http://www.springframework.org/schema/beans http://www.springframework.org/schema/beans/spring-beans-4.2.xsd ">
	<!-- 将User对象交给spring容器管理 -->
	<!-- Bean元素:使用该元素描述需要spring容器管理的对象
		name属性:被管理对象的完整类名,获得对象时根据名称获得对象,可以重复,可以使用特殊字符
		class属性:被管理对象的完整类名
		id属性:与name属性一模一样.名称不可以重复,不能使用特殊字符
		结论:尽量使用name属性
	 -->
	<bean name="user" class="com.zzh.spring.bean.User">

	</bean>
</beans>
13
1
2
<beans xmlns:xsi="http://www.w3.org/2001/XMLSchema-instance" xmlns="http://www.springframework.org/schema/beans" xsi:schemaLocation="http://www.springframework.org/schema/beans http://www.springframework.org/schema/beans/spring-beans-4.2.xsd ">3
<!-- 将User对象交给spring容器管理 -->4
<!-- Bean元素:使用该元素描述需要spring容器管理的对象5
name属性:被管理对象的完整类名,获得对象时根据名称获得对象,可以重复,可以使用特殊字符6
class属性:被管理对象的完整类名7
id属性:与name属性一模一样.名称不可以重复,不能使用特殊字符8
结论:尽量使用name属性9
-->10
<bean name="user" class="com.zzh.spring.bean.User">11
12
</bean>13
</beans>2.spring创建对象的方式
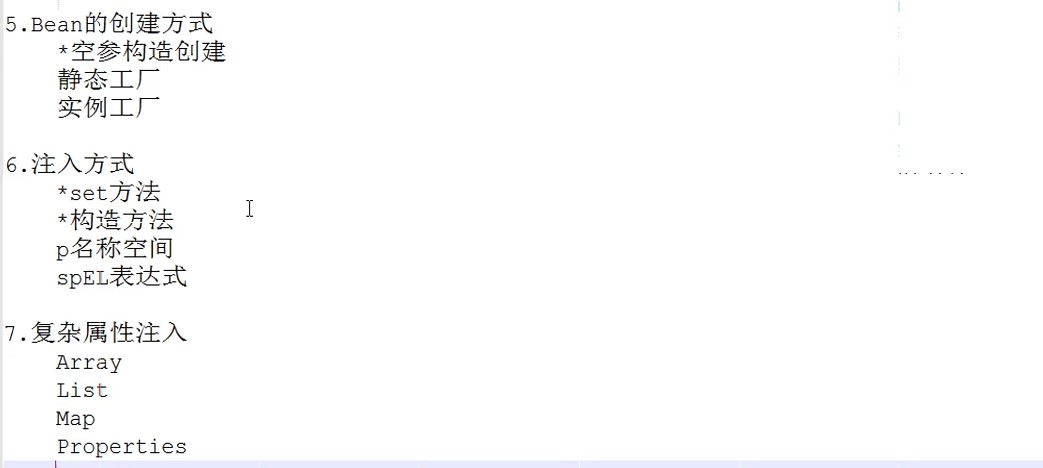
1.空参构造方式
2.静态工厂
3.实例工厂
<?xml version="1.0" encoding="UTF-8"?>
<beans xmlns:xsi="http://www.w3.org/2001/XMLSchema-instance" xmlns="http://www.springframework.org/schema/beans" xsi:schemaLocation="http://www.springframework.org/schema/beans http://www.springframework.org/schema/beans/spring-beans-4.2.xsd ">
	<!-- 创建方式1:空参构造创建 -->
	<bean name="user" class="com.zzh.spring.bean.User"></bean>
	<!-- 创建方式2:静态工厂创建
		调用UserFactory的createUser1方法创建名为user2的对象,放入容器
	 -->
	<bean name="user1" class="com.zzh.spring.create.UserFactory" factory-method="createUser1"></bean>
	<!-- 创建方式3:实例工厂创建
		调用UserFactory的createUser2方法创建名为user2的对象,放入容器
	 -->
	<bean name="userFactory" class="com.zzh.spring.create.UserFactory" ></bean>
	<bean name="user2" factory-bean="userFactory" factory-method="createUser2"></bean>
</beans>
14
1
2
<beans xmlns:xsi="http://www.w3.org/2001/XMLSchema-instance" xmlns="http://www.springframework.org/schema/beans" xsi:schemaLocation="http://www.springframework.org/schema/beans http://www.springframework.org/schema/beans/spring-beans-4.2.xsd ">3
<!-- 创建方式1:空参构造创建 -->4
<bean name="user" class="com.zzh.spring.bean.User"></bean>5
<!-- 创建方式2:静态工厂创建6
调用UserFactory的createUser1方法创建名为user2的对象,放入容器7
-->8
<bean name="user1" class="com.zzh.spring.create.UserFactory" factory-method="createUser1"></bean>9
<!-- 创建方式3:实例工厂创建10
调用UserFactory的createUser2方法创建名为user2的对象,放入容器11
-->12
<bean name="userFactory" class="com.zzh.spring.create.UserFactory" ></bean>13
<bean name="user2" factory-bean="userFactory" factory-method="createUser2"></bean>14
</beans>package com.zzh.spring.create;
import org.junit.Test;
import org.springframework.context.ApplicationContext;
import org.springframework.context.support.ClassPathXmlApplicationContext;
import com.zzh.spring.bean.User;
public class Demo {
//空参构造获取bean
@Test
public void fun1() {
ApplicationContext ac = new ClassPathXmlApplicationContext("com/zzh/spring/create/applicationContext.xml");
User u = (User) ac.getBean("user");
System.out.println(u);
}
//静态方法获取bean
@Test
public void fun2() {
ApplicationContext ac = new ClassPathXmlApplicationContext("com/zzh/spring/create/applicationContext.xml");
User u = (User) ac.getBean("user1");
System.out.println(u);
}
//实例方法获取bean
@Test
public void fun3() {
ApplicationContext ac = new ClassPathXmlApplicationContext("com/zzh/spring/create/applicationContext.xml");
User u = (User) ac.getBean("user2");
System.out.println(u);
}
}
34
1
package com.zzh.spring.create;2
3
import org.junit.Test;4
import org.springframework.context.ApplicationContext;5
import org.springframework.context.support.ClassPathXmlApplicationContext;6
7
import com.zzh.spring.bean.User;8
9
public class Demo {10
//空参构造获取bean11
12
public void fun1() {13
ApplicationContext ac = new ClassPathXmlApplicationContext("com/zzh/spring/create/applicationContext.xml");14
User u = (User) ac.getBean("user");15
System.out.println(u);16
}17
18
//静态方法获取bean19
20
public void fun2() {21
ApplicationContext ac = new ClassPathXmlApplicationContext("com/zzh/spring/create/applicationContext.xml");22
User u = (User) ac.getBean("user1");23
System.out.println(u);24
}25
26
//实例方法获取bean27
28
public void fun3() {29
ApplicationContext ac = new ClassPathXmlApplicationContext("com/zzh/spring/create/applicationContext.xml");30
User u = (User) ac.getBean("user2");31
System.out.println(u);32
}33
}34
package com.zzh.spring.create;

import com.zzh.spring.bean.User;

public class UserFactory {
	public static User createUser1() {
		User u = new User();
		System.out.println("静态方法创建user");
		return u;
	}

	public User createUser2() {
		User u = new User();
		System.out.println("实例方法创建user");
		return u;
	}
}
18
1
package com.zzh.spring.create;2
3
import com.zzh.spring.bean.User;4
5
public class UserFactory {6
public static User createUser1() {7
User u = new User();8
System.out.println("静态方法创建user");9
return u;10
}11
12
public User createUser2() {13
User u = new User();14
System.out.println("实例方法创建user");15
return u;16
}17
}18
Bean元素进阶
1.scope属性:
singleton(默认值):单例对象,被标识为单例的对象在spring容器中只会存在一个实例
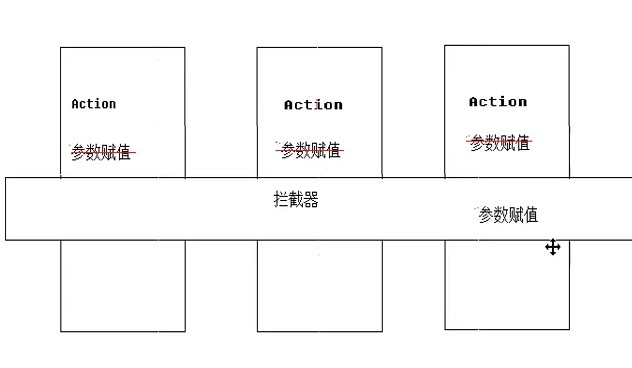
prototype:多例原型,被标识为多例对象,每次再获得才会创建,每次创建都是新的对象,整合struts2时,ActionBean必须配置为多例的
request:web环境下,对象与request生命周期一致
session:web环境下,对象与session生命周期一致
2.生命周期属性:
配置一个方法作为生命周期初始化方法,spring会在对象创建之后立即调用----int-method
配置一个方法作为生命周期的销毁方法,spring容器在关闭并销毁所有容器中的对象之前调用----destroy-method

Spring的分模块配置
	<!-- spring的分模块配置 -->
	<import resource="com/zzh/spring/create/applicationContext.xml"/>x
2
1
<!-- spring的分模块配置 -->2
<import resource="com/zzh/spring/create/applicationContext.xml"/>xspring的属性注入
1.set方法注入
<?xml version="1.0" encoding="UTF-8"?>
<beans xmlns:xsi="http://www.w3.org/2001/XMLSchema-instance" xmlns="http://www.springframework.org/schema/beans" xsi:schemaLocation="http://www.springframework.org/schema/beans http://www.springframework.org/schema/beans/spring-beans-4.2.xsd ">
	<!-- set方法注入 -->
	<bean name="user" class="com.zzh.spring.bean.User">
		<!-- 值类型注入:为User对象中名为name的属性注入zzh为值 -->
		<property name="name" value="zzh"></property>
		<property name="age" value="21"></property>
		<!-- 引用类型注入:为car属性注入配置在容器中的car对象 -->
		<property name="car" ref="car"></property>
	</bean>

	<!-- 将car对象配置到容器中 -->
	<bean name="car" class="com.zzh.spring.bean.Car">
		<property name="name" value="奥拓"></property>
		<property name="color" value="星空灰"></property>
	</bean>
</beans>
17
1
2
<beans xmlns:xsi="http://www.w3.org/2001/XMLSchema-instance" xmlns="http://www.springframework.org/schema/beans" xsi:schemaLocation="http://www.springframework.org/schema/beans http://www.springframework.org/schema/beans/spring-beans-4.2.xsd ">3
<!-- set方法注入 -->4
<bean name="user" class="com.zzh.spring.bean.User">5
<!-- 值类型注入:为User对象中名为name的属性注入zzh为值 -->6
<property name="name" value="zzh"></property>7
<property name="age" value="21"></property>8
<!-- 引用类型注入:为car属性注入配置在容器中的car对象 -->9
<property name="car" ref="car"></property>10
</bean>11
12
<!-- 将car对象配置到容器中 -->13
<bean name="car" class="com.zzh.spring.bean.Car">14
<property name="name" value="奥拓"></property>15
<property name="color" value="星空灰"></property>16
</bean>17
</beans>2.构造函数注入
	<!-- 构造函数注入 -->
	<bean name="user2" class="com.zzh.spring.bean.User">
		<!--
			name属性:构造方法中的参数名
			value属性:参数的值
			index属性:构造方法的参数索引
			type属性:构造方法中参数的类型
		 -->
		<constructor-arg name="name" value="zhuzhanhong" type="java.lang.String" index="0"></constructor-arg>
		<constructor-arg name="age" value="18"></constructor-arg>
		<constructor-arg name="car" ref="car"></constructor-arg>
	</bean>
12
1
<!-- 构造函数注入 -->2
<bean name="user2" class="com.zzh.spring.bean.User">3
<!-- 4
name属性:构造方法中的参数名5
value属性:参数的值6
index属性:构造方法的参数索引7
type属性:构造方法中参数的类型8
-->9
<constructor-arg name="name" value="zhuzhanhong" type="java.lang.String" index="0"></constructor-arg>10
<constructor-arg name="age" value="18"></constructor-arg>11
<constructor-arg name="car" ref="car"></constructor-arg>12
</bean>3.p名称空间注入
<!-- p名称空间注入
		 1.导入p名称空间:xmlns:p="http://www.springframework.org/schema/p"
		 2.使用p:属性完成注入
		 	|-值类型:p:属性名="值"
		 	|-对象类型:p:属性名-ref="bean名称"
	-->
	<bean name="user3" class="com.zzh.spring.bean.User" p:name="kirito" p:age="17" p:car-ref="car"></bean>
7
1
<!-- p名称空间注入 2
1.导入p名称空间:xmlns:p="http://www.springframework.org/schema/p"3
2.使用p:属性完成注入4
|-值类型:p:属性名="值"5
|-对象类型:p:属性名-ref="bean名称" 6
-->7
<bean name="user3" class="com.zzh.spring.bean.User" p:name="kirito" p:age="17" p:car-ref="car"></bean> 4.spel注入
	<!-- spel注入:spring Expression Language spring表达语言 -->
	<bean name="user4" class="com.zzh.spring.bean.User">
		<property name="name" value="#{user3.name}"></property>
		<property name="age" value="#{user3.age}"></property>
		<property name="car" ref="car"></property>
	</bean>
6
1
<!-- spel注入:spring Expression Language spring表达语言 -->2
<bean name="user4" class="com.zzh.spring.bean.User">3
<property name="name" value="#{user3.name}"></property>4
<property name="age" value="#{user3.age}"></property>5
<property name="car" ref="car"></property>6
</bean> 5.复杂类型注入
	<!-- 复杂类型注入 -->
	<bean name="cb" class="com.zzh.spring.bean.CollectionBean">
		<!-- 如果只往数组内注入一个值或对象,直接使用set方式注入即可
		<property name="arr" value="zzh"></property>
		-->
		<property name="arr">
			<array>
				<value>zzh</value>
				<ref bean="user3"/>
			</array>
		</property>

		<!-- 如果只往集合内注入一个值或对象,直接使用set方式注入即可
		<property name="list" value="zzh"></property>
		-->
		<property name="list">
			<list>
				<value>zhu</value>
				<ref bean="car"/>
			</list>
		</property>

		<property name="map">
			<map>
				<entry key="zzh" value="21"></entry>
				<entry key="zhu" value-ref="user3"></entry>
				<entry key-ref="user3" value="21"></entry>
			</map>
		</property>

		<property name="prop">
			<props>
				<prop key="url">www.baidu.com</prop>
				<prop key="goo">www.google.com</prop>
			</props>
		</property>
	</bean>
37
1
<!-- 复杂类型注入 -->2
<bean name="cb" class="com.zzh.spring.bean.CollectionBean">3
<!-- 如果只往数组内注入一个值或对象,直接使用set方式注入即可 4
<property name="arr" value="zzh"></property> 5
-->6
<property name="arr">7
<array>8
<value>zzh</value>9
<ref bean="user3"/>10
</array>11
</property>12
13
<!-- 如果只往集合内注入一个值或对象,直接使用set方式注入即可 14
<property name="list" value="zzh"></property> 15
-->16
<property name="list">17
<list>18
<value>zhu</value>19
<ref bean="car"/>20
</list>21
</property>22
23
<property name="map">24
<map>25
<entry key="zzh" value="21"></entry>26
<entry key="zhu" value-ref="user3"></entry>27
<entry key-ref="user3" value="21"></entry>28
</map>29
</property>30
31
<property name="prop">32
<props>33
<prop key="url">www.baidu.com</prop>34
<prop key="goo">www.google.com</prop>35
</props>36
</property>37
</bean>spring在struts中的应用的web.xml配置
  <!-- 配置监听器使spring容器随项目的启动而创建,随项目的关闭而销毁 -->
  <listener>
  	<listener-class>org.springframework.web.context.ContextLoaderListener</listener-class>
  </listener>
  <!-- 指定加载spring配置文件的位置 -->
  <context-param>
  	<param-name>contextConfigLocation</param-name>
  	<param-value>classpath:applicationContext.xml</param-value>
  </context-param>
9
1
<!-- 配置监听器使spring容器随项目的启动而创建,随项目的关闭而销毁 -->2
<listener>3
<listener-class>org.springframework.web.context.ContextLoaderListener</listener-class>4
</listener>5
<!-- 指定加载spring配置文件的位置 -->6
<context-param>7
<param-name>contextConfigLocation</param-name>8
<param-value>classpath:applicationContext.xml</param-value>9
</context-param>获取容器中已经配置了的对象
		//获得spring容器=>从Application域获得
		//1.获得servletContext对象
		ServletContext sc = ServletActionContext.getServletContext();
		//2.从Sc中获得ac容器
		WebApplicationContext ac = WebApplicationContextUtils.getWebApplicationContext(sc);
		//3.从容器中获得customerService
		CustomerService customerService = (CustomerService) ac.getBean("customerService");
7
1
//获得spring容器=>从Application域获得2
//1.获得servletContext对象3
ServletContext sc = ServletActionContext.getServletContext();4
//2.从Sc中获得ac容器5
WebApplicationContext ac = WebApplicationContextUtils.getWebApplicationContext(sc);6
//3.从容器中获得customerService7
CustomerService customerService = (CustomerService) ac.getBean("customerService");配置对象
	<!-- 配置Dao -->
	<bean name="customerDao" class="cn.itheima.dao.impl.CustomerDaoImpl" ></bean>
	<bean name="linkManDao" class="cn.itheima.dao.impl.LinkManDaoImpl" ></bean>
	<bean name="userDao" class="cn.itheima.dao.impl.UserDaoImpl" ></bean>
	<!-- 配置Service -->
	<bean name="customerService" class="cn.itheima.service.impl.CustomerServiceImpl" >
		<property name="customerDao" ref="customerDao" ></property>
	</bean>
	<bean name="linkManService" class="cn.itheima.service.impl.LinkManServiceImpl" >
		<property name="cd" ref="customerDao" ></property>
		<property name="lmd" ref="linkManDao" ></property>
	</bean>
	<bean name="userService" class="cn.itheima.service.impl.UserServiceImpl" >
		<property name="ud" ref="userDao" ></property>
	</bean>
15
1
<!-- 配置Dao -->2
<bean name="customerDao" class="cn.itheima.dao.impl.CustomerDaoImpl" ></bean>3
<bean name="linkManDao" class="cn.itheima.dao.impl.LinkManDaoImpl" ></bean>4
<bean name="userDao" class="cn.itheima.dao.impl.UserDaoImpl" ></bean>5
<!-- 配置Service -->6
<bean name="customerService" class="cn.itheima.service.impl.CustomerServiceImpl" >7
<property name="customerDao" ref="customerDao" ></property>8
</bean>9
<bean name="linkManService" class="cn.itheima.service.impl.LinkManServiceImpl" >10
<property name="cd" ref="customerDao" ></property>11
<property name="lmd" ref="linkManDao" ></property>12
</bean>13
<bean name="userService" class="cn.itheima.service.impl.UserServiceImpl" >14
<property name="ud" ref="userDao" ></property>15
</bean>Spring day01复习


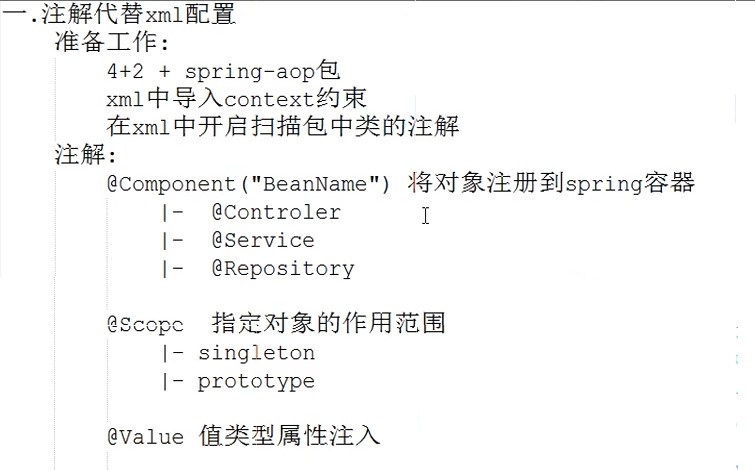
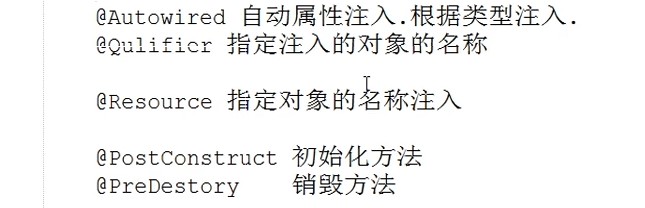
使用注解配置spring
一.步骤
1.为主配置文件引入新的命名空间
2.开启使用注解代理配置文件
3.在类中使用注解完成配置
package com.zzh.spring.bean;

import javax.annotation.PostConstruct;
import javax.annotation.PreDestroy;
import javax.annotation.Resource;

import org.springframework.beans.factory.annotation.Autowired;
import org.springframework.beans.factory.annotation.Qualifier;
import org.springframework.beans.factory.annotation.Value;
import org.springframework.context.annotation.Scope;
import org.springframework.stereotype.Component;
import org.springframework.stereotype.Controller;
import org.springframework.stereotype.Repository;
import org.springframework.stereotype.Service;

//相当于<bean name="user" class="com.zzh.spring.bean.User">
@Component("user")
	//@Service("user")//service层
	//@Controller("user")//web层
	//@Repository("user")//dao层
//指定对象的作用范围
@Scope(scopeName="singleton")
public class User {
	private String name;

	private Integer age;
	private Car car;


	public String getName() {
		return name;
	}

	@Value("tom")
	public void setName(String name) {
		this.name = name;
	}
	public Integer getAge() {
		return age;
	}

	@Value("21")
	public void setAge(Integer age) {
		this.age = age;
	}

	public Car getCar() {
		return car;
	}

	//@Autowired//Autowired与Qualifer需要一起使用
	//@Qualifier("car")//使用Qualifer注解告诉spring容器自动装配哪个名称的对象
	@Resource(name="car")
	public void setCar(Car car) {
		this.car = car;
	}

	@PostConstruct//在对象被创建后调用.init-method
	public void init() {
		System.out.println("初始化方法");
	}
	@PreDestroy//在对象销毁之前调用.destory-method
	public void destroy() {
		System.out.println("销毁方法");
	}


	public String toString() {
		return "User [name=" + name + ", age=" + age + ", car=" + car + "]";
	}
}
71
1
package com.zzh.spring.bean;2
3
import javax.annotation.PostConstruct;4
import javax.annotation.PreDestroy;5
import javax.annotation.Resource;6
7
import org.springframework.beans.factory.annotation.Autowired;8
import org.springframework.beans.factory.annotation.Qualifier;9
import org.springframework.beans.factory.annotation.Value;10
import org.springframework.context.annotation.Scope;11
import org.springframework.stereotype.Component;12
import org.springframework.stereotype.Controller;13
import org.springframework.stereotype.Repository;14
import org.springframework.stereotype.Service;15
16
//相当于<bean name="user" class="com.zzh.spring.bean.User">17
("user")18
//@Service("user")//service层19
//@Controller("user")//web层20
//@Repository("user")//dao层21
//指定对象的作用范围22
(scopeName="singleton")23
public class User {24
private String name;25
26
private Integer age;27
private Car car;28
29
30
public String getName() {31
return name;32
}33
34
("tom")35
public void setName(String name) {36
this.name = name;37
}38
public Integer getAge() {39
return age;40
}41
42
("21")43
public void setAge(Integer age) {44
this.age = age;45
}46
47
public Car getCar() {48
return car;49
}50
51
//@Autowired//Autowired与Qualifer需要一起使用52
//@Qualifier("car")//使用Qualifer注解告诉spring容器自动装配哪个名称的对象53
(name="car")54
public void setCar(Car car) {55
this.car = car;56
}57
58
//在对象被创建后调用.init-method59
public void init() {60
System.out.println("初始化方法");61
}62
//在对象销毁之前调用.destory-method63
public void destroy() {64
System.out.println("销毁方法");65
}66
67
68
public String toString() {69
return "User [name=" + name + ", age=" + age + ", car=" + car + "]";70
}71
}<?xml version="1.0" encoding="UTF-8"?>
<beans xmlns:xsi="http://www.w3.org/2001/XMLSchema-instance" xmlns="http://www.springframework.org/schema/beans" xmlns:context="http://www.springframework.org/schema/context" xsi:schemaLocation="http://www.springframework.org/schema/beans http://www.springframework.org/schema/beans/spring-beans-4.2.xsd http://www.springframework.org/schema/context http://www.springframework.org/schema/context/spring-context-4.2.xsd ">
<!-- 扫描com.zzh.spring.bean下的所有类中的注解
扫描包时,会扫描此包下的所有子包
-->
<context:component-scan base-package="com.zzh.spring.bean"></context:component-scan>
</beans>7
1
2
<beans xmlns:xsi="http://www.w3.org/2001/XMLSchema-instance" xmlns="http://www.springframework.org/schema/beans" xmlns:context="http://www.springframework.org/schema/context" xsi:schemaLocation="http://www.springframework.org/schema/beans http://www.springframework.org/schema/beans/spring-beans-4.2.xsd http://www.springframework.org/schema/context http://www.springframework.org/schema/context/spring-context-4.2.xsd ">3
<!-- 扫描com.zzh.spring.bean下的所有类中的注解 4
扫描包时,会扫描此包下的所有子包5
-->6
<context:component-scan base-package="com.zzh.spring.bean"></context:component-scan>7
</beans>Spring与JUnit整合测试
package com.zzh.spring.test;

import javax.annotation.Resource;

import org.junit.Test;
import org.junit.runner.RunWith;
import org.springframework.test.context.ContextConfiguration;
import org.springframework.test.context.junit4.SpringJUnit4ClassRunner;

import com.zzh.spring.bean.User;

//自动创建容器
@RunWith(SpringJUnit4ClassRunner.class)
//指定创建容器时使用哪个配置文件
@ContextConfiguration("classpath:applicationContext.xml")
public class Demo {
	//将名为user的对象注入到u中
	@Resource(name="user")
	private User u;

	@Test
	public void fun1() {
		System.out.println(u);
	}
}
26
1
package com.zzh.spring.test;2
3
import javax.annotation.Resource;4
5
import org.junit.Test;6
import org.junit.runner.RunWith;7
import org.springframework.test.context.ContextConfiguration;8
import org.springframework.test.context.junit4.SpringJUnit4ClassRunner;9
10
import com.zzh.spring.bean.User;11
12
//自动创建容器13
(SpringJUnit4ClassRunner.class)14
//指定创建容器时使用哪个配置文件15
("classpath:applicationContext.xml")16
public class Demo {17
//将名为user的对象注入到u中18
(name="user")19
private User u;20
21
22
public void fun1() {23
System.out.println(u);24
}25
}26
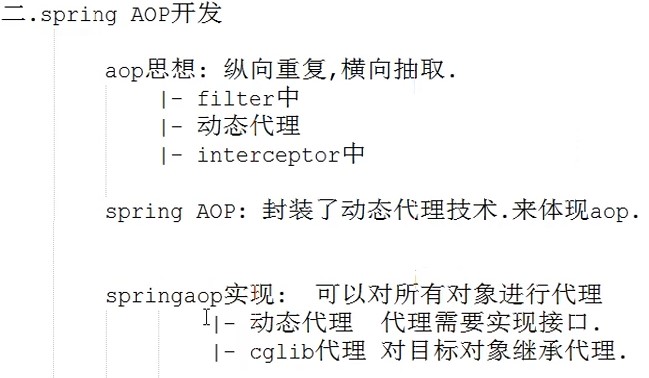
spring中的aop
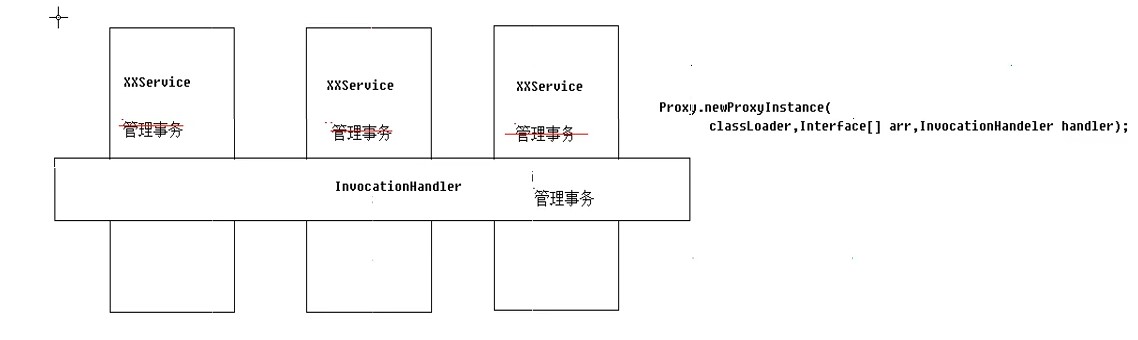
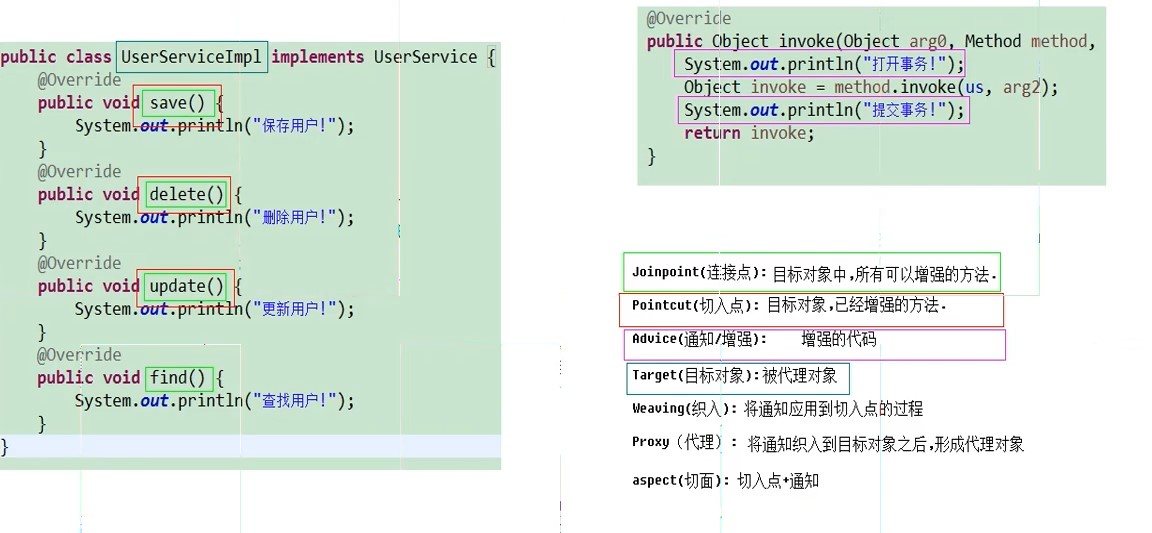
Spring能够为容器中管理的对象生成动态代理对象,以前使用动态代理时,我们需要自己调用Proxy.newProxyInstance(xx,xx,xx)生成代理对象
Spring实现aop的原理
1.动态代理:被代理对象必须实现接口,才能产生代理对象,如果没有接口将不能使用代理技术
2.cglib代理:第三方代理技术,cglib代理可以对任何类生成代理,代理的原理使对目标对象进行继承代理,如果目标对象被final修饰,那么该类无法被cglib代理
动态代理的代码如下:
package com.zzh.spring.proxy;

import java.lang.reflect.InvocationHandler;
import java.lang.reflect.Method;
import java.lang.reflect.Proxy;


import com.zzh.spring.service.UserService;
import com.zzh.spring.service.UserServiceImpl;

public class UserServiceProxyFactory implements InvocationHandler{
	private UserService us;
	public UserServiceProxyFactory(UserService us) {
		this.us = us;
	}

	public UserService getUserService() {
		UserService usProxy = (UserService) Proxy.newProxyInstance(UserServiceProxyFactory.class.getClassLoader(), UserServiceImpl.class.getInterfaces(), this);
		return usProxy;
	}

	@Override
	public Object invoke(Object arg0, Method method, Object[] arg2) throws Throwable {
		System.out.println("打开事务");
		Object invoke = method.invoke(us, arg2);
		System.out.println("提交事务");
		return invoke;
	}
}
29
1
package com.zzh.spring.proxy;2
3
import java.lang.reflect.InvocationHandler;4
import java.lang.reflect.Method;5
import java.lang.reflect.Proxy;6
7
8
import com.zzh.spring.service.UserService;9
import com.zzh.spring.service.UserServiceImpl;10
11
public class UserServiceProxyFactory implements InvocationHandler{12
private UserService us;13
public UserServiceProxyFactory(UserService us) {14
this.us = us;15
}16
17
public UserService getUserService() {18
UserService usProxy = (UserService) Proxy.newProxyInstance(UserServiceProxyFactory.class.getClassLoader(), UserServiceImpl.class.getInterfaces(), this);19
return usProxy;20
}21
22
23
public Object invoke(Object arg0, Method method, Object[] arg2) throws Throwable {24
System.out.println("打开事务");25
Object invoke = method.invoke(us, arg2);26
System.out.println("提交事务");27
return invoke;28
}29
}cglib的动态代理,此时代理对象继承了被继承对象
package com.zzh.spring.proxy;

import java.lang.reflect.InvocationHandler;
import java.lang.reflect.Method;
import java.lang.reflect.Proxy;

import org.springframework.cglib.proxy.Enhancer;
import org.springframework.cglib.proxy.MethodInterceptor;
import org.springframework.cglib.proxy.MethodProxy;

import com.zzh.spring.service.UserService;
import com.zzh.spring.service.UserServiceImpl;

public class UserServiceProxyFactory2 implements MethodInterceptor{

	public UserService getUserService() {
		Enhancer en = new Enhancer();
		en.setSuperclass(UserServiceImpl.class);
		en.setCallback(this);
		UserService us = (UserService) en.create();
		return us;
	}

	@Override
	public Object intercept(Object proxyObj, Method method, Object[] arg1, MethodProxy methodProxy) throws Throwable {
		System.out.println("打开事务");
		Object returnValue = methodProxy.invokeSuper(proxyObj, arg1);
		System.out.println("提交事务");
		return returnValue;
	}
}
31
1
package com.zzh.spring.proxy;2
3
import java.lang.reflect.InvocationHandler;4
import java.lang.reflect.Method;5
import java.lang.reflect.Proxy;6
7
import org.springframework.cglib.proxy.Enhancer;8
import org.springframework.cglib.proxy.MethodInterceptor;9
import org.springframework.cglib.proxy.MethodProxy;10
11
import com.zzh.spring.service.UserService;12
import com.zzh.spring.service.UserServiceImpl;13
14
public class UserServiceProxyFactory2 implements MethodInterceptor{15
16
public UserService getUserService() {17
Enhancer en = new Enhancer();18
en.setSuperclass(UserServiceImpl.class);19
en.setCallback(this);20
UserService us = (UserService) en.create();21
return us;22
}23
24
25
public Object intercept(Object proxyObj, Method method, Object[] arg1, MethodProxy methodProxy) throws Throwable {26
System.out.println("打开事务");27
Object returnValue = methodProxy.invokeSuper(proxyObj, arg1);28
System.out.println("提交事务");29
return returnValue;30
}31
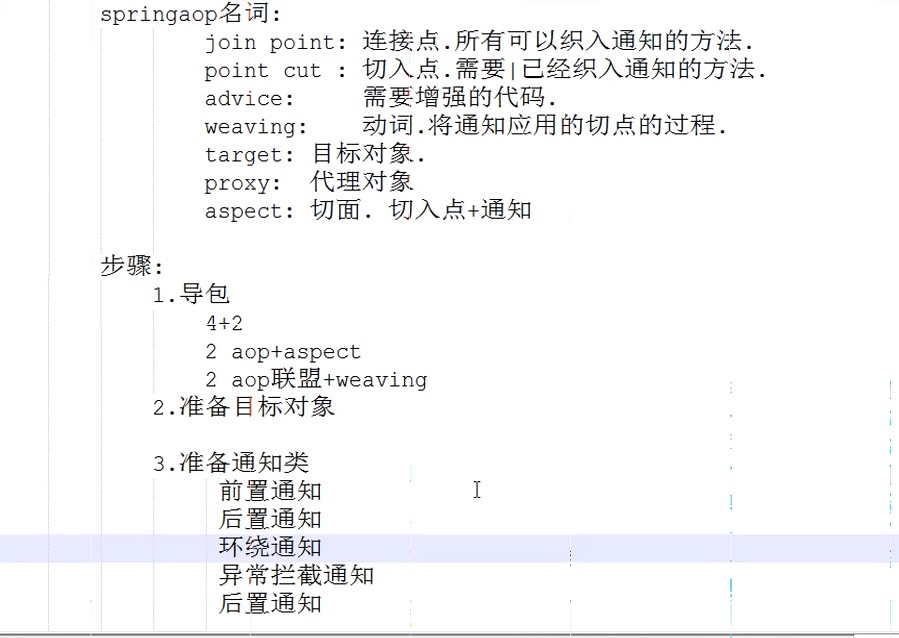
}AOP名词:
Joinpoint(连接点):目标对象中,所有可以增强的方法
Pointcut(切入点):目标对象,已经增强的方法
Advice(通知/增强):增强的代码
Target(目标对象):被代理对象
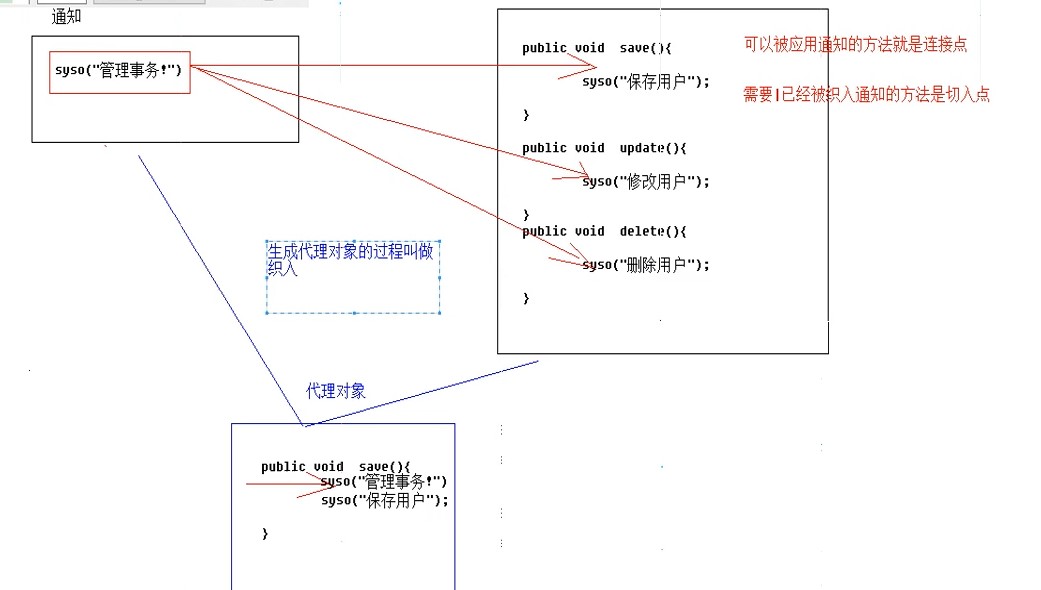
Weaving(织入):将通知织入切入点的过程
Proxy(代理):将通知织入到目标对象之后,形成代理对象
Aspect(切面):切入点+通知
通知对象的书写例子:
package com.zzh.spring.aop;

import org.aspectj.lang.ProceedingJoinPoint;

public class MyAdvice {
	//前置通知  目标方法运行之前调用
	//后置通知(如果出现异常将不会调用)  在目标方法运行之后调用
	//环绕通知  在目标方法之前和之后都调用
	//异常拦截通知  如果出现异常,就会调用
	//后置通知(无论是否出现异常都会调用)  在目标方法运行之后调用

	public void before() {
		System.out.println("这是前置通知方法");
	}

	public void afterReturning() {
		System.out.println("这是后置通知方法,出现异常不会调用");
	}

	public Object around(ProceedingJoinPoint pjp) throws Throwable {
		System.out.println("环绕方法的前半部分");
		Object proceed = pjp.proceed();
		System.out.println("环绕方法的后半部分");
		return proceed;
	}

	public void afterException() {
		System.out.println("这是异常拦截方法,出现异常时调用");
	}

	public void after() {
		System.out.println("这是后置通知方法,出现异常时也会调用");
	}
}
34
1
package com.zzh.spring.aop;2
3
import org.aspectj.lang.ProceedingJoinPoint;4
5
public class MyAdvice {6
//前置通知 目标方法运行之前调用7
//后置通知(如果出现异常将不会调用) 在目标方法运行之后调用8
//环绕通知 在目标方法之前和之后都调用9
//异常拦截通知 如果出现异常,就会调用10
//后置通知(无论是否出现异常都会调用) 在目标方法运行之后调用 11
12
public void before() {13
System.out.println("这是前置通知方法");14
}15
16
public void afterReturning() {17
System.out.println("这是后置通知方法,出现异常不会调用");18
}19
20
public Object around(ProceedingJoinPoint pjp) throws Throwable {21
System.out.println("环绕方法的前半部分");22
Object proceed = pjp.proceed();23
System.out.println("环绕方法的后半部分");24
return proceed; 25
}26
27
public void afterException() {28
System.out.println("这是异常拦截方法,出现异常时调用");29
}30
31
public void after() {32
System.out.println("这是后置通知方法,出现异常时也会调用");33
}34
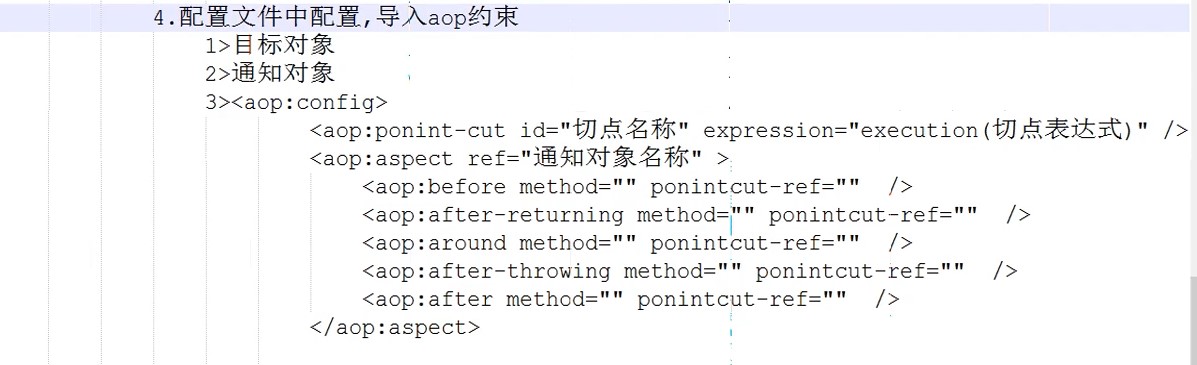
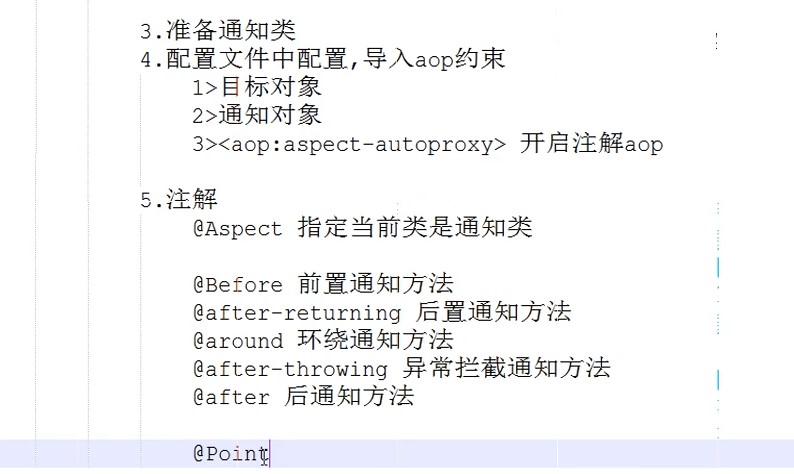
}配置aop通知的书写格式:
<?xml version="1.0" encoding="UTF-8"?>
<beans xmlns:xsi="http://www.w3.org/2001/XMLSchema-instance" xmlns="http://www.springframework.org/schema/beans" xmlns:context="http://www.springframework.org/schema/context" xmlns:aop="http://www.springframework.org/schema/aop" xsi:schemaLocation="http://www.springframework.org/schema/beans http://www.springframework.org/schema/beans/spring-beans-4.2.xsd http://www.springframework.org/schema/context http://www.springframework.org/schema/context/spring-context-4.2.xsd http://www.springframework.org/schema/aop http://www.springframework.org/schema/aop/spring-aop-4.2.xsd ">
	<!-- 准备工作:导入aop(约束)命名空间 -->
	<!-- 1.配置目标对象 -->
	<bean name="userServiceTarget" class="com.zzh.spring.service.UserServiceImpl"></bean>
	<!-- 2.配置通知对象 -->
	<bean name="myAdvice" class="com.zzh.spring.aop.MyAdvice"></bean>
	<!-- 3.配置将通知织入目标对象 -->
	<aop:config>
		<!-- 配置切入点
			public void com.zzh.spring.service.UserServiceImpl.save()
			void com.zzh.spring.service.UserServiceImpl.save()
			* com.zzh.spring.service.UserServiceImpl.save()
			* com.zzh.spring.service.UserServiceImpl.*()
			* com.zzh.spring.service.*ServiceImpl.*(..)
			* com.zzh.spring.service..*ServiceImpl.*(..)

		-->
		<aop:pointcut expression="execution(* com.zzh.spring.service.*ServiceImpl.*(..))" id="pc"/>
		<aop:aspect ref="myAdvice">
			<aop:before method="before" pointcut-ref="pc"/>
			<aop:after-returning method="afterReturning" pointcut-ref="pc"/>
			<aop:around method="around" pointcut-ref="pc"/>
			<aop:after-throwing method="afterException" pointcut-ref="pc"/>
			<aop:after method="after" pointcut-ref="pc"/>
		</aop:aspect>
	</aop:config>
</beans>
28
1
<?xml version="1.0" encoding="UTF-8"?>2
<beans xmlns:xsi="http://www.w3.org/2001/XMLSchema-instance" xmlns="http://www.springframework.org/schema/beans" xmlns:context="http://www.springframework.org/schema/context" xmlns:aop="http://www.springframework.org/schema/aop" xsi:schemaLocation="http://www.springframework.org/schema/beans http://www.springframework.org/schema/beans/spring-beans-4.2.xsd http://www.springframework.org/schema/context http://www.springframework.org/schema/context/spring-context-4.2.xsd http://www.springframework.org/schema/aop http://www.springframework.org/schema/aop/spring-aop-4.2.xsd ">3
<!-- 准备工作:导入aop(约束)命名空间 -->4
<!-- 1.配置目标对象 -->5
<bean name="userServiceTarget" class="com.zzh.spring.service.UserServiceImpl"></bean>6
<!-- 2.配置通知对象 -->7
<bean name="myAdvice" class="com.zzh.spring.aop.MyAdvice"></bean>8
<!-- 3.配置将通知织入目标对象 -->9
<aop:config>10
<!-- 配置切入点 11
public void com.zzh.spring.service.UserServiceImpl.save()12
void com.zzh.spring.service.UserServiceImpl.save()13
* com.zzh.spring.service.UserServiceImpl.save()14
* com.zzh.spring.service.UserServiceImpl.*()15
* com.zzh.spring.service.*ServiceImpl.*(..)16
* com.zzh.spring.service..*ServiceImpl.*(..)17
18
-->19
<aop:pointcut expression="execution(* com.zzh.spring.service.*ServiceImpl.*(..))" id="pc"/>20
<aop:aspect ref="myAdvice">21
<aop:before method="before" pointcut-ref="pc"/>22
<aop:after-returning method="afterReturning" pointcut-ref="pc"/>23
<aop:around method="around" pointcut-ref="pc"/>24
<aop:after-throwing method="afterException" pointcut-ref="pc"/>25
<aop:after method="after" pointcut-ref="pc"/>26
</aop:aspect>27
</aop:config>28
</beans>使用注解配置格式:
package com.zzh.spring.annotation;

import org.aspectj.lang.ProceedingJoinPoint;
import org.aspectj.lang.annotation.After;
import org.aspectj.lang.annotation.AfterReturning;
import org.aspectj.lang.annotation.AfterThrowing;
import org.aspectj.lang.annotation.Around;
import org.aspectj.lang.annotation.Aspect;
import org.aspectj.lang.annotation.Before;
import org.aspectj.lang.annotation.Pointcut;

@Aspect
public class MyAdvice {
	//前置通知  目标方法运行之前调用
	//后置通知(如果出现异常将不会调用)  在目标方法运行之后调用
	//环绕通知  在目标方法之前和之后都调用
	//异常拦截通知  如果出现异常,就会调用
	//后置通知(无论是否出现异常都会调用)  在目标方法运行之后调用

	@Pointcut("execution(* com.zzh.spring.service.*ServiceImpl.*(..))")
	public void pc() {}

	@Before("MyAdvice.pc()")
	public void before() {
		System.out.println("这是前置通知方法");
	}

	@AfterReturning("execution(* com.zzh.spring.service.*ServiceImpl.*(..))")
	public void afterReturning() {
		System.out.println("这是后置通知方法,出现异常不会调用");
	}

	@Around("execution(* com.zzh.spring.service.*ServiceImpl.*(..))")
	public Object around(ProceedingJoinPoint pjp) throws Throwable {
		System.out.println("环绕方法的前半部分");
		Object proceed = pjp.proceed();
		System.out.println("环绕方法的后半部分");
		return proceed;
	}

	@AfterThrowing("execution(* com.zzh.spring.service.*ServiceImpl.*(..))")
	public void afterException() {
		System.out.println("这是异常拦截方法,出现异常时调用");
	}

	@After("execution(* com.zzh.spring.service.*ServiceImpl.*(..))")
	public void after() {
		System.out.println("这是后置通知方法,出现异常时也会调用");
	}
}
50
1
package com.zzh.spring.annotation;2
3
import org.aspectj.lang.ProceedingJoinPoint;4
import org.aspectj.lang.annotation.After;5
import org.aspectj.lang.annotation.AfterReturning;6
import org.aspectj.lang.annotation.AfterThrowing;7
import org.aspectj.lang.annotation.Around;8
import org.aspectj.lang.annotation.Aspect;9
import org.aspectj.lang.annotation.Before;10
import org.aspectj.lang.annotation.Pointcut;11
12
13
public class MyAdvice {14
//前置通知 目标方法运行之前调用15
//后置通知(如果出现异常将不会调用) 在目标方法运行之后调用16
//环绕通知 在目标方法之前和之后都调用17
//异常拦截通知 如果出现异常,就会调用18
//后置通知(无论是否出现异常都会调用) 在目标方法运行之后调用 19
20
("execution(* com.zzh.spring.service.*ServiceImpl.*(..))")21
public void pc() {}22
23
("MyAdvice.pc()")24
public void before() {25
System.out.println("这是前置通知方法");26
}27
28
("execution(* com.zzh.spring.service.*ServiceImpl.*(..))")29
public void afterReturning() {30
System.out.println("这是后置通知方法,出现异常不会调用");31
}32
33
("execution(* com.zzh.spring.service.*ServiceImpl.*(..))")34
public Object around(ProceedingJoinPoint pjp) throws Throwable {35
System.out.println("环绕方法的前半部分");36
Object proceed = pjp.proceed();37
System.out.println("环绕方法的后半部分");38
return proceed; 39
}40
41
("execution(* com.zzh.spring.service.*ServiceImpl.*(..))")42
public void afterException() {43
System.out.println("这是异常拦截方法,出现异常时调用");44
}45
46
("execution(* com.zzh.spring.service.*ServiceImpl.*(..))")47
public void after() {48
System.out.println("这是后置通知方法,出现异常时也会调用");49
}50
}<?xml version="1.0" encoding="UTF-8"?>
<beans xmlns:xsi="http://www.w3.org/2001/XMLSchema-instance" xmlns="http://www.springframework.org/schema/beans" xmlns:context="http://www.springframework.org/schema/context" xmlns:aop="http://www.springframework.org/schema/aop" xsi:schemaLocation="http://www.springframework.org/schema/beans http://www.springframework.org/schema/beans/spring-beans-4.2.xsd http://www.springframework.org/schema/context http://www.springframework.org/schema/context/spring-context-4.2.xsd http://www.springframework.org/schema/aop http://www.springframework.org/schema/aop/spring-aop-4.2.xsd ">
<!-- 准备工作:导入aop(约束)命名空间 -->
<!-- 1.配置目标对象 -->
<bean name="userServiceTarget" class="com.zzh.spring.service.UserServiceImpl"></bean>
<!-- 2.配置通知对象 -->
<bean name="myAdvice" class="com.zzh.spring.annotation.MyAdvice"></bean>
<aop:aspectj-autoproxy ></aop:aspectj-autoproxy>
</beans>9
1
2
<beans xmlns:xsi="http://www.w3.org/2001/XMLSchema-instance" xmlns="http://www.springframework.org/schema/beans" xmlns:context="http://www.springframework.org/schema/context" xmlns:aop="http://www.springframework.org/schema/aop" xsi:schemaLocation="http://www.springframework.org/schema/beans http://www.springframework.org/schema/beans/spring-beans-4.2.xsd http://www.springframework.org/schema/context http://www.springframework.org/schema/context/spring-context-4.2.xsd http://www.springframework.org/schema/aop http://www.springframework.org/schema/aop/spring-aop-4.2.xsd ">3
<!-- 准备工作:导入aop(约束)命名空间 -->4
<!-- 1.配置目标对象 -->5
<bean name="userServiceTarget" class="com.zzh.spring.service.UserServiceImpl"></bean>6
<!-- 2.配置通知对象 -->7
<bean name="myAdvice" class="com.zzh.spring.annotation.MyAdvice"></bean>8
<aop:aspectj-autoproxy ></aop:aspectj-autoproxy>9
</beans>将通知织入目标类的图解
spring_day02复习
spring整合JDBC
1.spring中提供了一个可以操作数据库的对象,对象封装了jdbc技术
-----JDBCTemplateJDBC模板对象
2.与DBUtils中的QueryRunner非常相似
3.准备工作
使用JdbcTemplate向数据库表中插入内容的代码
package com.zzh.spring.jdbc;

import java.beans.PropertyVetoException;

import org.junit.Test;
import org.springframework.jdbc.core.JdbcTemplate;

import com.mchange.v2.c3p0.ComboPooledDataSource;

public class Demo {
	@Test
	public void fun1() throws Exception {
		//1.准备连接池
		ComboPooledDataSource datasource = new ComboPooledDataSource();
		datasource.setDriverClass("com.mysql.jdbc.Driver");
		datasource.setJdbcUrl("jdbc:mysql:///hibernate_day01");
		datasource.setUser("root");
		datasource.setPassword("123");
		//2.创建JdbcTemplate模板对象
		JdbcTemplate jd = new JdbcTemplate(datasource);
		//3.书写sql语句
		String sql = "insert into t_user values(1,'zzh')";
		jd.update(sql);
	}
}
25
1
package com.zzh.spring.jdbc;2
3
import java.beans.PropertyVetoException;4
5
import org.junit.Test;6
import org.springframework.jdbc.core.JdbcTemplate;7
8
import com.mchange.v2.c3p0.ComboPooledDataSource;9
10
public class Demo {11
12
public void fun1() throws Exception {13
//1.准备连接池14
ComboPooledDataSource datasource = new ComboPooledDataSource();15
datasource.setDriverClass("com.mysql.jdbc.Driver");16
datasource.setJdbcUrl("jdbc:mysql:///hibernate_day01");17
datasource.setUser("root");18
datasource.setPassword("123");19
//2.创建JdbcTemplate模板对象20
JdbcTemplate jd = new JdbcTemplate(datasource);21
//3.书写sql语句22
String sql = "insert into t_user values(1,'zzh')";23
jd.update(sql);24
}25
}增删改查的实现
package com.zzh.spring.jdbc;

import java.sql.ResultSet;
import java.sql.SQLException;
import java.util.List;

import org.springframework.jdbc.core.JdbcTemplate;
import org.springframework.jdbc.core.RowMapper;

import com.zzh.spring.bean.User;

public class UserDaoImpl implements UserDao {
	private JdbcTemplate jt;

	@Override
	public void save(User user) {
		String sql = "insert into t_user values(null,?)";
		jt.update(sql, user.getName());
	}

	@Override
	public void delete(Integer id) {
		String sql = "delete from t_user where id=?";
		jt.update(sql,id);
	}

	@Override
	public void update(User user) {
		String sql = "update t_user set name=? where id=?";
		jt.update(sql, user.getName(),user.getId());
	}

	@Override
	public User getById(Integer id) {
		String sql = "select from t_user where id=?";
		return jt.queryForObject(sql, new RowMapper<User>() {

			@Override
			public User mapRow(ResultSet rs, int arg1) throws SQLException {
				User u = new User();
				u.setId(rs.getInt("id"));
				u.setName(rs.getString("name"));
				return u;
			}}, id);
	}

	@Override
	public int getCount() {
		String sql = "select count(*) form t_user";
		Integer count = jt.queryForObject(sql, Integer.class);
		return count;
	}

	@Override
	public List getAll() {
		String sql = "select * form t_user";
		return jt.query(sql, new RowMapper<User>(){
			@Override
			public User mapRow(ResultSet rs, int arg1) throws SQLException {
				User u = new User();
				u.setId(rs.getInt("id"));
				u.setName(rs.getString("name"));
				return u;
				}});
	}

	public void setJt(JdbcTemplate jt) {
		this.jt = jt;
	}
}
70
1
package com.zzh.spring.jdbc;2
3
import java.sql.ResultSet;4
import java.sql.SQLException;5
import java.util.List;6
7
import org.springframework.jdbc.core.JdbcTemplate;8
import org.springframework.jdbc.core.RowMapper;9
10
import com.zzh.spring.bean.User;11
12
public class UserDaoImpl implements UserDao {13
private JdbcTemplate jt;14
15
16
public void save(User user) {17
String sql = "insert into t_user values(null,?)";18
jt.update(sql, user.getName());19
}20
21
22
public void delete(Integer id) {23
String sql = "delete from t_user where id=?";24
jt.update(sql,id);25
}26
27
28
public void update(User user) {29
String sql = "update t_user set name=? where id=?"; 30
jt.update(sql, user.getName(),user.getId());31
}32
33
34
public User getById(Integer id) {35
String sql = "select from t_user where id=?";36
return jt.queryForObject(sql, new RowMapper<User>() {37
38
39
public User mapRow(ResultSet rs, int arg1) throws SQLException {40
User u = new User();41
u.setId(rs.getInt("id"));42
u.setName(rs.getString("name"));43
return u;44
}}, id);45
}46
47
48
public int getCount() {49
String sql = "select count(*) form t_user"; 50
Integer count = jt.queryForObject(sql, Integer.class);51
return count;52
}53
54
55
public List getAll() {56
String sql = "select * form t_user";57
return jt.query(sql, new RowMapper<User>(){58
59
public User mapRow(ResultSet rs, int arg1) throws SQLException {60
User u = new User();61
u.setId(rs.getInt("id"));62
u.setName(rs.getString("name"));63
return u;64
}});65
}66
67
public void setJt(JdbcTemplate jt) {68
this.jt = jt;69
}70
}将jdbc查询所需要的类配置到spring的容器中
<?xml version="1.0" encoding="UTF-8"?>
<beans xmlns:xsi="http://www.w3.org/2001/XMLSchema-instance" xmlns="http://www.springframework.org/schema/beans" xmlns:context="http://www.springframework.org/schema/context" xsi:schemaLocation="http://www.springframework.org/schema/beans http://www.springframework.org/schema/beans/spring-beans-4.2.xsd http://www.springframework.org/schema/context http://www.springframework.org/schema/context/spring-context-4.2.xsd ">
<!-- 1.将连接池配置到spring容器中 -->
	<bean name="dataSource" class="com.mchange.v2.c3p0.ComboPooledDataSource">
		<property name="jdbcUrl" value="jdbc:mysql///hibernate_day01"></property>
		<property name="driverClass" value="com.mysql.jdbc.Driver"></property>
		<property name="user" value="root"></property>
		<property name="password" value="123"></property>
	</bean>
<!-- 2.将JDCBTemplate配置到spring容器中 -->
	<bean name="jdbcTemplate" class="org.springframework.jdbc.core.JdbcTemplate">
		<property name="dataSource" ref="dataSource"></property>
	</bean>
<!-- 3.将UserDao放入到spring容器中 -->
	<bean name="userDao" class="com.zzh.spring.jdbc.UserDaoImpl">
		<property name="jt" ref="jdbcTemplate"></property>
	</bean>
</beans>
18
1
2
<beans xmlns:xsi="http://www.w3.org/2001/XMLSchema-instance" xmlns="http://www.springframework.org/schema/beans" xmlns:context="http://www.springframework.org/schema/context" xsi:schemaLocation="http://www.springframework.org/schema/beans http://www.springframework.org/schema/beans/spring-beans-4.2.xsd http://www.springframework.org/schema/context http://www.springframework.org/schema/context/spring-context-4.2.xsd ">3
<!-- 1.将连接池配置到spring容器中 -->4
<bean name="dataSource" class="com.mchange.v2.c3p0.ComboPooledDataSource">5
<property name="jdbcUrl" value="jdbc:mysql///hibernate_day01"></property>6
<property name="driverClass" value="com.mysql.jdbc.Driver"></property>7
<property name="user" value="root"></property>8
<property name="password" value="123"></property>9
</bean>10
<!-- 2.将JDCBTemplate配置到spring容器中 -->11
<bean name="jdbcTemplate" class="org.springframework.jdbc.core.JdbcTemplate">12
<property name="dataSource" ref="dataSource"></property>13
</bean>14
<!-- 3.将UserDao放入到spring容器中 -->15
<bean name="userDao" class="com.zzh.spring.jdbc.UserDaoImpl">16
<property name="jt" ref="jdbcTemplate"></property>17
</bean>18
</beans>使用db.properties来配置datasource
//properties的书写格式
jdbc.jdbcUrl=jdbc:mysql:///hibernate_day01
jdbc.driverClass=com.mysql.jdbc.Driver
jdbc.user=root
jdbc.password=123
5
1
//properties的书写格式2
jdbc.jdbcUrl=jdbc:mysql:///hibernate_day013
jdbc.driverClass=com.mysql.jdbc.Driver4
jdbc.user=root5
jdbc.password=123<!-- 指定spring读取db.properties配置 -->
<context:property-placeholder location="classpath:db.properties"/>
<!-- 1.将连接池配置到spring容器中 -->
<bean name="dataSource" class="com.mchange.v2.c3p0.ComboPooledDataSource">
<property name="jdbcUrl" value="${jdbc.jdbcUrl}"></property>
<property name="driverClass" value="${jdbc.driverClass}"></property>
<property name="user" value="${jdbc.user}"></property>
<property name="password" value="${jdbc.password}"></property>
</bean>9
1
<!-- 指定spring读取db.properties配置 -->2
<context:property-placeholder location="classpath:db.properties"/>3
<!-- 1.将连接池配置到spring容器中 -->4
<bean name="dataSource" class="com.mchange.v2.c3p0.ComboPooledDataSource">5
<property name="jdbcUrl" value="${jdbc.jdbcUrl}"></property>6
<property name="driverClass" value="${jdbc.driverClass}"></property>7
<property name="user" value="${jdbc.user}"></property>8
<property name="password" value="${jdbc.password}"></property>9
</bean>spring中的aop事务
1.事务操作对象:因为在不同平台,操作事务的代码各不相同,因此spring提供了一个PlatformTransactionManager接口,针对不同平台有DataSourceTransactionManager和HibernateTransactionManager接口等
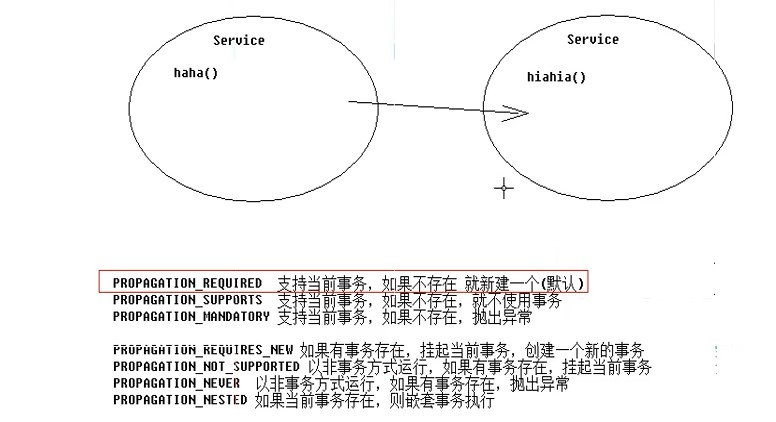
2.spring管理事务的属性介绍->事务的隔离级别,是否只读,事务的传播行为
spring管理事务方式
准备工作
<?xml version="1.0" encoding="UTF-8"?>
<beans xmlns:xsi="http://www.w3.org/2001/XMLSchema-instance" xmlns="http://www.springframework.org/schema/beans" xmlns:context="http://www.springframework.org/schema/context" xsi:schemaLocation="http://www.springframework.org/schema/beans http://www.springframework.org/schema/beans/spring-beans-4.2.xsd http://www.springframework.org/schema/context http://www.springframework.org/schema/context/spring-context-4.2.xsd ">

	<!-- 指定spring读取db.properties配置 -->
	<context:property-placeholder location="classpath:db.properties"/>
	<!-- 事务核心管理器,封装了所有事务操作,依赖于datasource -->
	<bean name="transactionManager" class="org.springframework.jdbc.datasource.DataSourceTransactionManager">
		<property name="dataSource" ref="dataSource"></property>
	</bean>
	<!-- 事务模型对象 -->
	<bean name="transactionTemplate" class="org.springframework.transaction.support.TransactionTemplate">
		<property name="transactionManager" ref="transactionManager"></property>
	</bean>
	<!-- 1.将连接池配置到spring容器中 -->
	<bean name="dataSource" class="com.mchange.v2.c3p0.ComboPooledDataSource">
		<property name="jdbcUrl" value="${jdbc.jdbcUrl}"></property>
		<property name="driverClass" value="${jdbc.driverClass}"></property>
		<property name="user" value="${jdbc.user}"></property>
		<property name="password" value="${jdbc.password}"></property>
	</bean>
	<bean name="accountDao" class="com.zzh.dao.AccountDaoImpl">
		<property name="dataSource" ref="dataSource"></property>
	</bean>
	<bean name="accountService" class="com.zzh.service.AccountServiceImpl">
		<property name="ad" ref="accountDao"></property>
		<property name="tt" ref="transactionTemplate"></property>
	</bean>
</beans>
28
1
2
<beans xmlns:xsi="http://www.w3.org/2001/XMLSchema-instance" xmlns="http://www.springframework.org/schema/beans" xmlns:context="http://www.springframework.org/schema/context" xsi:schemaLocation="http://www.springframework.org/schema/beans http://www.springframework.org/schema/beans/spring-beans-4.2.xsd http://www.springframework.org/schema/context http://www.springframework.org/schema/context/spring-context-4.2.xsd ">3
4
<!-- 指定spring读取db.properties配置 -->5
<context:property-placeholder location="classpath:db.properties"/>6
<!-- 事务核心管理器,封装了所有事务操作,依赖于datasource -->7
<bean name="transactionManager" class="org.springframework.jdbc.datasource.DataSourceTransactionManager">8
<property name="dataSource" ref="dataSource"></property>9
</bean>10
<!-- 事务模型对象 -->11
<bean name="transactionTemplate" class="org.springframework.transaction.support.TransactionTemplate">12
<property name="transactionManager" ref="transactionManager"></property>13
</bean>14
<!-- 1.将连接池配置到spring容器中 -->15
<bean name="dataSource" class="com.mchange.v2.c3p0.ComboPooledDataSource">16
<property name="jdbcUrl" value="${jdbc.jdbcUrl}"></property>17
<property name="driverClass" value="${jdbc.driverClass}"></property>18
<property name="user" value="${jdbc.user}"></property>19
<property name="password" value="${jdbc.password}"></property>20
</bean>21
<bean name="accountDao" class="com.zzh.dao.AccountDaoImpl">22
<property name="dataSource" ref="dataSource"></property>23
</bean>24
<bean name="accountService" class="com.zzh.service.AccountServiceImpl">25
<property name="ad" ref="accountDao"></property>26
<property name="tt" ref="transactionTemplate"></property>27
</bean>28
</beans>1.编码式(观光代码)
package com.zzh.service;

import org.springframework.transaction.TransactionStatus;
import org.springframework.transaction.support.TransactionCallback;
import org.springframework.transaction.support.TransactionCallbackWithoutResult;
import org.springframework.transaction.support.TransactionTemplate;

import com.zzh.dao.AccountDao;

public class AccountServiceImpl implements AccountService {
	private TransactionTemplate tt;
	private AccountDao ad;
	@Override
	public void trans(final Integer output,final Integer input, Double money) {
		tt.execute(new TransactionCallbackWithoutResult() {

			@Override
			protected void doInTransactionWithoutResult(TransactionStatus arg0) {
				ad.decreaseMoney(output, money);
				int i = 1/0;
				ad.increaseMoney(input, money);
			}
		});
	}


	public void setTt(TransactionTemplate tt) {
		this.tt = tt;
	}


	public void setAd(AccountDao ad) {
		this.ad = ad;
	}

}
38
1
package com.zzh.service;2
3
import org.springframework.transaction.TransactionStatus;4
import org.springframework.transaction.support.TransactionCallback;5
import org.springframework.transaction.support.TransactionCallbackWithoutResult;6
import org.springframework.transaction.support.TransactionTemplate;7
8
import com.zzh.dao.AccountDao;9
10
public class AccountServiceImpl implements AccountService {11
private TransactionTemplate tt;12
private AccountDao ad;13
14
public void trans(final Integer output,final Integer input, Double money) {15
tt.execute(new TransactionCallbackWithoutResult() {16
17
18
protected void doInTransactionWithoutResult(TransactionStatus arg0) {19
ad.decreaseMoney(output, money);20
int i = 1/0;21
ad.increaseMoney(input, money);22
}23
});24
}25
26
27
28
public void setTt(TransactionTemplate tt) {29
this.tt = tt;30
}31
32
33
34
public void setAd(AccountDao ad) {35
this.ad = ad;36
}37
38
}2.xml配置(aop)
 <?xml version="1.0" encoding="UTF-8"?>
<beans xmlns:xsi="http://www.w3.org/2001/XMLSchema-instance" xmlns="http://www.springframework.org/schema/beans" xmlns:context="http://www.springframework.org/schema/context" xmlns:tx="http://www.springframework.org/schema/tx" xmlns:aop="http://www.springframework.org/schema/aop" xsi:schemaLocation="http://www.springframework.org/schema/beans http://www.springframework.org/schema/beans/spring-beans-4.2.xsd http://www.springframework.org/schema/context http://www.springframework.org/schema/context/spring-context-4.2.xsd http://www.springframework.org/schema/tx http://www.springframework.org/schema/tx/spring-tx-4.2.xsd http://www.springframework.org/schema/aop http://www.springframework.org/schema/aop/spring-aop-4.2.xsd ">

	<!-- 指定spring读取db.properties配置 -->
	<context:property-placeholder location="classpath:db.properties"/>
	<!-- 事务核心管理器,封装了所有事务操作,依赖于datasource -->
	<bean name="transactionManager" class="org.springframework.jdbc.datasource.DataSourceTransactionManager">
		<property name="dataSource" ref="dataSource"></property>
	</bean>
	<!-- 事务模型对象 -->
	<bean name="transactionTemplate" class="org.springframework.transaction.support.TransactionTemplate">
		<property name="transactionManager" ref="transactionManager"></property>
	</bean>

	<tx:advice id="txAdvice" transaction-manager="transactionManager">
		<tx:attributes>
			<!-- 以方法为单位,指定方法应用什么事务属性
				isolution:隔离级别
				propagation:传播行为
				read-only:是否只读
			 -->
			<tx:method name="save*" propagation="REQUIRED" isolation="DEFAULT" read-only="false"/>
			<tx:method name="persist*" isolation="REPEATABLE_READ" propagation="REQUIRED" read-only="false" />
			<tx:method name="update*" isolation="REPEATABLE_READ" propagation="REQUIRED" read-only="false" />
			<tx:method name="modify*" isolation="REPEATABLE_READ" propagation="REQUIRED" read-only="false" />
			<tx:method name="delete*" isolation="REPEATABLE_READ" propagation="REQUIRED" read-only="false" />
			<tx:method name="remove*" isolation="REPEATABLE_READ" propagation="REQUIRED" read-only="false" />
			<tx:method name="get*" isolation="REPEATABLE_READ" propagation="REQUIRED" read-only="true" />
			<tx:method name="find*" isolation="REPEATABLE_READ" propagation="REQUIRED" read-only="true" />
			<tx:method name="trans" isolation="REPEATABLE_READ" propagation="REQUIRED" read-only="false" />
		</tx:attributes>
	</tx:advice>

	<!-- 配置织入-->
	<aop:config>
		<!-- 配置切点表达式 -->
		<aop:pointcut expression="execution(* com.zzh.service.*ServiceImpl.*(..))" id="txPc"/>
		<!-- 配置切面:通知+切点
			advice-ref:通知的名称
			pointcut-ref:切点的名称
		 -->
		<aop:advisor advice-ref="txAdvice" pointcut-ref="txPc"/>
	</aop:config>

	<!-- 1.将连接池配置到spring容器中 -->
	<bean name="dataSource" class="com.mchange.v2.c3p0.ComboPooledDataSource">
		<property name="jdbcUrl" value="${jdbc.jdbcUrl}"></property>
		<property name="driverClass" value="${jdbc.driverClass}"></property>
		<property name="user" value="${jdbc.user}"></property>
		<property name="password" value="${jdbc.password}"></property>
	</bean>
	<bean name="accountDao" class="com.zzh.dao.AccountDaoImpl">
		<property name="dataSource" ref="dataSource"></property>
	</bean>
	<bean name="accountService" class="com.zzh.service.AccountServiceImpl">
		<property name="ad" ref="accountDao"></property>
		<property name="tt" ref="transactionTemplate"></property>
	</bean>
</beans>
x
1
2
<beans xmlns:xsi="http://www.w3.org/2001/XMLSchema-instance" xmlns="http://www.springframework.org/schema/beans" xmlns:context="http://www.springframework.org/schema/context" xmlns:tx="http://www.springframework.org/schema/tx" xmlns:aop="http://www.springframework.org/schema/aop" xsi:schemaLocation="http://www.springframework.org/schema/beans http://www.springframework.org/schema/beans/spring-beans-4.2.xsd http://www.springframework.org/schema/context http://www.springframework.org/schema/context/spring-context-4.2.xsd http://www.springframework.org/schema/tx http://www.springframework.org/schema/tx/spring-tx-4.2.xsd http://www.springframework.org/schema/aop http://www.springframework.org/schema/aop/spring-aop-4.2.xsd ">3
4
<!-- 指定spring读取db.properties配置 -->5
<context:property-placeholder location="classpath:db.properties"/>6
<!-- 事务核心管理器,封装了所有事务操作,依赖于datasource -->7
<bean name="transactionManager" class="org.springframework.jdbc.datasource.DataSourceTransactionManager">8
<property name="dataSource" ref="dataSource"></property>9
</bean>10
<!-- 事务模型对象 -->11
<bean name="transactionTemplate" class="org.springframework.transaction.support.TransactionTemplate">12
<property name="transactionManager" ref="transactionManager"></property>13
</bean>14
15
<tx:advice id="txAdvice" transaction-manager="transactionManager">16
<tx:attributes>17
<!-- 以方法为单位,指定方法应用什么事务属性18
isolution:隔离级别19
propagation:传播行为20
read-only:是否只读21
-->22
<tx:method name="save*" propagation="REQUIRED" isolation="DEFAULT" read-only="false"/>23
<tx:method name="persist*" isolation="REPEATABLE_READ" propagation="REQUIRED" read-only="false" />24
<tx:method name="update*" isolation="REPEATABLE_READ" propagation="REQUIRED" read-only="false" />25
<tx:method name="modify*" isolation="REPEATABLE_READ" propagation="REQUIRED" read-only="false" />26
<tx:method name="delete*" isolation="REPEATABLE_READ" propagation="REQUIRED" read-only="false" />27
<tx:method name="remove*" isolation="REPEATABLE_READ" propagation="REQUIRED" read-only="false" />28
<tx:method name="get*" isolation="REPEATABLE_READ" propagation="REQUIRED" read-only="true" />29
<tx:method name="find*" isolation="REPEATABLE_READ" propagation="REQUIRED" read-only="true" />30
<tx:method name="trans" isolation="REPEATABLE_READ" propagation="REQUIRED" read-only="false" />31
</tx:attributes>32
</tx:advice>33
34
<!-- 配置织入-->35
<aop:config>36
<!-- 配置切点表达式 -->37
<aop:pointcut expression="execution(* com.zzh.service.*ServiceImpl.*(..))" id="txPc"/>38
<!-- 配置切面:通知+切点39
advice-ref:通知的名称40
pointcut-ref:切点的名称41
-->42
<aop:advisor advice-ref="txAdvice" pointcut-ref="txPc"/>43
</aop:config>44
45
<!-- 1.将连接池配置到spring容器中 -->46
<bean name="dataSource" class="com.mchange.v2.c3p0.ComboPooledDataSource">47
<property name="jdbcUrl" value="${jdbc.jdbcUrl}"></property>48
<property name="driverClass" value="${jdbc.driverClass}"></property>49
<property name="user" value="${jdbc.user}"></property>50
<property name="password" value="${jdbc.password}"></property>51
</bean>52
<bean name="accountDao" class="com.zzh.dao.AccountDaoImpl">53
<property name="dataSource" ref="dataSource"></property>54
</bean>55
<bean name="accountService" class="com.zzh.service.AccountServiceImpl">56
<property name="ad" ref="accountDao"></property>57
<property name="tt" ref="transactionTemplate"></property>58
</bean>59
</beans>3.注解配置(aop)
	<!-- 事务核心管理器,封装了所有事务操作,依赖于datasource -->
	<bean name="transactionManager" class="org.springframework.jdbc.datasource.DataSourceTransactionManager">
		<property name="dataSource" ref="dataSource"></property>
	</bean>
	<!-- 事务模型对象 -->
	<bean name="transactionTemplate" class="org.springframework.transaction.support.TransactionTemplate">
		<property name="transactionManager" ref="transactionManager"></property>
	</bean>

	<tx:annotation-driven/>
10
1
<!-- 事务核心管理器,封装了所有事务操作,依赖于datasource -->2
<bean name="transactionManager" class="org.springframework.jdbc.datasource.DataSourceTransactionManager">3
<property name="dataSource" ref="dataSource"></property>4
</bean>5
<!-- 事务模型对象 -->6
<bean name="transactionTemplate" class="org.springframework.transaction.support.TransactionTemplate">7
<property name="transactionManager" ref="transactionManager"></property>8
</bean>9
10
<tx:annotation-driven/> @Transactional(isolation=Isolation.DEFAULT,propagation=Propagation.REQUIRED,readOnly=false)
public void trans(Integer output,Integer input, Double money) {
ad.decreaseMoney(output, money);
int i = 1/0;
ad.increaseMoney(input, money);
}6
1
(isolation=Isolation.DEFAULT,propagation=Propagation.REQUIRED,readOnly=false)2
public void trans(Integer output,Integer input, Double money) {3
ad.decreaseMoney(output, money);4
int i = 1/0;5
ad.increaseMoney(input, money);6
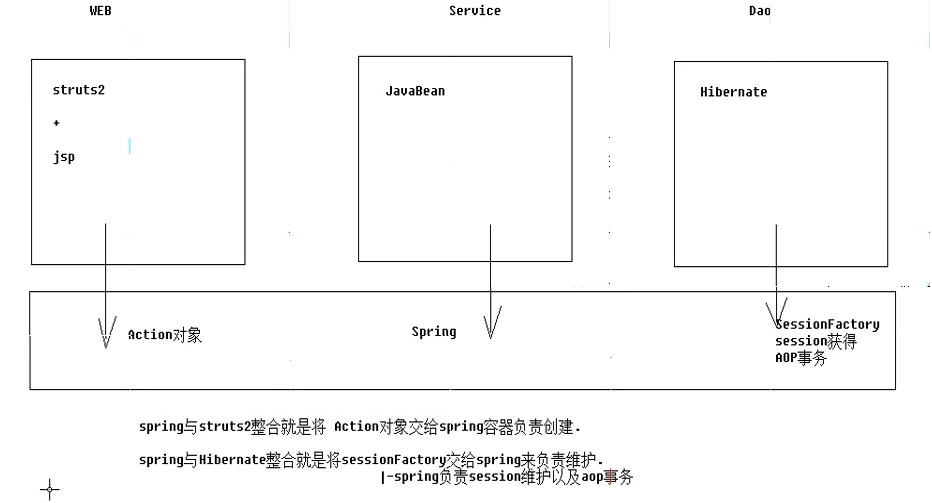
}三大框架整合
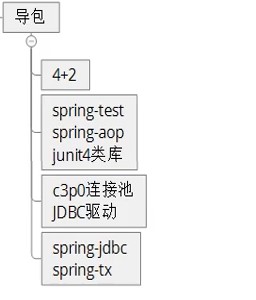
一.三大框架整合原理
spring中要导的包(hibernate+struts2+spring合计41个包)
struts.spring.hibernate
<?xml version="1.0" encoding="UTF-8"?>
   <!DOCTYPE struts PUBLIC
	"-//Apache Software Foundation//DTD Struts Configuration 2.3//EN"
	"http://struts.apache.org/dtds/struts-2.3.dtd">
<struts>
	<!-- # struts.objectFactory = spring 将action的创建交给容器
		 struts.objectFactory.spring.autoWire = name spring负责创建action的依赖属性
	-->
	<constant name="struts.objectFactory" value="spring"></constant>
	<package name="crm" namespace="/" extends="struts-default">
		<!-- 整合方案1(不推荐):class属性依然使用action的完整类名
			 struts2仍然创建action,由spring负责装配action中的依赖属性
			 不推荐的理由是:最好是由spring来控制action,使action的生命周期与spring容器一样,这样
			 才能使action使用spring的所有功能
		 -->
		<!-- 整合方案2:在class属性中填写spring容器中的BeanName
			 此时将完全由spring管理action的生命周期,包括action的创建
			 注意:此时需要手动配置action的依赖属性
		-->
		<action name="UserAction_*" class="userAction" method="{1}">
			<result name="success">/success.jsp</result>
		</action>
	</package>
</struts>
1
2
3
4
5
<struts>6
<!-- # struts.objectFactory = spring 将action的创建交给容器7
struts.objectFactory.spring.autoWire = name spring负责创建action的依赖属性8
-->9
<constant name="struts.objectFactory" value="spring"></constant>10
<package name="crm" namespace="/" extends="struts-default">11
<!-- 整合方案1(不推荐):class属性依然使用action的完整类名12
struts2仍然创建action,由spring负责装配action中的依赖属性13
不推荐的理由是:最好是由spring来控制action,使action的生命周期与spring容器一样,这样14
才能使action使用spring的所有功能15
-->16
<!-- 整合方案2:在class属性中填写spring容器中的BeanName 17
此时将完全由spring管理action的生命周期,包括action的创建18
注意:此时需要手动配置action的依赖属性19
-->20
<action name="UserAction_*" class="userAction" method="{1}">21
<result name="success">/success.jsp</result>22
</action>23
</package>24
</struts><?xml version="1.0" encoding="UTF-8"?>
<beans xmlns="http://www.springframework.org/schema/beans"
xmlns:context="http://www.springframework.org/schema/context"
xmlns:aop="http://www.springframework.org/schema/aop"
xmlns:tx="http://www.springframework.org/schema/tx"
xmlns:xsi="http://www.w3.org/2001/XMLSchema-instance"
xsi:schemaLocation="http://www.springframework.org/schema/beans http://www.springframework.org/schema/beans/spring-beans-4.2.xsd
http://www.springframework.org/schema/context http://www.springframework.org/schema/context/spring-context-4.2.xsd
http://www.springframework.org/schema/aop http://www.springframework.org/schema/aop/spring-aop-4.2.xsd
http://www.springframework.org/schema/tx http://www.springframework.org/schema/tx/spring-tx-4.2.xsd ">
<!-- 读取db.properties中的配置参数 -->
<context:property-placeholder location="classpath:db.properties"/>
<bean name="dataSource" class="com.mchange.v2.c3p0.ComboPooledDataSource">
<property name="jdbcUrl" value="${jdbc.jdbcUrl}"></property>
<property name="driverClass" value="${jdbc.driverClass}"></property>
<property name="user" value="${jdbc.user}"></property>
<property name="password" value="${jdbc.password}"></property>
</bean>
<bean name="transactionManager" class="org.springframework.orm.hibernate5.HibernateTransactionManager">
<property name="sessionFactory" ref="sessionFactory"></property>
</bean>
<tx:advice id="txAdvice" transaction-manager="transactionManager">
<tx:attributes>
<tx:method name="save*" isolation="REPEATABLE_READ" propagation="REQUIRED" read-only="false"/>
<tx:method name="persist*" isolation="REPEATABLE_READ" propagation="REQUIRED" read-only="false" />
<tx:method name="update*" isolation="REPEATABLE_READ" propagation="REQUIRED" read-only="false" />
<tx:method name="modify*" isolation="REPEATABLE_READ" propagation="REQUIRED" read-only="false" />
<tx:method name="delete*" isolation="REPEATABLE_READ" propagation="REQUIRED" read-only="false" />
<tx:method name="remove*" isolation="REPEATABLE_READ" propagation="REQUIRED" read-only="false" />
<tx:method name="get*" isolation="REPEATABLE_READ" propagation="REQUIRED" read-only="true" />
<tx:method name="find*" isolation="REPEATABLE_READ" propagation="REQUIRED" read-only="true" />
</tx:attributes>
</tx:advice>
<aop:config>
<aop:pointcut expression="execution(* com.zzh.service.*ServiceImpl.*(..))" id="txPc"/>
<aop:advisor advice-ref="txAdvice" pointcut-ref="txPc"/>
</aop:config>
<!-- 加载方案1:仍然使用外部的hibernate.cfg.xml配置信息-->
<!-- <bean name="sessionFactory" class="org.springframework.orm.hibernate5.LocalSessionFactoryBean">
<property name="configLocation" value="classpath:hibernate.cfg.xml"></property>
</bean> -->
<!-- 加载方案2:在spring配置中防止hibernate配置信息 -->
<bean name="sessionFactory" class="org.springframework.orm.hibernate5.LocalSessionFactoryBean">
<property name="dataSource" ref="dataSource"></property>
<!-- 配置hibernate基本信息 -->
<property name="hibernateProperties">
<props>
<!-- 必选配置 -->
<prop key="hibernate.dialect">org.hibernate.dialect.MySQLDialect</prop>
<!-- 可选配置 -->
<prop key="hibernate.show_sql">true</prop>
<prop key="hibernate.format_sql">true</prop>
<prop key="hibernate.hbm2ddl.auto">update</prop>
</props>
</property>
<property name="mappingDirectoryLocations" value="classpath:com/zzh/domain"></property>
</bean>
<bean name="userAction" class="com.zzh.web.action.UserAction" scope="prototype">
<property name="userService" ref="userService"></property>
</bean>
<bean name="userService" class="com.zzh.service.UserServiceImpl">
<property name="userDao" ref="userDao"></property>
</bean>
<bean name="userDao" class="com.zzh.dao.UserDaoImpl">
<property name="sessionFactory" ref="sessionFactory"></property>
</bean>
</beans>1
68
1
2
<beans xmlns="http://www.springframework.org/schema/beans" 3
xmlns:context="http://www.springframework.org/schema/context" 4
xmlns:aop="http://www.springframework.org/schema/aop" 5
xmlns:tx="http://www.springframework.org/schema/tx" 6
xmlns:xsi="http://www.w3.org/2001/XMLSchema-instance" 7
xsi:schemaLocation="http://www.springframework.org/schema/beans http://www.springframework.org/schema/beans/spring-beans-4.2.xsd 8
http://www.springframework.org/schema/context http://www.springframework.org/schema/context/spring-context-4.2.xsd 9
http://www.springframework.org/schema/aop http://www.springframework.org/schema/aop/spring-aop-4.2.xsd 10
http://www.springframework.org/schema/tx http://www.springframework.org/schema/tx/spring-tx-4.2.xsd ">11
<!-- 读取db.properties中的配置参数 -->12
<context:property-placeholder location="classpath:db.properties"/>13
<bean name="dataSource" class="com.mchange.v2.c3p0.ComboPooledDataSource">14
<property name="jdbcUrl" value="${jdbc.jdbcUrl}"></property>15
<property name="driverClass" value="${jdbc.driverClass}"></property>16
<property name="user" value="${jdbc.user}"></property>17
<property name="password" value="${jdbc.password}"></property>18
</bean>19
<bean name="transactionManager" class="org.springframework.orm.hibernate5.HibernateTransactionManager">20
<property name="sessionFactory" ref="sessionFactory"></property>21
</bean>22
<tx:advice id="txAdvice" transaction-manager="transactionManager">23
<tx:attributes>24
<tx:method name="save*" isolation="REPEATABLE_READ" propagation="REQUIRED" read-only="false"/>25
<tx:method name="persist*" isolation="REPEATABLE_READ" propagation="REQUIRED" read-only="false" />26
<tx:method name="update*" isolation="REPEATABLE_READ" propagation="REQUIRED" read-only="false" />27
<tx:method name="modify*" isolation="REPEATABLE_READ" propagation="REQUIRED" read-only="false" />28
<tx:method name="delete*" isolation="REPEATABLE_READ" propagation="REQUIRED" read-only="false" />29
<tx:method name="remove*" isolation="REPEATABLE_READ" propagation="REQUIRED" read-only="false" />30
<tx:method name="get*" isolation="REPEATABLE_READ" propagation="REQUIRED" read-only="true" />31
<tx:method name="find*" isolation="REPEATABLE_READ" propagation="REQUIRED" read-only="true" />32
</tx:attributes>33
</tx:advice>34
<aop:config>35
<aop:pointcut expression="execution(* com.zzh.service.*ServiceImpl.*(..))" id="txPc"/>36
<aop:advisor advice-ref="txAdvice" pointcut-ref="txPc"/>37
</aop:config>38
<!-- 加载方案1:仍然使用外部的hibernate.cfg.xml配置信息-->39
<!-- <bean name="sessionFactory" class="org.springframework.orm.hibernate5.LocalSessionFactoryBean">40
<property name="configLocation" value="classpath:hibernate.cfg.xml"></property>41
</bean> -->42
<!-- 加载方案2:在spring配置中防止hibernate配置信息 -->43
<bean name="sessionFactory" class="org.springframework.orm.hibernate5.LocalSessionFactoryBean">44
<property name="dataSource" ref="dataSource"></property>45
<!-- 配置hibernate基本信息 -->46
<property name="hibernateProperties">47
<props>48
<!-- 必选配置 -->49
<prop key="hibernate.dialect">org.hibernate.dialect.MySQLDialect</prop>50
<!-- 可选配置 -->51
<prop key="hibernate.show_sql">true</prop>52
<prop key="hibernate.format_sql">true</prop>53
<prop key="hibernate.hbm2ddl.auto">update</prop>54
</props>55
</property>56
<property name="mappingDirectoryLocations" value="classpath:com/zzh/domain"></property>57
</bean>58
59
<bean name="userAction" class="com.zzh.web.action.UserAction" scope="prototype">60
<property name="userService" ref="userService"></property>61
</bean>62
<bean name="userService" class="com.zzh.service.UserServiceImpl">63
<property name="userDao" ref="userDao"></property>64
</bean>65
<bean name="userDao" class="com.zzh.dao.UserDaoImpl">66
<property name="sessionFactory" ref="sessionFactory"></property>67
</bean>68
</beans>
 浙公网安备 33010602011771号