MQ高级
一、生产者确认机制
(1)ConfirmCallback机制
- 引入配置信息:
在publisher模块的application.yaml中添加配置:
spring:
  rabbitmq:
    publisher-confirm-type: correlated # 开启publisher confirm机制,并设置confirm类型
    publisher-returns: true # 开启publisher return机制
- 确认机制的三种模式:
这里publisher-confirm-type有三种模式可选:
none:关闭confirm机制simple:同步阻塞等待MQ的回执(回调方法)correlated:MQ异步回调返回回执
一般我们推荐使用correlated,回调机制。
- confirm测试方法:
@Test
void testPublisherConfirm() {
    // 1.创建CorrelationData
    CorrelationData cd = new CorrelationData();
    // 2.给Future添加ConfirmCallback
    cd.getFuture().addCallback(new ListenableFutureCallback<CorrelationData.Confirm>() {
        @Override
        public void onFailure(Throwable ex) {
            // 2.1.Future发生异常时的处理逻辑,基本不会触发
            log.error("send message fail", ex);
        }
        @Override
        public void onSuccess(CorrelationData.Confirm result) {
            // 2.2.Future接收到回执的处理逻辑,参数中的result就是回执内容
            if(result.isAck()){ // result.isAck(),boolean类型,true代表ack回执,false 代表 nack回执
                log.debug("到达交换机,发送消息成功,收到 ack!");
            }else{ // result.getReason(),String类型,返回nack时的异常描述
                log.error("未到达交换机,发送消息失败,收到 nack, reason : {}", result.getReason());
            }
        }
    });
    // 3.发送消息
    rabbitTemplate.convertAndSend("hmall.direct", "blue1", "hello blue", cd);
}
小结:
- 每个消息都有自己的一个确认机制。
- 消息到达交换机,返回ack,未到达交换机,返回nack。
(2)ReturnCallback机制
- 引入配置信息:
spring:
  rabbitmq:
    publisher-confirm-type: correlated # 开启publisher confirm机制,并设置confirm类型
    publisher-returns: true # 开启publisher return机制
- setReturnsCallback
@Slf4j
@AllArgsConstructor
@Configuration
public class MqConfig {
    private final RabbitTemplate rabbitTemplate;

    @PostConstruct
    public void init() {
        rabbitTemplate.setReturnsCallback(new RabbitTemplate.ReturnsCallback() {
            @Override
            public void returnedMessage(ReturnedMessage returned) {
                log.error("到达交换机,但是未到达对应的队列,触发return callback,");
                log.debug("exchange: {}", returned.getExchange());
                log.debug("routingKey: {}", returned.getRoutingKey());
                log.debug("message: {}", returned.getMessage());
                log.debug("replyCode: {}", returned.getReplyCode());
                log.debug("replyText: {}", returned.getReplyText());
            }
        });
    }
}
小结:
- 消息未到达队列,会触发该机制,全局只有一个
(3)生产者重试机制
两种方式:
- yaml文件的:retry配置项
- 注解的:@Retryable
配置
首先第一种情况,就是生产者发送消息时,出现了网络故障,导致与MQ的连接中断。
为了解决这个问题,SpringAMQP提供的消息发送时的重试机制。即:当RabbitTemplate与MQ连接超时后,多次重试。
publisher模块的application.yaml文件,添加下面的内容:
spring:
  rabbitmq:
    connection-timeout: 1s # 设置MQ的连接超时时间
    template:
      retry:
        enabled: true # 开启超时重试机制
        initial-interval: 1000ms # 失败后的初始等待时间
        multiplier: 1 # 失败后下次的等待时长倍数,下次等待时长 = 上次等待时长 * multiplier
        max-attempts: 3 # 总共尝试次数
:::color1
配置参数解释:
initial-interval: 失败后的初始等待时间multiplier: 倍增器,每次重试的等待时间是前一次几倍。
失败后下次等待时长 =上次等待时长 * multiplier
max-attempts: 最大重试次数(包括第一次尝试)
:::
举例:
由于<font style="background-color:rgb(242,243,245);">multiplier</font>设置为1,这意味着每次重试之间的间隔是固定的,不会增加。
假设在t=0时刻首次尝试发送消息,如果发送失败,则会按照以下时间点进行重试:
- 第一次尝试(也是首次发送):t=0(假设即时失败)
- 第一次重试:等待1秒后重试,t=1秒(首次失败后等待1秒)
- 第二次重试:等待1秒*1=1秒 后重试,t=2秒(从第一次重试再等待1秒)
如果设置如下:
initial-interval:1000ms
multiplier:2
max-attempts: 5
由于<font style="background-color:rgb(242,243,245);">multiplier</font>设置为2,这意味着每次重试之间的间隔会翻倍。
假设在t=0时刻首次尝试发送消息,如果发送失败,则会按照以下时间点进行重试:
- 第一次尝试(也是首次发送):t=0(假设即时失败)
- 第一次重试:等待1秒后重试,t=1秒(首次失败后等待1秒)
- 第二次重试:等待1*2=2秒 后重试,t=3秒
- 第三次重试:等待2*2=4秒 后重试,t=7秒
- 第四次重试:等待4*2=8秒 后重试,t=15秒
测试
我们利用命令停掉服务端的RabbitMQ服务:
docker stop mq
然后测试发送一条消息,会发现会每隔1秒重试1次,总共重试了3次。消息发送的超时重试机制配置成功了!
注意:当网络不稳定的时候,利用重试机制可以有效提高消息发送的成功率。不过SpringAMQP提供的重试机制是阻塞式的重试,也就是说多次重试等待的过程中,当前线程是被阻塞的。
如果对于业务性能有要求,建议禁用重试机制。如果一定要使用,请合理配置等待时长和重试次数,当然也可以考虑使用异步线程来执行发送消息的代码。
(4)消息发送失败落库
失败后把消息写入数据库,后期通过定时任务扫描,再次发送.如果定时任务发送多次依旧失败,则人工介入.
使用封装好的代码实现落库方案:
- 触发confirmCallback机制
连接交换机失败触发:
/**
 * 消息处理类
 *
 * @author zzj
 * @version 1.0
 */
@Slf4j
@Service
public class RabbitClient {

    @Resource
    private RabbitTemplate rabbitTemplate;
    @Autowired(required = false)
    private FailMsgDao failMsgDao;

    public void sendMsg(String exchange, String routingKey, Object msg) {
        sendMsg(exchange, routingKey, msg, null, null, false);
    }

    /**
     * 发送消息 重试3次
     *
     * @param exchange   交换机
     * @param routingKey 路由key
     * @param msg        消息对象,会将对象序列化成json字符串发出
     * @param delay      延迟时间 秒
     * @param msgId      消息id
     * @param isFailMsg  是否是失败消息
     * @return 是否发送成功
     */
    //此注释是生产者重试机制操作,和yaml中配置是一样的效果
    @Retryable(value = MqException.class, maxAttempts = 3, backoff = @Backoff(value = 3000, multiplier = 1.5), recover = "saveFailMag")
    public void sendMsg(String exchange, String routingKey, Object msg, Integer delay, Long msgId, boolean isFailMsg) {
        // 1.发送消息前准备
        // 1.1获取消息内容,如果非字符串将其序列化
        String jsonMsg = JsonUtils.toJsonStr(msg);
        // 1.2.全局唯一消息id,如果调用者设置了消息id,使用调用者消息id,如果为配置,默认雪花算法生成消息id
        msgId = NumberUtils.null2Default(msgId, IdUtil.getSnowflakeNextId());
        // 1.3.设置默认延迟时间,默认立即发送
        delay = NumberUtils.null2Default(delay, -1);
        log.debug("消息发送!exchange = {}, routingKey = {}, msg = {}, msgId = {}", exchange, routingKey, jsonMsg, msgId);

        // 1.4.构建回调
        RabbitMqListenableFutureCallback futureCallback = RabbitMqListenableFutureCallback.builder()
                .exchange(exchange)
                .routingKey(routingKey)
                .msg(jsonMsg)
                .msgId(msgId)
                .delay(delay)
                .isFailMsg(isFailMsg)
                .failMsgDao(failMsgDao)
                .build();
        // 1.5.CorrelationData设置
        CorrelationData correlationData = new CorrelationData(msgId.toString());
        correlationData.getFuture().addCallback(futureCallback);

        // 1.6.构造消息对象
        Message message = MessageBuilder.withBody(StrUtil.bytes(jsonMsg, CharsetUtil.CHARSET_UTF_8))
                //持久化
                .setDeliveryMode(MessageDeliveryMode.PERSISTENT)
                //消息id
                .setMessageId(msgId.toString())
                .build();
        try {
            // 2.发送消息
            this.rabbitTemplate.convertAndSend(exchange, routingKey, message, new DelayMessagePostProcessor(delay), correlationData);
        } catch (Exception e) {
            log.error("send error:" + e);
            // 3.构建异常回调,并抛出异常
            MqException mqException = new MqException();
            mqException.setMsg(ExceptionUtil.getMessage(e));
            mqException.setMqId(msgId);
            throw mqException;
        }
    }

    /**
     * @param mqException mq异常消息
     * @param exchange    交换机
     * @param routingKey  路由key
     * @param msg         mq消息
     * @param delay       延迟消息
     * @param msgId       消息id
     */
    @Recover
    public void saveFailMag(MqException mqException, String exchange, String routingKey, Object msg, Integer delay, String msgId) {
        //发送消息失败,需要将消息持久化到数据库,通过任务调度的方式处理失败的消息
        failMsgDao.save(mqException.getMqId(), exchange, routingKey, JsonUtils.toJsonStr(msg), delay, DateUtils.getCurrentTime() + 10,  ExceptionUtil.getMessage(mqException));
    }
}
- 触发returnCallback
连接队列失败触发:
/**
 * ReturnCallBack回调
 * @author itcast
 */
@Configuration
//这里使用了yaml文件中的配置
@ConditionalOnProperty(prefix = "rabbit-mq", name = "enable", havingValue = "true")
@Import({RabbitClient.class, FailMsgDaoImpl.class})
@Slf4j
public class RabbitMqConfiguration implements ApplicationContextAware {

    /**
     * 并发数量
     */
    public static final int DEFAULT_CONCURRENT = 10;

    @Autowired(required = false)
    private FailMsgDao failMsgDao;

    @Override
    public void setApplicationContext(ApplicationContext applicationContext) throws BeansException {
        // 获取RabbitTemplate
        RabbitTemplate rabbitTemplate = applicationContext.getBean(RabbitTemplate.class);
        //定义returnCallback回调方法
        rabbitTemplate.setReturnsCallback(
            new RabbitTemplate.ReturnsCallback() {
                @Override
                public void returnedMessage(ReturnedMessage returnedMessage) {
                    byte[] body = returnedMessage.getMessage().getBody();
                    //消息id
                    String messageId = returnedMessage.getMessage().getMessageProperties().getMessageId();
                    String content = new String(body, Charset.defaultCharset());
                    log.info("消息发送失败,应答码{},原因{},交换机{},路由键{},消息id{},消息内容{}",
                             returnedMessage.getReplyCode(),
                             returnedMessage.getReplyText(),
                             returnedMessage.getExchange(),
                             returnedMessage.getRoutingKey(),
                             messageId,
                                content);
                        if (failMsgDao != null) {
                            failMsgDao.save(Long.parseLong(messageId), returnedMessage.getExchange(), returnedMessage.getRoutingKey(), content, 0, DateUtils.getCurrentTime()+10, "returnCallback");
                        }
                    }
                }
        );
    }
}
- 消息失败落库实现代码
1)实现层
//这里注释掉这个是不需要丢到容器内了,而RabbitMqConfiguration直接使用了自动装配
//@Repository
//这里使用了yaml文件中的配置
@ConditionalOnProperty(prefix = "rabbit-mq", name = "persistence.enable", havingValue = "true")
public class FailMsgDaoImpl implements FailMsgDao {

    private final FailMsgMapper failMsgMapper;

    public FailMsgDaoImpl(FailMsgMapper failMsgMapper) {
        this.failMsgMapper = failMsgMapper;
    }

    /**
     * 集合名称
     */
    private static final String COLLECTION_NAME = "fail_msg";
    private static final String FAIL_CONSUMER_MSG = "fail_consumer_msg";

    private static final String FIELD_NAME_NEXT_EXECUTE_TIME = "next_execute_time";
    private static final String FIELD_NAME_EXCHANGE = "exchange";
    private static final String FIELD_NAME_QUEUE = "queue";
    private static final String FIELD_NAME_ROUTING_KEY = "routing_key";
    private static final String FIELD_NAME_MSG = "msg";
    private static final String FIELD_NAME_REASON = "reason";

    /**
     * 保存失败消息
     *
     * @param failMsg 失败消息
     */
    @Override
    public void save(FailMsg failMsg) {

        List<FailMsg> failMsgs = failMsgMapper.queryById(failMsg.getId());
        if (CollUtils.isEmpty(failMsgs)) {
            failMsgMapper.insert(failMsg);
        } else {
            failMsgMapper.updateById(failMsg);
        }
    }

    @Override
    public void save(Long id, String exchange, String routingKey, Object msg, Integer delay, Integer nextFetchTime, String failMessage) {
        //更新下次执行时间
        FailMsg failMsg = FailMsg.builder().id(id)
        .exchange(exchange)
        .routingKey(routingKey)
        .msg(JsonUtils.toJsonStr(msg))
        .delayMsgExecuteTime(DateUtils.getCurrentTime() + (delay!=null?delay:0))
        .nextFetchTime(nextFetchTime)
        .reason(failMessage)
        .build();

        failMsgMapper.insert(failMsg);
    }

    @Override
    public List<FailMsg> fetch(Integer limit) {

        List<FailMsg> failMsgs = failMsgMapper.fetch(DateUtils.getCurrentTime(), 100);
        if (CollUtils.isNotEmpty(failMsgs)) {
            failMsgMapper.batchUpdateExecuteTime(10, failMsgs.stream().map(FailMsg::getId).collect(Collectors.toList()));
        }
        return failMsgs;
    }

    /**
     * 根据id删除
     *
     * @param id 失败消息id
     */
    @Override
    public void removeById(Long id) {
        failMsgMapper.deleteById(id);
    }
}
2)Service/Dao层
public interface FailMsgDao {
    /**
     * 保存失败消息
     *
     * @param failMsg 失败消息
     */
    void save(FailMsg failMsg);

    /**
     *
     * @param id
     * @param exchange
     * @param routingKey
     * @param msg
     * @param delay
     * @param failMessage
     */
    void save(Long id, String exchange, String routingKey, Object msg, Integer delay, Integer nextFetchTime, String failMessage);

    /**
     * 获取当前可执行消息,并修改执行消息执行的时间,防止重复执行
     * @param limit 获取条数
     * @return
     */
    List<FailMsg> fetch(Integer limit);

    /**
     * 根据id删除
     *
     * @param id 失败消息id
     */
    void removeById(Long id);
}
3)Mapper层
/**
 * <p>
 * 失败消息 Mapper 接口
 * </p>
 *
 * @author itcast
 * @since 2023-07-11
 */
public interface FailMsgMapper {
    String BASE_COLUMNS = " id,exchange,routing_key as 'routingKey',msg,reason,delay_msg_execute_time as delayMsgExecuteTime,create_time as createTime, update_time as updateTime,next_fetch_time as nextFetchTime ";

    @Insert("insert into fail_msg(id,exchange,routing_key,msg,reason,delay_msg_execute_time,next_fetch_time) values(#{domain.id}," +
            "#{domain.exchange},#{domain.routingKey},#{domain.msg},#{domain.reason},#{domain.delayMsgExecuteTime},#{domain.nextFetchTime})")
    int insert(@Param("domain") FailMsg failMsg);

    @Select("select" + BASE_COLUMNS + "from fail_msg where id=#{id} limit 1")
    List<FailMsg> queryById(@Param("id") Long id);

    @Update("update fail_msg set exchange=#{domain.exchange},routing_key=#{domain.routingKey},msg=#{domain.msg},reason=#{domain.reason},delay_msg_execute_time=#{domain.delayMsgExecuteTime}" +
            " where id=#{domain.id}")
    int updateById(@Param("domain") FailMsg failMsg);


    @Update("<script>update fail_msg set next_fetch_time=next_fetch_time+#{time} where id in (<foreach collection='ids' item='id' separator=','>#{id}</foreach>)</script>")
    void batchUpdateExecuteTime(@Param("time") Integer time, @Param("ids") List<Long> ids);

    /**
     * 查询要执行的前n条数据
     * @param fetchTime 执行时间
     * @param num 获取num条数据
     * @return 执行失败记录
     */
    @Select("select" + BASE_COLUMNS + "from fail_msg where next_fetch_time<=#{fetchTime} limit #{num} ")
    List<FailMsg> fetch(@Param("fetchTime") Integer fetchTime, @Param("num") Integer num);

    @Delete("delete from fail_msg where id=#{id}")
    int deleteById(@Param("id") Long id);
}
4)自动装配和yaml文件配置
- 自动装配配置
org.springframework.boot.autoconfigure.EnableAutoConfiguration=\
 com.itheima.common.rabbitmq.config.RabbitMqConfiguration
- yaml文件配置
rabbit-mq:
  enable: true
  persistence:
    enable: true
二、消息持久化
持久化是指将定义信息(元数据)持久化到RabbitMQ的数据库(mnesia)中,RabbitMQ重启后交换机定义仍然存在。
- 设置方法:
在控制台的Exchanges页面,添加交换机时可以配置交换机/队列的Durability参数:
示例:
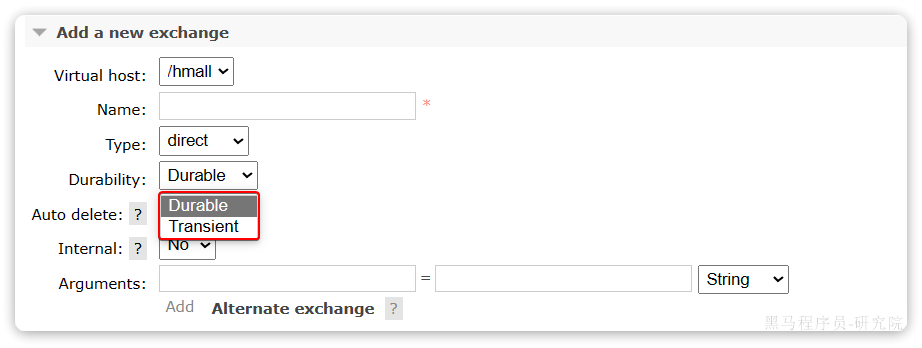
<font style="background-color:#FBDE28;">Durable</font>就是持久化模式,<font style="background-color:#FBDE28;">Transient</font>就是临时模式。
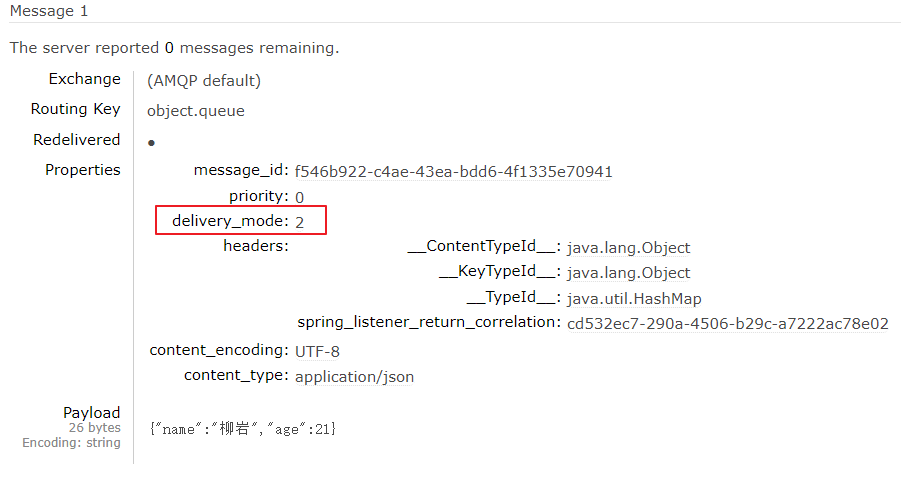
- 查看持久消息的内容:
delivery_mode=2 表示持久化
- 代码实现持久化
// 1.6.构造消息对象
Message message = MessageBuilder.withBody(StrUtil.bytes(jsonMsg, CharsetUtil.CHARSET_UTF_8))
//持久化
//这里PERSISTENT常量的值为:2
.setDeliveryMode(MessageDeliveryMode.PERSISTENT)
//消息id
.setMessageId(msgId.toString())
.build();
小结:
- 交换机,队列默认都是持久化的。
三、消费者确认机制
为了确认消费者是否成功处理消息,RabbitMQ提供了消费者确认机制(Consumer Acknowledgement)。即:当消费者处理消息结束后,应该向RabbitMQ发送一个回执,告知RabbitMQ消息处理状态。
:::color1
回执有三种可选值:
- ack:成功处理消息,RabbitMQ从队列中删除该消息
- nack:消息处理失败,RabbitMQ需要再次投递消息
- reject:消息处理失败并拒绝该消息,RabbitMQ从队列中删除该消息
:::
一般reject方式用的较少,除非是消息格式有问题,那就是开发问题了。因此大多数情况下我们需要将消息处理的代码通过try catch机制捕获,消息处理成功时返回ack,处理失败时返回nack.
SpringAMQP帮我们实现了消息确认,并可以通过配置文件设置消息确认的处理方式,
有三种模式:
:::info
**none**:不处理。即消息投递给消费者后消息会立刻从MQ删除。非常不安全,不建议使用**manual**:手动模式。需要自己在业务代码中调用api,发送ack或reject,存在业务入侵,但更灵活**auto**:自动模式。当业务正常执行时则自动返回ack. 当业务出现异常时,根据异常判断返回不同结果:- 如果是业务异常,会自动返回
nack; - 如果是消息处理或校验异常,自动返回
reject,返回的异常包括:MessageConversionException、MethodArgumentTypeMismatchException等
- 如果是业务异常,会自动返回
:::
(1)auto模式测试
通过下面的配置可以修改消息确认的处理方式为auto:
spring:
  rabbitmq:
    listener:
      simple:
        acknowledge-mode: auto # 自动ack
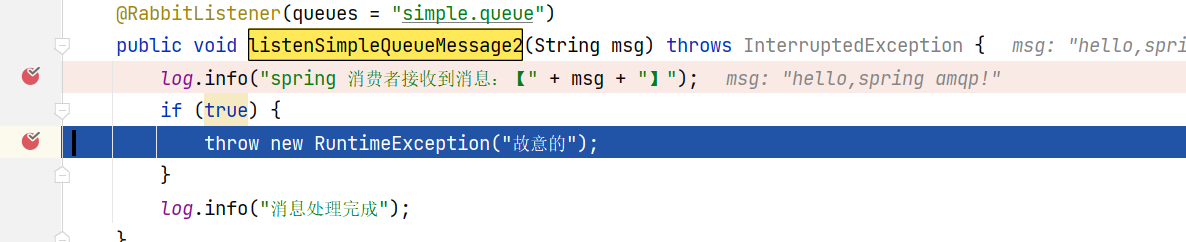
修改consumer服务的SpringRabbitListener类中的方法,模拟一个消息处理的异常:
@RabbitListener(queues = "simple.queue")
public void listenSimpleQueueMessage2(String msg) throws InterruptedException {
    log.info("spring 消费者接收到消息:【" + msg + "】");
    if (true) {
        throw new RuntimeException("故意的");
    }
    log.info("消息处理完成");
}
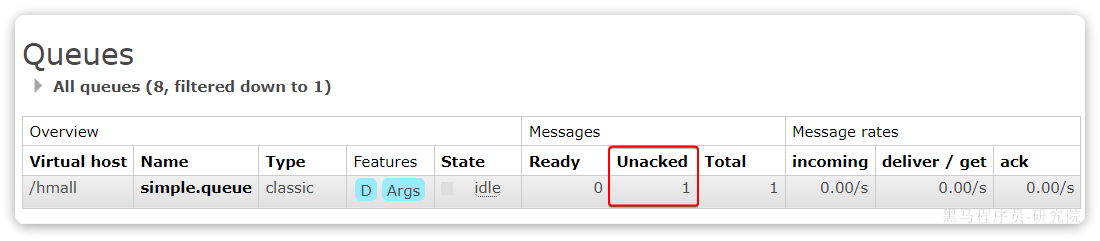
在此方法内第一句打断点,我们向队列“simple.queue”发一条消息,此时进入断点
可以发现此时有一条消息状态为unacked(未确定状态):
放行以后,由于抛出的是业务异常,消息处理失败后,会回到RabbitMQ,并重新投递到消费者。
(2)失败重试机制
当消费者出现异常后,消息会不断requeue(重入队)到队列,再重新发送给消费者。如果消费者再次执行依然出错,消息会再次返回到队列,再次投递,直到消息处理成功为止。
极端情况就是消费者一直无法执行成功,那么消息投递就会无限循环,导致mq的消息处理飙升,带来不必要的压力:

当然,上述极端情况发生的概率还是非常低的,不过不怕一万就怕万一。为了应对上述情况Spring又提供了消费者失败重试机制:在消费者出现异常时利用本地重试,而不是无限制的投递到mq队列。
修改consumer服务的application.yml文件,添加内容:
spring:
  rabbitmq:
    listener:
      simple:
        retry:
          enabled: true # 开启消费者失败重试
          initial-interval: 1000ms # 初识的失败等待时长为1秒
          multiplier: 1 # 失败的等待时长倍数,下次等待时长 = 上次等待时长 * multiplier
          max-attempts: 3 # 最大重试次数
重启consumer服务,重复之前的测试。可以发现:
- 消费者在失败后消息没有重新回到MQ无限重新投递,而是在本地重试了3次
- 本地重试3次以后,查看RabbitMQ控制台,发现消息被删除了,说明最后SpringAMQP返回的是
reject
结论:
- 开启本地重试时,消息处理过程中抛出异常,不会请求到队列,而是在消费者本地重试
- 重试达到最大次数后,Spring会返回reject,消息会被丢弃
(3)失败消息入队
本地测试达到最大重试次数后,消息会被丢弃。这在某些对于消息可靠性要求较高的业务场景下,显然不太合适了。
因此Spring允许我们自定义重试次数耗尽后的消息处理策略,这个策略是由MessageRecovery接口来定义的,它有3个不同实现:
RejectAndDontRequeueRecoverer:重试耗尽后,直接reject,丢弃消息。默认就是这种方式ImmediateRequeueMessageRecoverer:重试耗尽后,返回nack,消息重新入队<font style="background-color:#FBDE28;">RepublishMessageRecoverer</font>:重试耗尽后,将失败消息投递到指定的交换机
比较优雅的一种处理方案是RepublishMessageRecoverer,失败后将消息投递到一个固定交换机,通过交换机将消息转发到失败消息队列,程序监听失败消息队列,接收到失败消息,将失败消息存入失败消息表,通过定时任务进行处理。
步骤:
1)在consumer服务中定义处理失败消息的交换机和队列
2)定义一个RepublishMessageRecoverer,指定失败消息投递交换机的名称及routingkey
@Configuration
//这里定义的是yaml文件中的配置,当有这些配置的时候,才触发
@ConditionalOnProperty(name = "spring.rabbitmq.listener.simple.retry.enabled", havingValue = "true")
public class ErrorMessageConfig {
    //1)在consumer服务中定义处理失败消息的交换机和队列
    //定义交换机
    @Bean
    public DirectExchange errorMessageExchange(){
        return new DirectExchange("error.direct");
    }
    //定义队列
    @Bean
    public Queue errorQueue(){
        return new Queue("error.queue", true);
    }
    //队列绑定交换机和routingKey
    @Bean
    public Binding errorBinding(Queue errorQueue, DirectExchange errorMessageExchange){
        return BindingBuilder.bind(errorQueue).to(errorMessageExchange).with("error");
    }
    //2)定义一个RepublishMessageRecoverer,指定失败消息投递交换机的名称及routingkey
    //定义RepublishMessageRecoverer消息处理策略
    @Bean
    public MessageRecoverer republishMessageRecoverer(RabbitTemplate rabbitTemplate){
        return new RepublishMessageRecoverer(rabbitTemplate, "error.direct", "error");
    }
}
(4)测试失败消息入队
测试流程:
启动消费端程序:
@RabbitListener(queues = "simple.queue")
public void listenSimpleQueueMessage(String msg) throws InterruptedException {
    log.info("spring 消费者接收到消息:【" + msg + "】");
    if (true) {
        throw new RuntimeException("故意的");
    }
    log.info("消息处理完成");
}
达到最大重试次数将会投递到失败消息队列。
监听失败消息队列将失败消息写入数据库中,由人工定期处理。
@RabbitListener(queues = "error.queue")
public void listenErrorQueue(String msg) throws InterruptedException {
    System.out.println("接收失败消息:【" + msg + "】" + LocalTime.now());
    //存入数据库失败消息表...
}
四、MQ消息幂等性
什么是幂等性
:::info
在程序开发中,是指同一个业务,执行一次或多次对业务状态的影响是一致的。例如:
- 根据id删除数据
- 查询数据
但数据的更新往往不是幂等的,如果重复执行可能造成不一样的后果。比如:
- 取消订单,恢复库存的业务。如果多次恢复就会出现库存重复增加的情况
- 退款业务。重复退款对商家而言会有经济损失。
所以,我们要尽可能避免业务被重复执行,然而在实际业务场景中,由于意外经常会出现业务被重复执行的情况。例如:
- 页面卡顿时频繁刷新导致表单重复提交
- 服务间调用的重试
- MQ消息的重复投递
:::
因此,我们必须想办法保证消息处理的幂等性。这里给出两种方案:
- 唯一消息ID
- 业务状态判断
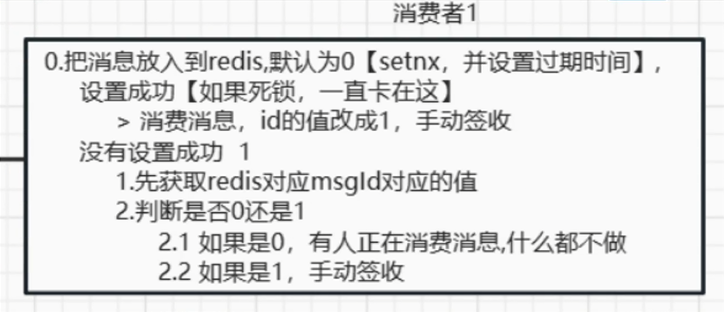
(1)唯一消息ID
(2)业务状态判断
业务判断就是基于业务本身的逻辑或状态来判断是否是重复的请求,不同的业务场景判断的思路也不一样。
例如在支付通知案例中,处理消息的业务逻辑是把订单状态从未支付修改为已支付。因此我们就可以在执行更新时判断订单状态是否是未支付,如果不是则证明订单已经被处理过,无需重复处理。
相比较而言,使用唯一消息ID的方案需要操作数据库或Redis保存消息ID,所以更推荐使用业务判断的方案。
(3)业务补偿
虽然我们利用各种机制尽可能增加了消息的可靠性,但也不好说能保证消息100%的可靠。万一真的MQ通知失败该怎么办呢?有没有其它补偿方案,能够确保订单的支付状态一致呢?
其实思想很简单:既然MQ通知不一定发送到交易服务,那么交易服务就必须自己主动去查询支付状态。这样即便支付服务的MQ通知失败,我们依然能通过主动查询来保证订单状态的一致。
五、延迟队列
成为死信的几种情况:此处为语雀卡片,点击链接查看
:::info
- 消费者使用basic.reject或basic.nack声明消费失败,并且消息的requeue参数设置为false。
- 消息设置了过期时间,或者消息存放的队列设置了过期时间,超过时间无人消费。
- 要投递的队列消息满了,无法投递。
:::
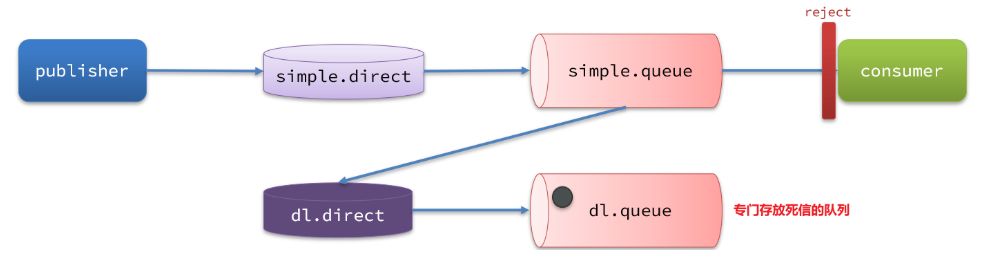
这些就是死信,然后会通过路由规则经过交换机,路由到一个队列,这个交换机就叫死信交换机,这个队列就是死信交换机。
(1)死信交换机+TTL
- 死信交换机(Dead Letter Exchange, DLX):
是一种处理消息队列中无法被消费的消息的方式。当消息因为某些原因(如消费者拒绝消费消息、消息过期等)而无法被正常消费时,这些消息就会成为“死信”。
- TTL(Time To Live-存活时间):
可以设定消息在队列中的存活时间,当消息在队列中停留的时间超过了设定的 TTL 后,消息就会成为死信。当消息变成死信时,会被发送到死信交换机中去,通过死信交换机转发到指定的队列,由应用程序去消费,进一步处理这些消息。
:::success
超时未消费,消息变成死信的两种情况:
- 消息所在的队列设置了超时时间;
- 消息本身设置了超时时间;
- 如果两者都设置了,以短的时间为优先。
:::
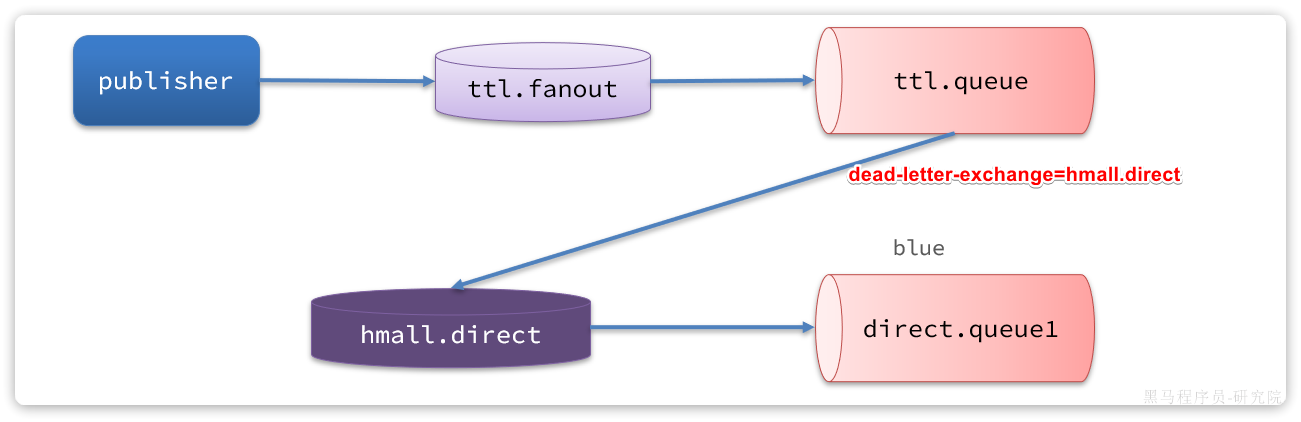
流程如下:
- 创建订单成功向“ttl.fanout”交换机发送消息,消息内容记录下单的订单信息,消息的TTL为30分钟
- 通过"ttl.fanout"将消息转发到"ttl.queue"队列
- 由于该队列并没有消费程序去监听,当到达30分钟时该消息变为死信,自动发给死信交换机“hmall.direct”,由列信交换机将消息转发到"direct.queue1"队列。
- 应用监听“direct.queue1”队列,收到未支付超时订单,执行取消订单并回滚库存。
(2)死信的路由过程
- 消费者拒绝消费消息
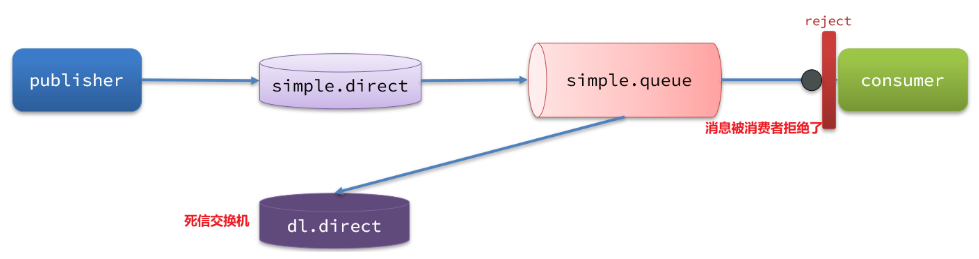
- 队列绑定了死信交换机
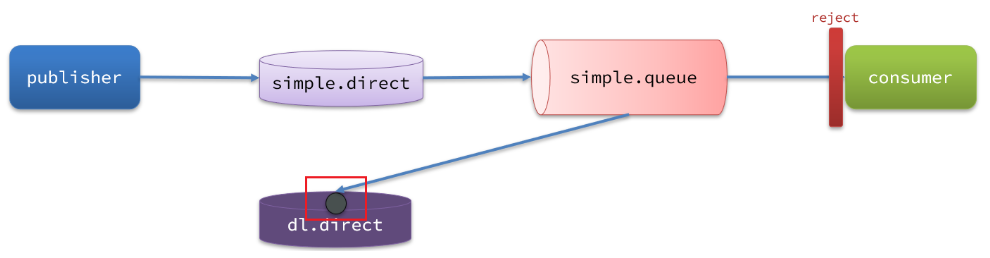
- 死信队列有绑定的死信交换机
(3)普通队列与死信交换机的关系
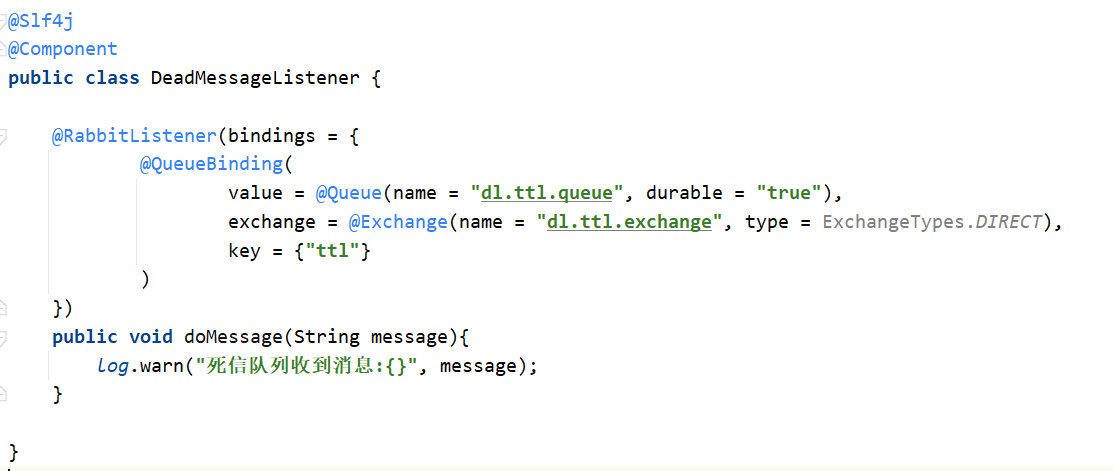
- 声明死信交换机和死信队列
注解方式:
- 声明普通队列和普通交换机、绑定关系
普通队列要把消息投递到死信交换机:
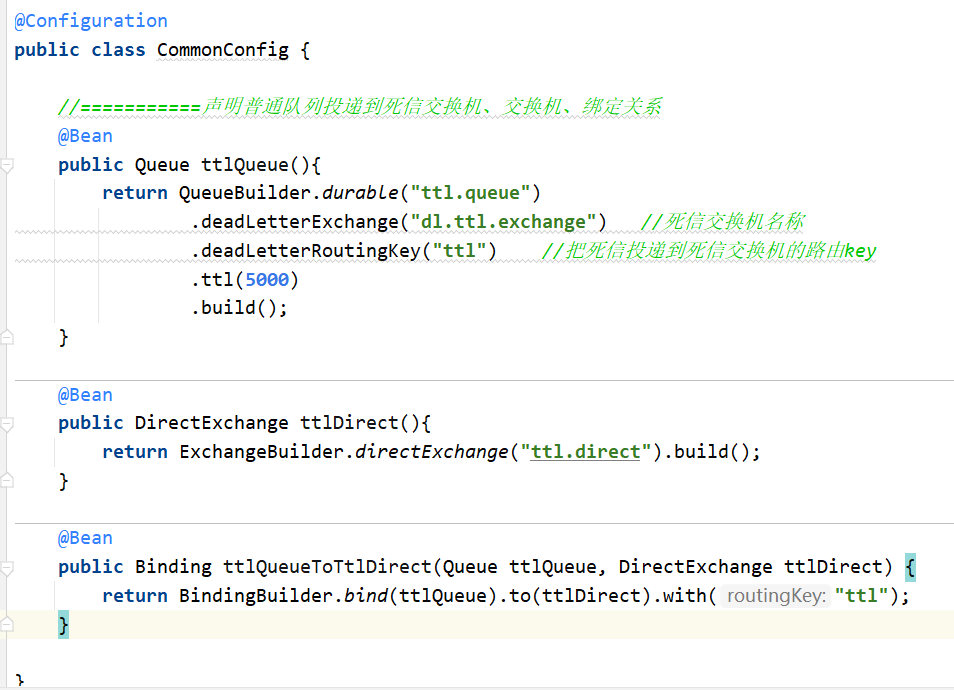
说明:一般这里的routingKey都是相同的ttl,当发送消息的时候和绑定死信交换机的时候,同时都设置了队列时间,那么这里以最短的设置时间为准。
六、延迟消息插件
官方文档说明:
Scheduling Messages with RabbitMQ | RabbitMQ
(1)下载
插件下载地址:
GitHub - rabbitmq/rabbitmq-delayed-message-exchange: Delayed Messaging for RabbitMQ
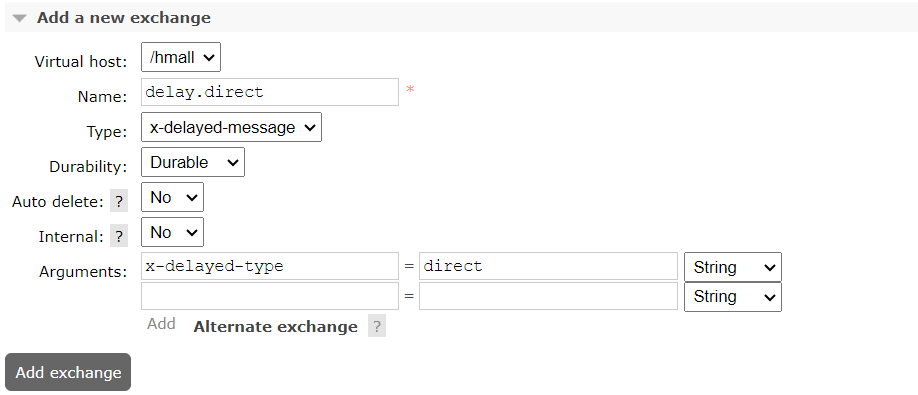
(2) 声明延迟交换机
控制台方式:
创建delay.queue队列,并绑定到延迟交换机
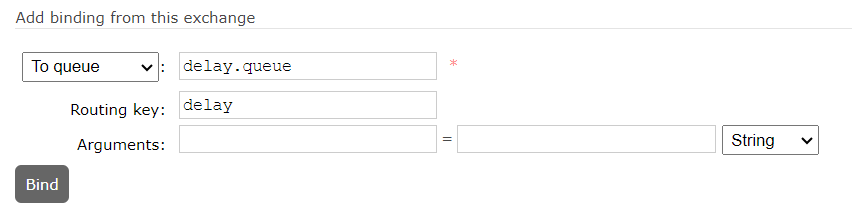
基于注解方式:
@RabbitListener(bindings = @QueueBinding(
    value = @Queue(name = "delay.queue", durable = "true"),
    exchange = @Exchange(name = "delay.direct", delayed = "true",type = ExchangeTypes.DIRECT, durable = "true"),
    key = "delay"
))
public void listenDelayMessage(String msg){
    log.info("接收到delay.queue的延迟消息:{}", msg);
}
(3)发送延迟消息
@Test
void testPublisherDelayMessage() {
    // 1.创建消息
    String message = "hello, delayed message";
    // 2.发送消息,利用消息后置处理器添加消息头
    rabbitTemplate.convertAndSend("delay.direct", "delay", message, new MessagePostProcessor() {
        @Override
        public Message postProcessMessage(Message message) throws AmqpException {
            // 添加延迟消息属性
            message.getMessageProperties().setDelay(5000);
            log.info("发送消息"+new String(message.getBody(), StandardCharsets.UTF_8)+ LocalDateTime.now());
            return message;
        }
    });
}
(4)测试
测试流程:
- 启动消费端监听程序。
在consumer模块添加监听方法。
@RabbitListener(queues = "delay.queue")
public void listenDelayQueue(String msg) throws InterruptedException {
    System.out.println("接收延迟消息:【" + msg + "】" + LocalTime.now());
}
- 执行发送程序
- 观察发送程序日志中发送的消息的时间,观察监听程序的日志中接收消息时间的,判断是否是按延迟时间发送消息。
注意:发送延迟消息会触发ReturnCallback,这是因为延迟消息并没有发送到队列,而是在延迟时间到达才发送到队列,所以会触发ReturnCallback,需要在ReturnCallback方法中判断,如果是延迟消息不要向失败消息表插入记录。

 浙公网安备 33010602011771号