使用IDEA详解Spring中依赖注入的类型
使用IDEA详解Spring中依赖注入的类型(上)
在Spring中实现IoC容器的方法是依赖注入,依赖注入的作用是在使用Spring框架创建对象时动态地将其所依赖的对象(例如属性值)注入Bean组件中。
Spring框架的依赖注入通常有两种实现方式,一种是使用构造方法注入,另一种是使用属性的setter方法注入。
使用构造方法注入
Spring框架可以采用Java反射机制,通过构造方法完成依赖注入。
创建项目及导入Maven模块过程请看《使用IDEA开发Spring入门程序》,在这就不赘述了。在这继续前面的项目,按照下面的步骤补充:
创建entity包,创建Person类
package entity;

public class Person {
    private String name;
    private String sex;

    public Person() {
        System.out.println("无参构造调用了...");
    }

    public Person(String name, String sex) {
        this.name = name;
        this.sex = sex;
    }

    public String getName() {
        return name;
    }

    public void setName(String name) {
        this.name = name;
    }

    public String getSex() {
        return sex;
    }

    public void setSex(String sex) {
        this.sex = sex;
    }

}

复制代码
构造方法注入方式一
编写配置文件
配置文件的具体代码如下:
<?xml version="1.0" encoding="UTF-8"?>
<beans xmlns="http://www.springframework.org/schema/beans"
       xmlns:xsi="http://www.w3.org/2001/XMLSchema-instance"
       xsi:schemaLocation="http://www.springframework.org/schema/beans
       http://www.springframework.org/schema/beans/spring-beans.xsd">
    <!--将指定类TestDaoImpl配置给Spring,即注册一个TestDaoImpl对象,让Spring创建其实例-->
    <!--
    一个Bean标签可以注册一个组件(对象、类)
    class:写要注册的组件的全类名
    id:这个对象的唯一标识
    -->
    <bean id="test" class="dao.TestDaoImpl"/>
    <bean id="person1" class="entity.Person"/>
    <!--使用构造方法注入-->
    <bean id="person2" class="entity.Person">
        <!--使用有参构造器进行创建对象并赋值-->
        <!-- public Person(String name, String sex) {
        this.name = name;
        this.sex = sex;
    }-->
        <constructor-arg name="name" value="泰斗贤若如"></constructor-arg>
        <constructor-arg name="sex" value="男"></constructor-arg>
    </bean>
</beans>

复制代码
在测试类TestDemo中测试
package test;

import dao.TestDao;
import entity.Person;
import org.junit.jupiter.api.Test;
import org.springframework.beans.factory.BeanFactory;
import org.springframework.beans.factory.xml.XmlBeanFactory;
import org.springframework.context.ApplicationContext;
import org.springframework.context.support.ClassPathXmlApplicationContext;
import org.springframework.context.support.FileSystemXmlApplicationContext;
import org.springframework.core.io.FileSystemResource;

public class TestDemo {

    @Test
    public void test4(){
        //初始化spring容器ApplicationContext,加载配置文件
        ApplicationContext applicationContext = new ClassPathXmlApplicationContext("applicationContext.xml");
        //通过容器获取test实例

        Person person2 =(Person) applicationContext.getBean("person2");
        System.out.println("姓名:"+person2.getName()+";"+"性别:"+person2.getSex());
    }
}

复制代码
测试结果
构造方法注入方式二
编写配置文件
<?xml version="1.0" encoding="UTF-8"?>
<beans xmlns="http://www.springframework.org/schema/beans"
       xmlns:xsi="http://www.w3.org/2001/XMLSchema-instance"
       xsi:schemaLocation="http://www.springframework.org/schema/beans
       http://www.springframework.org/schema/beans/spring-beans.xsd">
    <!--将指定类TestDaoImpl配置给Spring,即注册一个TestDaoImpl对象,让Spring创建其实例-->
    <!--
    一个Bean标签可以注册一个组件(对象、类)
    class:写要注册的组件的全类名
    id:这个对象的唯一标识
    -->
    <bean id="test" class="dao.TestDaoImpl"/>
    <bean id="person1" class="entity.Person"/>
    <!--使用构造方法注入-->
    <bean id="person2" class="entity.Person">
        <!--使用有参构造器进行创建对象并赋值-->
        <!-- public Person(String name, String sex) {
        this.name = name;
        this.sex = sex;
    }-->
        <constructor-arg name="name" value="泰斗贤若如"></constructor-arg>
        <constructor-arg name="sex" value="男"></constructor-arg>
    </bean>
    <!--可以省略name属性,严格按照构造器参数的位置赋值-->
    <bean id="person3" class="entity.Person">
        <!--使用有参构造器进行创建对象并赋值-->
        <!-- public Person(String name, String sex) {
        this.name = name;
        this.sex = sex;
    }-->
        <constructor-arg value="泰斗贤若如"></constructor-arg>
        <constructor-arg value="男"></constructor-arg>
    </bean>

</beans>

复制代码
在测试类TestDemo中测试
package test;
import dao.TestDao;
import entity.Person;
import org.junit.jupiter.api.Test;
import org.springframework.beans.factory.BeanFactory;
import org.springframework.beans.factory.xml.XmlBeanFactory;
import org.springframework.context.ApplicationContext;
import org.springframework.context.support.ClassPathXmlApplicationContext;
import org.springframework.context.support.FileSystemXmlApplicationContext;
import org.springframework.core.io.FileSystemResource;
public class TestDemo {
@Test
public void test5(){
//初始化spring容器ApplicationContext,加载配置文件
ApplicationContext applicationContext = new ClassPathXmlApplicationContext("applicationContext.xml");
//通过容器获取test实例
Person person3 =(Person) applicationContext.getBean("person3");
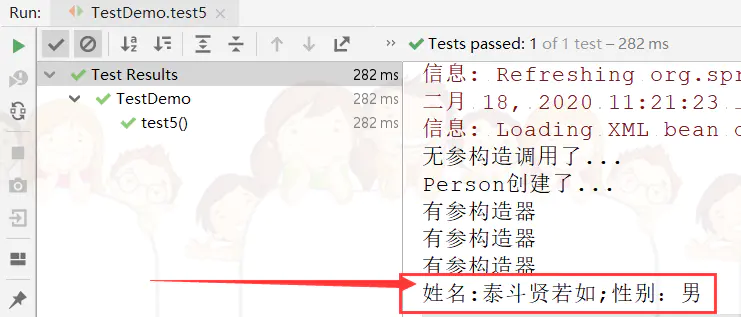
System.out.println("姓名:"+person3.getName()+";"+"性别:"+person3.getSex());
}
}
复制代码测试结果
需要注意的是,如果使用这种方法,要严格按照构造器参数的位置赋值,如果不这样赋值,当然也不会报错,但会造成赋值错乱,比如会把姓名赋值成性别,这当然是我们不愿意看到的,如果你非不按要求赋值(有点极端,皮一下),有种方法可以避免你赋值错乱,请看下面代码:
编写配置文件
<?xml version="1.0" encoding="UTF-8"?>
<beans xmlns="http://www.springframework.org/schema/beans"
       xmlns:xsi="http://www.w3.org/2001/XMLSchema-instance"
       xsi:schemaLocation="http://www.springframework.org/schema/beans
       http://www.springframework.org/schema/beans/spring-beans.xsd">
    <!--将指定类TestDaoImpl配置给Spring,即注册一个TestDaoImpl对象,让Spring创建其实例-->
    <!--
    一个Bean标签可以注册一个组件(对象、类)
    class:写要注册的组件的全类名
    id:这个对象的唯一标识
    -->
    <bean id="test" class="dao.TestDaoImpl"/>
    <bean id="person1" class="entity.Person"/>
    <!--使用构造方法注入-->
    <bean id="person2" class="entity.Person">
        <!--使用有参构造器进行创建对象并赋值-->
        <!-- public Person(String name, String sex) {
        this.name = name;
        this.sex = sex;
    }-->
        <constructor-arg name="name" value="泰斗贤若如"></constructor-arg>
        <constructor-arg name="sex" value="男"></constructor-arg>
    </bean>
    <!--可以省略name属性,严格按照构造器参数的位置赋值-->
    <bean id="person3" class="entity.Person">
        <!--使用有参构造器进行创建对象并赋值-->
        <!-- public Person(String name, String sex) {
        this.name = name;
        this.sex = sex;
    }-->
        <constructor-arg value="泰斗贤若如"></constructor-arg>
        <constructor-arg value="男"></constructor-arg>
    </bean>
    <bean id="person4" class="entity.Person">
        <!--使用有参构造器进行创建对象并赋值-->
        <!-- public Person(String name, String sex) {
        this.name = name;
        this.sex = sex;
    }-->
        <!--index="1",为参数指定索引,从0开始-->
        <constructor-arg value="男" index="1"></constructor-arg>
        <constructor-arg value="泰斗贤若如" ></constructor-arg>
    </bean>

</beans>

复制代码
在测试类TestDemo中测试
package test;

import dao.TestDao;
import entity.Person;
import org.junit.jupiter.api.Test;
import org.springframework.beans.factory.BeanFactory;
import org.springframework.beans.factory.xml.XmlBeanFactory;
import org.springframework.context.ApplicationContext;
import org.springframework.context.support.ClassPathXmlApplicationContext;
import org.springframework.context.support.FileSystemXmlApplicationContext;
import org.springframework.core.io.FileSystemResource;

public class TestDemo {

    @Test
    public void test5(){
        //初始化spring容器ApplicationContext,加载配置文件
        ApplicationContext applicationContext = new ClassPathXmlApplicationContext("applicationContext.xml");
        //通过容器获取test实例

        Person person4 =(Person) applicationContext.getBean("person4");
        System.out.println("姓名:"+person4.getName()+";"+"性别:"+person4.getSex());
    }
}

复制代码
测试结果
不要以为这样就完了,我在想,如果出现重载的情况,该如何办?且看我向下分解:
将entity包下的Person类修改如下
package entity;

public class Person {
    private String name;
    private String sex;
    private Integer age;
    private String email;

    public Person() {
        System.out.println("无参构造调用了...");
        System.out.println("Person创建了...");
    }

    public Person(String name, String sex) {
        this.name = name;
        this.sex = sex;
        System.out.println("有参构造器");
    }
    public Person(String name, String sex, Integer age) {
        this.name = name;
        this.sex = sex;
        this.age = age;
    }
    public Person(String name, String sex, String email) {
        this.name = name;
        this.sex = sex;
        this.email = email;
    }

    public String getName() {
        return name;
    }

    public void setName(String name) {
        this.name = name;
    }

    public String getSex() {
        return sex;
    }

    public void setSex(String sex) {
        this.sex = sex;
    }

    public Integer getAge() {
        return age;
    }

    public void setAge(Integer age) {
        this.age = age;
    }

    public String getEmail() {
        return email;
    }

    public void setEmail(String email) {
        this.email = email;
    }


}

复制代码
编写配置文件
<?xml version="1.0" encoding="UTF-8"?>
<beans xmlns="http://www.springframework.org/schema/beans"
       xmlns:xsi="http://www.w3.org/2001/XMLSchema-instance"
       xsi:schemaLocation="http://www.springframework.org/schema/beans
       http://www.springframework.org/schema/beans/spring-beans.xsd">
    <!--将指定类TestDaoImpl配置给Spring,即注册一个TestDaoImpl对象,让Spring创建其实例-->
    <!--
    一个Bean标签可以注册一个组件(对象、类)
    class:写要注册的组件的全类名
    id:这个对象的唯一标识
    -->
    <bean id="test" class="dao.TestDaoImpl"/>
    <bean id="person1" class="entity.Person"/>
    <!--使用构造方法注入-->
    <bean id="person2" class="entity.Person">
        <!--使用有参构造器进行创建对象并赋值-->
        <!-- public Person(String name, String sex) {
        this.name = name;
        this.sex = sex;
    }-->
        <constructor-arg name="name" value="泰斗贤若如"></constructor-arg>
        <constructor-arg name="sex" value="男"></constructor-arg>
    </bean>
    <!--可以省略name属性,严格按照构造器参数的位置赋值-->
    <bean id="person3" class="entity.Person">
        <!--使用有参构造器进行创建对象并赋值-->
        <!-- public Person(String name, String sex) {
        this.name = name;
        this.sex = sex;
    }-->
        <constructor-arg value="泰斗贤若如"></constructor-arg>
        <constructor-arg value="男"></constructor-arg>
    </bean>
    <bean id="person4" class="entity.Person">
        <!--使用有参构造器进行创建对象并赋值-->
        <!-- public Person(String name, String sex) {
        this.name = name;
        this.sex = sex;
    }-->
        <!--index="1",为参数指定索引,从0开始-->
        <constructor-arg value="男" index="1"></constructor-arg>
        <constructor-arg value="泰斗贤若如" ></constructor-arg>
    </bean>
    <bean id="person5" class="entity.Person">
        <!--使用有参构造器进行创建对象并赋值-->
        <!--public Person(String name, String sex, Integer age) {
        this.name = name;
        this.sex = sex;
        this.age = age;
    }
            public Person(String name, String sex, String email) {
        this.name = name;
        this.sex = sex;
        this.email = email;
    } -->

        <!--重载的情况下type可以指定参数的类型-->
        <constructor-arg value="男" index="1"></constructor-arg>
        <constructor-arg value="泰斗贤若如" index="0"></constructor-arg>
        <constructor-arg value="22" index="2" type="java.lang.Integer"></constructor-arg>
    </bean>

</beans>

复制代码
在测试类TestDemo中测试
package test;

import dao.TestDao;
import entity.Person;
import org.junit.jupiter.api.Test;
import org.springframework.beans.factory.BeanFactory;
import org.springframework.beans.factory.xml.XmlBeanFactory;
import org.springframework.context.ApplicationContext;
import org.springframework.context.support.ClassPathXmlApplicationContext;
import org.springframework.context.support.FileSystemXmlApplicationContext;
import org.springframework.core.io.FileSystemResource;

public class TestDemo {

    @Test
    public void test6(){
        //初始化spring容器ApplicationContext,加载配置文件
        ApplicationContext applicationContext = new ClassPathXmlApplicationContext("applicationContext.xml");
        //通过容器获取test实例

        Person person5 =(Person) applicationContext.getBean("person5");
        System.out.println("姓名:"+person5.getName()+";"+"性别:"+person5.getSex()+";"+"年龄:"+person5.getAge());
    }
}

复制代码
测试结果
不过话又说过来了,明明name能搞定的事情弄这么复杂干嘛,所以常用的还是方式一
使用属性的setter方法注入
这部分放到下一篇讲解吧,篇幅有点多了,请持续关注!

作者:泰斗贤若如
微信公众号:去有风的地方飞翔
Github:https://github.com/zyx110
有事微信:zyxt1637039050
本文版权归作者和博客园共有,欢迎转载,但未经作者同意必须保留此段声明,且在文章页面明显位置给出原文链接,否则保留追究法律责任的权利。

我不能保证我所说的都是对的,但我能保证每一篇都是用心去写的,我始终认同: “分享的越多,你的价值增值越大”,我们一同在分享中进步,在分享中成长,越努力越幸运。再分享一句话“十年前你是谁,一年前你是谁,甚至昨天你是谁,都不重要。重要的是,今天你是谁,以及明天你将成为谁。”
人生赢在转折处,改变从现在开始!
支持我的朋友们记得点波推荐哦,您的肯定就是我前进的动力。

 浙公网安备 33010602011771号