SpringBoot自定义注解
1.注解的概念
注解是一种能被添加到java代码中的元数据,类、方法、变量、参数和包都可以用注解来修饰。用来定义一个类、属性或一些方法,以便程序能被捕译处理。 相当于一个说明文件,告诉应用程序某个被注解的类或属性是什么,要怎么处理。注解对于它所修饰的代码并没有直接的影响。
2.注解的使用范围
1)为编译器提供信息:注解能被编译器检测到错误或抑制警告。
2)编译时和部署时的处理: 软件工具能处理注解信息从而生成代码,XML文件等等。
3)运行时的处理:有些注解在运行时能被检测到。
3.自定义注解的步骤
第一步:定义注解
第二步:配置注解
第三步:解析注解
4.注解的基本语法
4.1最基本的注解定义
package com.example.demo.config;

public @interface MyAnnotation {
    public String name();
    int age();
    String sex() default "女";
}
在自定义注解中,其实现部分只能定义注解类型元素!
说明:
a.访问修饰符必须为public,不写默认为public;
b.该元素的类型只能是基本数据类型、String、Class、枚举类型、注解类型以及一维数组;
c.该元素的名称一般定义为名词,如果注解中只有一个元素,名字起为value最好;
d.()不是定义方法参数的地方,也不能在括号中定义任何参数,仅仅只是一个特殊的语法;
e.default代表默认值,值必须定义的类型一致;
f.如果没有默认值,代表后续使用注解时必须给该类型元素赋值。
4.2常用的元注解
元注解:专门修饰注解的注解。
4.2.1@Target
@Target是专门用来限定某个自定义注解能够被应用在哪些Java元素上面的。其注解的源码如下:
@Documented
@Retention(RetentionPolicy.RUNTIME)
@Target(ElementType.ANNOTATION_TYPE)
public @interface Target {
    /**
     * Returns an array of the kinds of elements an annotation type
     * can be applied to.
     * @return an array of the kinds of elements an annotation type
     * can be applied to
     */
    ElementType[] value();
}
从源码可以看出它使用一个枚举类型元素,接下来看这个枚举类型的源码:
public enum ElementType {
    /** Class, interface (including annotation type), or enum declaration */
    TYPE,

    /** Field declaration (includes enum constants) */
    FIELD,

    /** Method declaration */
    METHOD,

    /** Formal parameter declaration */
    PARAMETER,

    /** Constructor declaration */
    CONSTRUCTOR,

    /** Local variable declaration */
    LOCAL_VARIABLE,

    /** Annotation type declaration */
    ANNOTATION_TYPE,

    /** Package declaration */
    PACKAGE,

    /**
     * Type parameter declaration
     *
     * @since 1.8
     */
    TYPE_PARAMETER,

    /**
     * Use of a type
     *
     * @since 1.8
     */
    TYPE_USE
}
因此,我们可以在使用@Target时指定注解的使用范围,示例如下:
//@MyAnnotation被限定只能使用在类、接口或方法上面
@Target(value = {ElementType.METHOD,ElementType.TYPE})
public @interface MyAnnotation {
    public String name();
    int age();
    String sex() default "女";
}
4.2.2@Retention
@Retention注解,用来修饰自定义注解的生命力。
a.如果一个注解被定义为RetentionPolicy.SOURCE,则它将被限定在Java源文件中,那么这个注解即不会参与编译也不会在运行期起任何作用,这个注解就和一个注释是一样的效果,只能被阅读Java文件的人看到;
b.如果一个注解被定义为RetentionPolicy.CLASS,则它将被编译到Class文件中,那么编译器可以在编译时根据注解做一些处理动作,但是运行时JVM(Java虚拟机)会忽略它,我们在运行期也不能读取到,是默认的;
c.如果一个注解被定义为RetentionPolicy.RUNTIME,那么这个注解可以在运行期的加载阶段被加载到Class对象中。那么在程序运行阶段,我们可以通过反射得到这个注解,并通过判断是否有这个注解或这个注解中属性的值,从而执行不同的程序代码段。我们实际开发中的自定义注解几乎都是使用的RetentionPolicy.RUNTIME。
@Retention注解源码如下:
@Documented
@Retention(RetentionPolicy.RUNTIME)
@Target(ElementType.ANNOTATION_TYPE)
public @interface Retention {
    /**
     * Returns the retention policy.
     * @return the retention policy
     */
    RetentionPolicy value();
}
里面也是一个枚举类型元素,其源码如下:
public enum RetentionPolicy {
    /**
     * Annotations are to be discarded by the compiler.
     */
    SOURCE,

    /**
     * Annotations are to be recorded in the class file by the compiler
     * but need not be retained by the VM at run time.  This is the default
     * behavior.
     */
    CLASS,

    /**
     * Annotations are to be recorded in the class file by the compiler and
     * retained by the VM at run time, so they may be read reflectively.
     *
     * @see java.lang.reflect.AnnotatedElement
     */
    RUNTIME
}
使用此注解修饰自定义注解生命力的示例如下:
//设置注解的生命力在运行期
@Retention(RetentionPolicy.RUNTIME)
public @interface MyAnnotation {
    public String name();
    int age();
    String sex() default "女";
}
4.2.3@Documented
@Documented注解,是被用来指定自定义注解是否能随着被定义的java文件生成到JavaDoc文档当中。源码如下:
@Documented
@Retention(RetentionPolicy.RUNTIME)
@Target(ElementType.ANNOTATION_TYPE)
public @interface Documented {
}
4.2.4@Inherited
@Inherited注解,是指定某个自定义注解如果写在了父类的声明部分,那么子类(继承关系)的声明部分也能自动拥有该注解。该注解只对@Target被定义为ElementType.TYPE的自定义注解起作用。下面对其进行详细说明:
1)打开其源码,可以看到
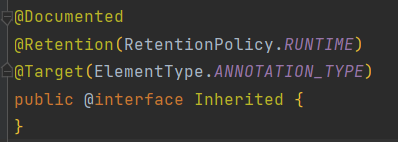
(1)该注解作用于整个程序运行中(@Retention(RetentionPolicy.RUNTIME);
(2)该注解只能修饰注解(@Target({ElementType.ANNOTATION_TYPE})),它是一个元注解。
此注解的中文翻译是继承的意思,那么究竟是什么意思呢?通过示例进行演示
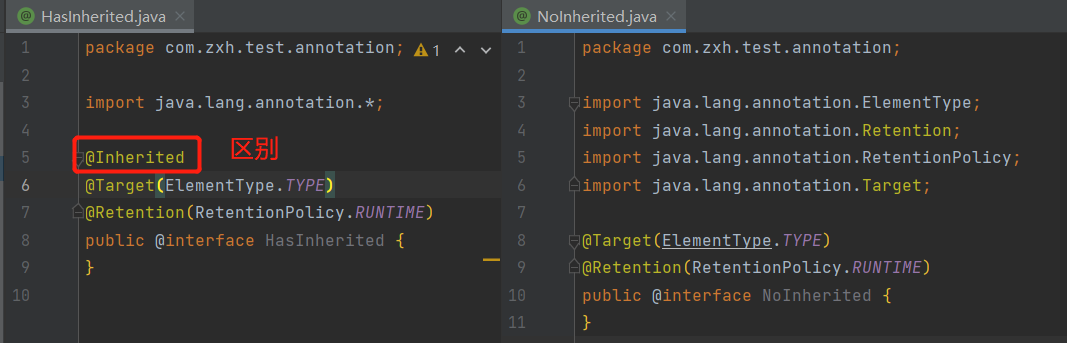
第一:先定义两个注解@HasInherited 和 @NoInherited,前者注解包含@Inherited 注解,后者反之
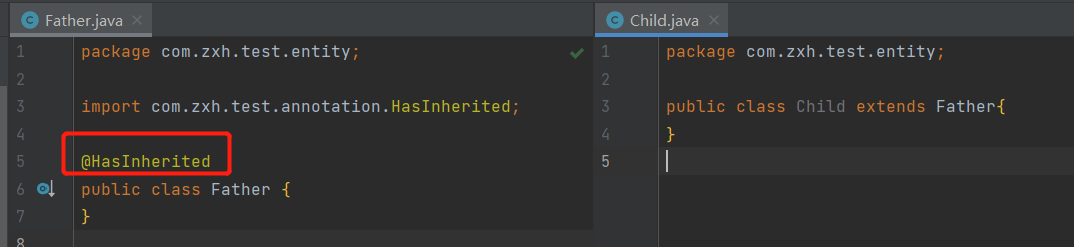
第二:再新建两个类,让其具有继承关系(Father类和Child类),类上暂时不添加任何注解

第三:给父类添加注解@HasInherited,子类不加,然后来获取两个类的注解信息
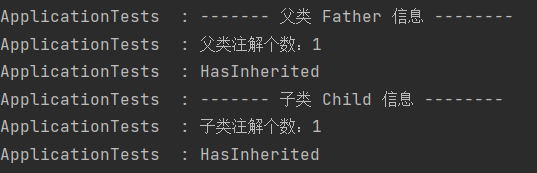
通过测试类获取注解信息
    @Test
    public void test() {
        // 打印父类注解信息
        Annotation[] fatherAnnotations = Father.class.getAnnotations();
        log.info("------- 父类 Father 信息 --------");
        log.info("父类注解个数:" + fatherAnnotations.length);
        for (Annotation fa : fatherAnnotations) {
            log.info(fa.annotationType().getSimpleName());
        }
        // 打印子类注解信息
        Annotation[] childAnnotations = Child.class.getAnnotations();
        log.info("------- 子类 Child 信息 --------");
        log.info("子类注解个数:" + childAnnotations.length);
        for (Annotation ca : childAnnotations) {
            log.info(ca.annotationType().getSimpleName());
        }
    }
打印信息如下
第四:给父类添加注解@NoInherited,子类不加,然后来获取两个类的注解信息

运行测试方法后打印信息如下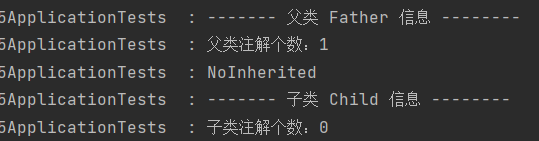
也就是说,被 @Inherited 注解修饰的注解,如果作用于某个类上,其子类是可以继承的该注解的。否则,若一个注解没有被 @Inherited注解所修饰,那么其作用范围只能是当前类,其子类是不能被继承的。
熟悉@SpringBootApplication注解的都知道,对于SpringBoot的启动类上的@SpringBootApplication注解也使用了@Inherited 注解,那么按道理也遵循上述的验证结果,不如就来验证一下吧
自定义一个类继承项目的SpringBoot的启动类,并修改启动的main方法,看是否可以启动(可以把项目的SpringBoot的启动类的main方法注释)
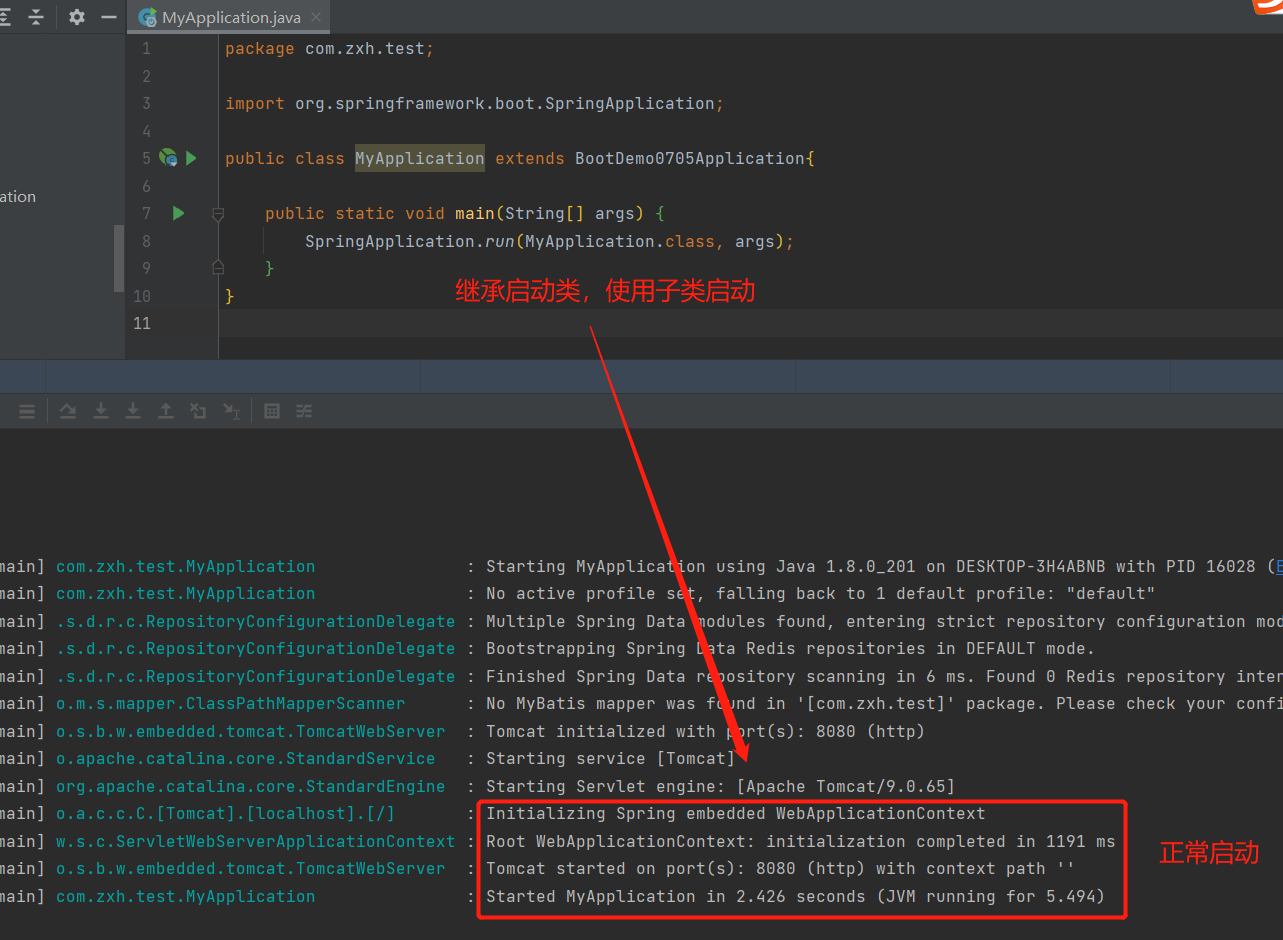
可以看到使用子类也能启动成功,猜想得到验证。
5.自定义注解举例
第一步:自定义的注解如下
package com.example.demo.config;

import java.lang.annotation.*;

@Target(value={ElementType.METHOD})
@Retention(RetentionPolicy.RUNTIME)
@Documented
public @interface MyAnnotation {
    public String name();
    int age();
    String sex() default "女";
    String[] hobby();
}
第二步:创建一个类,新建方法使用该注解
package com.example.demo.controller;

import com.example.demo.config.MyAnnotation;

public class UserController {

    @MyAnnotation(name = "张三",age = 18,hobby = {"跑步,打游戏"})
    public String get(){
        return "Hello Annotation";
    }
}
第三步:利用反射获取注解。创建一个类,代码如下:
package com.example.demo.test;

import com.example.demo.config.MyAnnotation;

import java.lang.annotation.Annotation;
import java.lang.reflect.Method;

public class Test {
    public static void main(String[] args) {
        try {
            //获取Class对象
            Class mylass = Class.forName("com.example.demo.controller.UserController");
            //获得该对象身上配置的所有的注解
            Annotation[] annotations = mylass.getAnnotations();
            System.out.println(annotations.toString());
            //获取里面的一个方法
            Method method = mylass.getMethod("get");
            //判断该元素上是否配置有某个指定的注解
            if(method.isAnnotationPresent(MyAnnotation.class)){
                System.out.println("UserController类的get方法上配置了MyAnnotation注解!");
                //获取该元素上指定类型的注解
                MyAnnotation myAnnotation = method.getAnnotation(MyAnnotation.class);
                System.out.println("name: " + myAnnotation.name() + ", age: " + myAnnotation.age()
                        + ",sex:"+myAnnotation.sex()+", hobby: " + myAnnotation.hobby()[0]);
            }else{
                System.out.println("UserController类的get方法上没有配置MyAnnotation注解!");
            }
        } catch (Exception e) {
            e.printStackTrace();
        }

    }
}
打印结果如下:
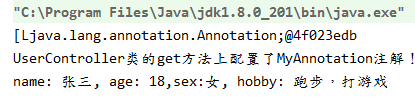
如果要获得的注解是配置在方法上的,从Method对象上获取;如果是配置在属性上,就需要从该属性对应的Field对象上去获取,如果是配置在类型上,需要从Class对象上去获取。
6.注解的特殊语法
特殊的语法是基于5的,这里就直接讲述特殊的定义和使用。
1)如果注解没有注解类型元素,那么在使用注解时可省略(),直接写为:@注解名。
定义如下:
@Target(value={ElementType.METHOD})
@Retention(RetentionPolicy.RUNTIME)
@Documented
public @interface MyAnnotation {
}
使用如下:
public class UserController {

    @MyAnnotation
    public String get(){
        return "Hello Annotation";
    }
}
2)如果注解只有一个注解类型元素,且命名为value,那么在使用注解时可直接写为:@注解名(注解值)。
定义如下:
@Target(value={ElementType.METHOD})
@Retention(RetentionPolicy.RUNTIME)
@Documented
public @interface MyAnnotation {
    String value();
}
使用如下:
public class UserController {

    @MyAnnotation("hello")
    public String get(){
        return "Hello Annotation";
    }
}
3)如果注解中的某个注解类型元素是一个数组类型,在使用时又出现只需要填入一个值的情况,那么在使用注解时可直接写为:@注解名(类型名 = 类型值),和标准的@注解名(类型名 = {类型值})等效!
定义如下:
@Target(value={ElementType.METHOD})
@Retention(RetentionPolicy.RUNTIME)
@Documented
public @interface MyAnnotation {
    String[] arr();
}
使用如下:
public class UserController {

    @MyAnnotation(arr = "hello")
    public String get(){
        return "Hello Annotation";
    }
}
4)如果注解的@Target定义为Element.PACKAGE,那么这个注解是配置在package-info.java中的,而不能直接在某个类的package代码上面配置。
7.在项目中使用自定义的注解
源代码:https://github.com/zhongyushi-git/annotation-demo.git
7.1环境搭建
1)新建一个SpringBoot的项目,导入jar座标
 <dependency>
            <groupId>org.springframework.boot</groupId>
            <artifactId>spring-boot-starter-web</artifactId>
        </dependency>
        <dependency>
            <groupId>org.springframework.boot</groupId>
            <artifactId>spring-boot-starter-aop</artifactId>
        </dependency>
        <dependency>
            <groupId>org.mybatis.spring.boot</groupId>
            <artifactId>mybatis-spring-boot-starter</artifactId>
            <version>1.3.2</version>
        </dependency>
        <dependency>
            <groupId>org.springframework.boot</groupId>
            <artifactId>spring-boot-starter-jdbc</artifactId>
        </dependency>
        <dependency>
            <groupId>mysql</groupId>
            <artifactId>mysql-connector-java</artifactId>
            <scope>runtime</scope>
        </dependency>
        <dependency>
            <groupId>com.alibaba</groupId>
            <artifactId>druid</artifactId>
            <version>1.1.9</version>
        </dependency>
        <dependency>
            <groupId>org.projectlombok</groupId>
            <artifactId>lombok</artifactId>
            <version>1.18.8</version>
        </dependency>
2)配置application.yml
#数据源配置
spring:
  datasource:
    #使用阿里巴巴的druid
    type: com.alibaba.druid.pool.DruidDataSource
    #配置数据库的路径和用户名密码
    url: jdbc:mysql://127.0.0.1:3306/annotation?useUnicode=true&characterEncoding=UTF-8&serverTimezone=CTT&zeroDateTimeBehavior=convertToNull&useSSL=false&allowMultiQueries=true
    username: root
    password: 123456


mybatis:
  mapperLocations: classpath*:mapper/*Mapper.xml

#开启日志打印
logging:
  level:
    com.zys.training: debug
3)执行sql脚本
create database annotation;
use annotation;
CREATE TABLE `systemlog`  (
  `id` varchar(200) CHARACTER SET utf8 COLLATE utf8_general_ci NOT NULL COMMENT '日志主键',
  `title` varchar(200) CHARACTER SET utf8 COLLATE utf8_general_ci NULL DEFAULT NULL COMMENT '标题',
  `describe` varchar(200) CHARACTER SET utf8 COLLATE utf8_general_ci NULL DEFAULT NULL COMMENT '模块描述',
  `create_time` datetime NULL DEFAULT NULL COMMENT '记录时间',
  `method` varchar(200) CHARACTER SET utf8 COLLATE utf8_general_ci NULL DEFAULT NULL COMMENT '调用方法',
  `error` longtext CHARACTER SET utf8 COLLATE utf8_general_ci NULL COMMENT '错误信息',
  PRIMARY KEY (`id`) USING BTREE
) ENGINE = InnoDB CHARACTER SET = utf8 COLLATE = utf8_general_ci ROW_FORMAT = Compact;
7.2创建日志的MVC
1)创建日志类
package com.zys.springboot.annotationdemo.entity;


import lombok.Getter;
import lombok.Setter;
import lombok.ToString;

import java.util.Date;

@Getter
@Setter
@ToString
public class SystemLog {
    private String id;
    private String title;
    private String describe;
    private Date create_time;
    private String method;
    private String error;
}
2)创建service
package com.zys.springboot.annotationdemo.service;

import com.zys.springboot.annotationdemo.entity.SystemLog;

public interface SystemLogService {
    int createLog(SystemLog log);
}
3)创建impl
package com.zys.springboot.annotationdemo.service.impl;

import com.zys.springboot.annotationdemo.dao.SystemLogDao;
import com.zys.springboot.annotationdemo.entity.SystemLog;
import com.zys.springboot.annotationdemo.service.SystemLogService;
import org.springframework.beans.factory.annotation.Autowired;
import org.springframework.stereotype.Service;

@Service
public class SystemLogServiceImpl implements SystemLogService {
    @Autowired
    private SystemLogDao systemLogDao;
    @Override
    public int createLog(SystemLog log) {
        return systemLogDao.createLog(log);
    }
}
4)创建dao
package com.zys.springboot.annotationdemo.dao;

import com.zys.springboot.annotationdemo.entity.SystemLog;
import org.apache.ibatis.annotations.Mapper;

@Mapper
public interface SystemLogDao {
    int createLog(SystemLog log);
}
5)创建mapper
在resources目录下新建mapper目录,然后创建文件SystemLogMapper.xml
<?xml version="1.0" encoding="uTF-8" ?>
<!DOCTYPE mapper PUBLIC "-//mybatis.org//DTD Mapper 3.0//EN"
        "http://mybatis.org/dtd/mybatis-3-mapper.dtd">
<mapper namespace="com.zys.springboot.annotationdemo.dao.SystemLogDao">
    <!--插入系统日志-->
    <insert id="createLog" parameterType="com.zys.springboot.annotationdemo.entity.SystemLog">
        insert into systemLog values(#{id},#{title},#{describe},sysdate(),#{method},#{error})
    </insert>

</mapper>
7.3自定义注解
1)创建注解
package com.zys.springboot.annotationdemo.config;

import java.lang.annotation.*;

/**
 * 自定义日志注解
 */

@Target(ElementType.METHOD)
@Retention(RetentionPolicy.RUNTIME)
@Documented
public @interface Log {
    String title() default "";//模块名称
    String describe() default "";//描述
}
2)创建aop切面
package com.zys.springboot.annotationdemo.config;

import com.zys.springboot.annotationdemo.entity.SystemLog;
import com.zys.springboot.annotationdemo.service.SystemLogService;
import org.aspectj.lang.JoinPoint;
import org.aspectj.lang.Signature;
import org.aspectj.lang.annotation.AfterReturning;
import org.aspectj.lang.annotation.AfterThrowing;
import org.aspectj.lang.annotation.Aspect;
import org.aspectj.lang.annotation.Pointcut;
import org.aspectj.lang.reflect.MethodSignature;
import org.slf4j.Logger;
import org.slf4j.LoggerFactory;
import org.springframework.beans.factory.annotation.Autowired;
import org.springframework.stereotype.Component;

import java.lang.reflect.Method;
import java.util.UUID;

@Aspect
@Component("logAspect")
public class LogAspect {
    @Autowired
    private SystemLogService logService;

    private static final Logger log = LoggerFactory.getLogger(LogAspect.class);

    // 配置织入点
    @Pointcut("@annotation(com.zys.springboot.annotationdemo.config.Log)")
    public void logPointCut() {
    }

    /**
     * 前置通知 用于拦截操作,在方法返回后执行
     *
     * @param joinPoint 切点
     */
    @AfterReturning(pointcut = "logPointCut()")
    public void doBefore(JoinPoint joinPoint) {
        handleLog(joinPoint, null);
    }

    /**
     * 拦截异常操作,有异常时执行
     *
     * @param joinPoint
     * @param e
     */
    @AfterThrowing(value = "logPointCut()", throwing = "e")
    public void doAfter(JoinPoint joinPoint, Exception e) {
        handleLog(joinPoint, e);
    }

    private void handleLog(JoinPoint joinPoint, Exception e) {
        MethodSignature signature = (MethodSignature) joinPoint.getSignature();
        SystemLog systemLog = new SystemLog();
        //获取方法名
        String functionName = signature.getDeclaringTypeName() + "." + signature.getName() + "()";
        //获取注解对象
        Log annotation = signature.getMethod().getAnnotation(Log.class);
        if (annotation != null) {
            systemLog.setId(UUID.randomUUID().toString().replace("-", ""));
            systemLog.setMethod(functionName);
            //获取注解中对方法的描述信息
            systemLog.setTitle(annotation.title());
            systemLog.setDescribe(annotation.describe());
            if (e != null) {
                String err = e.getMessage();
                if (err != null && err.length() > 4000) {
                    err = err.substring(0, 4000);
                }
                systemLog.setError(err);
            }
        }
        //记录到数据库
        logService.createLog(systemLog);
    }

    /**
     * 是否存在注解,如果存在就获取
     */
    private static Log getAnnotationLog(JoinPoint joinPoint) throws Exception {
        Signature signature = joinPoint.getSignature();
        MethodSignature methodSignature = (MethodSignature) signature;
        Method method = methodSignature.getMethod();
        if (method != null) {
            return method.getAnnotation(Log.class);
        }
        return null;
    }

}
7.4创建测试接口
在controller包下创建UserController类,用于测试注解。
package com.zys.springboot.annotationdemo.controller;

import com.zys.springboot.annotationdemo.config.Log;
import org.springframework.web.bind.annotation.GetMapping;
import org.springframework.web.bind.annotation.RestController;

@RestController
public class UserController {

    //使用日志注解
    @Log(title = "用户模块",describe = "获取用户列表")
    @GetMapping("/get")
    public String get(){
        return "Hello word!";
    }

    @Log(title = "用户模块",describe = "测试接口")
    @GetMapping("/test")
    public String test(){
        return "Hello Test!";
    }

}
7.5测试
启动项目,访问http://localhost:8080/get,然后查询数据库,发现日志已经记录了,如下图,同理访问http://localhost:8080/test。

8.结合SpEL实现注解动态参数传值
不知道开发的小伙伴有没有遇到这样的情况,在自定义注解后,使用注解时其参数必须是固定不变的。那么能不能实现动态传参呢?答案是肯定的。
下面通过一个案例进行说明:对于资源文档,不同的人有不同的访问权限,比如A用户可以访问文档001,002和003,B用户只能访问001和003,C用户不能访问任何文档。对于给不同用户分配不同的文档权限,这属于系统功能,非常简单就能实现,而难点是权限分配后,后端如何进行权限验证,来保证文档的安全性呢?
这时便可以结合SpEL表达式+注解方式实现。简单来说,就是在查阅文档时,需要传入用户的编号,把用户编号作为权限注解的参数,在切面中去获取用户编号去验证此用户是否有查阅权限,如果有则放行,反之则抛出异常,进行全局异常捕获后指定返回的信息。相比于拦截器,个人更推荐这种方式。具体实现如下:
1)自定义注解
package com.zxh.test.annotation;

import java.lang.annotation.*;

/**
 * 资源访问权限注解
 */
@Inherited
@Target(ElementType.METHOD)
@Retention(RetentionPolicy.RUNTIME)
public @interface ResourceAccessPermission {
    /**
     * 用户编号,可支持SpEL表达式
     *
     * @return
     */
    String value();
}
2)创建SpEL表达式解析器
package com.zxh.test.config;

import lombok.AllArgsConstructor;
import lombok.Getter;
import lombok.ToString;
import org.springframework.aop.support.AopUtils;
import org.springframework.context.expression.AnnotatedElementKey;
import org.springframework.context.expression.CachedExpressionEvaluator;
import org.springframework.context.expression.MethodBasedEvaluationContext;
import org.springframework.core.DefaultParameterNameDiscoverer;
import org.springframework.core.ParameterNameDiscoverer;
import org.springframework.expression.EvaluationContext;
import org.springframework.expression.Expression;

import java.lang.reflect.Method;
import java.util.Map;
import java.util.concurrent.ConcurrentHashMap;

/**
 * SpEL表达式解析器,根据传入的类型进行解析
 *
 * @param <T>
 */
public class ExpressionEvaluator<T> extends CachedExpressionEvaluator {
    private final ParameterNameDiscoverer paramNameDiscoverer = new DefaultParameterNameDiscoverer();
    private final Map<ExpressionKey, Expression> conditionCache = new ConcurrentHashMap<>(64);
    private final Map<AnnotatedElementKey, Method> targetMethodCache = new ConcurrentHashMap<>(64);

    /**
     * 创建表达式上下文
     *
     * @param object
     * @param targetClass
     * @param method
     * @param args
     * @return
     */
    public EvaluationContext createEvaluationContext(Object object, Class<?> targetClass, Method method, Object[] args) {
        Method targetMethod = getTargetMethod(targetClass, method);
        ExpressionRootObject root = new ExpressionRootObject(object, args);
        return new MethodBasedEvaluationContext(root, targetMethod, args, this.paramNameDiscoverer);
    }

    /**
     * 获取目标对象的方法
     *
     * @param targetClass
     * @param method
     * @return
     */
    private Method getTargetMethod(Class<?> targetClass, Method method) {
        AnnotatedElementKey methodKey = new AnnotatedElementKey(method, targetClass);
        Method targetMethod = this.targetMethodCache.get(methodKey);
        if (targetMethod == null) {
            targetMethod = AopUtils.getMostSpecificMethod(method, targetClass);
            this.targetMethodCache.put(methodKey, targetMethod);
        }
        return targetMethod;
    }

    /**
     * 根据条件表达式获SpEL取值
     *
     * @param conditionExpression
     * @param elementKey
     * @param evalContext
     * @param clazz
     * @return
     */
    public T getValueByConditionExpression(String conditionExpression, AnnotatedElementKey elementKey, EvaluationContext evalContext, Class<T> clazz) {
        return getExpression(this.conditionCache, elementKey, conditionExpression).getValue(evalContext, clazz);
    }
}

@Getter
@ToString
@AllArgsConstructor
class ExpressionRootObject {
    private final Object object;
    private final Object[] args;
}
3)配置切面,进行权限认证
package com.zxh.test.config;

import cn.hutool.core.util.StrUtil;
import com.zxh.test.annotation.ResourceAccessPermission;
import lombok.extern.slf4j.Slf4j;
import org.aspectj.lang.JoinPoint;
import org.aspectj.lang.annotation.Aspect;
import org.aspectj.lang.annotation.Before;
import org.aspectj.lang.annotation.Pointcut;
import org.aspectj.lang.reflect.MethodSignature;
import org.springframework.context.expression.AnnotatedElementKey;
import org.springframework.expression.EvaluationContext;
import org.springframework.stereotype.Component;

import java.lang.reflect.Method;

/**
 * 资源访问权限切面处理
 */
@Component
@Aspect
@Slf4j
public class ResourceAccessPermissionAspect {
    private ExpressionEvaluator<String> evaluator = new ExpressionEvaluator<>();

    @Pointcut("@annotation(com.zxh.test.annotation.ResourceAccessPermission)")
    private void pointCut() {

    }

    @Before("pointCut()")
    public void doPermission(JoinPoint joinPoint) {
        MethodSignature methodSignature = (MethodSignature) joinPoint.getSignature();
        Method method = methodSignature.getMethod();
        Object[] args = joinPoint.getArgs();
        ResourceAccessPermission permission = method.getAnnotation(ResourceAccessPermission.class);
        if (args == null) {
            return;
        }
        // 读取参数,如果以#开头则按照EL处理,否则按照普通字符串处理
        String userNo = permission.value();
        if (StrUtil.startWith(userNo, "#")) {
            Object pointTarget = joinPoint.getTarget();
            Class<?> aClass = pointTarget.getClass();
            // SpEL表达式的方式读取对应参数值
            EvaluationContext evaluationContext = evaluator.createEvaluationContext(pointTarget, aClass, method, args);
            AnnotatedElementKey methodKey = new AnnotatedElementKey(method, aClass);
            //根据条件读取注解中的参数值
            userNo = evaluator.getValueByConditionExpression(userNo, methodKey, evaluationContext, String.class);
        }
        log.info("参数:{}", userNo);
        // TODO 按照业务自定义逻辑处理

        /**
         * 这里为了演示,假设用户编号不等于3时显示无权限,实际需要去查询用户与权限分配表
         * 不符合要求的就抛出指定的异常,再捕获全局异常返回相应提示信息即可
         */
        if (!userNo.equals("3")) {
            throw new RuntimeException("无权访问");
        }
    }
}
4)在接口中使用注解
    /**
     * 这里将查询条件中的用户编号作为参数传入注解
     *
     * @param queryBody
     * @return
     */
    @PostMapping("/read")
    @ResourceAccessPermission("#queryBody.userNo")
    public String read(@RequestBody QueryBody queryBody) {
        return "查询成功";
    }
在上述示例中,关于通过查询数据库来获取用户的文档权限和异常捕获的步骤并未体现,这些可通过实际的需要进行自定义。通过此示例已经学会了如何给注解动态传递参数,那么就可以举一反三。

 浙公网安备 33010602011771号