
WPF MvvMLight
一、MVVM概述
MVVM是Model-View-ViewModel的简写,主要目的是为了解耦视图(View)和模型(Model)。
MVVM结构如下:


 public class ViewModelLocator
    {
        /// <summary>
        /// Initializes a new instance of the ViewModelLocator class.
        /// </summary>
        public ViewModelLocator()
        {
            ServiceLocator.SetLocatorProvider(() => SimpleIoc.Default);

            ////if (ViewModelBase.IsInDesignModeStatic)
            ////{
            ////    // Create design time view services and models
            ////    SimpleIoc.Default.Register<IDataService, DesignDataService>();
            ////}
            ////else
            ////{
            ////    // Create run time view services and models
            ////    SimpleIoc.Default.Register<IDataService, DataService>();
            ////}

            SimpleIoc.Default.Register<MainViewModel>(); //容器在这里注册了MainViewModel类
        }

        public MainViewModel Main
        {
            get
            {
                return ServiceLocator.Current.GetInstance<MainViewModel>();//容器获取MainViewModel类
            }
        }

        public static void Cleanup()
        {
            // TODO Clear the ViewModels
        }
    }
在构造函数中,创建了一个SimpleIoc类型的单实例,用于注册ViewModel,然后用ServiceLocator对这个SimpleIoc类型的单实例进行包裹,方便统一管理。
观察App.xaml文件,我们会发现ViewModelLocator类被生成资源字典并加入到了全局资源,所以每次App初始化的时候,就会去初始化ViewModelLocator类。
<Application x:Class="MvvmLightDemo.App" xmlns="http://schemas.microsoft.com/winfx/2006/xaml/presentation"
             xmlns:x="http://schemas.microsoft.com/winfx/2006/xaml"
             xmlns:local="clr-namespace:MvvmLightDemo" StartupUri="MainWindow.xaml"
             xmlns:d="http://schemas.microsoft.com/expression/blend/2008"
             d1p1:Ignorable="d" xmlns:d1p1="http://schemas.openxmlformats.org/markup-compatibility/2006">
  <Application.Resources>
    <ResourceDictionary>
      <vm:ViewModelLocator x:Key="Locator" d:IsDataSource="True" xmlns:vm="clr-namespace:MvvmLightDemo.ViewModel" />
    </ResourceDictionary>
  </Application.Resources>
</Application>
ViewModel文件分析:类继承了ViewModelBase
 public class MainViewModel : ViewModelBase
    {
        /// <summary>
        /// Initializes a new instance of the MainViewModel class.
        /// </summary>
        public MainViewModel()
        {
            if (IsInDesignMode)
            {
                // Code runs in Blend --> create design time data.

                this.MyProperty = "Hello 123![单独]";
            }
            else
            {
                this.MyProperty = "你好 456!";
                // Code runs "for real"
            }
        }

        private string myVar;

        public string MyProperty
        {
            get { return myVar; }
            set { myVar = value; this.RaisePropertyChanged(); } //this.RaisePropertyChanged()触发界面更改
        }

        private int _value;

        public int Value
        {
            get { return _value; }
            set { Set<int>(ref _value, value); }//Set里面已经实现了RaisePropertyChanged
        }


    }
四、MVVMLight命令RelayCommand
在MVVM Light框架中,主要通过命令绑定来进行事件的处理。
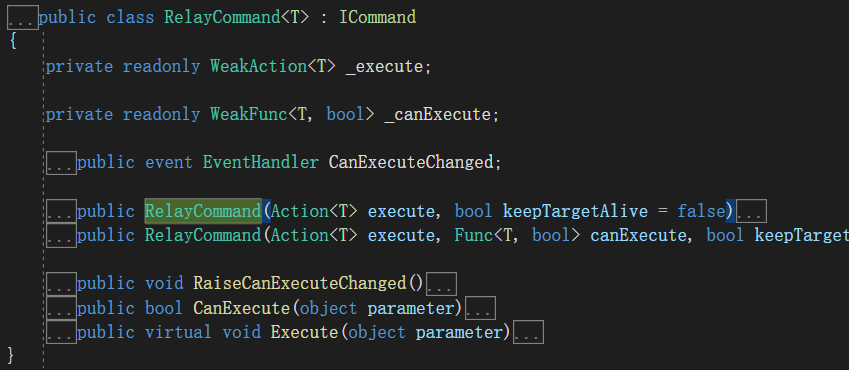
WPF中,命令是通过实现 ICommand 接口创建的。 ICommand 公开了两个方法(Execute 及 CanExecute)和一个事件(CanExecuteChanged)。
在MVVM Light框架中,RelayCommand类实现了ICommand 接口,用于完成命令绑定。
通过RelayCommand类的构造函数传入Action类型的Execute委托和Func<bool>类型的CanExecute委托,CanExecute委托用于表示当前命令是否可以执行,Execute委托则表示执行当前命令对应的方法。
通过命令绑定,解耦了View和ViewModel的行为交互,将视图的显示和业务逻辑分开。比如我们对界面上的某个按钮进行命令绑定,当点击按钮的时候,实际上进行操作是在对应的ViewModel下的所绑定的方法中执行的。
RelayCommand包含带参数跟不带参数的,带参数的就用泛型RelayCommand<T>对象

1、带一个参数的命令绑定
代码片段如下:
<StackPanel>
            <GroupBox Header="带string类型参数的命令" BorderBrush="#FF11519C" BorderThickness="1" FontSize="16" Foreground="#FFCDAA0C" Margin="2">
                <StackPanel>
                    <StackPanel Orientation="Horizontal">
                        <Label Content="UserList:" VerticalContentAlignment="Center" FontSize="20" ></Label>
                        <Label Content="{Binding Path=UserList,Mode=TwoWay,UpdateSourceTrigger=PropertyChanged}" FontSize="20" />
                    </StackPanel>
                    <StackPanel Orientation="Horizontal">
                        <Label Content="UserName:" VerticalContentAlignment="Center" FontSize="20" ></Label>
                        <TextBox Width="200" Name="tbUser"></TextBox>
                        <Button Content="AddUser" Command="{Binding AddUserCommand}" CommandParameter="{Binding ElementName=tbUser,Path=Text}"></Button>
                        <CheckBox Content="IsCanAdd" VerticalAlignment="Center" FontSize="16" IsChecked="{Binding IsCanAddUser, Mode=TwoWay, UpdateSourceTrigger=PropertyChanged}"></CheckBox>
                    </StackPanel>
                </StackPanel>
            </GroupBox>
        </StackPanel>
 private RelayCommand<string> addUserCommand;

        public RelayCommand<string> AddUserCommand
        {
            get
            {
                if (addUserCommand == null)
                {
                    addUserCommand = new RelayCommand<string>(AddUser, (string p) => { return IsCanAddUser; });
                }
                return addUserCommand;
            }
            set { addUserCommand = value; }
        }
        private void AddUser(string par)
        {
            UserList = UserList + "  " + par;
        }
2、带多个参数的命令绑定
给命令传递多个参数,建议使用以下方式:
使用MultiBinding将多绑定的各个值转换成我们所需的对象或者实例模型,再传递给ViewModel中的命令。
代码片段如下:
<Window x:Class="MvvmLightDemo1.MainWindow"
        xmlns="http://schemas.microsoft.com/winfx/2006/xaml/presentation"
        xmlns:x="http://schemas.microsoft.com/winfx/2006/xaml"
        xmlns:d="http://schemas.microsoft.com/expression/blend/2008"
        xmlns:mc="http://schemas.openxmlformats.org/markup-compatibility/2006"
        xmlns:local="clr-namespace:MvvmLightDemo1"
        xmlns:cvt="clr-namespace:MvvmLightDemo1.Converter"
        xmlns:mvvm="http://www.galasoft.ch/mvvmlight"
        xmlns:i="clr-namespace:System.Windows.Interactivity;assembly=System.Windows.Interactivity"
        mc:Ignorable="d"
        Title="MVVMLIghtDemo1" Height="500" Width="700"  >
    <Window.Resources>
        <cvt:UserInfoConverter x:Key="userInfoConverter"></cvt:UserInfoConverter>
    </Window.Resources>
    <Window.DataContext>
        <Binding Path="Main" Source="{StaticResource Locator}"></Binding>
    </Window.DataContext>
    <StackPanel>
        <StackPanel>
            <GroupBox Header="带string类型参数的命令" BorderBrush="#FF11519C" BorderThickness="1" FontSize="16" Foreground="#FFCDAA0C" Margin="2">
                <StackPanel>
                    <StackPanel Orientation="Horizontal">
                        <Label Content="UserList:" VerticalContentAlignment="Center" FontSize="20" ></Label>
                        <Label Content="{Binding Path=UserList,Mode=TwoWay,UpdateSourceTrigger=PropertyChanged}" FontSize="20" />
                    </StackPanel>
                    <StackPanel Orientation="Horizontal">
                        <Label Content="UserName:" VerticalContentAlignment="Center" FontSize="20" ></Label>
                        <TextBox Width="200" Name="tbUser"></TextBox>
                        <Button Content="AddUser" Command="{Binding AddUserCommand}" CommandParameter="{Binding ElementName=tbUser,Path=Text}"></Button>
                        <CheckBox Content="IsCanAdd" VerticalAlignment="Center" FontSize="16" IsChecked="{Binding IsCanAddUser, Mode=TwoWay, UpdateSourceTrigger=PropertyChanged}"></CheckBox>
                    </StackPanel>
                </StackPanel>
            </GroupBox>
        </StackPanel>

        <StackPanel>
            <GroupBox Header="带对象类型参数的命令" BorderBrush="#FF11519C" BorderThickness="1" FontSize="16" Foreground="#FF127C0D" Margin="2">
                <StackPanel>
                    <StackPanel Orientation="Horizontal">
                        <Label Content="UserName:" FontSize="16" ></Label>
                        <TextBox Width="200" Name="tbxUser" FontSize="16" />
                        <Label Content="Password:" FontSize="16" ></Label>
                        <TextBox Width="200" Name="tbxPwd" FontSize="16" />
                        <Button Content="AddUser" Command="{Binding AddUserCommandWithObjPar}">
                            <Button.CommandParameter>
                                <MultiBinding Converter="{StaticResource userInfoConverter}">
                                    <Binding ElementName="tbxUser" Path="Text"/>
                                    <Binding ElementName="tbxPwd" Path="Text"/>
                                </MultiBinding>
                            </Button.CommandParameter>

                        </Button>
                    </StackPanel>
                    <StackPanel Orientation="Horizontal">
                        <Label Content="Parameter:"  FontSize="16" ></Label>
                        <Label Content="{Binding ObjParameter}"  FontSize="16" ></Label>

                    </StackPanel>
                </StackPanel>
            </GroupBox>
        </StackPanel>

        <StackPanel>
            <GroupBox Header="事件转命令" BorderBrush="#FF11519C" BorderThickness="1" FontSize="16" Foreground="#FFCDAA0C" Margin="2">
                <StackPanel>
                    <StackPanel>
                        <ListBox x:Name="lb" ItemsSource="{Binding ListBoxData}"  BorderThickness="0" SelectedIndex="{Binding SelectIndex}" >
                            <i:Interaction.Triggers>
                                <i:EventTrigger EventName="SelectionChanged">
                                    <mvvm:EventToCommand Command="{Binding SelectionChangedCommand}"/>
                                </i:EventTrigger>
                            </i:Interaction.Triggers>
                            <ListBox.ItemsPanel>
                                <ItemsPanelTemplate>
                                    <WrapPanel Width="{Binding ActualWidth,RelativeSource={RelativeSource AncestorType={x:Type ListBox}}}"/>
                                </ItemsPanelTemplate>
                            </ListBox.ItemsPanel>

                            <ListBox.ItemTemplate>
                                <DataTemplate>
                                    <Border BorderBrush="AntiqueWhite" BorderThickness="1">
                                        <StackPanel Margin="2">

                                            <Image Source="{Binding Img}" Width="96" Height="96"/>
                                            <TextBlock HorizontalAlignment="Center" Text="{Binding Info}"/>


                                    </StackPanel>
                                    </Border>
                                </DataTemplate>
                            </ListBox.ItemTemplate>
                        </ListBox>
                        <Label Content="您选择的是:" FontSize="16" ></Label>
                        <Label Content="{Binding Path=SelResult,Mode=TwoWay,UpdateSourceTrigger=PropertyChanged}" FontSize="16" />
                    </StackPanel>
                </StackPanel>
            </GroupBox>
        </StackPanel>

    </StackPanel>
</Window>
using MvvmLightDemo1.ViewModel;
using System;
using System.Linq;
using System.Windows.Data;

namespace MvvmLightDemo1.Converter
{
    public class UserInfoConverter: IMultiValueConverter
    {
        public object Convert(object[] values, Type targetType, object parameter, System.Globalization.CultureInfo culture)
        {
            if (!values.Cast<string>().Any(text => string.IsNullOrEmpty(text)) && values.Count() == 2)
            {
                UserModel userModel = new UserModel() { UserName = values[0].ToString(), PassWord = values[1].ToString()};
                return userModel;
            }

            return null;
        }

        public object[] ConvertBack(object value, Type[] targetTypes, object parameter, System.Globalization.CultureInfo culture)
        {
            throw new NotImplementedException();
        }
    }
}
   private RelayCommand<UserModel> addUserCommandWithObjPar;

        public RelayCommand<UserModel> AddUserCommandWithObjPar
        {
            get
            {
                if (addUserCommandWithObjPar == null)
                {
                    addUserCommandWithObjPar = new RelayCommand<UserModel>(AddUserWithObjPar);
                }
                return addUserCommandWithObjPar;
            }
            set { addUserCommandWithObjPar = value; }
        }
        private void AddUserWithObjPar(UserModel par)
        {
            ObjParameter = "UserName: "+ par.UserName + " Password: " + par.PassWord;
        }
在WPF中,并不是所有控件都有Command,例如TextBox,那么当文本改变,我们需要处理一些逻辑,这些逻辑在ViewModel中,没有Command如何绑定呢?
这个时候我们就用到EventToCommand,事件转命令,可以将一些事件例如TextChanged,Checked等事件转换成命令的方式。
接下来我们就以ListBox为例子,来看看具体的实例:
View代码:(这边声明了i特性和mvvm特性,一个是为了拥有触发器和行为附加属性的能力,当事件触发时,会去调用相应的命令,EventName代表触发的事件名称;一个是为了使用MVVMLight中 EventToCommand功能。)
这边就是当ListBox执行SelectionChanged事件的时候,会相应去执行ViewModel中 SelectionChangedCommand命令。
代码片段如下:
<Window x:Class="MvvmLightDemo1.MainWindow"
        xmlns="http://schemas.microsoft.com/winfx/2006/xaml/presentation"
        xmlns:x="http://schemas.microsoft.com/winfx/2006/xaml"
        xmlns:d="http://schemas.microsoft.com/expression/blend/2008"
        xmlns:mc="http://schemas.openxmlformats.org/markup-compatibility/2006"
        xmlns:local="clr-namespace:MvvmLightDemo1"
        xmlns:cvt="clr-namespace:MvvmLightDemo1.Converter"
        xmlns:mvvm="http://www.galasoft.ch/mvvmlight"
        xmlns:i="clr-namespace:System.Windows.Interactivity;assembly=System.Windows.Interactivity"
        mc:Ignorable="d"
        Title="MVVMLIghtDemo1" Height="500" Width="700"  >
    <Window.Resources>
        <cvt:UserInfoConverter x:Key="userInfoConverter"></cvt:UserInfoConverter>
    </Window.Resources>
    <Window.DataContext>
        <Binding Path="Main" Source="{StaticResource Locator}"></Binding>
    </Window.DataContext>
    <StackPanel>
        <StackPanel>
            <GroupBox Header="带string类型参数的命令" BorderBrush="#FF11519C" BorderThickness="1" FontSize="16" Foreground="#FFCDAA0C" Margin="2">
                <StackPanel>
                    <StackPanel Orientation="Horizontal">
                        <Label Content="UserList:" VerticalContentAlignment="Center" FontSize="20" ></Label>
                        <Label Content="{Binding Path=UserList,Mode=TwoWay,UpdateSourceTrigger=PropertyChanged}" FontSize="20" />
                    </StackPanel>
                    <StackPanel Orientation="Horizontal">
                        <Label Content="UserName:" VerticalContentAlignment="Center" FontSize="20" ></Label>
                        <TextBox Width="200" Name="tbUser"></TextBox>
                        <Button Content="AddUser" Command="{Binding AddUserCommand}" CommandParameter="{Binding ElementName=tbUser,Path=Text}"></Button>
                        <CheckBox Content="IsCanAdd" VerticalAlignment="Center" FontSize="16" IsChecked="{Binding IsCanAddUser, Mode=TwoWay, UpdateSourceTrigger=PropertyChanged}"></CheckBox>
                    </StackPanel>
                </StackPanel>
            </GroupBox>
        </StackPanel>

        <StackPanel>
            <GroupBox Header="带对象类型参数的命令" BorderBrush="#FF11519C" BorderThickness="1" FontSize="16" Foreground="#FF127C0D" Margin="2">
                <StackPanel>
                    <StackPanel Orientation="Horizontal">
                        <Label Content="UserName:" FontSize="16" ></Label>
                        <TextBox Width="200" Name="tbxUser" FontSize="16" />
                        <Label Content="Password:" FontSize="16" ></Label>
                        <TextBox Width="200" Name="tbxPwd" FontSize="16" />
                        <Button Content="AddUser" Command="{Binding AddUserCommandWithObjPar}">
                            <Button.CommandParameter>
                                <MultiBinding Converter="{StaticResource userInfoConverter}">
                                    <Binding ElementName="tbxUser" Path="Text"/>
                                    <Binding ElementName="tbxPwd" Path="Text"/>
                                </MultiBinding>
                            </Button.CommandParameter>

                        </Button>
                    </StackPanel>
                    <StackPanel Orientation="Horizontal">
                        <Label Content="Parameter:"  FontSize="16" ></Label>
                        <Label Content="{Binding ObjParameter}"  FontSize="16" ></Label>

                    </StackPanel>
                </StackPanel>
            </GroupBox>
        </StackPanel>

        <StackPanel>
            <GroupBox Header="事件转命令" BorderBrush="#FF11519C" BorderThickness="1" FontSize="16" Foreground="#FFCDAA0C" Margin="2">
                <StackPanel>
                    <StackPanel>
                        <ListBox x:Name="lb" ItemsSource="{Binding ListBoxData}"  BorderThickness="0" SelectedIndex="{Binding SelectIndex}" >
                            <i:Interaction.Triggers>
                                <i:EventTrigger EventName="SelectionChanged">
                                    <mvvm:EventToCommand Command="{Binding SelectionChangedCommand}"/>
                                </i:EventTrigger>
                            </i:Interaction.Triggers>
                            <ListBox.ItemsPanel>
                                <ItemsPanelTemplate>
                                    <WrapPanel Width="{Binding ActualWidth,RelativeSource={RelativeSource AncestorType={x:Type ListBox}}}"/>
                                </ItemsPanelTemplate>
                            </ListBox.ItemsPanel>

                            <ListBox.ItemTemplate>
                                <DataTemplate>
                                    <Border BorderBrush="AntiqueWhite" BorderThickness="1">
                                        <StackPanel Margin="2">

                                            <Image Source="{Binding Img}" Width="96" Height="96"/>
                                            <TextBlock HorizontalAlignment="Center" Text="{Binding Info}"/>


                                    </StackPanel>
                                    </Border>
                                </DataTemplate>
                            </ListBox.ItemTemplate>
                        </ListBox>
                        <Label Content="您选择的是:" FontSize="16" ></Label>
                        <Label Content="{Binding Path=SelResult,Mode=TwoWay,UpdateSourceTrigger=PropertyChanged}" FontSize="16" />
                    </StackPanel>
                </StackPanel>
            </GroupBox>
        </StackPanel>
     <StackPanel>
            <GroupBox Header="带事件本身参数的命令" BorderBrush="#FF11519C" BorderThickness="1" FontSize="16" Foreground="#FF127C0D" Margin="2">

                <StackPanel Orientation="Horizontal">
                    <Button Content="拖拽上传文件" AllowDrop="True">
                        <i:Interaction.Triggers>
                        <i:EventTrigger EventName="Drop">
                            <mvvm:EventToCommand PassEventArgsToCommand="True" Command="{Binding DropCommand}" />
                        </i:EventTrigger>
                        </i:Interaction.Triggers>
                    </Button>
                    <Label Content="FilePath:"  FontSize="16" ></Label>
                    <Label Content="{Binding DraggedFilePath}"  FontSize="16" ></Label>

                </StackPanel>

            </GroupBox>
        </StackPanel>
</StackPanel> </Window>
五、MVVMLight消息Messenger
Messeger是信使的意思,顾名思义,他的目是用于View和ViewModel 以及 ViewModel和ViewModel 之间的消息通知和接收。Messenger类用于应用程序的通信,接受者只能接受注册的消息类型,另外目标类型可以被指定,用Send<TMessage, TTarget>(TMessage message)实现,在这种情况下信息只能被传递如果接受者类型和目标参数类型匹配,message可以是任何简单或者复杂的对象,你可以用特定的消息类型或者创建你自己的类型继承自他们。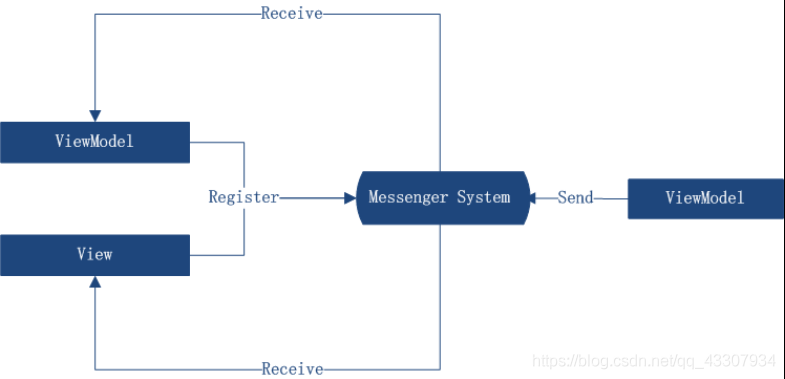
Messenger首先需要注册一下,用来接收消息
Messenger.Default.Register<string>(this, (o) =>
{
MessageBox.Show("收到字符串数据:" + o);
});
Messenger.Default.Register<string>(this, (o) =>
{
MessageBox.Show("收到字符串数据:" + o);
},"token");//带令牌的注册
// 接口注册receiveDerivedMessagesToo为false,继承的对象发送将不能接收,为TRUE继承的对象发送可以接收
Messenger.Default.Register<IA>(this, false, (o) =>
{
});
比如Messanger.Default.Send<A>()//false,发送不能接收
Messanger.Default.Register<T>泛型方法,T代表指定类型,只有发送这个类型的消息才能被指定泛型注册的方法捕获到
消息发送:
Messenger.Default.Send("123");
Messenger.Default.Send("123", "token");//"token"消息令牌,如果带了令牌,只有注册了该令牌的消息才能接收到
Messenger.Default.Send<NotificationMessage>(new NotificationMessage(this, "123"));
Messenger.Default.Send(null, "token");//如果需要发送广播消息,消息内容为空
Message消息对象类型 说明
MessageBase 简单的消息类,携带可选的信息关于消息发布者的
GenericMessage<T> 泛型消息
NotificationMessage 用于发送一个string类型通知给接受者
NotificationMessage<T>
和上面一样是一个,且具有泛型功能
NotificationMessage 向接受者发送一个通知,允许接受者向发送者回传消息
NotificationMessageAction<T> NotificationMessage的泛型方式
DialogMessage 发送者(通常是View)显示对话,并且传递调用者得回传结果(用于回调),接受者可以选择怎样显示对话框,可以使是标准的MessageBox也可也是自定义弹出窗口
PropertyChangedMessage<T> 用于广播一个属性的改变在发送者里,和PropertyChanged事件有完全箱体内各的目的,但是是一种弱联系方式
DialogMessage发送代码:
//通过命令发送令牌信息
public ICommand TestMathCommand
{
get
{
return new RelayCommand(() =>
{
DialogMessage msg = new DialogMessage("提示正文", MessageBoxCallBack);
//设置弹出的MessageBox的类型,包含两个按钮,一个"确认", 一个"取消"
msg.Button = MessageBoxButton.OKCancel;
msg.Caption = "标题";
Messenger.Default.Send<DialogMessage>(msg);
});
}
}
private void MessageBoxCallBack(MessageBoxResult ret)
{
if (ret == MessageBoxResult.OK)
{
MessageBox.Show("弹窗点击了确认。继续执行。");
}
}
DialogMessage接收代码:
public MainWindow()
{
InitializeComponent();
Messenger.Default.Register<DialogMessage>(this, dlgmsg =>
{
var res = MessageBox.Show(dlgmsg.Content, dlgmsg.Caption, dlgmsg.Button);
dlgmsg.Callback(res); //这句会此起ViewModel中的MessageBoxCallBack调用
});
}
DialogMessage包含了弹出框需要的全部信息,包括标题,正文和回调函数。在这个Demo中需要注意一下MessageBox是模态的,因此当执行到MessageBox.Show()时,执行流会卡住,等到用户点击"OK"惑"Cancel"按钮后,程序才会继续执行。
NotificationMessageAction发送代码:
//通过命令发送令牌信息
public ICommand TestMathCommand
{
get
{
return new RelayCommand(() =>
{
NotificationMessageAction<MessageBoxResult> msg = new NotificationMessageAction<MessageBoxResult>("主页面测试", (ret) =>
{
if (ret == MessageBoxResult.OK)
{
MessageBox.Show("弹窗点击了确认。继续执行。");
}
}
);
Messenger.Default.Send<NotificationMessageAction<MessageBoxResult>>(msg);
});
}
}
NotificationMessageAction接收代码:
public MainWindow()
{
InitializeComponent();
Messenger.Default.Register<NotificationMessageAction<MessageBoxResult>>(this, (msg) =>
{
var ret = MessageBox.Show("内容", "标题", MessageBoxButton.OKCancel);
//msg.Notification内容是“主页面测试”
if (msg.Notification != null)
{
msg.Execute(ret);
}
}
);
}
如果ViewModel需要向View发送一个对象,可以使用 NotificationMessage<类型>的泛型版本
// PropertyChangedMessage属性消息,当属性更改会触发消息通知,属性需要把广播的参数设置为true
比如:public string name
{
get
{
return _name;
}
set
{
set(ref _name,value,broadcast:true);
}
}
Messenger.Default.Register<PropertyChangedMessage<string>>(this, (o) =>
{
if (o.PropertyName == "MyProperty")// 区别一下哪个属性进行了变化
{
}
});
六、MVVMLight DispatchHelper UI更新
在应用程序中,线程可以被看做是应用程序的一个较小的执行单位。每个应用程序都至少拥有一个线程,我们称为主线程。当调用和操作主线程的时候,该操作将动作添加到一个队列中,每个操作均按照将它们添加到队列中的顺序连续执行,但是可以通过为这些动作指定优先级来影响执行顺序,而负责管理此队列的对象称之为线程调度程序。
我们知道,WPF程序中,控件是属于UI线程的,如果试图在子线程中访问或者更新UI,就需要在子线程中通知主线程来处理UI, 通过向主线程的Dispatcher队列注册工作项,来通知UI线程更新结果。
Dispatcher提供两个注册工作项的方法:Invoke 和 BeginInvoke。
这两个方法均调度一个委托来执行。Invoke 是同步调用,也就是说,直到 UI 线程实际执行完该委托它才返回。BeginInvoke是异步的,将立即返回。
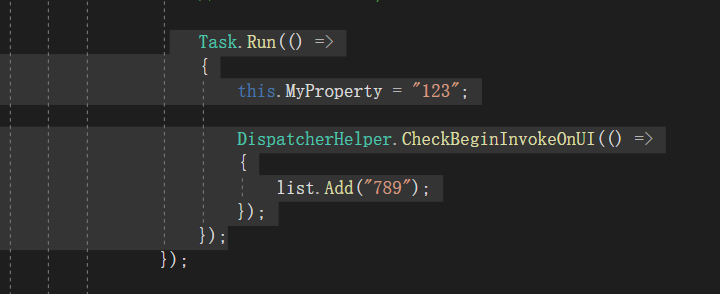
代码片段如下:
 this.Dispatcher.BeginInvoke((Action)delegate()
            {
                更新UI控件ing;
            });
通常情况下,ViewModel 不从 DispatcherObject 继承,不能访问 Dispatcher 属性。这时候,我们需要使用DispatcherHelper 组件来更新UI。
实际上,该类所做的是将主线程的调度程序保存在静态属性中,并公开一些实用的方法,以便通过统一的方式访问。
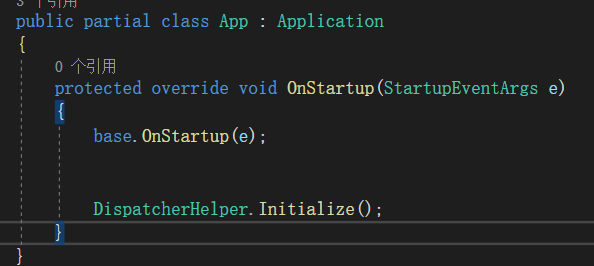
为了实现正常功能,需要在主线程上初始化该类。
通常,在 MVVM Light 应用程序中,DispatcherHelper 可以在 App.xaml.cs 或者ViewModel的构造函数中进行初始化,App.xaml.cs 是定义应用程序启动类的文件。
在 WPF 中,该类一般是在 App 构造函数中进行初始化的。
DispatcherHelper组件初始化以后,DispatcherHelper 类的 UIDispatcher 属性包含对主线程的调度程序的引用。
但是一般很少直接使用该属性,虽然确实可以使用。通常我们会使用 CheckBeginInvokeOnUi 方法来更新UI。
七、MVVMLight 消息对话框
首先实现IDialgService类,然后注册类,然后调用类显示消息对话框
注册对话框类:
  public class B : IA, IDialogService
    {
        public B()
        {
        }

        public void Show()
        {
            throw new NotImplementedException();
        }

        public Task ShowError(string message, string title, string buttonText, Action afterHideCallback)
        {
            throw new NotImplementedException();
        }

        public Task ShowError(Exception error, string title, string buttonText, Action afterHideCallback)
        {
            throw new NotImplementedException();
        }

        public Task ShowMessage(string message, string title)
        {
            MessageBox.Show(message, title);
            return null;
        }

        public Task ShowMessage(string message, string title, string buttonText, Action afterHideCallback)
        {
            throw new NotImplementedException();
        }

        public Task<bool> ShowMessage(string message, string title, string buttonConfirmText, string buttonCancelText, Action<bool> afterHideCallback)
        {
            throw new NotImplementedException();
        }

        public Task ShowMessageBox(string message, string title)
        {
            throw new NotImplementedException();
        }
    }
注册类

// IDialogService的使用
SimpleIoc.Default.GetInstance<IDialogService>().ShowMessage("", "");

 浙公网安备 33010602011771号