

Spring.Net快速入门:控制翻转、依赖注入、面向切面编程
Spring.Net主要功能:
1.IoC:控制翻转(Inversion of Control) 理解成抽象工厂
翻转控制:就是创建对象的权利由开发人员自己控制New,转到了由容器来控制。
2.DI:依赖注入(Dependency Injection)
依赖注入:就是在通过容器开创建对象的时候,在对象的初始化是可以给一些属性、构造方法的参数等注入默认值(可以是复杂的类型).
3.AOP:面向切面编程 (类似:管道、MVC过滤器等)
一、IoC示例Demo:
1.新建WinForm项目
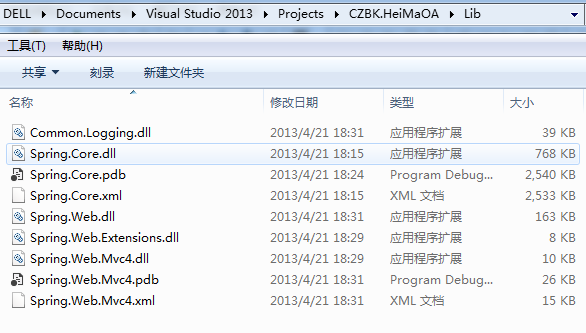
2.在解决方案下新建文件夹Lib,用来存放Spring.Net用到的dll和文件
Spring.Core.dll、Common.Logging.dll(Spring.Core.dll内部使用到的)、Spring.Core.pdb、Spring.Core.xml
3.首先添加Spring.Net核心dll:Spring.Core.dll 和 Common.Logging.dll引用
4.配置app.config文件:
5.代码调用:
using Spring.Context;
using Spring.Context.Support;
using System;
using System.Windows.Forms;

namespace CZBK.HeiMaOA.SpringNetDemo
{
    public partial class Form1 : Form
    {
        public Form1()
        {
            InitializeComponent();
        }

        private void button1_Click(object sender, EventArgs e)
        {
            IApplicationContext context = ContextRegistry.GetContext();//创建容器
            IUserInfoService userInfoService = (IUserInfoService)context.GetObject("UserInfoService");
            MessageBox.Show(userInfoService.ShowMsg());

        }
    }
}
UserInfoService类:
using System;
using System.Collections.Generic;
using System.Linq;
using System.Text;
using System.Threading.Tasks;

namespace CZBK.HeiMaOA.SpringNetDemo
{
    public class UserInfoService : IUserInfoService
    {
        public string ShowMsg()
        {
            return "Hello World";
        }
    }
}
IUserInfoService接口:
namespace CZBK.HeiMaOA.SpringNetDemo
{
    public interface IUserInfoService
    {
        string ShowMsg();
    }
}
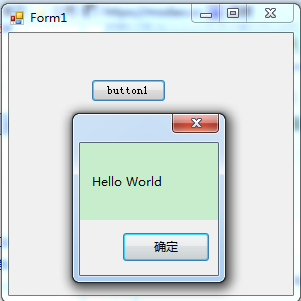
6.效果:
7.Demo源码下载:点击下载>>
二、DI:依赖注入示例Demo:
1.添加一个复杂类型:
namespace CZBK.HeiMaOA.SpringNetDemo
{
    public class Person
    {
        public int Age { get; set; }
    }
}
2.修改下之前代码:
using System;
using System.Collections.Generic;
using System.Linq;
using System.Text;
using System.Threading.Tasks;
namespace CZBK.HeiMaOA.SpringNetDemo
{
public class UserInfoService : IUserInfoService
{
public string Name { get; set; }
public Person Person { get; set; }
public string ShowMsg()
{
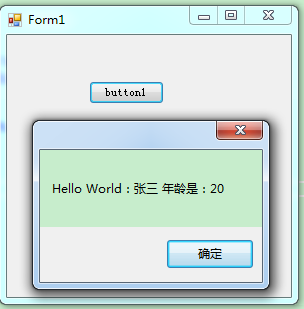
return "Hello World:" + Name + " 年龄是:" + Person.Age;
}
}
}
3.修改App.config配置:
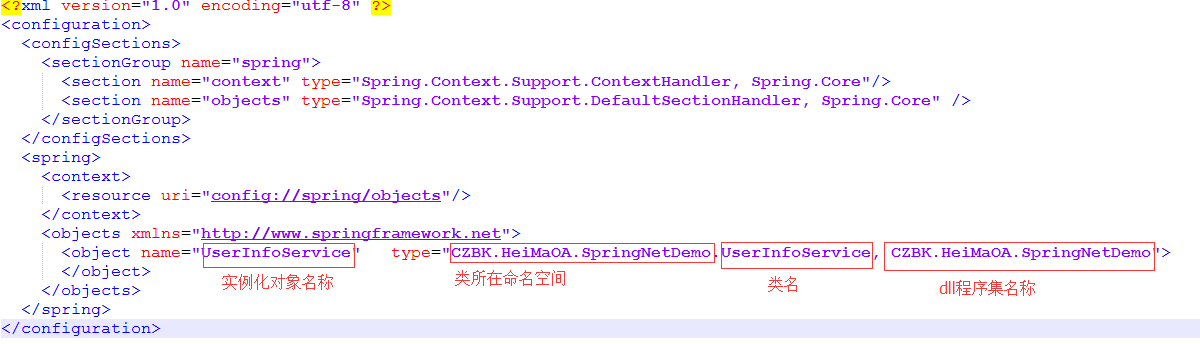
<?xml version="1.0" encoding="utf-8" ?>
<configuration>
  <configSections>
    <sectionGroup name="spring">
      <section name="context" type="Spring.Context.Support.ContextHandler, Spring.Core"/>
      <section name="objects" type="Spring.Context.Support.DefaultSectionHandler, Spring.Core" />
    </sectionGroup>
  </configSections>
  <spring>
    <context>
      <resource uri="config://spring/objects"/>
    </context>
    <objects xmlns="http://www.springframework.net">
      <object name="UserInfoService" type="CZBK.HeiMaOA.SpringNetDemo.UserInfoService, CZBK.HeiMaOA.SpringNetDemo">
        <property name="Name" value="张三"/>
        <property name="Person" ref="Person"/>
      </object>

      <object name="Person" type="CZBK.HeiMaOA.SpringNetDemo.Person, CZBK.HeiMaOA.SpringNetDemo">
        <property name="Age" value="20"/>
      </object>

    </objects>
  </spring>
</configuration>
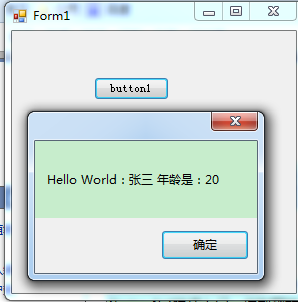
4.运行效果:
5.源码下载:点击下载>>
三、改进:
将app.config中的objects节点配置放到一个单独的xml文件中存放
1.将objects节点剪切到objects.xml文件中:
<?xml version="1.0" encoding="utf-8" ?>

<objects xmlns="http://www.springframework.net">

<object name="UserInfoService" type="CZBK.HeiMaOA.SpringNetDemo.UserInfoService, CZBK.HeiMaOA.SpringNetDemo">
  <property name="Name" value="张三"/>
  <property name="Person" ref="Person"/>
</object>

<object name="Person" type="CZBK.HeiMaOA.SpringNetDemo.Person, CZBK.HeiMaOA.SpringNetDemo">
  <property name="Age" value="20"/>
</object>

</objects>
2.修改app.confgi文件:
<?xml version="1.0" encoding="utf-8" ?>
<configuration>
  <configSections>
    <sectionGroup name="spring">
      <section name="context" type="Spring.Context.Support.ContextHandler, Spring.Core"/>
      <section name="objects" type="Spring.Context.Support.DefaultSectionHandler, Spring.Core" />
    </sectionGroup>
  </configSections>
  <spring>
    <context>
      <resource uri="config://spring/objects"/>
      <resource uri="file://objects.xml"/>   <!--指定xml文件位置(这里程序会到bin\debug或release目录下找这个文件,需要修改下xml文件属性,改为始终复制到输出目录)-->
    </context>

    <objects xmlns="http://www.springframework.net">  <!--这个节点需要保留-->
    </objects>

  </spring>
</configuration>
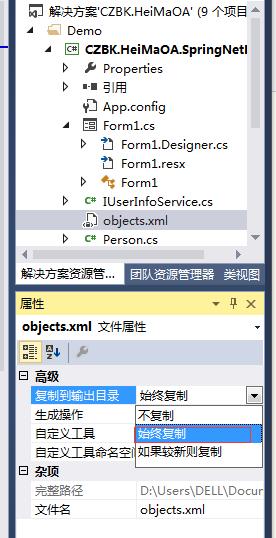
3.修改objects.xml文件属性:
4.运行效果:
5.源码下载:点击下载>>
四、在MVC4中使用Spring.Net
1.Web工程添加dll引用: 点击下载需要的dll文件>>
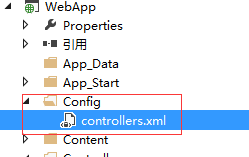
2.在Web工程下新建Config文件夹和控制器xml文件:
3.控制器代码:
namespace WebApp.Controllers
{
    public class UserInfoController : Controller
    {
        //
        // GET: /UserInfo/

        //IUserInfoService userInfoService = new UserInfoService();
        //修改成下面的:
       CZBK.HeiMaOA.IBLL.IUserInfoService userInfoService { get; set; }  //这样就完成了Web层与BLL层的解耦

        public ActionResult Index()
        {
            return View();
        }
}
4.controllers.xml文件配置内容:
<?xml version="1.0" encoding="utf-8" ?>
<objects xmlns="http://www.springframework.net">

  <object type="WebApp.Controllers.UserInfoController,WebApp" singleton="false" >  <!--指定命名空间、程序集、是否单例-->
    <property name="userInfoService" ref="userInfoService" />  <!--配置UserInfoController中用到的复杂类型userInfoService-->
  </object>

  <object type="CZBK.HeiMaOA.BLL.UserInfoService,CZBK.HeiMaOA.BLL" singleton="false" >
  </object>

</objects>
5.修改Web工程中的web.config文件,添加如下节点:
 <configSections>
    <!--Spring.Net配置-->
    <sectionGroup name="spring">
      <section name="context" type="Spring.Context.Support.MvcContextHandler, Spring.Web.Mvc4"/>  <!--指定为MVC4-->
    </sectionGroup>
  </configSections>

  <!--Spring.Net配置-->
  <spring>
    <context>
      <resource uri="file://~/Config/controllers.xml"/>   <!--指定控制器xml文件-->
    </context>
  </spring>
  <!--Spring.Net配置结束-->
6.源码下载:
五、小结:
Spring.Net实质上底层就是用反射去读取配置文件,以后需要变动就不需要修改代码,直接修改配置文件就可以了,方便灵活。
六、Spring.Net中文帮助文档(联网版):
七、扩推荐:
类似的框架还有微软的Unity,也很不错。推荐博文:

 浙公网安备 33010602011771号