Ansible(二)
Ansible (二)
1.Ansible Playbook基本概述
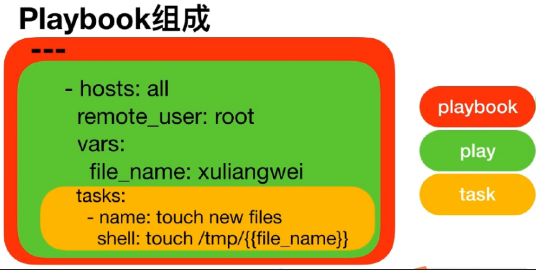
1.什么是playbook,playbook翻译过来就是“剧本”,那么playbook组成如下:
playbook:定义一个文本文件,以yml为后缀结尾
play:定义的是主机的角色
task:定义的是具体执行的任务
总结:playbook是由一个或者多个play组成,一个play可以包含多个task任务。
可以理解为:使用不同的模块共同完成一件事情
2.Ansible playbook与AD-Hoc之间的关系
- playbook是对AD-Hoc的一种编排方式;
- playbook可以持久运行,而AD-Hoc只能临时运行;
- playbook适合复杂的任务,而AD-Hoc适合做快速简单的任务;
- playbookl能控制任务执行的先后顺序,以及互相依赖的关系;
3.Ansible playbook书写格式
playbook是由yml语法书写,结构清晰,可读性强,所以必须掌握yml基础语法
| 语法 | 描述 |
|---|---|
| 缩进 | YAML使用固定的缩进风格表示层级结构,每个缩进由两个空格组成,不能使用tabs |
| 冒号 | 以冒号结尾的除外,其他所有冒号后面必须有空格 |
| 短横线 | 表示列表项,使用一个段横杠加一个空格。多个项使用同样的缩进级别作为同一列表 |
4.下面编写一个playbook文件,playbook起步
host:对哪些主机进行操作
remote_user:要使用什么用户去执行
tasks:具体执行什么任务
1.编写一个简单的playbook
[root@m01 project1]# cat p1.yml
---
#play
- hosts: webservers

  tasks:
    - name: Installed Httpd Server
      yum:
        name: httpd
        state: present

    - name: Start Httpd Server
      systemd:
        name: httpd
        state: started
        enabled: yes

2.检查语法,只检查是否是yaml语法格式。并不做逻辑校验。
[root@m01 project1]# ansible-playbook --syntax-check p1.yml

playbook: p1.yml

3.模拟执行(不是真的执行)
[root@m01 project1]# ansible-playbook -C  p1.yml

4.真实的描述状态(被控端的状态必须与控制端描述的状态一致)
[root@m01 project1]# ansible-playbook   p1.yml
4.Ansible Playbook练习实验
注:把前一天内容做好
5.Ansible Playbook案例实践
案例一、使用ansible 安装并配置nfs服务
1)编写安装配置nfs服务的playbook文件
[root@m01 project1]# cat exports.j2
/data 172.16.1.0/24(rw,sync,all_squash,anouid=666,anongid=666)

[root@m01 project1]# cat nfs.yml
- hosts: web01

  tasks:
    - name: Install NFS-utils Server
      yum: name=nfs-utils state=present

    - name: Configure NFS-utils Server
      copy: src=./exports.j2 dest=/etc/exports owner=root group=root mode=0644
	  notify: Restart NFS Server
    - name: Create NFS Group
      group: name=www gid=666

    - name: Create NFS User
      user: name=www uid=666 group=www create_home=no shell=/sbin/nologin

    - name: Create Data Directory
      file: path=/data state=directory owner=www group=www mode=0755 recurse=yes

    - name: Start NFS Server
      systemd: name=nfs state=started enabled=yes

  handlers:
  	- name: Restart NFS Server
  	  systemd: name=nfs state=started

- hosts: web02
  tasks:
    - name: Mount NFS Server
      mount: path=/opt src=172.16.1.7:/data fstype=nfs opts=defaults state=mounted
案例二、ansible安装并配置httpd服务,根据不同的主机配置不同的网站。(多个play使用方式,但不是生产推荐(了解即可),生产推荐使用循环模式)
1)编写安装配置httpd服务的playbook文件
[root@m01 project1]# cat p1.yml
---
#play
- hosts: webservers

  tasks:
    - name: Installed Httpd Server
      yum: name=httpd state=present

    - name: Start Httpd Server
      systemd: name=httpd state=started enabled=yes

    - name: Start Firewalld Server
      systemd: name=firewalld state=started enabled=yes

    - name: Configure Firewalld Server
      firewalld: service=http immediate=yes permanent=yes state=enabled

- hosts: web01   #针对web01
  tasks:
    - name: Configure web01 Website
      copy: content='This is Web01' dest=/var/www/html/index.html

- hosts: web02	 #针对web02
  tasks:
    - name: Cofnigure webi-2 weisite
      copy: content='This is Web02' dest=/var/www/html/index.html
6.Ansible Playbook项目实践
使用AnsiblePlaybook方式构建LAMP架构,具体操作步骤如下:
1.使用yum安装 httpd、php、php-mysql、mariadb、firewalld等
2.启动httpd、firewalld、mariadb等服务
3.添加防火墙规则,放行http的流量,并永久生效
4.使用get_url下载 http://fj.xuliangwei.com/public/index.php 文件
[root@m01 project1]# cat lamp.yml
#- hosts: webservers
- hosts: otherservers
  tasks:
    - name: Installed Web Packages
      yum: name=httpd,mariadb-server,php,php-mysql,php-pdo state=present

    - name: Start Web Serivce
      service: name=httpd state=started

    - name: Start Mariadb Service
      service: name=mariadb state=started

    - name: Get Wordpress
      unarchive: src=./wordpress-5.0.3-zh_CN.tar.gz dest=/var/www/html/ copy=yes mode=0755


  #  - name: Copy Index.php
  #    copy: src=./index.php.j2 dest=/var/www/html/index.php


 #   - name: Get Url index.php
 #     get_url: url="http://fj.xuliangwei.com/public/index.php" dest=/var/www/html/index.php
一起动手学习吧!!!

 浙公网安备 33010602011771号