

前言
之前经常在一些网站看到一些特别炫酷的特效,例如文字呈粒子状的特效,或图片的蒙太奇效果,刚巧找了相关的canvas动画研究了一些,因此在这里做一个简单的总结。
思路
一个像素点是由四个值组成的 RGBA:
第一个像素点 RGBA [data[0],data[1],data[2],data[3]];
第二个像素点 RGBA [data[4],data[5],data[6],data[7]];
第N个像素点 RGBA [data[(n-1)*4],data[(n-1)*4]+1,data[(n-1)*4]+2,data[(n-1)*4]+3];
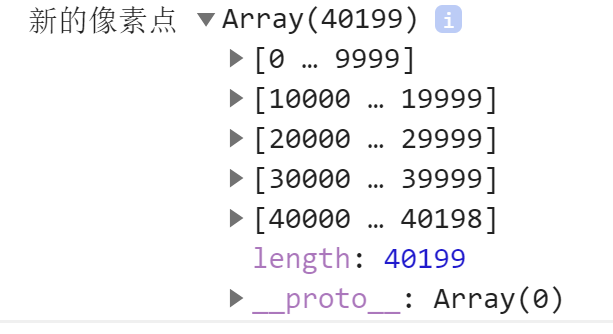
整体像素是一个区域 200*200空间,上面的分析只适合单独一行进行计算的时候,内部定位,每一个像素一行一列的时候,取得第i行第j列的信息 const pos = [(i-1)*200+(j-1)]*4;
正常情况我们是把getImageData获取到的像素点原封不动的渲染回来,但如果要做成粒子效果,往往会把粒子的位置(x,y)做一些偏移再渲染,形成粒子状动画。
案例一:
图片的蒙太奇效果

代码
<!DOCTYPE html>
<html lang="en">
<head>
  <meta charset="UTF-8">
  <meta name="viewport" content="width=device-width, initial-scale=1.0">
  <title>H5蒙太奇效果</title>
</head>
<body>
  <canvas id="myCanvas" width="600" height="400" style="background-color: #200;"></canvas>
</body>
<script>
  const canvas = document.getElementById("myCanvas");
  const ctx = canvas.getContext("2d");

  const img = new Image();
  img.src = "https://tse4-mm.cn.bing.net/th/id/OIP.WpP_Wt3bD5BVaKuljRcEywHaJh?w=206&h=265&c=7&o=5&dpr=2.5&pid=1.7";
  img.crossOrigin = '';
  // 计算所有的像素点
  let pixels = [];
  let imageData;
  img.onload = ()=>{
    ctx.drawImage(img,200,100,200,200);
    imageData = ctx.getImageData(200,100,200,200);
    getPixels();
    drawPic();
    // console.log(imageData);
    console.log("新的像素点",pixels);
  };
  function getPixels() {
    const data = imageData.data;
    for(let i=0;i<=200;i++){
      let pos = 0;
      for(let j=0;j<=200;j++){
        pos = [(i-1)*200+(j-1)]*4;
        if(data[pos] >= 0) {
          const pixel = {
            x: 200 + j + Math.random() * 20,
            y: 100 + i + Math.random() * 20,
            fillStyle: `rgba(${data[pos]},${data[pos+1]},${data[pos+2]},${data[pos+3]})`
          };
          pixels.push(pixel);
        }
      }
    }
  };

  function drawPic() {
    ctx.clearRect(0,0,600,400);
    let curr_pixel = null;
    for(const _piexel of pixels) {
      const {x,y,fillStyle} = _piexel;
      ctx.fillStyle = fillStyle;
      ctx.fillRect(x,y,1,1);
    }
  }
</script>
</html>
案例二:
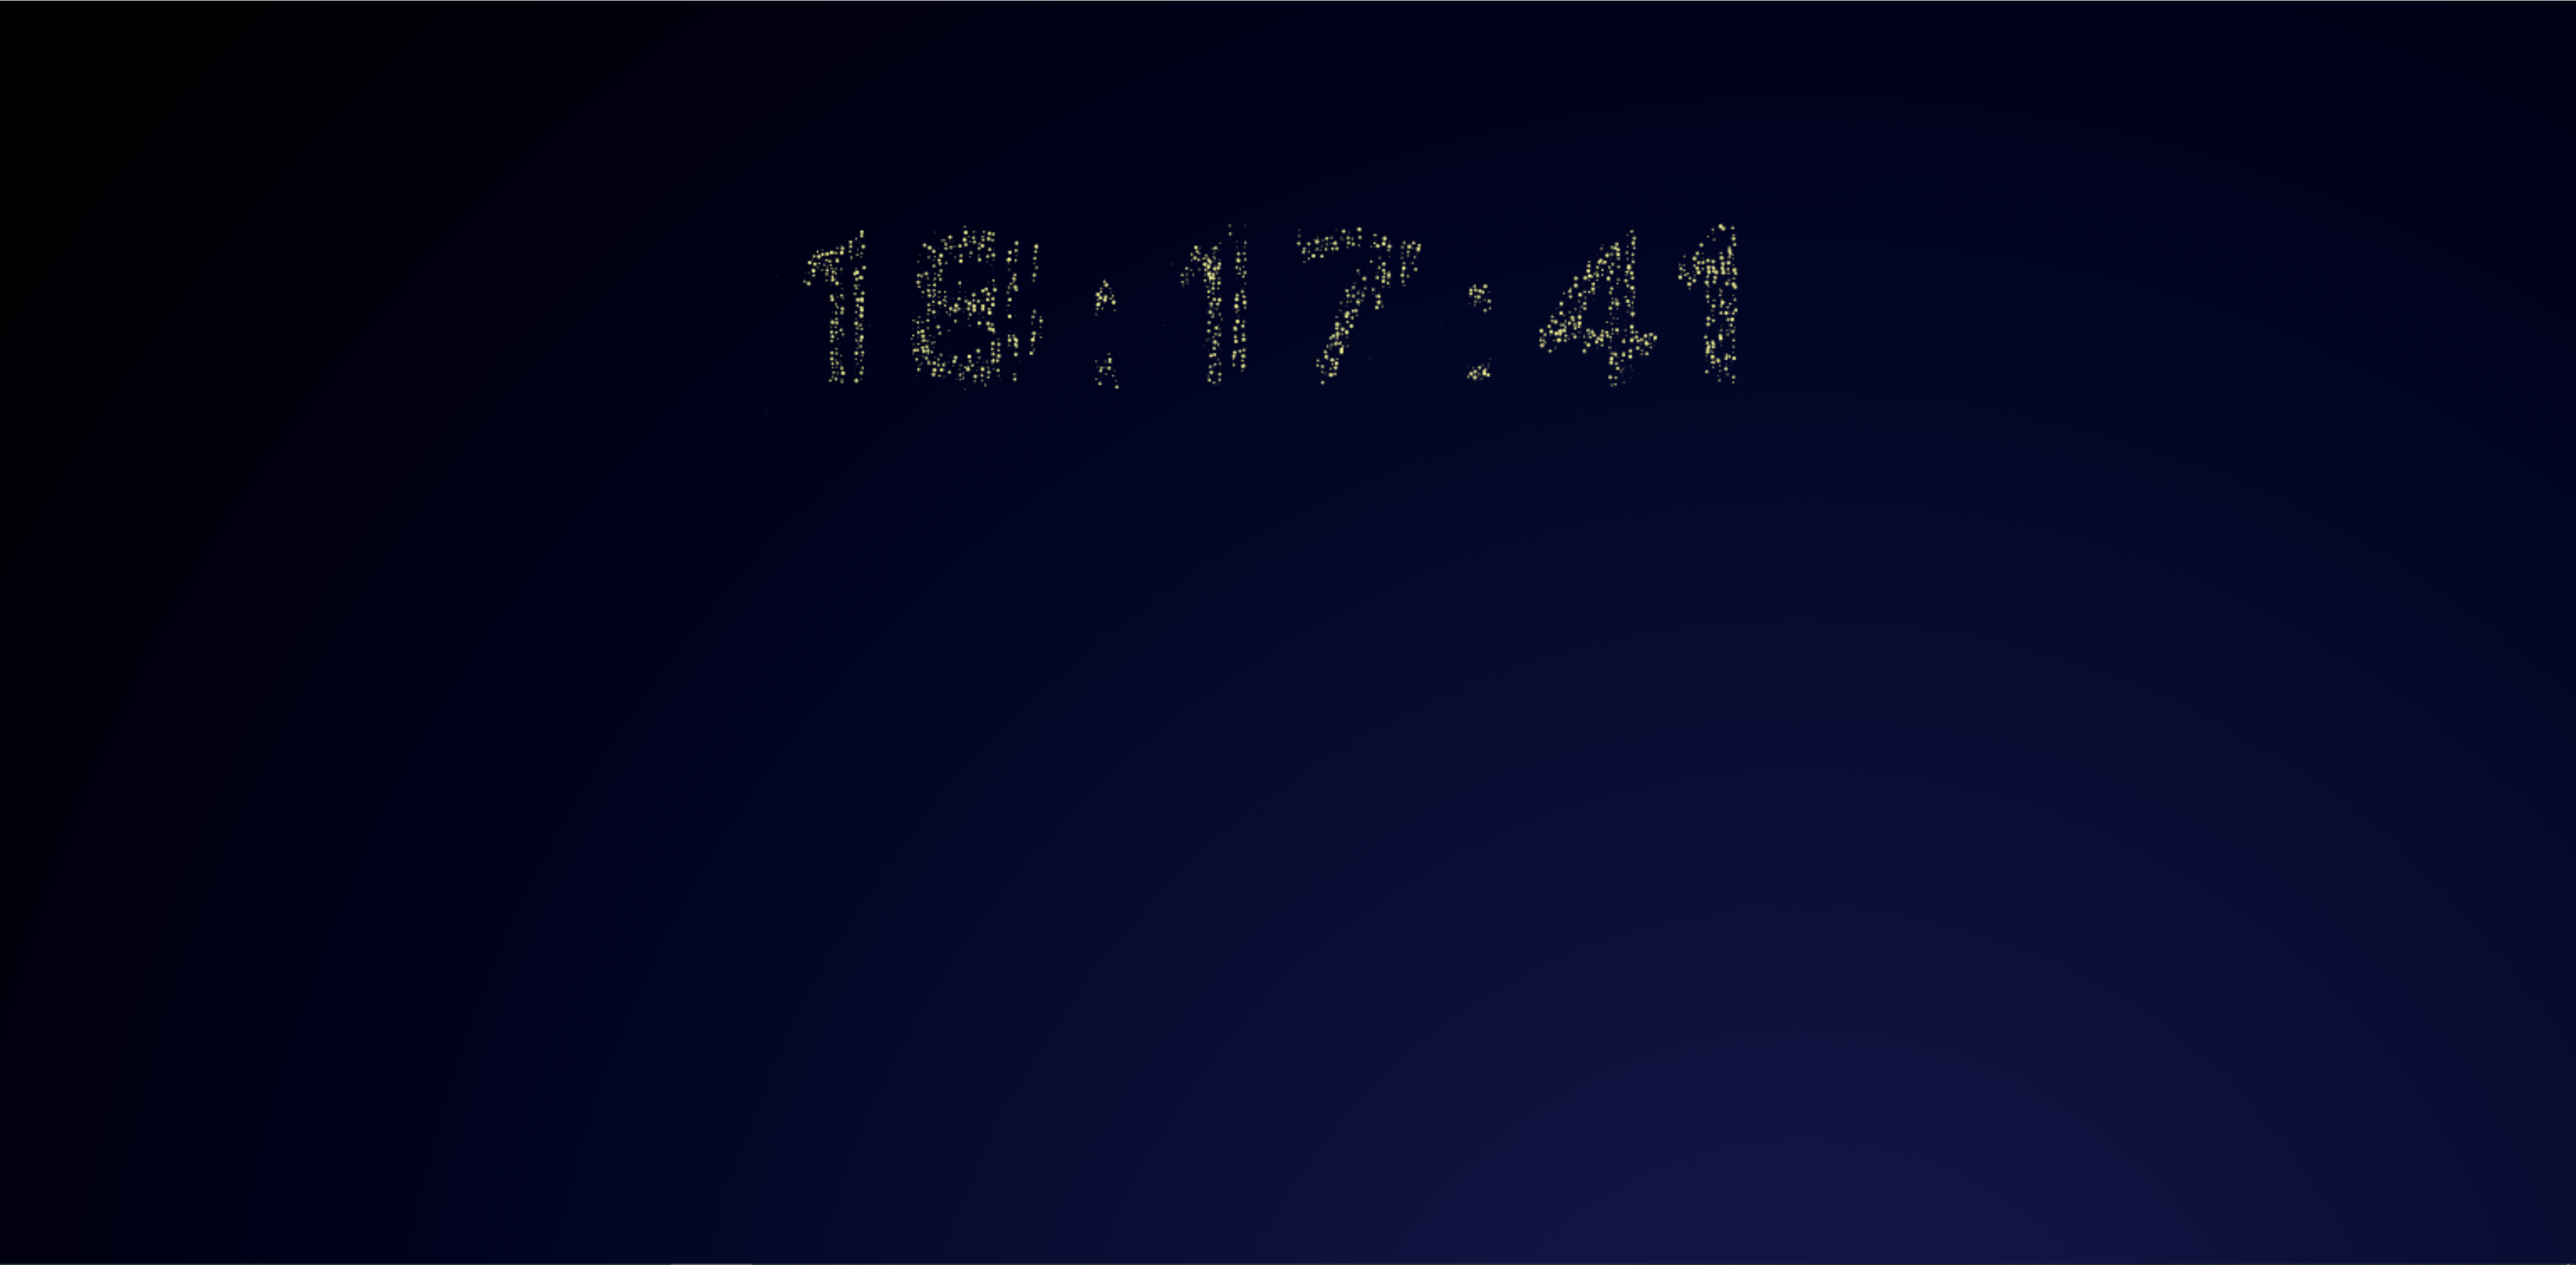
倒计时
这个就是不断重绘canvas,产生炫酷的粒子动画效果。
代码
(function (window) {
  window.requestAnimationFrame =
    window.requestAnimationFrame ||
    window.mozRequestAnimationFrame ||
    window.webkitRequestAnimationFrame ||
    window.msRequestAnimationFrame;

  const PARTICLE_NUM = 2000;//颗粒点
  const RADIUS = Math.PI * 2;//半径
  const CANVASWIDTH = 700;//宽
  const CANVASHEIGHT = 150;//高
  const CANVASID = "canvas";//ID

  let canvas,
    ctx,
    particles = [],//颗粒点数组
    quiver = true,//是否需要抖动
    text = formatTime(new Date());//文字--当前时间
    textSize = 150;//字体大小

  function draw() {
    ctx.clearRect(0, 0, CANVASWIDTH, CANVASHEIGHT);
    ctx.fillStyle = "rgb(255, 255, 255)";
    ctx.textBaseline = "middle";
    ctx.fontWeight = "bold";
    ctx.font = textSize + "px 'SimHei', 'Avenir', 'Helvetica Neue', 'Arial', 'sans-serif'";
    ctx.fillText(text,(CANVASWIDTH - ctx.measureText(text).width) * 0.5,CANVASHEIGHT * 0.5);

    let imgData = ctx.getImageData(0, 0, CANVASWIDTH, CANVASHEIGHT);

    ctx.clearRect(0, 0, CANVASWIDTH, CANVASHEIGHT);

    for (let i = 0, l = particles.length; i < l; i++) {
      let p = particles[i];
      p.inText = false;
    }
    particleText(imgData);

    window.requestAnimationFrame(draw);
  }

  function particleText(imgData) {
    // 点坐标获取
    var pxls = [];
    for (var w = CANVASWIDTH; w > 0; w -= 3) {
      for (var h = 0; h < CANVASHEIGHT; h += 3) {
        var index = (w + h * CANVASWIDTH) * 4;
        if (imgData.data[index] > 1) {
          pxls.push([w, h]);
        }
      }
    }

    var count = pxls.length;
    var j = parseInt((particles.length - pxls.length) / 2, 10);
    j = j < 0 ? 0 : j;

    for (var i = 0; i < pxls.length && j < particles.length; i++, j++) {
      try {
        var p = particles[j],
          X,
          Y;

        if (quiver) {
          X = pxls[i - 1][0] - (p.px + Math.random() * 10);
          Y = pxls[i - 1][1] - (p.py + Math.random() * 10);
        } else {
          X = pxls[i - 1][0] - p.px;
          Y = pxls[i - 1][1] - p.py;
        }
        var T = Math.sqrt(X * X + Y * Y);
        var A = Math.atan2(Y, X);
        var C = Math.cos(A);
        var S = Math.sin(A);
        p.x = p.px + C * T * p.delta;
        p.y = p.py + S * T * p.delta;
        p.px = p.x;
        p.py = p.y;
        p.inText = true;
        p.fadeIn();
        p.draw(ctx);
      } catch (e) {}
    }
    for (var i = 0; i < particles.length; i++) {
      var p = particles[i];
      if (!p.inText) {
        p.fadeOut();

        var X = p.mx - p.px;
        var Y = p.my - p.py;
        var T = Math.sqrt(X * X + Y * Y);
        var A = Math.atan2(Y, X);
        var C = Math.cos(A);
        var S = Math.sin(A);

        p.x = p.px + (C * T * p.delta) / 2;
        p.y = p.py + (S * T * p.delta) / 2;
        p.px = p.x;
        p.py = p.y;

        p.draw(ctx);
      }
    }
    console.log(pxls);
  }

  function setDimensions() {
    canvas.width = CANVASWIDTH;
    canvas.height = CANVASHEIGHT;
    canvas.style.position = "absolute";
    canvas.style.left = "0px";
    canvas.style.top = "0px";
    canvas.style.bottom = "0px";
    canvas.style.right = "0px";
    canvas.style.marginTop = window.innerHeight * 0.15 + "px";
  }

  function event() {
    setInterval(() => {
      text = formatTime(new Date());
    }, 1000);
  }

  function formatTime(date) {
    var h = date.getHours(),
      m = date.getMinutes(),
      s = date.getSeconds(),
      m = m < 10 ? "0" + m : m;
    s = s < 10 ? "0" + s : s;
    return h + ":" + m + ":" + s;
  }

  function init() {
    canvas = document.getElementById(CANVASID);
    if (canvas === null || !canvas.getContext) {
      return;
    }
    ctx = canvas.getContext("2d");
    setDimensions();
    event();

    for (var i = 0; i < PARTICLE_NUM; i++) {
      particles[i] = new Particle(canvas);
    }

    draw();
  }

  class Particle {
    constructor(canvas) {
      let spread = canvas.height;
      let size = Math.random() * 1.2;
      // 速度
      this.delta = 0.06;
      // 现在的位置
      this.x = 0;
      this.y = 0;
      // 上次的位置
      this.px = Math.random() * canvas.width;
      this.py = canvas.height * 0.5 + (Math.random() - 0.5) * spread;
      // 记录点最初的位置
      this.mx = this.px;
      this.my = this.py;
      // 点的大小
      this.size = size;
      // this.origSize = size
      // 是否用来显示字
      this.inText = false;
      // 透明度相关
      this.opacity = 0;
      this.fadeInRate = 0.005;
      this.fadeOutRate = 0.03;
      this.opacityTresh = 0.98;
      this.fadingOut = true;
      this.fadingIn = true;
    }
    fadeIn() {
      this.fadingIn = this.opacity > this.opacityTresh ? false : true;
      if (this.fadingIn) {
        this.opacity += this.fadeInRate;
      } else {
        this.opacity = 1;
      }
    }
    fadeOut() {
      this.fadingOut = this.opacity < 0 ? false : true;
      if (this.fadingOut) {
        this.opacity -= this.fadeOutRate;
        if (this.opacity < 0) {
          this.opacity = 0;
        }
      } else {
        this.opacity = 0;
      }
    }
    draw(ctx) {
      ctx.fillStyle = "rgba(226,225,142, " + this.opacity + ")";
      ctx.beginPath();
      ctx.arc(this.x, this.y, this.size, 0, RADIUS, true);
      ctx.closePath();
      ctx.fill();
    }
  }

  init();
})(window);
html
<!doctype html>
<html lang="">

<head>
  <meta charset="utf-8">
  <meta name="description" content="">
  <meta name="viewport" content="width=device-width, initial-scale=1.0, maximum-scale=1.0, user-scalable=no" />
  <title>倒计时</title>
  <style>
    html,
    body {
      padding: 0px;
      margin: 0px;
      width: 100%;
      height: 100%;
      position: fixed;
    }

    body {
      display: -webkit-box;
      display: -webkit-flex;
      display: -ms-flexbox;
      display: flex;
      -webkit-box-pack: center;
      -webkit-justify-content: center;
      -ms-flex-pack: center;
      justify-content: center;
      -webkit-box-align: center;
      -webkit-align-items: center;
      -ms-flex-align: center;
      align-items: center;
      -webkit-filter: contrast(120%);
      filter: contrast(120%);
      background-color: black;
    }

    .container {
      width: 100%;
      height: 100%;
      background-image: radial-gradient(1600px at 70% 120%, rgba(33, 39, 80, 1) 10%, #020409 100%);

    }

    .content {
      width: inherit;
      height: inherit;
    }

    #canvas {
      margin: 200px auto;
    }
  </style>
</head>

<body>
  <div class="container">
    <div class="content">
      <canvas id="canvas"></canvas>
    </div>
  </div>
  <script src="scripts/main.js"></script>
</body>

</html>
总结
粒子化最关键的在于 getImageData(),获取像素点,然后不断清除之前的样式再进行重绘,像上面的案例 ctx.clearRect(0, 0, CANVASWIDTH, CANVASHEIGHT); 再 ctx.fillText(text,(CANVASWIDTH - ctx.measureText(text).width) * 0.5,CANVASHEIGHT * 0.5); ctx.getImageData(0, 0, CANVASWIDTH, CANVASHEIGHT);

 浙公网安备 33010602011771号