Struts2入门(一)_hm
Struts-2.3.24
Struts2是一个基于MVC设计模式的Web应用框架,它本质上相当于一个servlet,在MVC设计模式中,Struts2作为控制器(Controller)来建立模型与视图的数据交互。(好处:使业务逻辑和Servlet的API脱离)
常见WEB层框架
Struts2、SpringMVC
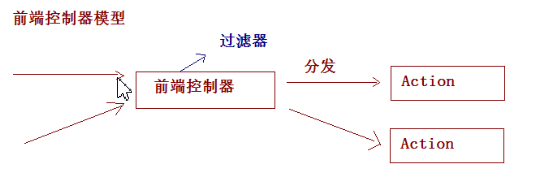
WEB框架使用的前端控制器模型
搭建Struts2开发环境
step1:下载Struts2
下载struts-2.3.24-all.zip,解压后的目录结构
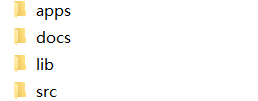
1、apps:Struts2提供的应用,war文件:web项目打成war包。直接放入到tomcat可以运行。
2、docs:Struts2的开发文档和API
3、lib:Strtus2框架的开发的jar包
4、src:Struts2的源码
step2:引入jar包
方式一:复制jar包到项目中
解压struts-2.3.24\apps下的struts2-blank.war:将该文件放入到Tomcat的webapps,然后启动Tomcat即可解压,引入struts2-blank\WEB-INF\lib下的jar包
方式二:Maven的pom.xml配置
<dependency>
    <groupId>org.apache.struts</groupId>
    <artifactId>struts2-core</artifactId>
    <version>2.3.24</version>
</dependency>
<dependency>
    <groupId>org.javassist</groupId>
    <artifactId>javassist</artifactId>
    <version>3.24.0-GA</version>
</dependency>
step3:创建一个JSP页面
hello.jsp


<%@ page language="java" contentType="text/html; charset=UTF-8"
    pageEncoding="UTF-8"%>
<!DOCTYPE html PUBLIC "-//W3C//DTD HTML 4.01 Transitional//EN" "http://www.w3.org/TR/html4/loose.dtd">
<html>
<head>
<meta http-equiv="Content-Type" content="text/html; charset=UTF-8">
<title>Insert title here</title>
</head>
<body>
    <h1>Struts2入门</h1>
    <a href="${pageContext.request.contextPath }/hello.action">Struts2入门</a>
</body>
</html>
success.jsp
<%@ page language="java" contentType="text/html; charset=UTF-8"
    pageEncoding="UTF-8"%>
<!DOCTYPE html PUBLIC "-//W3C//DTD HTML 4.01 Transitional//EN" "http://www.w3.org/TR/html4/loose.dtd">
<html>
<head>
<meta http-equiv="Content-Type" content="text/html; charset=UTF-8">
<title>Insert title here</title>
</head>
<body>
    <h1>成功跳转页面</h1>
</body>
</html>
step4:编写Action的类
package com.strust.demo;

public class HelloAction {
    /**
     * 提供一个方法:方法签名是固定的,返回值是String类型,方法名为execute,无参
     */
    public String execute() {
        System.out.println("HelloAction.......");
        return "success" ;//根据返回值将会跳转到指定的页面
    }
}
step5:对Action进行配置
在src下创建(提供)名称叫做struts.xml的配置文件
<?xml version="1.0" encoding="UTF-8"?>
<!DOCTYPE struts PUBLIC
    "-//Apache Software Foundation//DTD Struts Configuration 2.3//EN"
    "http://struts.apache.org/dtds/struts-2.3.dtd">
<struts>
    <!-- Struts2为了管理Action的配置,通过包进行管理 -->
    <!-- 配置Struts2的包 -->
    <package name="demo1" extends="struts-default" namespace="/">
        <!-- 配置Action -->
        <action name="hello" class="com.struts2.demo.HelloAction">
            <!-- 配置页面的跳转 -->
            <result name="success">/success.jsp</result>
        </action>
    </package>
</struts>
PS:配置中继承struts-default的意思是继承struts-default.xml文件中的定义为抽象包的struts-default包
step6:配置前端控制器(核心过滤器)
web.xml
<?xml version="1.0" encoding="UTF-8"?>
<web-app xmlns:xsi="http://www.w3.org/2001/XMLSchema-instance" xmlns="http://java.sun.com/xml/ns/javaee" xsi:schemaLocation="http://java.sun.com/xml/ns/javaee http://java.sun.com/xml/ns/javaee/web-app_2_5.xsd" id="WebApp_ID" version="2.5">
  <display-name>struts2Demo</display-name>
  <welcome-file-list>
    <welcome-file>index.html</welcome-file>
    <welcome-file>index.htm</welcome-file>
    <welcome-file>index.jsp</welcome-file>
    <welcome-file>default.html</welcome-file>
    <welcome-file>default.htm</welcome-file>
    <welcome-file>default.jsp</welcome-file>
  </welcome-file-list>

  <filter>
      <filter-name>struts2</filter-name>
      <filter-class>org.apache.struts2.dispatcher.ng.filter.StrutsPrepareAndExecuteFilter</filter-class>
  </filter>
  <filter-mapping>
      <filter-name>struts2</filter-name>
      <url-pattern>/*</url-pattern>
  </filter-mapping>
</web-app>
Struts2执行流程
当用户访问某一个Action的时候,先经过核心过滤器,在核心过滤器中执行一组拦截器(这组拦截器实现部分功能),执行目标Action,根据Action的返回值,进行页面跳转。参考图
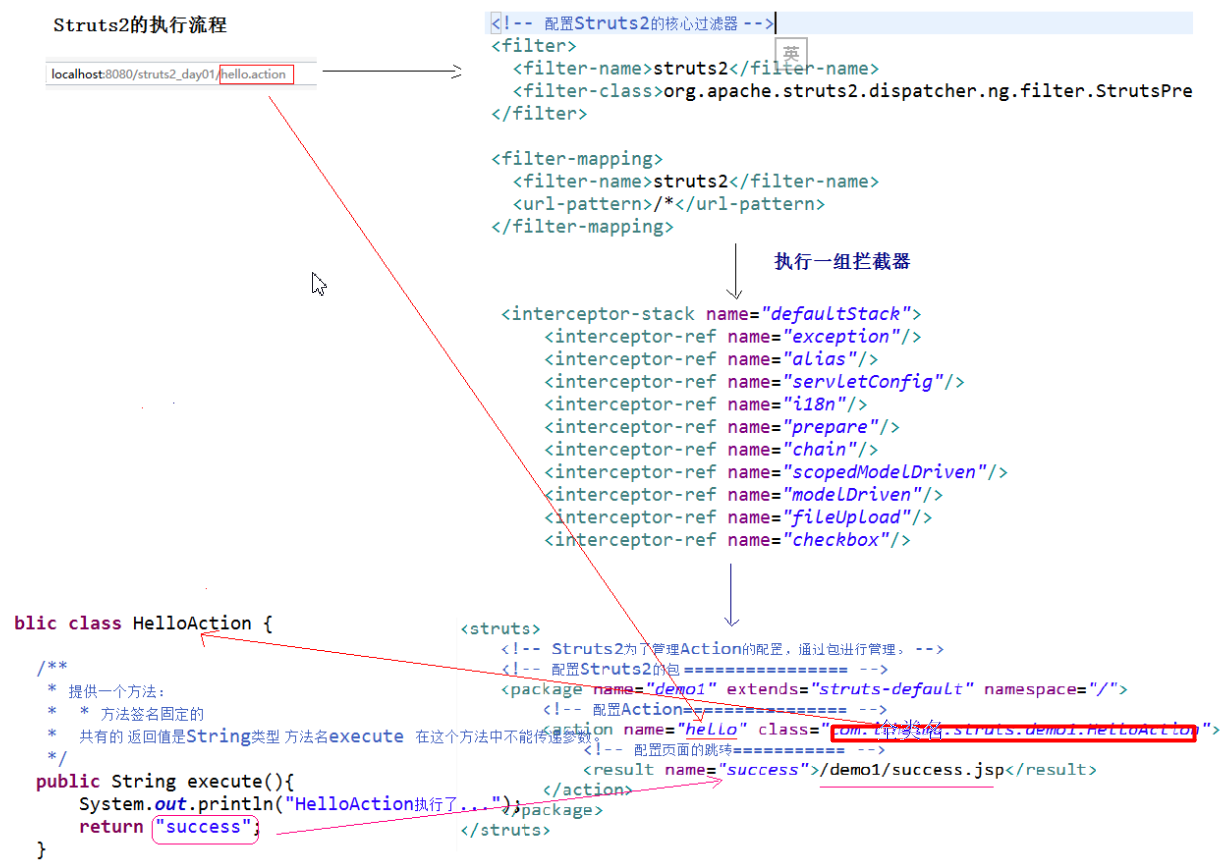
PS:当请求访问的是静态页面(没有访问到Action),则不会触发拦截器的执行
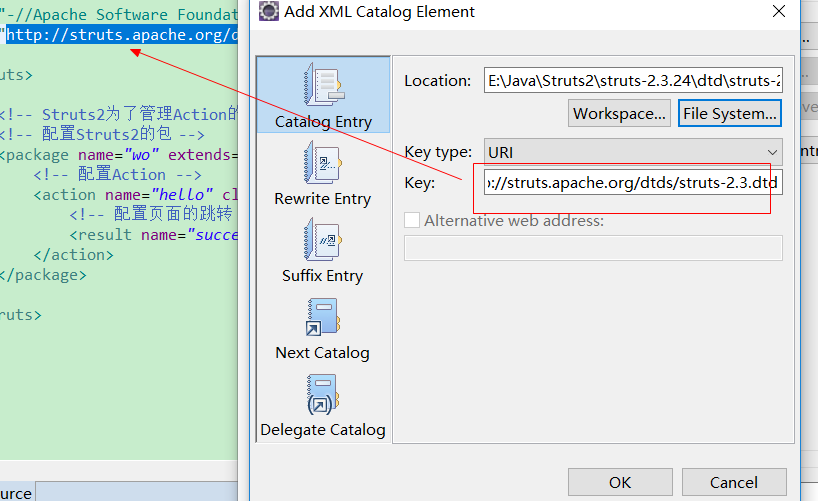
XML提示的配置
dtd文件位置:struts-2.3.24\src\core\src\main\resources
Struts2的配置文件的加载顺序(了解)
服务器启动时,过滤器被创建,配置文件的加载在Filter的init方法中
1、init_DefaultProperties() ----加载default.properties Struts2定义所有的常量
2、init_TraditionalXmlConfigurations(); ----加载struts-default.xml、struts-plugin.xml、struts.xml
3、init_LegacyStrutsProperties(); ----加载struts.properties(用户可以自定义)
4、init_CustomConfigurationProviders(); ----加载配置提供类
5、init_FilterInitParameters() ; // [6] ----加载web.xml中过滤器初始化参数
6、init_AliasStandardObjects() ; // [7] ----加载Bean对象
加载顺序
1、default.properties(配置常量)
2、struts-default.xml (其中配置有:默认拦截器栈)
3、struts-plugin.xml
下面的三个文件可以配置常量
4、struts.xml
5、struts.properties
6、web.xml
注意:后配置的常量的值会覆盖先配置的常量的值。
Action的配置:struts.xml
package的配置
package标签称为包,这个包与Java中的包的概念不一致。包为了更好管理action的配置。
package标签的属性
1、name :包的名称,只有在一个项目中不重名即可。
2、extends :继承哪个包,通常值为struts-default。
3、namespace :名称空间,与<action>标签中的name属性共同决定访问路径。
名称空间有三种写法:
带名称的名称空间 :namespace=”/aaa”
根名称空间:namespance=”/”
默认名称空间:namespace=””
4、abstract :抽象的,用于其他包的继承。
PS:寻找顺序:有名称的空间-->"/"-->"" 默认空间
action标签配置Action类
action标签的属性
1、name :与namespace共同决定访问路径
2、class :Action类的全路径
3、method :执行Action中的哪个方法的方法名,默认值execute
4、converter :用于设置类型转换器(了解)
Struts2的常量配置
在Struts2的框架中,提供了非常多的常量:(在default.properties)
1、struts.i18n.encoding=UTF-8 ----Struts2中所有的post请求的中文乱码不用处理。
2、struts.action.extension=action,, ----Struts2请求的默认的扩展名。默认扩展名是.action或者什么都不写。
在Struts2中修改一些常量的值,修改常量的值,可以有三个位置进行修正:
1、struts.xml中进行修改(一般在此处修改)
<constant name="struts.action.extension" value="action"/>
<?xml version="1.0" encoding="UTF-8"?>
<!DOCTYPE struts PUBLIC
    "-//Apache Software Foundation//DTD Struts Configuration 2.3//EN"
    "http://struts.apache.org/dtds/struts-2.3.dtd">
<struts>

    <!-- 配置Struts2的常量 -->
    <constant name="struts.action.extension" value="action"/>

    <!-- Struts2为了管理Action的配置,通过包进行管理 -->
    <!-- 配置Struts2的包 -->
    <package name="demo1" extends="struts-default" namespace="/">
        <!-- 配置Action -->
        <action name="hello" class="com.struts2.demo.HelloAction">
            <!-- 配置页面的跳转 -->
            <result name="success">/success.jsp</result>
        </action>
    </package>
</struts>
2、struts.properties中进行修改(了解)
struts.action.extension=action
3、web.xml中进行修改

<?xml version="1.0" encoding="UTF-8"?>
<web-app xmlns:xsi="http://www.w3.org/2001/XMLSchema-instance" xmlns="http://java.sun.com/xml/ns/javaee" xsi:schemaLocation="http://java.sun.com/xml/ns/javaee http://java.sun.com/xml/ns/javaee/web-app_2_5.xsd" id="WebApp_ID" version="2.5">
  <display-name>struts2Demo2</display-name>
  <welcome-file-list>
    <welcome-file>index.html</welcome-file>
    <welcome-file>index.htm</welcome-file>
    <welcome-file>index.jsp</welcome-file>
    <welcome-file>default.html</welcome-file>
    <welcome-file>default.htm</welcome-file>
    <welcome-file>default.jsp</welcome-file>
  </welcome-file-list>

  <filter>
      <filter-name>struts2</filter-name>
      <filter-class>org.apache.struts2.dispatcher.ng.filter.StrutsPrepareAndExecuteFilter</filter-class>
      <!-- 修改常量 -->
      <init-param>
          <param-name>struts.action.extension</param-name>
          <param-value>action</param-value>
      </init-param>
  </filter>
  <filter-mapping>
      <filter-name>struts2</filter-name>
      <url-pattern>/*</url-pattern>
  </filter-mapping>
</web-app>
分模块开发的配置
include的配置:在一个配置文件中引入其他配置文件
例如:引入一个包下的配置文件
<include file="com/struts/demo1/strutsDemo.xml"/>
strutsDemo.xml
<?xml version="1.0" encoding="UTF-8"?>
<!DOCTYPE struts PUBLIC
    "-//Apache Software Foundation//DTD Struts Configuration 2.3//EN"
    "http://struts.apache.org/dtds/struts-2.3.dtd">
<struts>

    <!-- 配置Struts2的常量 -->
    <constant name="struts.action.extension" value="action"/>

    <!-- Struts2为了管理Action的配置,通过包进行管理 -->
    <!-- 配置Struts2的包 -->
    <package name="demo1" extends="struts-default" namespace="/">
        <!-- 配置Action -->
        <action name="hello" class="com.struts2.demo.HelloAction">
            <!-- 配置页面的跳转 -->
            <result name="success">/success.jsp</result>
        </action>
    </package>
</struts>
struts.xml
<?xml version="1.0" encoding="UTF-8"?>
<!DOCTYPE struts PUBLIC
    "-//Apache Software Foundation//DTD Struts Configuration 2.3//EN"
    "http://struts.apache.org/dtds/struts-2.3.dtd">
<struts>

    <!-- 配置Struts2的常量 -->
    <constant name="struts.action.extension" value="action"/>

    <!-- 引入配置文件 -->
    <include file="com/struts2/demo/strutsDemo.xml"/>
</struts>
Action的三种编写方式
1、Action类是POJO类(普通java类)
在类中提供一个public String execute()方法实现
2、Action类是实现Action接口的类
实现了接口中的execute方法
好处:实现Action接口的这种方式:提供了五个常量(五个视图的名称)
①SUCCESS:成功
②ERROR:失败
③LOGIN:登录出错页面跳转
④INPUT:表单校验的出错页面跳转(不可修改)
⑤NONE:不跳转页面
3、Action类是继承ActionSupport类的类:(推荐使用这种方式)
重写execute方法,父类的execute方法默认返回SUCCESS
好处:ActionSupport中提供数据校验、国际化等一系列操作的方法
package com.struts2.demo;

import com.opensymphony.xwork2.ActionSupport;

public class HelloAction extends ActionSupport {
    @Override
    public String execute() throws Exception {
        System.out.println("HelloAction类继承ActionSupport的execute的方法执行.........");
        //return SUCCESS ;
        return super.execute();
    }
}
Action的访问
多个不同的请求访问,使用同一个类中的不同方法响应
1、通过method设置
    <package name="demo2" extends="struts-default" namespace="/">
        <action name="userFind" class="com.strust.demo.UserAction" method="find"></action>
        <action name="userUpdate" class="com.strust.demo.UserAction" method="update"></action>
        <action name="userDelete" class="com.strust.demo.UserAction" method="delete"></action>
        <action name="userSave" class="com.strust.demo.UserAction" method="save"></action>
    </package>
2、通过通配符的方式进行配置(工作时使用)
    <!-- "{1}"代表通配符中第一个*的取值 -->
    <package name="demo2" extends="struts-default" namespace="/">
        <action name="user_*" class="com.strust.demo.UserAction" method="{1}"></action>
    </package>
UserAction.java
package com.struts2.demo;

import com.opensymphony.xwork2.ActionSupport;

public class UserAction extends ActionSupport {
    public void save() {
        System.out.println("UserAction的save方法执行了......");
    }
    public void find() {
        System.out.println("UserAction的finde方法执行了......");
    }
    public void delete() {
        System.out.println("UserAction的delete方法执行了......");
    }
    public void update() {
        System.out.println("UserAction的update方法执行了......");
    }
}
user.jsp
<%@ page language="java" contentType="text/html; charset=UTF-8"
    pageEncoding="UTF-8"%>
<!DOCTYPE html PUBLIC "-//W3C//DTD HTML 4.01 Transitional//EN" "http://www.w3.org/TR/html4/loose.dtd">
<html>
<head>
<meta http-equiv="Content-Type" content="text/html; charset=UTF-8">
<title>Insert title here</title>
</head>
<body>
<h1>通配符的方式</h1>
<a href="${pageContext.request.contextPath }/user_save.action">保存用户</a>
<a href="${pageContext.request.contextPath }/user_delete.action">删除用户</a>
<a href="${pageContext.request.contextPath }/user_update.action">修改用户</a>
<a href="${pageContext.request.contextPath }/user_find.action">查询用户</a>
</body>
</html>
struts.xml
<?xml version="1.0" encoding="UTF-8"?>
<!DOCTYPE struts PUBLIC
    "-//Apache Software Foundation//DTD Struts Configuration 2.3//EN"
    "http://struts.apache.org/dtds/struts-2.3.dtd">
<struts>

    <!-- 配置Struts2的常量 -->
    <constant name="struts.action.extension" value="action"/>

    <!-- Struts2为了管理Action的配置,通过包进行管理 -->
    <!-- 配置Struts2的包 -->
    <package name="demo1" extends="struts-default" namespace="/">
        <!-- 配置Action -->
        <action name="user_*" class="com.struts2.demo.UserAction" method="{1}">
            <!-- 配置页面的跳转 -->
            <result name="success">/success.jsp</result>
        </action>
    </package>
</struts>
更抽象的写法
    <package name="demo2" extends="struts-default" namespace="/">
        <action name="*_*" class="XXX.{1}" method="{2}"></action>
    </package>
3、动态方法访问(使用相对较少)
action的配置
<action name="user" class="com.strust.demo.UserAction"></action>
动态方法访问默认是关闭的:在struts.xml配置常量开启
<constant name="struts.enable.DynamicMethodInvocation" value="true"/>
编写访问路径
    <a href="${pageContext.request.contextPath }/user!find.action">查询</a>
    <a href="${pageContext.request.contextPath }/user!update.action">修改</a>
zwy

 浙公网安备 33010602011771号