一、安装依赖
npm install jsbarcode --save
二、main.js中全局引入
import JsBarcode from 'jsbarcode'
app.config.globalProperties.jsbarcode = JsBarcode
代码如下:
import { createApp } from 'vue'
import App from './App.vue'
import router from './router'
import JsBarcode from 'jsbarcode'
const app = createApp(App).use(router)
app.config.globalProperties.jsbarcode = JsBarcode
app.mount('#app')
三、定义组件
<template>
  <div>
    <svg class="barcode" ></svg>
  </div>
</template>

<script setup>
import { ref, onMounted, nextTick } from 'vue'
import JsBarcode from 'jsbarcode'

const props = defineProps({
  // 数据
  // 当前的值
  value: String
});

onMounted(() => {
  nextTick(() => {
    JsBarcode('.barcode', String(props.value), {
      format: "CODE39",//选择要使用的条形码类型
      width:1,//设置条之间的宽度
      height:40,//高度
      displayValue:true,//是否在条形码下方显示文字
//   text:"456",//覆盖显示的文本
//   fontOptions:"bold italic",//使文字加粗体或变斜体
//   font:"fantasy",//设置文本的字体
//   textAlign:"left",//设置文本的水平对齐方式
//   textPosition:"top",//设置文本的垂直位置
//   textMargin:5,//设置条形码和文本之间的间距
      fontSize:15,//设置文本的大小
//   background:"#eee",//设置条形码的背景
//   lineColor:"#2196f3",//设置条和文本的颜色。
      margin:15//设置条形码周围的空白边距
    });
  })
})
</script>
四、使用组件
1、引入
import Barcode from '@/components/Barcode';
2、注册
components: {
    BarcodeGen
  },
3、使用
<barcode-gen :value="orderNo"/>
完整代码如下:
<template>
<div>
<barcode-gen :value="orderNo"/>
</div>
</template>
<script>
import BarcodeGen from '@/components/Barcode'
export default {
name: "barcode",
components: {
BarcodeGen
},
data() {
return {
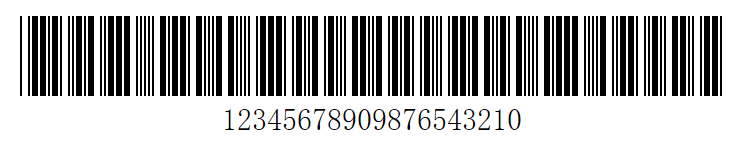
orderNo: "12345678909876543210"
}
},
}
</script>
<style scoped>
</style>
效果如下:
注意事项:
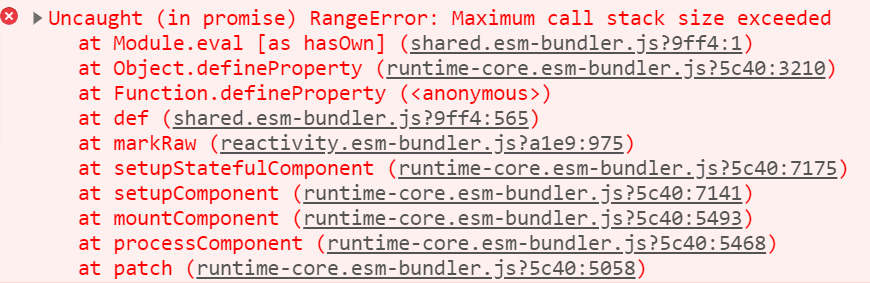
(1)、引用组件名称和当前组件名称不能一样,否则会导致内存溢出,报错如下:RangeError: Maximum call stack size exceeded
报错代码如下:
<template>
  <div>
<!--    <barcode-gen :value="orderNo"/>-->
    <barcode :value="orderNo"/>
  </div>
</template>

<script>
import Barcode from '@/components/Barcode'
export default {
  name: "barcode",
  components: {
    Barcode
  },
  data() {
    return {
      orderNo: "12345678909876543210"
    }
  },
}
</script>

<style scoped>
</style>
(2)、条形码必须是字符串类型,否则会出现后面几位为数字的情况。
如果设置为数字,如下所示:
data() {
    return {
      orderNo: 12345678909876543210
    }
  },
结果如下:

五、循环生成条形码
1、组件CycleBarcode
<template>
  <div>
    <svg :id="'barcode'+index"></svg>
  </div>
</template>

<script setup>
import {onMounted, nextTick, defineProps} from 'vue'
import JsBarcode from 'jsbarcode'

const props = defineProps({
  // 数据
  // 当前的值
  value: {
    type: String,
    default: ''
  },
  index: {
    type: Number
  }
});

onMounted(() => {
  nextTick(() => {
    JsBarcode('#barcode' + props.index, String(props.value), {
      format: "CODE39",//选择要使用的条形码类型
      width: 1,//设置条之间的宽度
      height: 40,//高度
      displayValue: true,//是否在条形码下方显示文字
//   text:"456",//覆盖显示的文本
//   fontOptions:"bold italic",//使文字加粗体或变斜体
//   font:"fantasy",//设置文本的字体
//   textAlign:"left",//设置文本的水平对齐方式
//   textPosition:"top",//设置文本的垂直位置
//   textMargin:5,//设置条形码和文本之间的间距
      fontSize: 15,//设置文本的大小
//   background:"#eee",//设置条形码的背景
//   lineColor:"#2196f3",//设置条和文本的颜色。
      margin: 15//设置条形码周围的空白边距
    });
  })
})
</script>
2、使用组件
引入
import CycleBarcode from '@/components/CycleBarcode';
注册
components: {
    CycleBarcode
  },
使用
<div class='js_barcode'>
    <div v-for='(item,index) in jsBarcodeList ' :key='index'>
      <cycle-barcode :value="item" :index="index"/>
    </div>
  </div>
完整代码
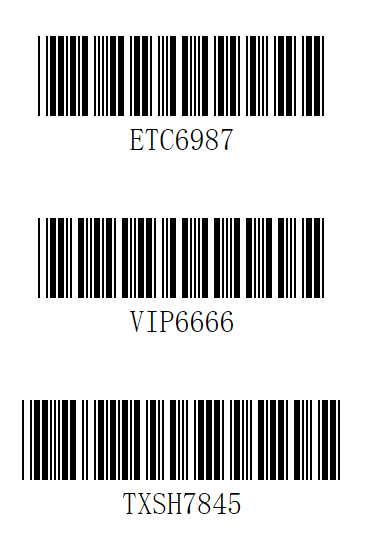
<template>
  <div class='js_barcode'>
    <div v-for='(item,index) in jsBarcodeList ' :key='index'>
      <cycle-barcode :value="item" :index="index"/>
    </div>
  </div>
</template>

<script>
import CycleBarcode from '@/components/CycleBarcode';
export default {
  name: "barcodeCycle",
  components: {
    CycleBarcode
  },
  data() {
    return {
      jsBarcodeList: ['ETC6987','VIP6666','TXSH7845']
    }
  },
}
</script>

<style scoped>
</style>
效果如下:
注意:如果在table表格中循环,则index的值为scope.$index。如下所示:
<barcode :value="scope.row.jcode" :index="scope.$index"/>
scope.$index→拿到每一行的index。scope.$row→拿到每一行的数据。

 浙公网安备 33010602011771号