canvas实现鼠标追踪动画思路总结
canvas鼠标追踪动画思路总结
效果

源码
html
点击查看代码
<!DOCTYPE html>
<html lang="en">
  <head>
    <meta charset="UTF-8" />
    <meta http-equiv="X-UA-Compatible" content="IE=edge" />
    <meta name="viewport" content="width=device-width, initial-scale=1.0" />
    <title>鼠标追踪动画</title>
    <style>
      canvas {
        margin: 50px auto;
        display: block;
        box-shadow: 0 0 10px rgb(0 0 0 / 50%);
      }
    </style>
  </head>
  <body onload="draw()">
    <canvas width="800" height="500"></canvas>

    <script src="./js/鼠标追踪动画.js"></script>
    <script>
      let offsetX = 0
      let offsetY = 0
      let targetArr = []
      function draw() {
        const canvas = document.querySelector('canvas')
        const ctx = canvas.getContext('2d')
        canvas.onmousemove = function (e) {
          offsetX = e.offsetX
          offsetY = e.offsetY
        }
        targetArr = prepareLine(canvas.width / 2, canvas.height / 2)
        startAnimation(ctx, canvas.width, canvas.height)
      }
      function prepareLine(startX, startY) {
        const res = []
        offsetX = startX
        offsetY = startY
        for (let i = 0; i < 100; i++) {
          res.push(new Line(startX, startY))
        }
        return res
      }

      function startAnimation(ctx, width, height) {
        requestAnimationFrame(() => startAnimation(ctx, width, height))
        // 透明度控制长尾效果的长度
        ctx.fillStyle = 'rgba(0,0,0,0.05)'
        ctx.fillRect(0, 0, width, height)
        targetArr.forEach((obj) => {
          obj.draw(ctx, offsetX, offsetY)
        })
      }
    </script>
  </body>
</html>
js
鼠标追踪动画.js
点击查看代码
class Line {
  constructor(startX, startY) {
    this.startX = startX

    this.startY = startY
    // 线的随机角度
    this.randomAngle = this._getRandomAngle()
    // 控制范围
    this.maxLineLength = 150
    // 控制粗细
    this.lineWidth = 4
    // 角度改变的频率(转速)
    this.angleRate = 0.02
    // 由maxLineLength而来,控制范围
    this.lineLength = this._getRandomLength()
    this.lineColor = this._getRandomColor()
  }

  setMaxLineLength(length) {
    this.maxLineLength = length
  }

  setLineWidth(width) {
    this.lineWidth = width
  }

  draw(ctx, offsetX, offsetY) {
    ctx.save()
    const { lineW, lineH } = this._computeLocationData()
    ctx.lineWidth = this.lineWidth
    ctx.strokeStyle = this.lineColor
    ctx.beginPath()
    // 上一个点的位置
    ctx.moveTo(this.startX, this.startY)
    // 距离鼠标位置的x坐标
    this.startX = offsetX + lineW
    // 距离鼠标位置的y坐标
    this.startY = offsetY + lineH
    // 从上一个点的位置画到下一个点的位置(角度方面中间相差this.angleRate度)
    ctx.lineTo(this.startX, this.startY)
    ctx.stroke()
    ctx.closePath()
    ctx.restore()
  }

  _computeLocationData() {
    this.randomAngle += this.angleRate
    return {
      lineW: Math.cos(this.randomAngle) * this.lineLength, // 线的随机长度(x坐标)
      lineH: Math.sin(this.randomAngle) * this.lineLength // 线的随机高度(y坐标)
    }
  }

  _getRandomAngle() {
    return Math.random() * Math.PI * 2
  }

  _getRandomLength() {
    return Math.random() * this.maxLineLength
  }

  _getRandomColor() {
    const s = '0123456789ABCDEF'
    let c = '#'
    for (let i = 0; i < 6; i++) {
      c += s[Math.ceil(Math.random() * 15)]
    }
    return c
  }
}
思路梳理
- 所有的线都有相同的表现形式,可以抽象为一个
Line类- 每条线的长度、颜色都是恒定的,移动过程中每条线都有长尾效果
- 线的移动依赖于鼠标的位置
- 鼠标移动,每条线都会跟着动
主要流程
- 初始所有线的起点是画布中间,每条线长、颜色都是随机计算的
- 准备线时,是从画布中心向外根据随机计算的角度、线长开始画线(计算方式参考步骤4)
- 动画开始后,线以上一次的终点为起点开始绘制新线
- 新线的位置
- 依赖于鼠标位置
- 距离鼠标位置的长度依赖于之前随机计算的线长。应该是:鼠标位置 + 线长
- 因为每条线会有旋转的效果,所有该位置应该有一定的角度变化,否则实现不了线旋转的效果
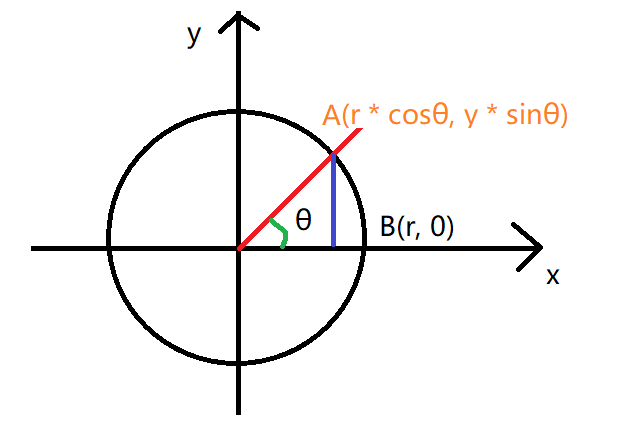
- 想象一下坐标系上半径为
r的圆 - 从圆心向外拉一条线,与圆交于A点(x, y),角度为θ
- 由三角函数,可以知道,
x = r * cosθ,y = r * sinθ
- 由三角函数,可以知道,
- 角度θ发生变化时,对应的
x、y也会发生相应的变化
- 想象一下坐标系上半径为
- 当角度变化时,新线的位置应该是
x = 鼠标位置X + 线长 * cosθy = 鼠标位置Y + 线长 * sinθ
- 动画过程中循环步骤3、步骤4
长尾效果
将清除画布的代码 ctx.clearRect(0, 0, canvas.width, canvas.heigth)
换为下面的代码,让其重复覆盖之前的样式,达到长尾效果
ctx.fillStyle = 'rgba(0,0,0,0.05)'
ctx.fillRect(0, 0, canvas.width, canvas.heigth)
参考
https://developer.mozilla.org/zh-CN/docs/Web/API/Canvas_API/Tutorial/Basic_animations
https://developer.mozilla.org/zh-CN/docs/Web/API/Canvas_API/Tutorial/Advanced_animations

 浙公网安备 33010602011771号