


WebSocket是两个应用之间全双工的通信通道。WebSocket最常见的应用场景是实现服务器和基于浏览器的应用之间的通信。
浏览器中的javascript客户端开启一个到服务器的连接,服务器通过这个连接发送更新给浏览器。相比轮询服务端以查找更新的
方案,这种技术更加高效。
下面将通过两种方式(XML配置和Java类配置)实现WebSocket的简单应用。
需要说明的是,由于本人浏览器无法支持WebSocket(这也是WebSocket令人遗憾的地方),所以使用WebSocket的备用方案
SockJS。SockJS会优先选用WebSocket,但是如果WebSocket不可用的话,它将会从其他方案中挑选最优方案。
不论哪种方案,首先要在maven项目中添加相关依赖:
<!-- WebSocket依赖 -->
    <dependency>
      <groupId>org.springframework</groupId>
      <artifactId>spring-websocket</artifactId>
        <version>5.1.3.RELEASE</version>
    </dependency>
<!-- 处理json数据 -->
    <dependency>
      <groupId>com.fasterxml.jackson.core</groupId>
      <artifactId>jackson-core</artifactId>
      <version>2.9.8</version>
    </dependency>
    <dependency>
      <groupId>com.fasterxml.jackson.core</groupId>
      <artifactId>jackson-databind</artifactId>
      <version>2.9.8</version>
    </dependency>
注意,后两个依赖不能忘记,不然会在通信时出错
一、通过XML配置
在之前的项目中,我们首先创建example.websocket包,用于存放我们定义的处理器类。在该包中创建我们的
WebSocket处理器类MyHandler:
package example.websocket;

import org.slf4j.Logger;
import org.slf4j.LoggerFactory;
import org.springframework.web.socket.CloseStatus;
import org.springframework.web.socket.TextMessage;
import org.springframework.web.socket.WebSocketSession;
import org.springframework.web.socket.handler.TextWebSocketHandler;

/**
 * webSocket处理器
 */
public class MyHandler extends TextWebSocketHandler {
    private static final Logger log = LoggerFactory.getLogger(MyHandler.class);

    /**
     * 处理接收的信息行为
     * @param session
     * @param message
     * @throws Exception
     */
    @Override
    protected void handleTextMessage(WebSocketSession session, TextMessage message) throws Exception {
        log.info("Received message: " + message.getPayload());
        session.sendMessage(new TextMessage("Server has received your message"));
    }

    /**
     * 处理建立连接后的事件
     * @param session
     * @throws Exception
     */
    @Override
    public void afterConnectionEstablished(WebSocketSession session) throws Exception {
        log.info("Connection established");
    }

    /**
     * 处理连接关闭事件
     * @param session
     * @param status
     * @throws Exception
     */
    @Override
    public void afterConnectionClosed(WebSocketSession session, CloseStatus status) throws Exception {
        log.info("Connection closed. Status: " + status);
    }
}
接下来我们要在DispatcherServlet中配置我们的WebSocket:
<websocket:handlers>
        <websocket:mapping path="/myHandler" handler="myHandler"/>
        <websocket:sockjs/>
    </websocket:handlers>
    <bean id="myHandler" class="example.websocket.MyHandler"/>
注意,这段代码应放入dispatcher-servlet.xml中,其中<websocket:sockjs/>标签配置了SockJS
接下来我们创建一个新的Controller类用于加载一个独立的视图:
package example.controller;

import org.springframework.stereotype.Controller;
import org.springframework.web.bind.annotation.RequestMapping;
import org.springframework.web.bind.annotation.RequestMethod;
import org.springframework.web.servlet.ModelAndView;

@Controller
@RequestMapping(value = "websocket")
public class CommunicationController {

    @RequestMapping(method = RequestMethod.GET)
    public ModelAndView webSocketView() {
        ModelAndView modelAndView = new ModelAndView("webSocketClient");
        return modelAndView;
    }
}
下面我们来编写一个简易的前端代码,创建webSocketClient.jsp文件,需要注意,在使用SockJS之前,需要引入相应的库,
具体参见https://github.com/sockjs/sockjs-client,这里借用了其他博主的代码https://blog.csdn.net/dadiyang/article/details/83715569
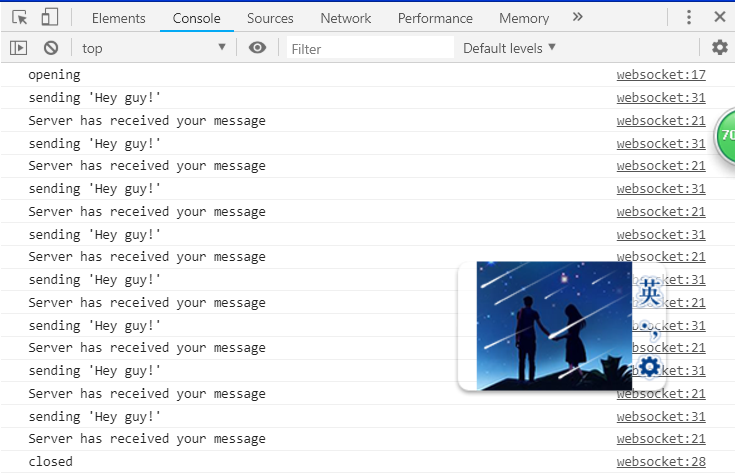
<%--
  Created by IntelliJ IDEA.
  User: asus1
  Date: 2019/1/24
  Time: 21:58
  To change this template use File | Settings | File Templates.
--%>
<%@ page contentType="text/html;charset=UTF-8" language="java" %>
<html>
<head>
    <title>webSocket客户端</title>
</head>
<body>
<h1>Welcome!</h1>
<ul id="ul">
</ul>
<script  type="text/javascript" src="${pageContext.request.contextPath}/statics/js/sockjs-1.0.0.min.js"></script>
<script>
    var url = '/myHandler';
    var sock = new SockJS(url);

    sock.onopen = function (ev) {
        console.log("opening");
        sayHey();
    };
    sock.onmessage = function (ev) {
        console.log(ev.data);
        var li = document.createElement("li");
        li.innerText = ev.data;
        document.getElementById("ul").appendChild(li);
        setTimeout(sayHey, 2000);
    };
    sock.onclose = function (ev) {
        console.log("closed");
    };
    function sayHey() {
        console.log("sending 'Hey guy!'");
        sock.send("Hey guy!");
    };
</script>
</body>
</html>
运行项目结果:


二、通过java类配置
完全依照其他博主的方法重新创建了一个项目,整个项目通过java类进行配置
参考资料:https://blog.csdn.net/dadiyang/article/details/83715569
《Spring 实战(第4版)》
下面直接粘代码:
配置类:
RootConfig:
package com.example.config;

import org.springframework.context.annotation.ComponentScan;
import org.springframework.context.annotation.Configuration;
import org.springframework.context.annotation.FilterType;
import org.springframework.web.servlet.config.annotation.EnableWebMvc;

@Configuration
@ComponentScan(basePackages = {"com.example"},
    excludeFilters = {
        @ComponentScan.Filter(type = FilterType.ANNOTATION, value = EnableWebMvc.class)
    })
public class RootConfig {
}
WebConfig:
package com.example.config;

import org.springframework.context.annotation.ComponentScan;
import org.springframework.context.annotation.Configuration;
import org.springframework.web.servlet.config.annotation.DefaultServletHandlerConfigurer;
import org.springframework.web.servlet.config.annotation.EnableWebMvc;
import org.springframework.web.servlet.config.annotation.ViewResolverRegistry;
import org.springframework.web.servlet.config.annotation.WebMvcConfigurer;
import org.springframework.web.servlet.view.InternalResourceViewResolver;

/**
 * WebMvcConfigurerAdapter在新版本中已被弃用
 * 可以通过实现WebMvcConfigurer或者拓展WebMvcConfigurerSupport
 * 替代WebMvcConfigurerAdapter的拓展
 */
@Configuration
@EnableWebMvc
@ComponentScan(basePackages = {"com.example"})
public class WebConfig implements WebMvcConfigurer {

    /**
     * 配置jsp视图解析器
     * @param registry
     */
    @Override
    public void configureViewResolvers(ViewResolverRegistry registry) {
        registry.jsp("/WEB-INF/views/", ".jsp");
    }

    /**
     * 配置静态资源的处理
     * @param configurer
     */
    @Override
    public void configureDefaultServletHandling(DefaultServletHandlerConfigurer configurer) {
        configurer.enable();
    }
}
WebSocketConfig:
package com.example.config;

import com.example.websocket.MyHandler;
import org.springframework.context.annotation.Bean;
import org.springframework.context.annotation.Configuration;
import org.springframework.web.socket.config.annotation.EnableWebSocket;
import org.springframework.web.socket.config.annotation.WebSocketConfigurer;
import org.springframework.web.socket.config.annotation.WebSocketHandlerRegistry;

@Configuration
@EnableWebSocket
public class WebSocketConfig implements WebSocketConfigurer {
    @Override
    public void registerWebSocketHandlers(WebSocketHandlerRegistry webSocketHandlerRegistry) {
        webSocketHandlerRegistry.addHandler(myHandler(), "/myHandler").withSockJS();
    }

    @Bean
    public MyHandler myHandler() {
        return new MyHandler();
    }
}
WebApp初始化类:
package com.example.webappinit;

import com.example.config.RootConfig;
import com.example.config.WebConfig;
import org.springframework.web.servlet.support.AbstractAnnotationConfigDispatcherServletInitializer;

public class wsWebAppInitializer extends AbstractAnnotationConfigDispatcherServletInitializer {
    @Override
    protected Class<?>[] getRootConfigClasses() {
        return new Class[] {RootConfig.class};
    }

    @Override
    protected String[] getServletMappings() {
        return new String[] {"/"};
    }

    @Override
    protected Class<?>[] getServletConfigClasses() {
        return new Class[] {WebConfig.class};
    }
}
其他代码与XML配置一样
运行项目结果:


 浙公网安备 33010602011771号