CentOS7安装Docker并且使用Idea一键部署
一、Cenos7环境安装Docker
Docker 包括三个基本概念:
- 镜像(Image):Docker镜像就相当于一个root文件系统。
- 容器(Container):镜像和容器的关系就像面向对象中的类和实例一样,容器是镜像运行时的实体,可以被创建、启动、停止、暂停、删除等。
- 仓库(Repository):仓库用来保存镜像。
CentOS Docker 安装:
Docker 支持以下的 64 位 CentOS 版本:
- CentOS 7
- CentOS 8
- 更高版本...
使用官方安装脚本自动安装:
安装命令如下:
curl -fsSL https://get.docker.com | bash -s docker --mirror Aliyun
也可以使用国内 daocloud 一键安装命令:
curl -sSL https://get.daocloud.io/docker | sh
手动安装:
卸载旧版本:
sudo yum remove docker docker-client docker-client-latest docker-common docker-latest docker-latest-logrotate docker-logrotate docker-engine
安装 Docker Engine-Community:
使用 Docker 仓库进行安装:
在新主机上首次安装 Docker Engine-Community 之前,需要设置 Docker 仓库。之后,您可以从仓库安装和更新 Docker。
设置仓库:
安装所需的软件包。yum-utils 提供了 yum-config-manager ,并且 device mapper 存储驱动程序需要 device-mapper-persistent-data 和 lvm2。
sudo yum install -y yum-utils device-mapper-persistent-data lvm2
使用以下命令来设置稳定的仓库:
官方源地址(比较慢):
sudo yum-config-manager --add-repo https://download.docker.com/linux/centos/docker-ce.repo
阿里云:
sudo yum-config-manager --add-repo http://mirrors.aliyun.com/docker-ce/linux/centos/docker-ce.repo
安装 Docker Engine-Community:
安装最新版本的 Docker Engine-Community 和 containerd:
sudo yum install docker-ce docker-ce-cli containerd.io
安装特定版本的 Docker Engine-Community:
yum list docker-ce --showduplicates | sort -r

docker-ce.x86_64            3:20.10.3-3.el7                     docker-ce-stable
docker-ce.x86_64            3:20.10.2-3.el7                     docker-ce-stable
docker-ce.x86_64            3:20.10.1-3.el7                     docker-ce-stable
docker-ce.x86_64            3:20.10.0-3.el7                     docker-ce-stable
docker-ce.x86_64            3:19.03.9-3.el7                     docker-ce-stable
Docker的启动、重启、关闭命令:
启动:
systemctl start docker

守护进程重启:
sudo systemctl daemon-reload

重启docker服务:
systemctl restart docker
sudo service docker restart

关闭docker:
service docker stop
docker systemctl stop docker
通过运行 hello-world 映像来验证是否正确安装了 Docker Engine-Community :
sudo docker run hello-world
Docker 安装 Nginx:
拉取官方的最新版本的Nginx镜像:

docker pull nginx:latest
Docker查看镜像:

docker images
运行 nginx 容器:

docker run --name nginx-fist -p 8080:80 -d nginx

参数说明:
--name nginx-test:容器名称。
-p 8080:80: 端口进行映射,将本地 8080 端口映射到容器内部的 80 端口。
-d nginx: 设置容器在在后台一直运行。
最后浏览器访问Ngnix: IP+8080端口
二、Idea一键部署
配置Docker远程连接端口:
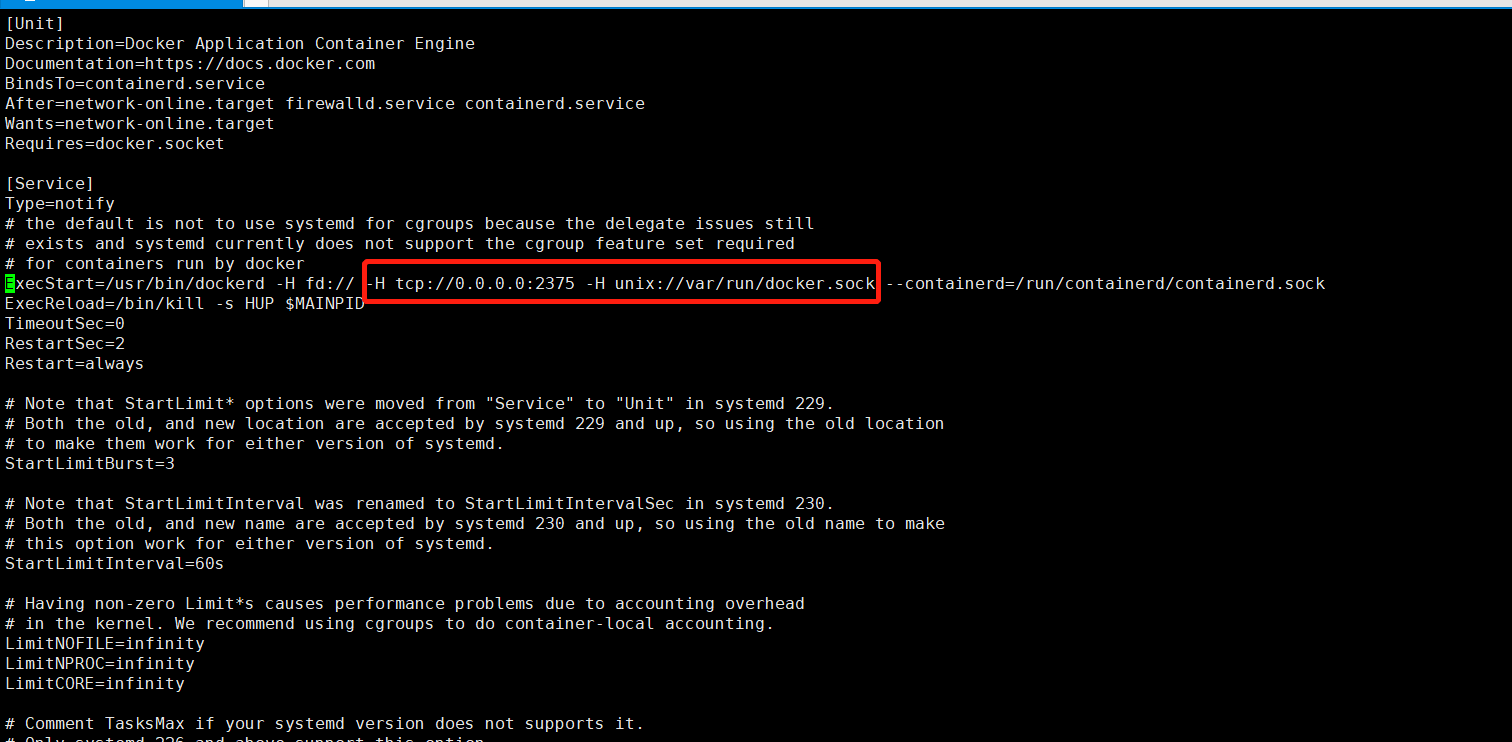
编辑Docker文件:

vim /usr/lib/systemd/system/docker.service
在ExecStart=/usr/bin/dockerd 后插入 -H tcp://0.0.0.0:2375 -H unix://var/run/docker.sock

修改后保存文件,然后重启docker:

systemctl daemon-reload
service docker restart
重启之后测试远程连接是否正常:

curl http://localhost:2375/version

看到返回信息基本上就没有问题了:
{"Platform":{"Name":"Docker Engine - Community"},"Components":[{"Name":"Engine","Version":"20.10.3","Details":{"ApiVersion":"1.41","Arch":"amd64","BuildTime":"2021-01-29T14:32:37.000000000+00:00","Experimental":"false","GitCommit":"46229ca","GoVersion":"go1.13.15","KernelVersion":"3.10.0-514.26.2.el7.x86_64","MinAPIVersion":"1.12","Os":"linux"}},{"Name":"containerd","Version":"1.4.3","Details":{"GitCommit":"269548fa27e0089a8b8278fc4fc781d7f65a939b"}},{"Name":"runc","Version":"1.0.0-rc92","Details":{"GitCommit":"ff819c7e9184c13b7c2607fe6c30ae19403a7aff"}},{"Name":"docker-init","Version":"0.19.0","Details":{"GitCommit":"de40ad0"}}],"Version":"20.10.3","ApiVersion":"1.41","MinAPIVersion":"1.12","GitCommit":"46229ca","GoVersion":"go1.13.15","Os":"linux","Arch":"amd64","KernelVersion":"3.10.0-514.26.2.el7.x86_64","BuildTime":"2021-01-29T14:32:37.000000000+00:00"}
然后开启端口,或者关闭防火墙,二者选其一即可:

firewall-cmd --zone=public --add-port=2375/tcp --permanent
chkconfig iptables off
浏览器中返回信息也正常:

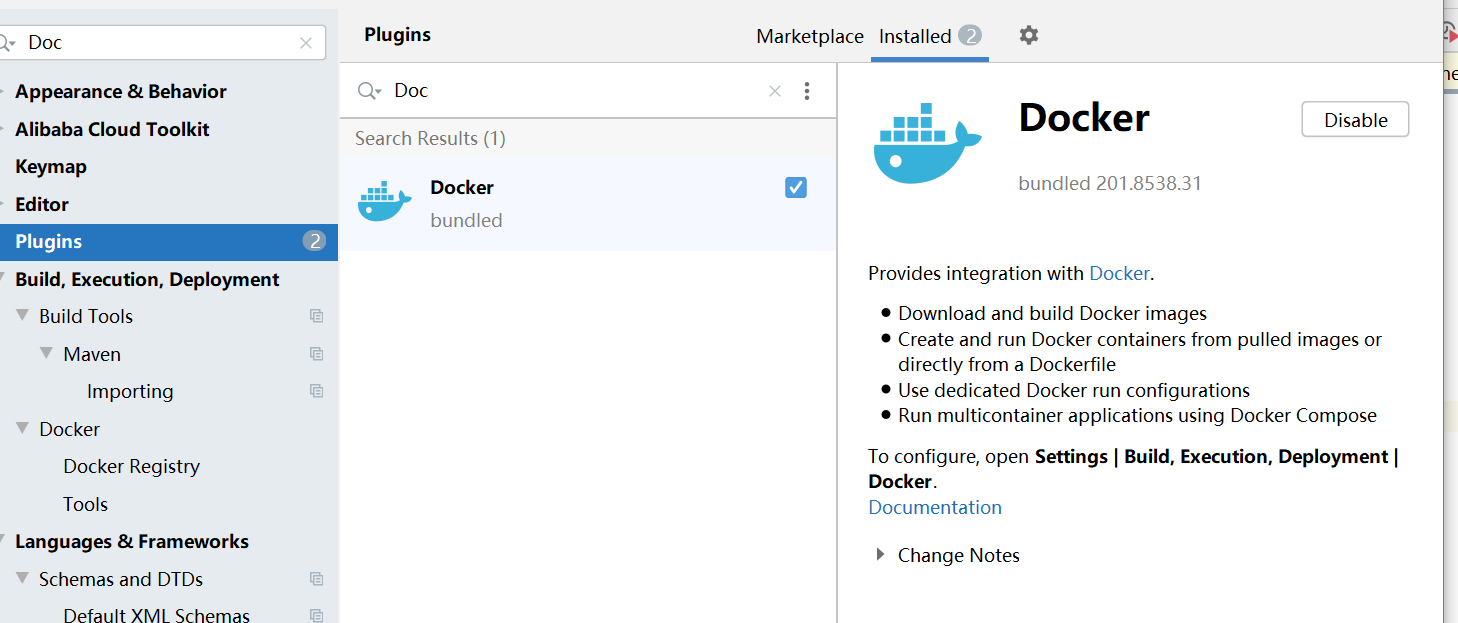
使用idea连接到docker:
首先下载docker插件,idea自带了docker插件。
然后配置docker地址,在Idea的File | Settings | Build, Execution, Deployment | Docker:
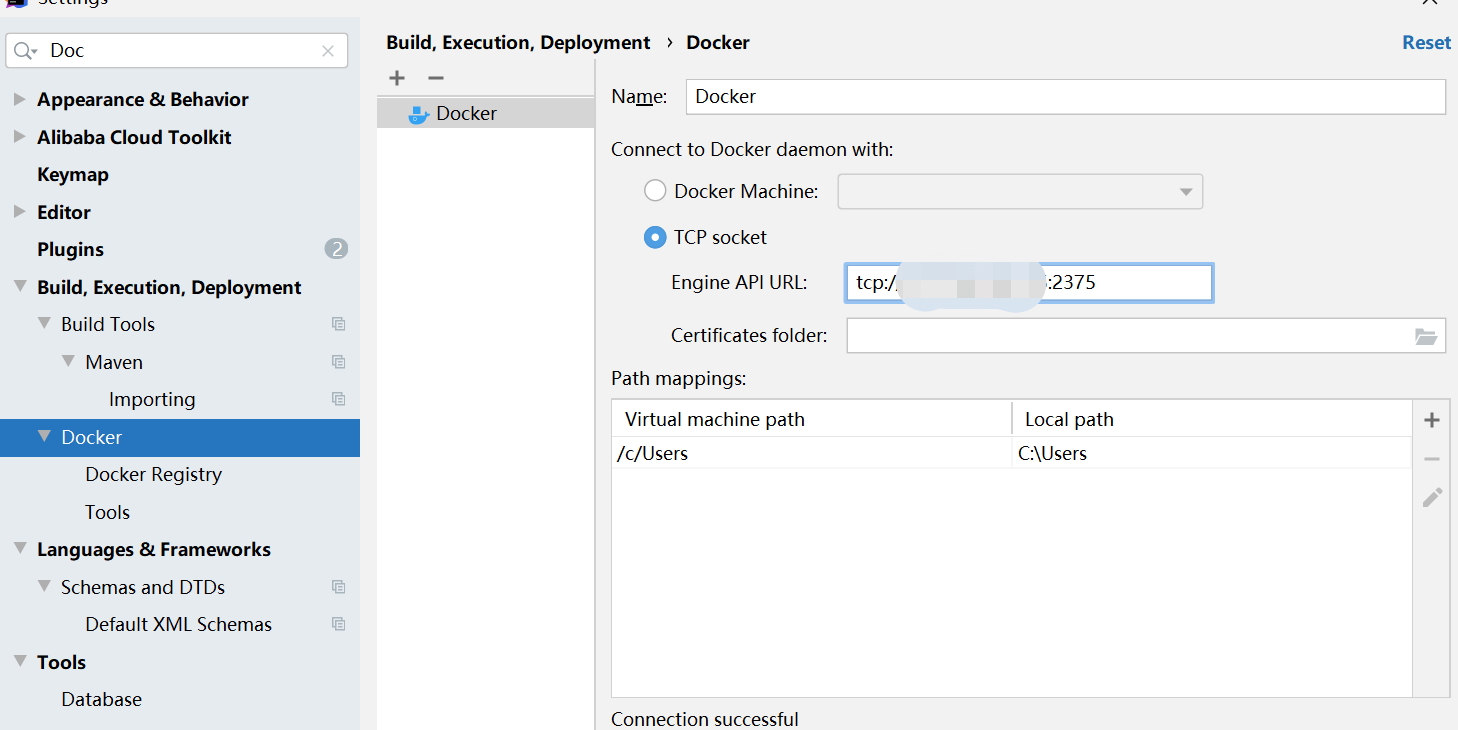
配置完成链接之后,出现了框中的内容即可.

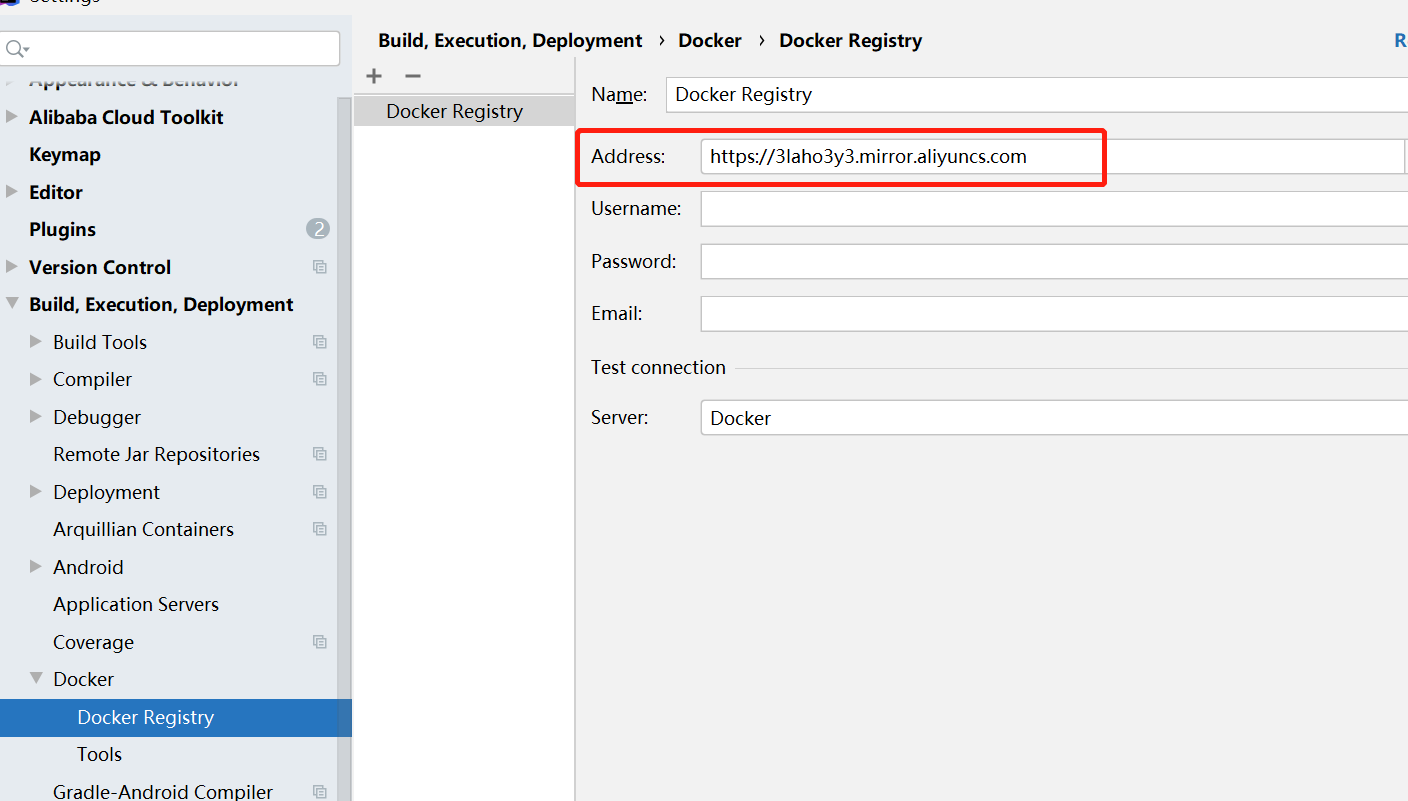
配置阿里云镜像加速器:

https://3laho3y3.mirror.aliyuncs.com
docker-maven-plugin 介绍:
在我们持续集成过程中,项目工程一般使用 Maven 编译打包,然后生成镜像,通过镜像上线,能够大大提供上线效率,同时能够快速动态扩容,快速回滚。
docker-maven-plugin 插件就是为了帮助我们在Maven工程中,通过简单的配置,自动生成镜像并推送到仓库中。
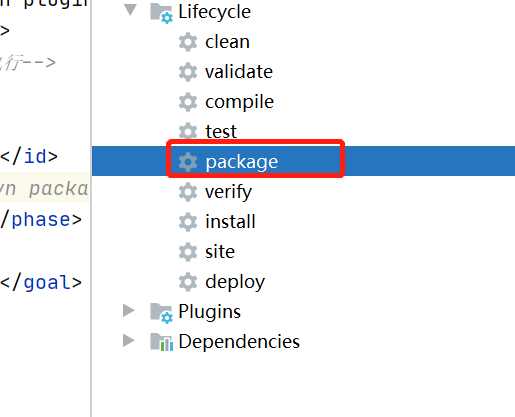
pom.xml:

<build>

        <finalName>${project.artifactId}</finalName>

        <plugins>
            <plugin>
                <groupId>org.springframework.boot</groupId>
                <artifactId>spring-boot-maven-plugin</artifactId>
                <configuration>
                    <excludes>
                        <exclude>
                            <groupId>org.projectlombok</groupId>
                            <artifactId>lombok</artifactId>
                        </exclude>
                    </excludes>
                </configuration>
            </plugin>

            <!-- 跳过单元测试 -->
            <plugin>
                <groupId>org.apache.maven.plugins</groupId>
                <artifactId>maven-surefire-plugin</artifactId>
                <configuration>
                    <skipTests>true</skipTests>
                </configuration>
            </plugin>

            <!--使用docker-maven-plugin插件-->
            <plugin>
                <groupId>com.spotify</groupId>
                <artifactId>docker-maven-plugin</artifactId>
                <version>1.0.0</version>
                <!--将插件绑定在某个phase执行-->
                <executions>
                    <execution>
                        <id>build-image</id>
                        <!--用户只需执行mvn package ,就会自动执行mvn docker:build-->
                        <phase>package</phase>
                        <goals>
                            <goal>build</goal>
                        </goals>
                    </execution>
                </executions>
                <configuration>
                    <!--指定生成的镜像名-->
                    <imageName>${project.artifactId}</imageName>
                    <!--指定标签-->
                    <imageTags>
                        <imageTag>latest</imageTag>
                    </imageTags>
                    <!-- 指定我们项目中Dockerfile文件的路径-->
                    <dockerDirectory>${project.basedir}/src/main/resources</dockerDirectory>
                    <!--指定远程 docker api地址-->
                    <dockerHost>http://121.196.164.215:2375</dockerHost>

                    <!-- 这里是复制 jar 包到 docker 容器指定目录配置 -->
                    <resources>
                        <resource>
                            <targetPath>/</targetPath>
                            <!--jar 包所在的路径  此处配置的 即对应 target 目录-->
                            <directory>${project.build.directory}</directory>
                            <!--用于指定需要复制的文件 需要包含的 jar包 ,这里对应的是 Dockerfile中添加的文件名 -->
                            <include>${project.build.finalName}.jar</include>
                        </resource>
                    </resources>
                </configuration>
            </plugin>

        </plugins>
    </build>
在/src/main/resources下添加Dockerfile文件:
FROM java:8
VOLUME /tmp
ADD *.jar app.jar
EXPOSE 9090
ENTRYPOINT [ "java", "-Djava.security.egd=file:/dev/./urandom", "-jar", "/app.jar" ]
执行Maven打包命令:
打包之后会在Docker镜像看到你的项目:

之后右击镜像点击Create Container,在弹出的窗口设置完成后点击run:

END;

 浙公网安备 33010602011771号