
爬虫
一、爬虫介绍
# 爬虫:又称网络蜘蛛,spider,一堆程序,从互联网中抓取数据---->数据清洗---->入库
# 爬虫需要掌握的知识
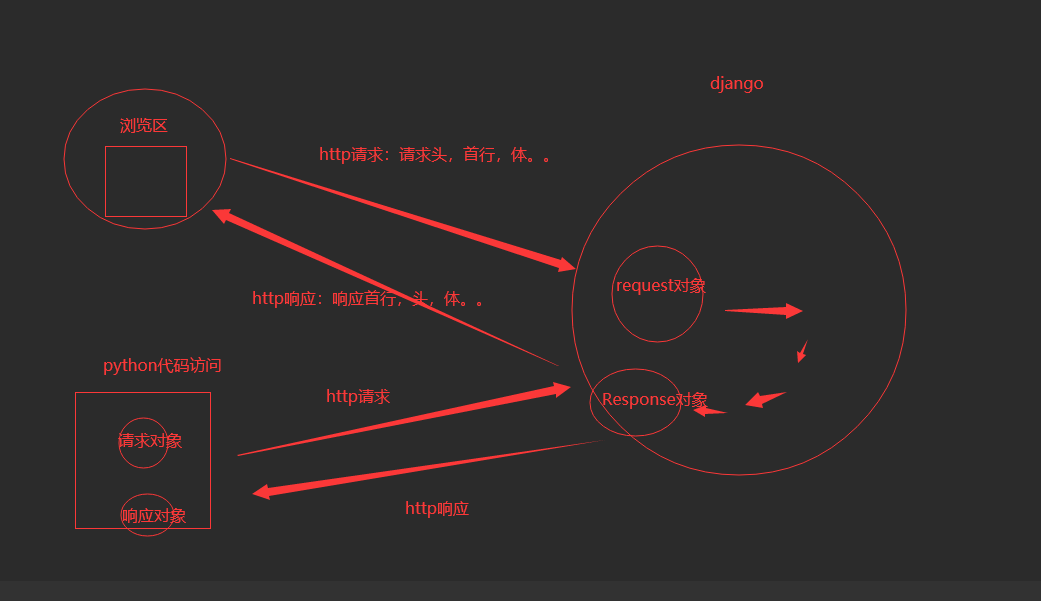
-抓取数据:发送网络请求(http),获得响应(http响应,响应头,响应体--->真正重要的数据在响应体中)
-python模块:requests,selenium
-清洗数据:解析拿回来的数据---> json,xml,html,二进制
-json解析,xml解析...
-python模块:re,json,beautifulsoup4(bs4),lxml,selenium
-入库:存文件,存mysql,redis,mongodb
-python模块:file,pymsql,redis-py,pymongo
# 反扒
-频率限制
-封ip(代理池),封账号(一堆小号:cookie池)
-请求头中带加密信息,referer,user-agent...
-响应回来的数据是加密
-验证码反扒(破解验证码--->第三方平台)
-js加密--->压缩--->加密方法其实在前端能看到--->看上去很晦涩
js逆向,在浏览器中看,把js逻辑用python实现出来
-手机设备:唯一id号
# 搜索引擎都是大爬虫
-百度输入框搜索--->美女--->去百度的数据库搜索---->显示在页面上
-百度一刻不停的在互联网中爬网页,爬完存到它的数据库
-seo优化:免费排,排靠前,浏览量高
-sem优化:搜出来的靠前的,带广告的是花钱的,买断关键词
#可见即可爬
爬虫协议
每个网站都会有爬虫协议,规定了哪些可以爬,哪些不能爬。网站根路径下robots.txt文件
    -User-Agent: *  # 客户端类型
    -Allow: /  # 允许的路径
    -Disallow: /baidu  # 不允许的路径

长链转短链
	-https://www.cnblogs.com/liuqingzheng/p/16005866.html
    -转短链服务(申请短域名:  m.tb.cn):
    	-https://www.cnblogs.com/liuqingzheng/p/16005866.html
        -生成随机字符串:9QqPdHKXc2n
        id   随机字符串   真正地址
        1    9QqPdHKXc2n   ...
        -这个地址返回给你:https://m.tb.cn/h.5bZAfFS?tk=9QqPdHKXc2n

        -用户拿着短地址访问---->https://m.tb.cn/h.5bZAfFS?tk=9QqPdHKXc2n--->访问短链服务
        -取出:9QqPdHKXc2n  去数据库一查--->真正地址:...
        -重定向到真正地址实现了跳转
二、requests模块介绍和快速使用
# requests是模拟发送http请求的模块
	-不仅仅可以做爬虫
    -后端服务,请求别人服务


# pip3.8 install requests
2.1 使用requests发送get请求
import requests

# res 响应对象,http响应,python包装成了对象,响应头,响应头...在res中都会有
res = requests.get('https://www.cnblogs.com/liuqingzheng/p/16005866.html')
print(res)  # <Response [200]>
print(res.text)  # 响应体转成字符串
2.2 get请求携带参数
# 发送get请求,地址栏中携带参数

# 方式一:直接地址字符串中携带
res = requests.get('https://www.cnblogs.com/liuqingzheng/p/16005866.html/?name=lqz&age=19')
print(res.text)

# 方式二:params参数
res = requests.get('https://www.cnblogs.com/liuqingzheng/p/16005866.html/', params={'name': "lqz", 'age': 19})
# print(res.text)  # 响应体转成字符串
print(res.url)  # 响应地址
# https://www.cnblogs.com/liuqingzheng/p/16005866.html?name=lqz&age=19
三、url的编码和解码
from urllib.parse import quote, unquote

# 解码
print(unquote('http://www.aa7a.cn/user.php?&ref=http%3A%2F%2Fwww.aa7a.cn%2F'))
# http://www.aa7a.cn/user.php?&ref=http://www.aa7a.cn/

# 编码
print(quote("帅哥"))  # %E5%B8%85%E5%93%A5
res = requests.get('https://www.baidu.com/s?wd=%E5%B8%85%E5%93%A5')
print(res.text)
四、携带请求头
# 携带请求头--->发送get请求,有的网站,拿不到数据,模拟的不像,请求头的数据没有携带

# 请求头的参数:1 User-Agent:客户端类型  2 referer :上一个页面的地址  3 cookie

header = {
    'User-Agent': 'Mozilla/5.0 (Windows NT 10.0; Win64; x64) AppleWebKit/537.36 (KHTML, like Gecko) Chrome/114.0.0.0 Safari/537.36'
}
# res = requests.get('https://dig.chouti.com/')  # 您的请求带有不合法参数,已被拦截!
res = requests.get('https://dig.chouti.com/', headers=header)
print(res.text)
五、发送post请求,携带数据
header = {
    'Referer': 'http://www.aa7a.cn/user.php?&ref=http%3A%2F%2Fwww.aa7a.cn%2F',
    'User-Agent': 'Mozilla/5.0 (Windows NT 10.0; Win64; x64) AppleWebKit/537.36 (KHTML, like Gecko) Chrome/114.0.0.0 Safari/537.36'
}

data = {
    'username': '616564099@qq.com',
    'password': 'lqz123',
    'captcha': 'xxxx',
    'remember': 1,
    'ref': ' http://www.aa7a.cn/',
    'act': 'act_login'
}
# data,json请求体的数据。编码方式:Content-Type
# 编码方式是 urlencoded
res = requests.post('http://www.aa7a.cn/user.php', data=data, headers=header)
# # 编码是json格式
# res = requests.post('http://www.aa7a.cn/user.php', json=data, headers=header)
print(res.text)  # {"error":0,"ref":"http://www.aa7a.cn/"}

# 获取登录成功后的cookie
cookie = res.cookies
print(cookie)

六、携带cookie两种方式
方式一: 使用cookie参数
cookie = ''
res1 = requests.get('http://www.aa7a.cn/', cookies=cookie)
print(res1.text)
# print('616564099@qq.com' in res1.text)
方式二:携带在请求头中
# 点赞
header = {
    'User-Agent': 'Mozilla/5.0 (Windows NT 10.0; Win64; x64) AppleWebKit/537.36 (KHTML, like Gecko) Chrome/114.0.0.0 Safari/537.36',
    'Cookie': 'deviceId=web.eyJ0eXAiOiJKV1QiLCJhbGciOiJIUzI1NiJ9.eyJqaWQiOiI5MjBkNmRiOC03MDk1LTQyN2ItOGQ5NS1lOGFiMjgzZjAyODYiLCJleHBpcmUiOiIxNjkxNTY0NDgxNDAyIn0.zuDRupx-c5VlW3eRUuYpSlSJc7_jT3z95_TpT8jvfno; Hm_lvt_03b2668f8e8699e91d479d62bc7630f1=1688972483; Hm_lpvt_03b2668f8e8699e91d479d62bc7630f1=1688972505',
}
data = {
    'linkId': '39240604'
}
res = requests.post('https://dig.chouti.com/link/vote', headers=header, data=data)
print(res.text)
七、requests高级用法
7.1 自动携带cookie 的session对象
# session对象---->已经模拟登录上了一些网站--->单独把cookie 取出来
	-res.cookies,是个CookieJar对象
    -转成字典 res.cookies.get_dict()

# 为什么使用cookies,因为http请求都是无状态、无连接的。

import requests
header = {
    'Referer': 'http://www.aa7a.cn/user.php?&ref=http%3A%2F%2Fwww.aa7a.cn%2F',
    'User-Agent': 'Mozilla/5.0 (Windows NT 10.0; Win64; x64) AppleWebKit/537.36 (KHTML, like Gecko) Chrome/114.0.0.0 Safari/537.36'
}

data = {
    'username': '616564099@qq.com',
    'password': 'lqz123',
    'captcha': 'xxxx',
    'remember': 1,
    'ref': ' http://www.aa7a.cn/',
    'act': 'act_login'
}

res = requests.post('http://www.aa7a.cn/user.php', data=data, headers=header)
# print(res.text)  # {"error":0,"ref":"http://www.aa7a.cn/"}

# 获取登录成功后的cookie
cookie = res.cookies
# print(cookie)
print(res.cookies.get_dict())
# {'ECS[password]': '4a5e6ce9d1aba9de9b31abdf303bbdc2', 'ECS[user_id]': '61399', 'ECS[username]': '616564099%40qq.com', 'ECS[visit_times]': '1', 'ECS_ID': '563c44af72f93f8f1e24eef2aea0ae238502b184'}
print(type(cookie))  # <class 'requests.cookies.RequestsCookieJar'>
# from requests.cookies import RequestsCookieJar


## 使用session发送请求
session = requests.session()
res = session.post('http://www.aa7a.cn/user.php', data=data, headers=header)
cookie = res.cookies.get_dict()
# print(cookie)
res1 = session.get('http://www.aa7a.cn/')
# print(res1.text)
print('616564099@qq.com' in res1.text)  # 不需要携带cookie了
7.2 响应Response
# http的响应,就是res对象,所有http响应的东西,都在这个对象中
res = requests.get('http://www.aa7a.cn/')
print(type(res))  # <class 'requests.models.Response'>

from requests.models import Response

# __attrs__ = []  # 中括号中写可以点出来的类属性

# respone属性
print(res.text)   # 响应体转成字符串,默认使用utf-8编码----> 以后打印出来可能会乱码
print(res.content)  # 响应体的bytes格式,\xc6\xf7\xb9\xd9\xb7\xbd\xd5
print(res.status_code)  # 响应状态码
print(res.headers)  # 响应头
print(res.cookies)  # cookie
print(res.cookies.get_dict())  # cookie 转成字典
print(res.cookies.items())  # 键值对的形式
print(res.url)  # 请求地址
print(res.history)  # 访问一个地址,如果重定向了,requests会自动重定向过去,放着之前没重定向之前的地址,列表形式
print(res.encoding)  # 网页编码


# res.iter_content()  # 响应的bytes格式,一点一点取,用来下载图片视频之类的
from contextlib import closing
with open('a.txt', 'wb') as f:
    for line in res.iter_content():
        f.write(line)

# res.close()  # 关闭
bytes格式补充
res = '刘清政'.encode('utf-8')
print(res)
l = []
for i in res:
    print(i)  # for循环后就直接转成了十进制形式

for i in res:
    print(bin(i))
    l.append(bin(i)[2:])  # 截取出后面的字符

print(''.join(l))  # 拼接在一起
# 111001011000100010011000111001101011100010000101111001101001010010111111  # 电脑底层就是这种字符,但是不好识别
7.3 下载图片,视频到本地
res = requests.get('http://pic.imeitou.com/uploads/allimg/220520/5-220520095649.jpg')
with open('性感.png', 'wb') as f:
    f.write(res.content)

# 一行一行写
with open('性感123.png', 'wb') as f:
    for line in res.iter_content(chunk_size=1024):  # chunk_size参数,一次性写入的字节大小
        f.write(line)


# 视频比较大,一行一行写
res = requests.get('https://vd2.bdstatic.com/mda-pfbcdfzec56w6bkn/1080p/cae_h264/1686576386781438049/mda-pfbcdfzec56w6bkn.mp4')
with open('母猪的产后护理.mp4', 'wb') as f:
    for line in res.iter_content(chunk_size=1024):
        f.write(line)
7.4 编码问题
# 直接打印res.text 字符串形式----->从网络过来是二进制---->转成字符串涉及到编码--->默认以utf-8--->现在会自动识别页面的编码,自动转成对应的

res.encoding='gbk' # 手动指定编码
print(res.text)
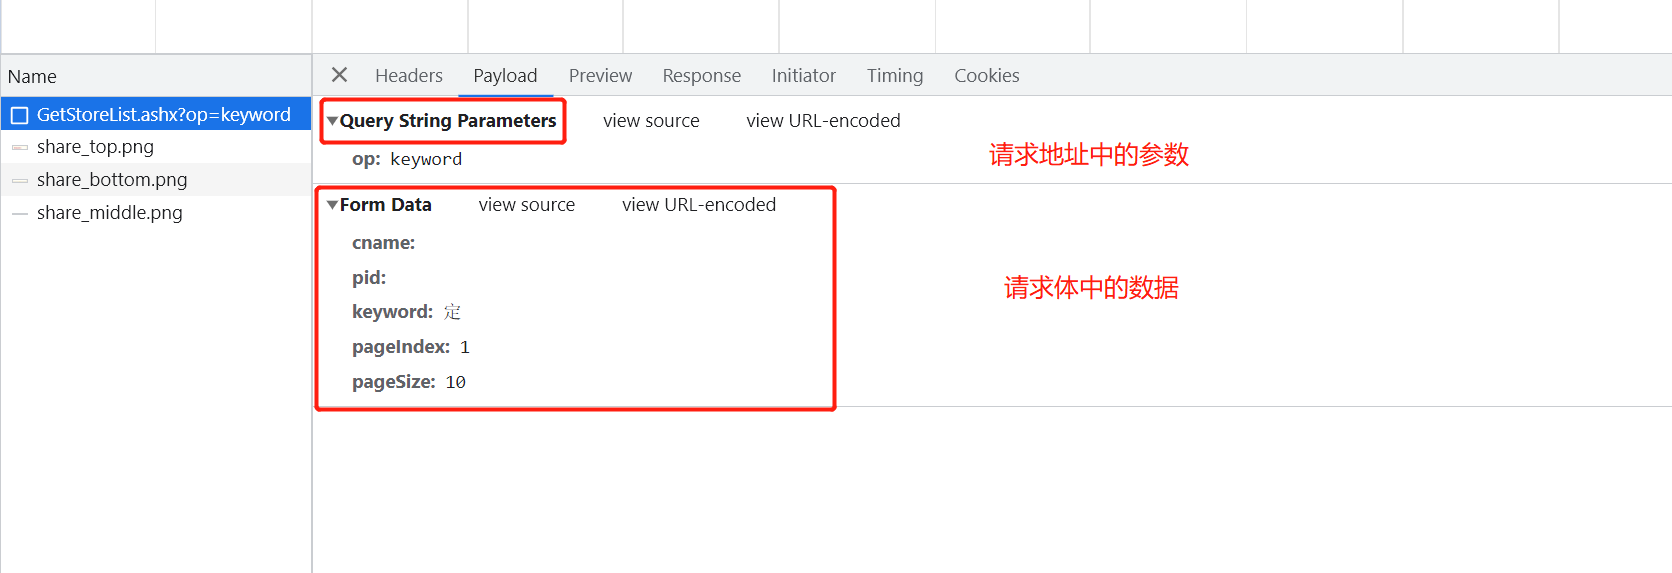
7.5 解析json
# 返回的可能是html,也可能是json(前后端分离项目,返回数据json格式),转成字典直接用
# http://json.cn

# res = requests.post('http://www.kfc.com.cn/kfccda/ashx/GetStoreList.ashx?op=keyword',
#                     data='cname=&pid=&keyword=%E5%AE%9A&pageIndex=1&pageSize=10',  # data使用字符串形式
#                     headers={
#                         'Content-Type': 'application/x-www-form-urlencoded; charset=UTF-8'
#                     })
# print(res.text)  # 字符串形式
# print(res.json())  # json格式,这样就可根据列表或者字典取值了

res = requests.post('http://www.kfc.com.cn/kfccda/ashx/GetStoreList.ashx?op=keyword',
                    data={
                        'cname': '',
                        'pid': '',
                        'keyword': '定',
                        'pageIndex': 1,
                        'pageSize': 10,
                    },
                    headers={
                        'Content-Type': 'application/x-www-form-urlencoded; charset=UTF-8'
                    })

for item in res.json()['Table1']:
    print('餐厅名字:%s,餐厅地址:%s' % (item['storeName'], item['addressDetail']))
'''
餐厅名字:安定门,餐厅地址:安定门外大街西河沿13号楼
餐厅名字:张家界回龙路,餐厅地址:永定区回龙路十字街7栋101号首层肯德基餐厅
餐厅名字:东阳定安,餐厅地址:吴宁镇双岘路1号
餐厅名字:定海解放,餐厅地址:解放西路169号
'''
7.6 ssl认证(了解)
# 证书验证(大部分网站都是https)
import requests
res = requests.get('https://www.12306.cn') # 如果是ssl请求,首先检查证书是否合法,不合法则报错,程序终端
# 改进1:去掉报错,但是会报警告
import requests
res = requests.get('https://www.12306.cn', verify=False) # 不验证证书,报警告,返回200
print(res.text)
# 改进2:去掉报错,并且去掉警报信息
import requests
from requests.packages import urllib3
urllib3.disable_warnings() # 关闭警告
respone = requests.get('https://www.12306.cn', verify=False)
print(respone.status_code)
# 改进3:加上证书
# 很多网站都是https,但是不用证书也可以访问,大多数情况都是可以携带也可以不携带证书
# 知乎\百度等都是可带可不带
# 有硬性要求的,则必须带,比如对于定向的用户,拿到证书后才有权限访问某个特定网站
import requests
respone = requests.get('https://www.12306.cn',
cert=('/path/server.crt',
'/path/key'))
print(respone.status_code)
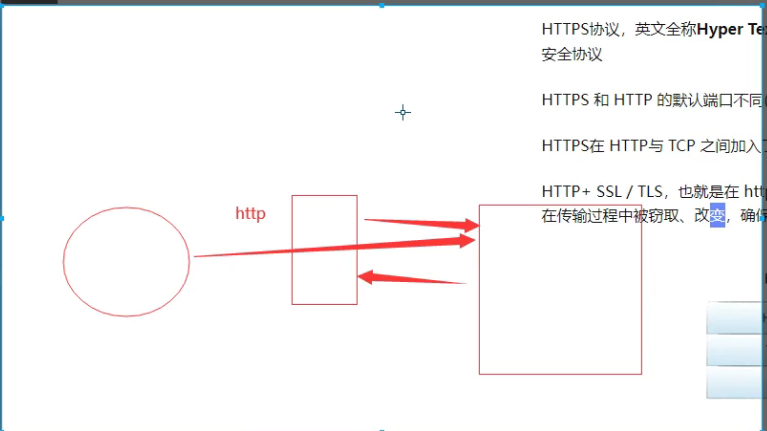
# 补充:http和https的区别 :https://zhuanlan.zhihu.com/p/561907474
-HTTPS 和 HTTP 的默认端口不同(443和80)
-HTTPS在 HTTP与 TCP 之间加入了一个加密/身份验证层,提供了身份验证与加密通讯
-HTTP+ SSL / TLS,也就是在 http上又加了一层处理加密信息的模块,比 http安全,可防止数据在传输过程中被窃取、改变,确保数据的完整性。可以防止中间人攻击
# 中间人攻击
7.7 使用代理(重要)
## 7 使用代理 --->访问某些网站,频率过高,就会被封ip===>使用代理ip访问--->封的是代理ip
#  代理:免费,收费    公司会花钱买的
proxies = {
    'http': '104.193.88.77:80',
}
respone = requests.get('http://127.0.0.1:8000/', proxies=proxies)
print(respone)


# 验证是否走了代理,咱们写个django后端,运行在公网上,使用requests访问
from django.shortcuts import render, HttpResponse

def index(request):
    ip = request.META.get('REMOTE_ADDR')
    print(ip)
    return HttpResponse('您的ip是:%s' % ip)
7.8 超时设置
respone=requests.get('https://www.baidu.com',timeout=0.0001)
print(respone)
7.9 异常处理
import requests
from requests.exceptions import *  # 可以查看requests.exceptions获取异常类型

try:
    r = requests.get('http://www.baidu.com', timeout=0.00001)
# except ReadTimeout:
#     print('===')
# except RequestException:
#     print('Error')
except Exception as e:  # 可以直接使用Exception
    print(e)
7.10 上传文件
files = {'myfile': open('性感.png', 'rb')}
res = requests.post('http://127.0.0.1:8000/upload/', files=files)
print(res.status_code)


def upload(request):
    file =request.FILES.get('myfile')
    with open(file.name, 'wb') as f:
        for line in file:
            f.write(line)
    return HttpResponse('文件上传成功')
7.11 认证登录(老式的)
import requests
r=requests.get('xxx',auth=('user','password'))
print(r.status_code)
八、代理池搭建
8.1 介绍代理池
# 只使用一个代理
import requests
proxies = {
    'http': '104.193.88.77:80',
}
respone = requests.get('http://127.0.0.1:8000/', proxies=proxies)
print(respone)

# 这样也解决不了封号的问题,解决方法是:使用代理池,每次都随机使用一个代理。


# 搭建一个代理池--->每次可以从池中随机取出一个代理--->发送请求
# 公司内部要用,会花钱买
# 咱们自己用,基于网上的开源软件,自己搭建


##  开源的代理池核心原理:https://github.com/jhao104/proxy_pool
	-1 使用爬虫技术,爬取网上免费的代理
    -2 爬完回来做验证,如果能用,存到redis中
    # 启动调度程序,爬代理,验证,存到redis中
	python proxyPool.py schedule

    -3 使用flask启动服务,对外开放了几个接口,向某个接口发请求,就能随机获取一个代理
    # 启动webApi服务
	python proxyPool.py server

#搭建步骤:
	 1 从git拉去开源代码
    	git clone https://github.com/jhao104/proxy_pool.git
    2 使用pycharm打开,创建虚拟环境
    	mkvirtualenv -p python38 pool
    3 配置项目使用虚拟环境
    4 下载项目依赖
    	pip install -r requirements.txt
    5 修改项目配置文件
    	# redis的链接
    	DB_CONN = 'redis://127.0.0.1:6379/2'
		HTTP_URL = "http://www.baidu.com"
		HTTPS_URL = "https://www.baidu.com"

    6 启动调度程序--->爬取网站,验证,存到redis。爬取的差不多就可以直接停止程序了
    	python proxyPool.py schedule

    7 启动web程序(flask写的)
    	python proxyPool.py server

    8 向http://192.168.1.252:5010/get/?type=http 地址发送请求就可以随机获取代理ip
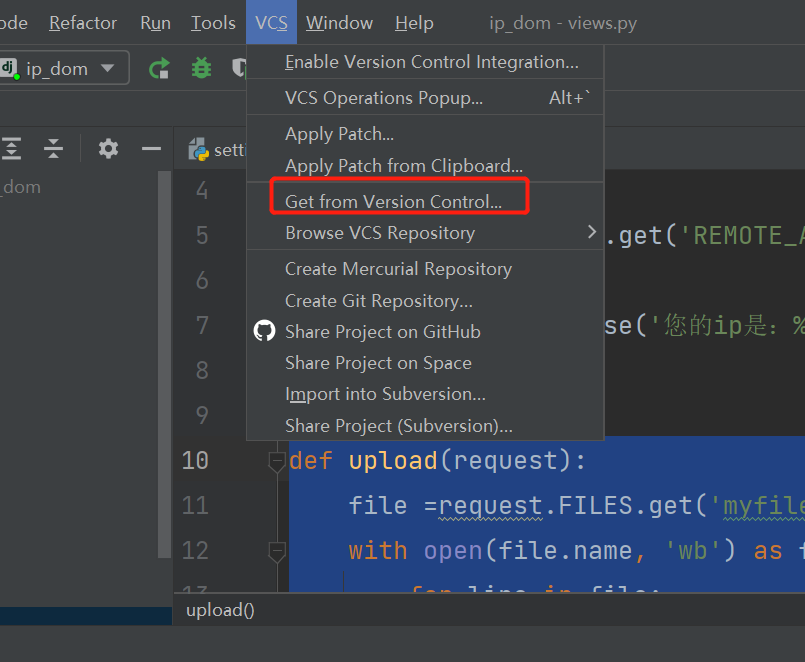
Pycharm可远程拉取Github项目进行本地管理,可通过选择不同的版本控制方式进行clone项目
8.2 django后端获取代理池的ip
import requests
# 向这个地址发送请求,拿回一个代理
res = requests.get('http://192.168.1.252:5010/get/?type=http').json()['proxy']
# 使用代理
proxies = {
    'http': res,
}
respone = requests.get('http://www.cnblog.com/', proxies=proxies)
验证代理
# 我们自己写个后端,验证一下是否使用的是查询出来的代理
import requests
res = requests.get('http://192.168.1.252:5010/get/?type=http').json()['proxy']
# 使用代理
proxies = {
    'http': res,
}
print(proxies)
# 我们是http 要使用http的代理
respone = requests.get('http://139.155.203.196:8080/', proxies=proxies)
print(respone.text)


# 把django项目运行在公网上
1 settings中
    ALLOWED_HOSTS = ['*']
    # DATABASES = {
    #     'default': {
    #         'ENGINE': 'django.db.backends.sqlite3',
    #         'NAME': BASE_DIR / 'db.sqlite3',
    #     }
    # }
2 文件压缩待命
3 Xshell中输入命令:rz---> unzip ip_dom.zip ---> cd ip_dom/
    python3.9 manage.py runserver 0.0.0.0:8080  # 安全组记得打开


# 公网测试的django代码
from django.shortcuts import render, HttpResponse

def index(request):
    ip = request.META.get('REMOTE_ADDR')
    print(ip)
    return HttpResponse('您的ip是:%s' % ip)
8.3 爬取某视频网站
# https://www.pearvideo.com/

#  加载下一页的地址
https://www.pearvideo.com/category_loading.jsp?reqType=5&categoryId=1&start=0
import requests
import re

res = requests.get('https://www.pearvideo.com/category_loading.jsp?reqType=5&categoryId=1&start=0')

video_list = re.findall('<a href="(.*?)" class="vervideo-lilink actplay">', res.text)  # 用正则匹配a标签,获取地址
print(video_list)
for video in video_list:
    url = 'https://www.pearvideo.com/' + video
    header = {
        'Referer': url
    }

    video_id = video.split('_')[-1]
    video_url = 'https://www.pearvideo.com/videoStatus.jsp?contId=%s&mrd=0.8273125965736401' % video_id
    res1 = requests.get(video_url, headers=header).json()  # 真正能拿到视频的地址发送请求
    real_mp4_url = res1['videoInfo']['videos']['srcUrl']

    real_mp4_url = real_mp4_url.replace(real_mp4_url.split('/')[-1].split('-')[0], 'cont-%s' % video_id)
    print(real_mp4_url)
    res2 = requests.get(real_mp4_url)
    with open('./video/%s.mp4' % video, 'wb') as f:
        for line in res2.iter_content():
            f.write(line)


# ajax 请求拿回来的视频地址是:
# 能播放的地址:
# https://video.pearvideo.com/mp4/adshort/20181106/     1688703103822    -13189302_adpkg-ad_hd.mp4  # 不能的
# https://video.pearvideo.com/mp4/adshort/20181106/      cont-1470647     -13189302_adpkg-ad_hd.mp4 #能的

# url = 'https://video.pearvideo.com/mp4/adshort/20181106/1688703103822-13189302_adpkg-ad_hd.mp4'
作业:使用多线程(线程池),使用代理,爬视频

 浙公网安备 33010602011771号