
HP Notebook PCs - Updating the BIOS
HP Notebook PCs - Updating the BIOS
This document includes the steps for finding, downloading, and installing updates to BIOS (Basic Input Output System) or ROM (ROMPaq) for your HP or Compaq notebook computer.
NOTE:
The term "ROMPaq" refers to the BIOS for Compaq Presario computers prior to 2002.
Updating the BIOS, also known as "flashing the BIOS," replaces the BIOS firmware. When completed successfully, a BIOS update can fix or enhance aspects of a computer's performance, or provide support for newly installed hardware. However, if an incorrect update is installed or if the update process is interrupted, the motherboard can be permanently damaged, leaving the computer unable to boot. It is recommended to update your BIOS only if one or more of the following conditions apply:
-
The update fixes a problem with your computer.
-
The update enhances your computer's performance in a desired way.
-
You are planning to change the operating system, processor, or other feature(s), and the current BIOS version will not support the new configuration.
-
An HP Support Agent, or an HP support document, recommends that you download and install a specific updated BIOS.
Use one of the sets of steps below to update the BIOS in your computer.
CAUTION:
Only install BIOS updates from HP. Do not install BIOS updates from the motherboard manufacturer's website. Doing so might prevent the computer from accepting an HP System Recovery.
Updating the BIOS
Use the following steps to find and install an updated BIOS:
Before you begin updating the BIOS
The following tools and information are needed to perform the steps in this document and check for BIOS updates:
-
Product number
NOTE:
The product number is usually located on a sticker on the bottom of the computer. For help finding the product number, refer to the HP support document, How Do I Find My Model Number or Product Number?. -
An Internet connectionIf your computer does not have an Internet connection, use another computer with an Internet connection to download the update and save it to removable media (for example, a CD or thumb drive).
-
A printout of this document
-
Pencil and paper
Step 1: Finding the current BIOS version number
To find the current BIOS version on your computer, follow the steps below.
-
In Windows search for msinfo32.exe, and click msinfo32.exe in the list of results.
-
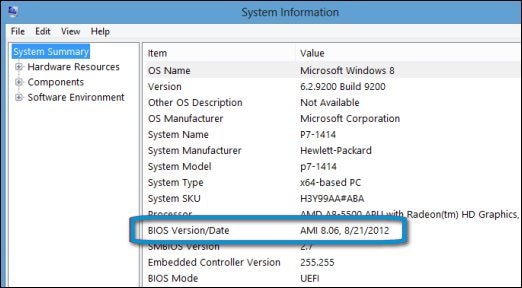
In the System Information window under the System Summary category, look for the BIOS Version/Date entry. This is your current BIOS version.Figure : System Information BIOS Version/Date
-
Write down the BIOS version and continue with the next section to find the processor type.
Step 2: Finding the processor type
Some computer models have more than one kind of processor over the course of their manufacturing lifetime. A different processor might require a different BIOS. Verify which processor is installed in your computer and compare it to the documentation in your BIOS download before installing the BIOS update.
To determine which processor is installed in your computer, follow the steps below.
- In Windows search for msinfo32.exe, and click msinfo32.exe in the list of results.
-
In the System Information window under the System Summary category, look for the Processor entry. This is the type of processor in your computer.Figure : System Information Processor entry

-
Write down the processor information. Take the time to ensure that the BIOS you are about to install is one meant to be used with your specific processor. Continue with finding and downloading BIOS updates.
Step 3: Finding and downloading BIOS updates
To find and download the BIOS updates for your computer, find the specific product number on your computer and follow these steps:
-
Go to the HP Software & Driver Downloads webpage.
-
Navigate to the product page for your computer model.For help finding the product number of your notebook, refer to the HP support document How Do I Find My Model Number or Product Number?
-
Select the operating system (such as Microsoft Windows 8.1 (64-bit)) your computer is running, and then click Submit.
NOTE:
If the operating system that you need is not listed, updates for your computer are not available from HP at this time. -
The webpage lists the available updates for your computer. If a BIOS category is listed, select BIOS.
-
If a BIOS category is not listed on the webpage, the original BIOS version already on the computer might be the latest available.
-
If the update is newer than your current BIOS version, choose the correct download for your processor and follow the on-screen instructions.
-
If the version of the listed BIOS is the same or older than the current BIOS on the computer, you may exit this procedure. The computer does not require a BIOS update at this time.
-
-
Click More details to view the overview, installation instructions, and system requirements for the BIOS update.It is important to read the Overview and System requirements sections to verify that the BIOS update applies to your computer. Installing a BIOS that is not designed for the processor or operating system in your computer could cause the computer to stop working.
-
Click Download, and when prompted, click Save as to save the file to a convenient location, such as your desktop.
CAUTION:
Do not select the option to Run a BIOS update over the network.The BIOS image is now saved to the computer. Continue to the next section to install the BIOS update.
Step 4: Installing the BIOS update
Once you have downloaded and saved the latest version of the BIOS to your computer, you will need to install the new BIOS image. Installing the BIOS update will take a few minutes. It is important to remain patient - do not interrupt the update process.
To install the BIOS update, follow the steps below.
-
Connect the AC power supply to the notebook. Do not disconnect the power supply during the BIOS update process.
-
Close any open programs and temporarily disable your antivirus software. Remember to re-enable the antivirus software after the installation is complete.
-
Locate the BIOS file (example filename: sp12345.exe) that you downloaded and saved to a convenient location on your computer.
-
Double-click the file to start the installation and follow the on-screen instructions.
-
Wait for the installation to complete, and then restart the computer when prompted.The latest version of the BIOS is now installed on the computer.
Updating the BIOS when Windows does not start (Windows 10, 8, 7)
Unified Extensible Firmware Interface (UEFI) is firmware code from a chip on your motherboard that provides extra functionality, beyond the Basic Input/Output System (BIOS). If your computer will not boot into Windows, and the computer features a UEFI Startup Menu, you can update the system BIOS using UEFI.
NOTE:
If your computer does not feature UEFI, update the BIOS using the other method described in this document.
Use the following steps to update the BIOS through the UEFI menu:
Before you begin updating the BIOS
The following tools and information are needed to perform the steps in this section:
-
Product number
NOTE:
The product number is usually located on a sticker on the bottom of the computer. For help finding the product number, refer to the HP support document, How Do I Find My Model Number or Product Number?. -
An Internet connectionIf your computer does not have an Internet connection, use another computer with an Internet connection to download the update and save it to removable media (for example, a CD or thumb drive).
-
A blank USB drive
Step 1: Finding and downloading BIOS updates
To find and download a BIOS updates for your computer, find the specific product number on your computer and follow these steps:
-
Connect a blank USB drive to the computer.
-
Go to the HP Software & Driver Downloads webpage.
-
Navigate to the product page for your computer model.For help finding the product number of your notebook, refer to the HP support document How Do I Find My Model Number or Product Number?
-
Select the operating system (such as Microsoft Windows 8.1 (64-bit)) your computer is running, and then click Submit.
-
The webpage lists the available updates for your computer. If a BIOS category is listed, click BIOS.
-
Click More details to view the overview, installation instructions, and system requirements for the BIOS update.It is important to read the Overview and System requirements sections to verify that the BIOS update applies to your computer. Installing a BIOS that is not designed for the processor or operating system in your computer could cause the computer to stop working.
-
Click the file name, and then click Run.
-
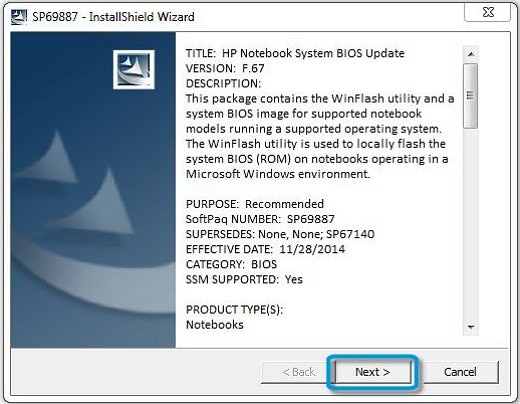
In the InstallShield Wizard window, click Next.Figure : InstallShield Wizard
-
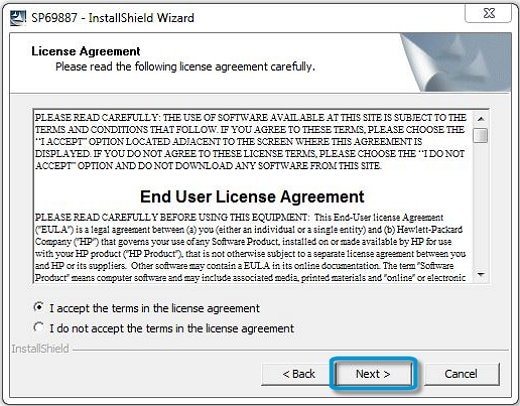
Select I accept the terms in the license agreement, and then click Next.Figure : End User License Agreement
-
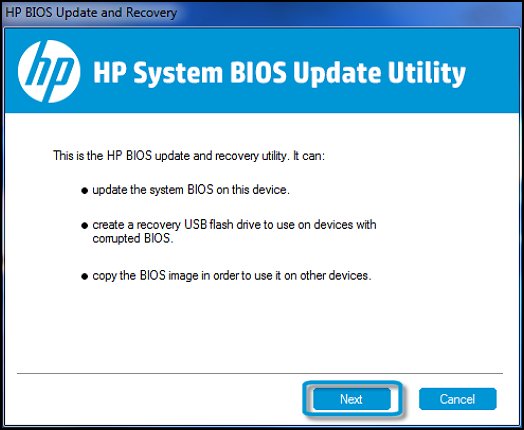
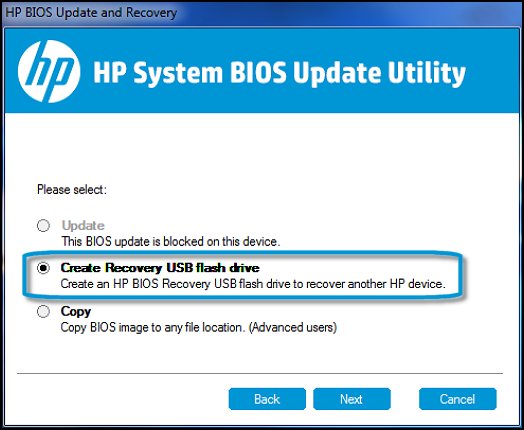
The HP System BIOS Update Utility opens. Click Next.Figure : HP System BIOS Update Utility
-
Select Create Recovery USB flash drive, and then click Next.Figure : Create Recovery USB flash drive
-
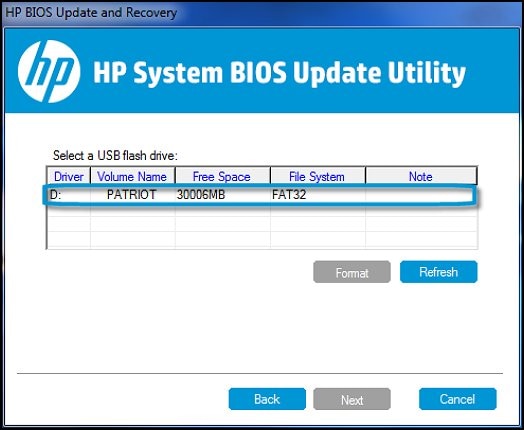
Select your USB drive in the list, and then click Next.Figure : USB flash drive
-
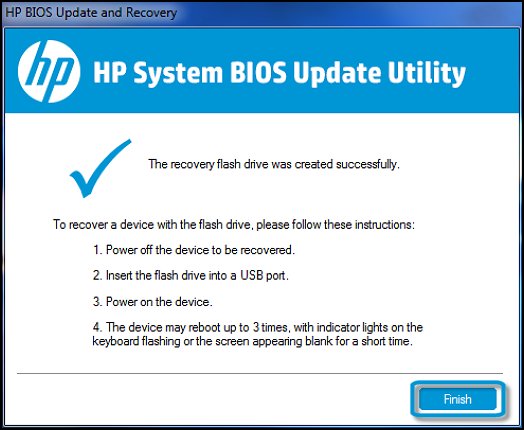
Wait while the BIOS files are copied to your USB drive. When the message The recovery flash drive was created successfully displays, clickFinish.Figure : The recovery flash drive was created successfully
-
Click Cancel to close the HP System BIOS Update Utility.The BIOS recovery USB drive is ready to use. Proceed to the next step.
Step 2: Finding the System Board ID in BIOS
You will need the notebook System Board ID to identify the correct BIOS file to install. Find the System Board ID on your notebook using the following steps:
-
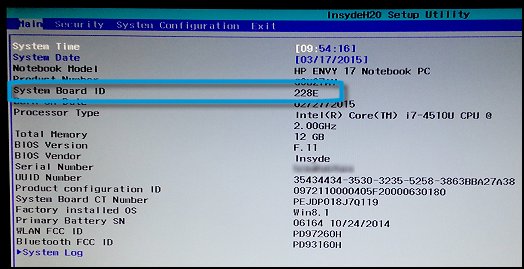
Turn on the computer and, while the display is blank, press the F10 key to enter the BIOS settings menu.
NOTE:
The BIOS settings menu is accessible by pressing the F2 or F6 key on some computers. -
On the Main tab, find the System Board ID, and write it down to reference during the BIOS update process.Figure : System Board ID
-
Press the F10 key to exit BIOS.
Step 3: Open the Hardware Diagnostics UEFI menu
Use the steps in one of the following sections to open the Hardware Diagnostics UEFI menu:
Step 4: Update the BIOS
With the Hardware Diagnostics UEFI menu open, use the following steps to update the BIOS:
-
Connect the AC power supply to the notebook. Do not disconnect the power supply during the BIOS update process.
-
Connect the USB drive that contains the BIOS file to the notebook.
-
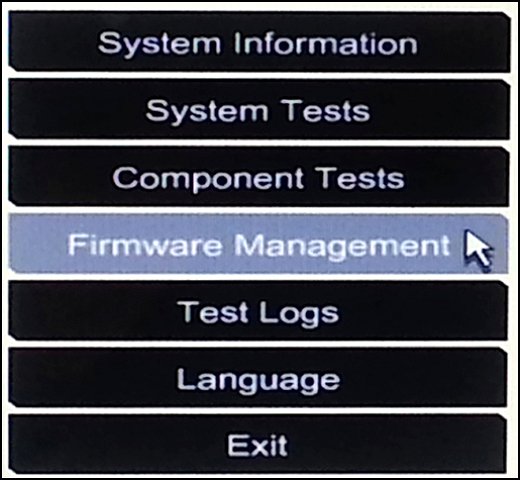
On the HP PC Hardware Diagnostics UEFI screen, click Firmware Management or BIOS Management.Figure : Firmware Management
-
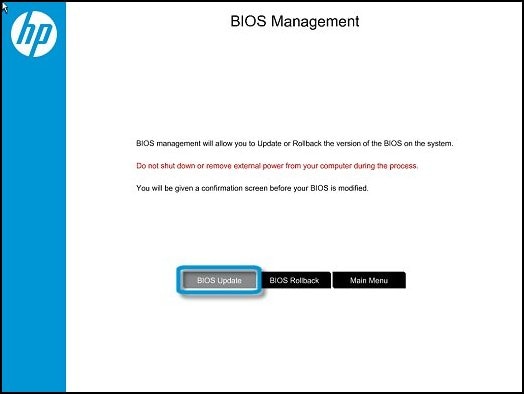
Click BIOS Update.Figure : BIOS Update
-
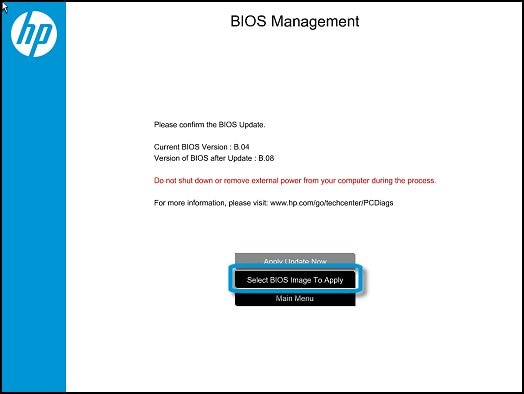
The BIOS Management screen shows the current BIOS version. Click Select BIOS Image To Apply.Figure : Select BIOS Image To Apply
-
Click HP_TOOLS, and then click HEWLETT_PACKARD.
-
Navigate to the BIOS image. The file is stored in a folder named either BIOSUpdate, CURRENT, NEW, or PREVIOUS.
-
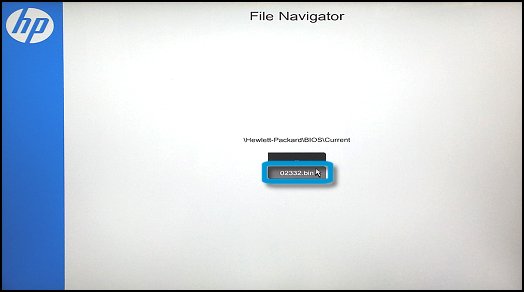
Select the BIOS update file that matches the System Board ID, with a "0" before the four-digit number (for example, if the System Board ID is 2291, select the 02291.bin file).Figure : BIOS update file selection
-
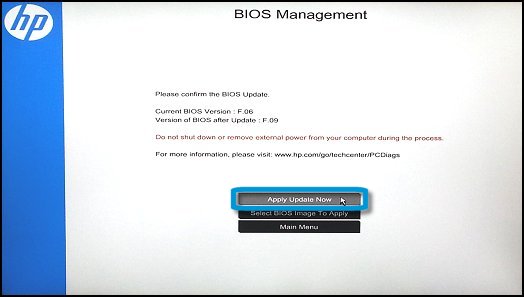
A confirmation screen displays the current BIOS version and the version of BIOS after the update. Click Apply Update Now to confirm and begin the update.Figure : Apply Update Now
-
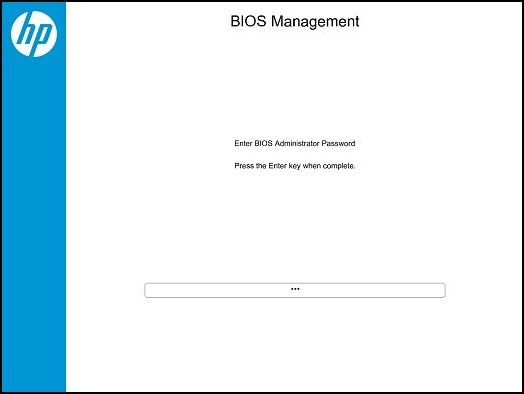
If the BIOS is locked with an administrator password, type the password, and then press Enter.Figure : Enter BIOS Administrator Password
-
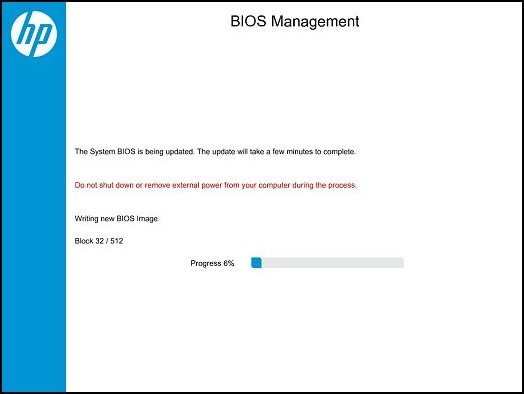
The BIOS Management screen shows the write and verify progress. Wait for the update to complete.Figure : Writing new BIOS Image progress
-
If the BIOS update is successful, a screen shows the completion status, and the system restarts automatically after 30 seconds. Do not attempt to turn off your computer while the system restarts.The BIOS update process is complete.Figure : System BIOS update is complete
 If the BIOS update fails, a failure screen displays, and the system restarts automatically after 30 seconds.Additional information about the failure is displayed if available. If the BIOS was written, the system will execute a BIOS recovery after a restart. Do not attempt to turn off your computer while the system restarts.Figure : System BIOS update failed
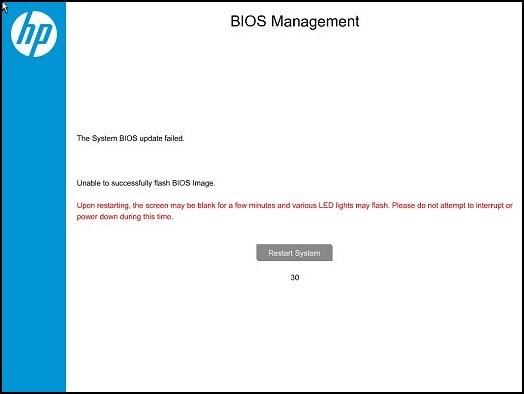

 浙公网安备 33010602011771号