

Linux useful commands
#update to ubuntu failure stay clean window
dev/sda1: clean, 552599/6111232 files, 7119295/24414464 blocks
fix : ctr + atl + F2 loginsudo apt-get install --reinstall ubuntu-desktop
#find the files and list the attributes
find / -iname 'list.txt' -exec ls -l {} +
#upgrade CMake
-
Check your current version with:
cmake --version -
Uninstall it with:
sudo apt remove cmake -
Visit https://cmake.org/download/ and download the latest bash script.
- In my case
cmake-3.6.2-Linux-x86_64.shis sufficient.
- In my case
-
Copy the script to
/opt/. -
Make the script executable:
chmod +x /opt/cmake-3.*your_version*.sh -
Change to desired installation directory (to
/opt/for example)- As of cmake 3.10.2 the installer no longer seems to install to
/optby default
- As of cmake 3.10.2 the installer no longer seems to install to
-
Run:
sudo bash /opt/cmake-3.*your_version*.shYou will need to press
ytwice. -
The script installs the binary to
/opt/cmake-3.*your_version*so in order to get thecmakecommand, make a symbolic link:sudo ln -s /opt/cmake-3.*your_version*/bin/* /usr/local/bin -
Test your results with:
cmake --version
#Could not get lock /var/lib/dpkg/lock-frontend - open (11: Resource temporarily unavailable)
This may happen if
-
'Synaptic Package Manager' or 'Software Updater' is open.
-
Some apt command is running in Terminal.
-
Some apt process is running in background.
For above wait for the process to complete. If this does not happen run in terminal:
sudo killall apt apt-get
If none of the above works, remove the lock files. Run in terminal:
sudo rm /var/lib/apt/lists/lock
sudo rm /var/cache/apt/archives/lock
sudo rm /var/lib/dpkg/lock*
then reconfigure the packages. Run in terminal:
sudo dpkg --configure -a
and
sudo apt update
That should do the job.
#ubuntu 18 cannot wake up
fix this problem:
sudo apt install gnome-screensaver#fix fsck error on boot: /dev/sda2: UNEXPECTED INCONSISTENCY; RUN fsck MANUALLY
in fix mode :
fsck /dev/sda2 -a
and then reboot, system shall be enabled to reboot now
after reboot, create a new terminal:
sudo apt-get update
there are errors, sudo ap-get clean
sudo apt-get update
sudo apt-get upgrade
#install package offline
sudo dpkg -i DEB_PACKAGE#cp basic commands
- prompt before override
cp -i a.file b.file
- force not override a file
cp -n a.file b.file
- create a symbolic file
cp -s a.file ~/desktop/
- overwrite only if source is newer than dest
cp -u a.file b.file
#enable middle mouse copy/paste
apt-get install gnome-tweak-tool
The default is ok, you can gnome-tweak to disable/enable it.
#dd command
# sudo dd if=/dev/sda of=/dev/sdb

create a image file from while disk
# sudo dd if=/dev/sda of=/home/username/sdadisk.img

create a image from a partition of disk
# sudo dd if=/dev/sda1 of=/home/username/sdadisk.img

wipe a disk
# sudo dd if=/dev/zero of=/dev/sda1
monitor the progress, sudo apt-get install pv
# sudo dd if=/dev/zero | pv | of=/dev/sda1

To a zip file
$ sudo dd if=/dev/sda bs=1M | gzip -c -9 > sda.dd.gz
#get the disk while re-install
The system is crash, need to reinstall ubuntu via usb. how to find the the old disk for backup.
sudo vgscan
sudo lvs
To get the vm disk
mount -t ext4 /dev/vm--xx /tmp/ddd#change the owner of folder & sub-folders
chown -R user /home/user#know which systemd services are enable
systemctl list-unit-files | grep enabled will list all enabled ones.
systemctl list-unit-files --state=enabled

#know the folder size
sudo du -shc /var/*

list the sizes of all sub-folders

# du -hs * | sort -hr
#ls /home very slow
that's because there is a net mount folder at /home
#get the versions of package
sudo apt-cache madison openssh-client
#install specific verison
sudo apt-get install openssh-client=1:6.6p1-2ubuntu1
#tee
The tee command basically reads from the standard input and writes to standard output and files. Following is the syntax of the command:
make 2>&1 | tee build.log
ping google.com | tee output.txt
#ubuntu18.4通过apt的方式更新cmake到最新版(ppa)
添加签名密钥
wget -O - https://apt.kitware.com/keys/kitware-archive-latest.asc 2>/dev/null | sudo apt-key add -
将存储库添加到您的源列表并进行更新
稳定版
sudo apt-add-repository 'deb https://apt.kitware.com/ubuntu/ bionic main'
sudo apt-get update

候选发布版本
sudo apt-add-repository 'deb https://apt.kitware.com/ubuntu/ bionic-rc main'
sudo apt-get update
#find the files and delete it
find /dir/to/search/ -name "filename" -exec rm -rf {} \;
#Install the linux header files
sudo apt-get install linux-headers-generic
or sudo apt-get install linux-headers-$(uname -r)
#list the install packages
apt list --installed
#find the binary files
find . -type f | perl -lne 'print if -B'
another method is grep
grep -r -I -L -Z . | xargs -0 ls -l
-L : list the binary file
-r : rescusive
-Z :printf NULl byte after filename
xargs: run command, here is 'ls -l'
-0 : is the parameter of xargs
#change a folder/file group and owner
sudo chgrp groupname foldername
sudo chown ownername foldername
#7zip and rar support
sudo apt-get install p7zip-full p7zip-rar#auto sudo password in shell
Here, the example below shows how to implement the auto password in shell script.
Echo yourpasswordhere | sudo -S insmod xxx.ko
#show the dependent libs
ldd theexefile
ldd prints the shared objects (shared libraries) required by each program or shared object specified on the command line.
#failure to install a package when sudo apt-get install 7zip-full
The error shows: The package segger-jlink-udev-rules needs to be reinstalled, but I can't find an archive for it
step1: backup the status file . sudo cp /var/lib/dpkg/status status.bkp
step2: sudo vim sudo cp /var/lib/dpkg/status, add remove the segger-jlink-udev-rules related full section.
#show system version
lsb_release -d
or cat /etc/issue
#show directory size
du -h
du : disk usage
#history
histoy to list the histoy commands
Ctrl+R: Recall the last command matching the characters you provide. Press this shortcut and start typing to search your bash history for a command. Ctrl+O: Run the command you found with Ctrl+R. Ctrl+G: Leave the history searching mode without running a command
#show the file path
find . -type f
other options can be : -type [bcdpflsD], d: is only directory
example:
./u-boot-imx_%.bbappend
./u-boot-imx/Kconfig.patch
./u-boot-imx/board/bosch/ulpanel/plugin.S
#list the file permission in number e.g. 666
stat -c "%a %n" *#compress a current date folder
DIR=$(date "+%Y%m%d")
tar -zcf $DIR.tar.gz $DIR
#change the real name of user
sudo chfn -f "FirstName LastName" *username*#backup file auto create sub folders
rsync -a -r ~/Documents/newsys/yocto/zeus/build/conf $DIR/
rsync -a -r ~/Documents/newsys/yocto/zeus/meta-ul_bsp $DIR/
#Putty
sudo apt-get install putty
after plug-in the imx6ullevk board to linux, the device is /dev/ttyUSB0
In my linux, I cannot open this device because I do not belong to ttyUSB0 groups (root dialout).
1)check the you belong. groups username
2)add to dialout group
>sudo usermod -a -G dialout zjb
or you can direct change the file : sudo vim /etc/group
3) you need restart or logout
#Quick copy the selected text as input in terminate
using middle button of mouse.
#Create a series of folder
install -d arch/arm/boot/dts
or mkdir -p arch/arm/boot/dts
tree .
.
└── arch
└── arm
└── boot
└── dts
#Info
Almost all the standard Linux programming tools (including ld, the linker; as, the assembler; and gprof, the profiler) come with useful Info pages.
e.g. info uname
#cat misc.
cat xxx | more
cat xxx | less
cat > xxx , create a file xxx
cat -n xxx | more with line number information.
cat aaa.txt >> bbb.txt, the aaa.txt will be appened to bbb.txt
#create a user belong to root group
>sudo su
>adduser yourname
>usermod -aG sudo username
>su - username
>sudo whoami
su : switch user
sudo : The sudo command allows you to run programs as another user, by default the root user. If you spend a lot of time on the command line, sudo is one of the commands that you will use quite frequently.
#get the user group
>groups
>id username
>who : determine the users logged on the machine
#using awk to get the device major number
in a shell file, to get the device major number
major =$(awk '/scull/ print {$1}' /proc/devices)
#tail a file with auto update when file change
tail -f /var/log/syslog
#makefile with detail commands infomation
make V = 1 , which will show the detailed commands
cmake -DCMAKE_VERBOSE_MAKEFILE:BOOL=ON .#To switch root user
sudo su switch to root user
using exit to go back to login user
#To check which driver is mounting for CD-ROM
just typeing mount in terminate
/dev/sda2 on / type ext4 (rw,errors=remount-ro)
proc on /proc type proc (rw,noexec,nosuid,nodev)
sysfs on /sys type sysfs (rw,noexec,nosuid,nodev)
none on /sys/fs/cgroup type tmpfs (rw)
none on /sys/fs/fuse/connections type fusectl (rw)
none on /sys/kernel/debug type debugfs (rw)
none on /sys/kernel/security type securityfs (rw)
none on /sys/firmware/efi/efivars type efivarfs (rw)
udev on /dev type devtmpfs (rw,mode=0755)
devpts on /dev/pts type devpts (rw,noexec,nosuid,gid=5,mode=0620)
tmpfs on /run type tmpfs (rw,noexec,nosuid,size=10%,mode=0755)
none on /run/lock type tmpfs (rw,noexec,nosuid,nodev,size=5242880)
none on /run/shm type tmpfs (rw,nosuid,nodev)
none on /run/user type tmpfs (rw,noexec,nosuid,nodev,size=104857600,mode=0755)
none on /sys/fs/pstore type pstore (rw)
/dev/sda1 on /boot/efi type vfat (rw)
binfmt_misc on /proc/sys/fs/binfmt_misc type binfmt_misc (rw,noexec,nosuid,nodev)
systemd on /sys/fs/cgroup/systemd type cgroup (rw,noexec,nosuid,nodev,none,name=systemd)
gvfsd-fuse on /run/user/1000/gvfs type fuse.gvfsd-fuse (rw,nosuid,nodev,user=zjb)
/dev/sr0 on /media/zjb/UDF Volume type udf (ro,nosuid,nodev,uid=1000,gid=1000,iocharset=utf8,umask=0077,uhelper=udisks2)
#To create ISO from CD-ROM
dd if=source of=destination
example, dd if=/dev/sr0 of=windows.iso
#To create ISO from folder
apt-get install genisoimage
genisoimage -o output_image.iso -J -R -l directory_name
-J -R -l is to keep the original filename
#To install .deb file
sudo dpkg -i /path/to/deb/file
sudo apt install ./name.deb
#source bash_file
source is a Unix command that evaluates the file following the command, as a list of commands, executed in the current context
#lz4c not found
apt-get install liblz4-tool
#mkfs.ubifs not found
apt-get install mtd-utils
#Installing the ncurses library which may used in make menuconfig
libncurses5-dev : Developer’s libraries for ncurses
libncursesw5-dev : Developer’s libraries for ncursesw
#tree list the folder/file in a tree way
tree -d directory only
tree -d -f full file.
#.bashrc
.bashrc文件主要保存个人的一些个性化设置,如命令别名、路径等。
.bash_profile'只在会话开始时被读取一次,而'.bashrc'则每次打开新的终端时,都要被读取。
要定义一个全局变量,使在以后打开的终端中生效,您需要将局部变量输出(export),可以用"export"命令:
export PATH=$PATH:/some/directory
#set the PATH temprary
export PATH=$PATH:/some/directory
#print the PATH
echo $PATH
#find which shell used
echo $0
#get the inserted disk or sd card
sudo fdisk -l
or using
lsblk
so you can find the usb device is on media/xxxx, you can visit by cd media/xxx
#generate the patch file
e.g. diff -Nupr --no-dereference xyssl-0.8/ xyssl-0.8-dll/ >xyssl.patch
#find a file
find . -name xxx.file
#grep a word
grep [options] pattern [files]

grep yocto readme.txt, search yocto in readme.txt file
grep 'yocto\|org' readme.txt , search yocto or org in readme.txt file
ps -aux | grep timer, only list the timer process in ps output
example below..
grep -rnw '/path/to/somewhere/' -e 'pattern'-ror-Ris recursive,-nis line number, and-wstands for match the whole word.-l(lower-case L) can be added to just give the file name of matching files.
Along with these, --exclude, --include, --exclude-dir flags could be used for efficient searching:
-
This will only search through those files which have .c or .h extensions:
grep --include=\*.{c,h} -rnw '/path/to/somewhere/' -e "pattern" -
This will exclude searching all the files ending with .o extension:
grep --exclude=*.o -rnw '/path/to/somewhere/' -e "pattern" -
For directories it's possible to exclude a particular directory(ies) through
--exclude-dirparameter. For example, this will exclude the dirs dir1/, dir2/ and all of them matching *.dst/:grep --exclude-dir={dir1,dir2,*.dst} -rnw '/path/to/somewhere/' -e "pattern"
This works very well for me, to achieve almost the same purpose like yours.
For more options check man grep.
#Linux 下计算代码行数的工具
cloc
#source and .
you can replace the first . as source, example . ./oe-init-build-env, you can run as : source ./oe-init-build-env,
source is a shell built-in command which is used to read and execute the content of a file(generally set of commands), passed as an argument in the current shell script. It has a synonym in .
#using samba to visit network driver
1) Install cifs tool:
sudo apt-get install cifs-utils
2) Create the local folder for mount (I would recommend you not to create these folder directly under your home directory, because it cause it slowly to every time you open your home directory)
~$ mkdir ~/RND-tool
3) create the credentials
~$ gedit ~/.smbcredentials
4) Add the following content to it (not include ‘[‘&’]’):
username=[ user name]
password=[password]
Save the file
1) Change the permission:
~$ chmod 600 ~/.smbcredentials
2) Edit /etc/fstab
~$ sudo gedit /etc/fstab
3) add the following content: network disk folder
//10.54.128.19/folder$ /home/[your ubuntu user name]/RND-tool cifs uid=[your ubuntu user id],gid=[your ubuntu user group id],credentials=/home/[your ubuntu user name]/.smbcredentials,iocharset=utf8,sec=ntlm,noserverino 0 0
Save the file and,
**** in unbutun 18.04.
//10.54.128.19/folder$ /home/[your ubuntu user name]/RND-tool cifs uid=[your ubuntu user id],gid=[your ubuntu user group id],credentials=/home/[your ubuntu user name]/.smbcredentials ,iocharset=utf8 0 0
Restart Ubuntu to test R disk if works.
4) ~$ sudo mount –a
If the last step is failed, don’t worry, just reboot system, and then it will works if previous operations are correct. Now you can access network disk.
Note: mount -a is to mount all stuff from /etc/fstab
This command can be tested in terminal before fstab.
sudo mount //10.54.128.19/folder$ /home/[your ubuntu user name]/RND-tool -t cifs -o uid=[your ubuntu user id],gid=[your ubuntu user group id],credentials=/home/[your ubuntu user name]/.smbcredentials ,iocharset=utf8
sudo umount RND-tool
#Shell file Error
Syntax error: end of file unexpected (expecting "then")
The problem is the shell file is windows format, so cover to unix format.
#Find the location of program
which xxx
dpkg -listfiles xxx
#type to know the command
type -a xx
examples:
type -a ls
type -a cd
cd is a shell buildin
#Show system information
uname -a, will show all information of system
#file redirection
">" is the output redirection in linux command
e.g. ls -l >abc.txt, the ls output will be in abc.txt, the abc.txt will be overried.
e.g. ls -l >>abc.txt same as before but the abc.txt will not be overrided.
e.g. ls -l >abc.txt 2>&1, here 2 is stderr, redirect the stderr to abc.txt
also "<" is input redirection.
#get the last command return value
echo $?
#ipcs/ipcrm
ipcs lists the system interprocess communication, incl. share memory, queue, semphore.
ipcrm remove a IPC e.g. share memory .
#mount
mount [-t vfstype] [-o options] device directory
e.g. mount -t ext4 /dev/mmcblk0p1 /mnt
#chmod
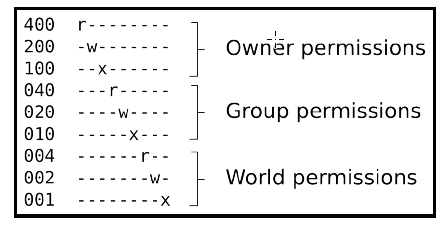
e.g. chmod 777 abc 7 = 4+2+1
#Change password
- Open the terminal application by pressing Ctrl + Alt + T
- To change a password for user named tom in Ubuntu, type:
- sudo passwd tom
- To change a password for root user on Ubuntu Linux, run:
- sudo passwd root
- And to change your own password for Ubuntu, execute:
- passwd


 浙公网安备 33010602011771号