《Spring实战》学习笔记(4)——面向切面的Spring
这章学习Spring第二个重要的知识点:AOP。
本章知识点:
- 面向切面编程的基本原理
- 通过POJO创建切面
- 使用@AspectJ注解
- 为AspectJ切面注入依赖
一、什么是面向切面编程
切面能帮助我们模块化横切关注点(影响应用的多处功能)。使用面向切面编程时,可以通过声明的方式定义通过功能以何种方式,在何处调用,且无需修改受影响的类。
1. AOP术语
- 横切关注点:影响应用的多处功能。
- 切面:横切关注点可以被模块化为特殊的类,这些类叫切面。切面是通知和切点的集合,定义了切面它是什么,何时,何处完成其功能。
- 通知:切面的工作。
- 连接点:Spring应用中有许多时机去使用通知,这些时机成为连接点。连接点是应用执行过程中能插入切面的一个点。
- 切点:影响应用的多处功能。
- 引入:向现有的类添加新方法或属性。
- 织入:把切面应用到目标对象并创建新的代理对象的过程。
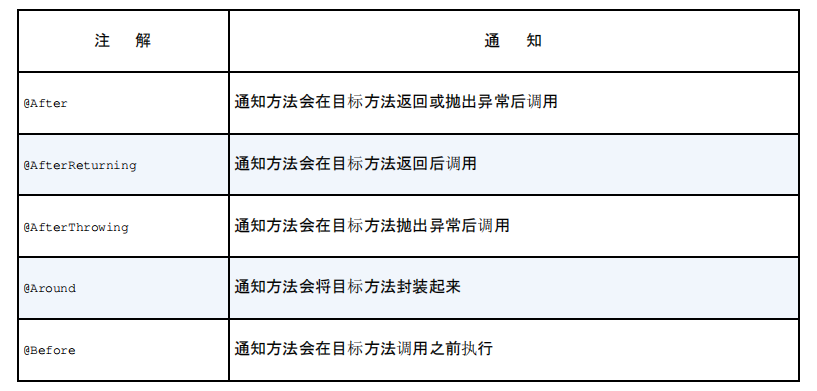
切面可以使用五种类型的通知:
- 前置通知(Before):在目标方法被调用前调用通知。
- 后置通知(After):在目标方法被调用后调用通知。
- 返回通知(After-returning):在目标方法成功执行后调用通知。
- 异常通知(After-throwing):在目标方法抛出异常后调用通知
- 环绕通知(Around):通知包裹被通知的方法,在被通知的方法调用前和调用后执行自定义行为。
2. Spring对AOP的支持
Spring提供了4中类型的AOP支持:
- 基于代理的经典Spring AOP
- 纯POJO切面
- @AspectJ注解驱动的切面
- 注入式AspectJ切面
关于AOP框架的一些知识:
Spring通知是Java编写的。
Spring在运行时通知对象。
通过在代理类中包裹切面,Spring在运行期间把切面织入到Spring管理的bean中。
Spring只支持方法级别的连接点。
二、通过切点来选择连接点
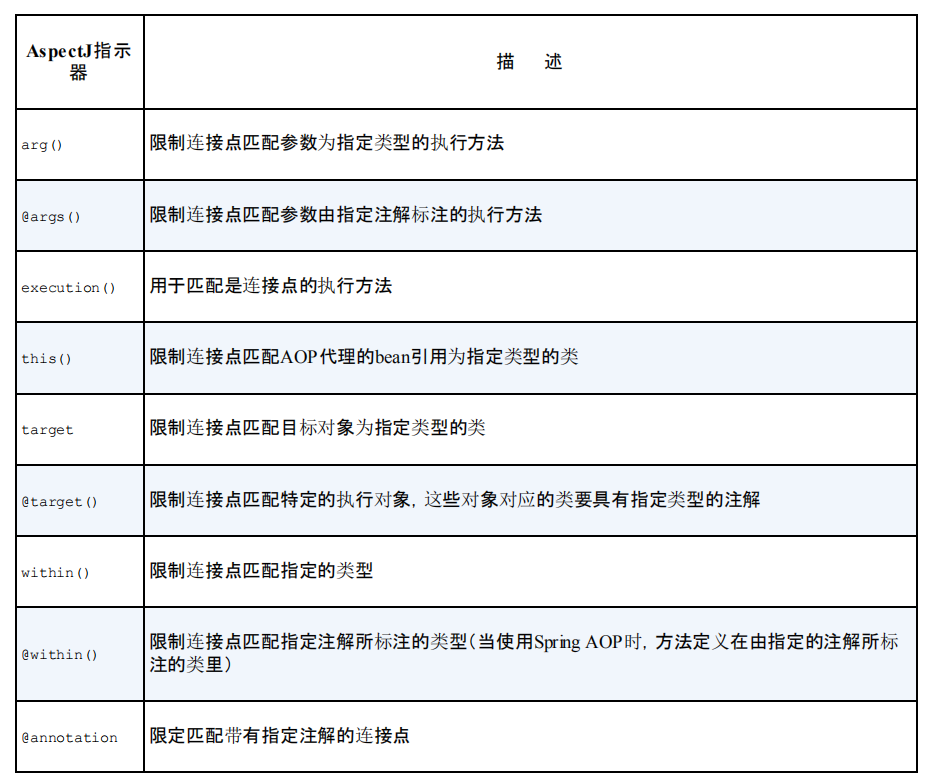
在Spring AOP中,要使用AspectJ的切点表达式语言来定义切点。下面是Spring AOP支持的切点指示器。
1. 编写切点
我们依旧使用之前的例子,借口Hero,killEnemy方法在英雄击杀敌人时调用。
public interface Hero {
    void killEnemy();
}
下面为一个切点表达式
execution(* chapterfour.hero.Hero.killEnemy(..))
- execution():在方法执行时触发
- *:返回任意类型
- chapterfour.hero.Hero:方法所属的类
- killEnemy:触发通知的方法
- (..)中的‘..’:使用任意参数
如果我们想配置的切点仅匹配chapterfour包,可用within()指示器限制匹配:
execution(* chapterfour.hero.Hero.killEnemy(..)) && within(chapterfour.*)
类似的,我们也可以用“||”,“!” 这样的逻辑运算符。
2. 在切点中选择bean
execution(* chapterfour.hero.Hero.killEnemy(..)) && bean('adHero')
我们使用bean('beanID')这种方式来限制切点只匹配特定的bean。
三、使用注解创建切面
1. 定义切面
我们定义一场比赛新闻的切面:
@Aspect
public class GameBroadcast {
    @Before("execution(* chapterfour.hero.Hero.killEnemy(..))")
    public void lockEnemy(){
        System.out.println("英雄锁定目标敌人");
    }

    @Before("execution(* chapterfour.hero.Hero.killEnemy(..))")
    public void beforeKill(){
        System.out.println("英雄击杀敌人前");
    }

    @AfterReturning("execution(* chapterfour.hero.Hero.killEnemy(..))")
    public void afterKill(){
        System.out.println("英雄击杀敌人后");
    }

    @AfterThrowing("execution(* chapterfour.hero.Hero.killEnemy(..))")
    public void heroDead(){
        System.out.println("英雄阵亡");
    }
}
使用@Aspect注解,表明该类是一个切面。
有5个注解来定义通知:
我们可以看到,上面例子中,同样的切点表达式,我们重复了四次,有没有办法只定义一次然后重复利用呢?
@Aspect
public class GameBroadcast {
    @Pointcut("execution(* chapterfour.hero.Hero.killEnemy(..))")
    public void broadcast() {

    }

    @Before("broadcast()")
    public void lockEnemy() {
        System.out.println("英雄锁定目标敌人");
    }

    @Before("broadcast()")
    public void beforeKill() {
        System.out.println("英雄击杀敌人前");
    }

    @AfterReturning("broadcast()")
    public void afterKill() {
        System.out.println("英雄击杀敌人后");
    }

    @AfterThrowing("broadcast()")
    public void heroDead() {
        System.out.println("英雄阵亡");
    }
}
在方法上使用@Pointcut注解,参数为切点表达式。之后便可以将相同的切点表达式替换为方法名。broadcast()方法本身内容应该为空,因为它的内容不重要,只是一个标识而已。
GameBroadcast类是一个切面,而且他依旧是一个POJO,可以想其他Java类一样,调用它的方法,也可以作为bean进行装配。
上面例子只是定义了切面,但就像之前学习自动扫描与自动装配时,@Component与@ComponentScan要搭配使用一样。在这里,只有@Aspect注解,Spring是不会认为这是切面的,还需要我们去启动切面自动代理。
@Configuration
@EnableAspectJAutoProxy
@ComponentScan
public class HeroConfig {
   @Bean
    public GameBroadcast gameBroadcast(){
        return new GameBroadcast();
    }
}
使用@EnableAspectJAutoProxy注解启用AspecJ自动代理。
在XML中的写法:
<context:component-scan base-package="chapterfour" />
<aop:aspectJ-autoproxy />
<bean class="chapterfour.hero.GameBroadcast" />
AspectJ自动代理会为使用@Aspect注解的bean创建一个代理。
测试一下:
@Configuration
@EnableAspectJAutoProxy
@ComponentScan(value="chapterfour")
public class HeroConfig {
    @Bean
    public GameBroadcast gameBroadcast(){
        return new GameBroadcast();
    }
}
@RunWith(SpringJUnit4ClassRunner.class)
@ContextConfiguration(classes = HeroConfig.class)
public class HeroTest {
    @Autowired
    private Hero adHero;

    @Autowired
    private GameBroadcast gameBroadcast;

    @Test
    public void testAOP() {
        adHero.killEnemy();
    }
}
其中,GameBroadcast 也可以使用自动装配的方式,将HeroConfig改为:
@Configuration
@EnableAspectJAutoProxy
@ComponentScan(value="chapterfour")
public class HeroConfig {
}
然后在切面上加上@Component注解。两种装配方式都可以,但一定要为切面创建bean,否则切面则不会生效。
输出结果:
英雄击杀敌人前
英雄锁定目标敌人
炮车兵被击杀
英雄击杀敌人后
2. 使用环绕通知
我们将上一小节的例子改为环绕通知:
@Aspect
public class GameBroadcast {
    @Pointcut("execution(* chapterfour.hero.Hero.killEnemy(..))")
    public void broadcast() {

    }

    @Around("broadcast()")
    public void aroundGame(ProceedingJoinPoint joinPoint) {
        try {
            System.out.println("英雄击杀敌人前");
            System.out.println("英雄锁定目标敌人");
            joinPoint.proceed();
            System.out.println("英雄击杀敌人后");
        } catch (Throwable e) {
            System.out.println("英雄阵亡");
        }
    }
}
@Around注解表明aroundGame方法会作为broadcast()切点的环绕通知。
我们在aroundGame中接收了ProceedingJoinPoint类型的参数,这个对象是必须的,因为我们需要在环绕通知中去调用被通知的方法。利用环绕通知,我们将之前四个通知合成了一个。
注意:如果我们不调用proceed()方法的话,那么这个通知就会阻塞被通知的方法的调用。
3. 处理通知中的参数
前几个例子中的切面都很简单,没有参数。如果切面通知的方法中有参数怎么办呢?
我们为Hero接口增加一个购买装备的方法:
public interface Hero {
    void killEnemy();

    void buy(String equip);
}
ADHero中实现buy()方法:
@Component
public class ADHero implements Hero {
    @Autowired
    private Enemy enemy;

    private List<String> equipList = new ArrayList<>();

    public void killEnemy() {
        enemy.dead();
    }

    @Override
    public void buy(String equip) {
        this.equipList.add(equip);
    }
}
接着我们修改切面:
@Aspect
public class GameBroadcast {

    @Pointcut("execution(* chapterfour.hero.Hero.buy(String)) && args(equip)")
    public void broadcast(String equip) {

    }

    @AfterReturning("broadcast(equip)")
    public void afterBuy(String equip) {
        System.out.println("英雄购买了装备:"+ equip);
    }
}
测试一下:
@RunWith(SpringJUnit4ClassRunner.class)
@ContextConfiguration(classes = HeroConfig.class)
public class HeroTest {
    @Autowired
    private Hero adHero;

    @Autowired
    private GameBroadcast gameBroadcast;

    @Test
    public void testAOP() {
        adHero.buy("无尽之刃");
    }
}
输出:
英雄购买了装备:无尽之刃
分析一下表达式:
execution(* chapterfour.hero.Hero.buy(String)) && args(equip)
- *:返回任意类型
- chapterfour.hero.Hero:方法所在类
- buy:方法
- String:方法接收String类型的参数
- args(equip):指定参数,与buy方法中的参数相匹配
4. 通过注解引入新功能
我们增加一个技能接口,接口中有回城方法:
public interface Skill {
    void backCity();
}
它的实现类如下:
public class SkillImpl implements Skill{
    @Override
    public void backCity() {
        System.out.println("英雄回城了");
    }
}
我们想要Hero有回城的能力,但又不想让Hero实现Skill接口,有没有其他方法呢?我们可以使用AOP去为bean引入新的方法。
创建一个新的切面:
@Aspect
public class SkillIntorducer {
    @DeclareParents(value = "chapterfour.hero.Hero+",defaultImpl = SkillImpl.class)
    public static Skill skill;
}
这个切面不同于之前的切面,有各种通知,这个切面的作用是将Skill接口引入到Hero的bean中。
分析一下 @DeclareParents(value = "chapterfour.hero.Hero+",defaultImpl = SkillImpl.class):
- value:指定为哪种类型的bean引入新接口。“+”代表是Hero的所有子类型,而不是Hero本身。
- defaultImpl:指定需要引入的新接口的实现类。
- @DeclareParents:该注解标注的静态属性就是要引入的接口。
与之前定义切面一样,我们也需要为SkillIntorducer这个切面声明为一个bean:
@Configuration
@EnableAspectJAutoProxy
@ComponentScan(value="chapterfour")
public class HeroConfig {
    @Bean
    public GameBroadcast gameBroadcast(){
        return new GameBroadcast();
    }

    @Bean
    public SkillIntorducer skillIntorducer(){
        return new SkillIntorducer();
    }
}
测试一下:
@RunWith(SpringJUnit4ClassRunner.class)
@ContextConfiguration(classes = HeroConfig.class)
public class HeroTest {
    @Autowired
    private Hero adHero;

    @Autowired
    private GameBroadcast gameBroadcast;

    @Test
    public void testAOP() {
        adHero.buy("无尽之刃");
        Skill adHero = (Skill) this.adHero;
        adHero.backCity();
    }
}
输出结果:
英雄购买了装备:无尽之刃
英雄回城了
注意:我们虽然为Hero引入了接口Skill,但我们调用Skill接口的backCity方法前,需要将adHero转换为Skill类型以绕过语法检查。
四、在XML中声明切面
我们的原则是基于注解的配置优于基于Java的配置,基于Java的配置优于基于XML的配置。但有时不能为通知添加注解,就只能使用XML配置了。
1. 声明前置通知和后置通知
我们将最开始的切面例子上的注解全部拿掉:
public class GameBroadcast {

    public void lockEnemy() {
        System.out.println("英雄锁定目标敌人");
    }


    public void beforeKill() {
        System.out.println("英雄击杀敌人前");
    }


    public void afterKill() {
        System.out.println("英雄击杀敌人后");
    }


    public void heroDead() {
        System.out.println("英雄阵亡");
    }

}
现在它变成了一个简单的Java类,但是它依然具有成为AOP通知的潜质,只需要在XML中进行一些配置。
<bean id="gameBroadcast" class="chapterfour.hero.GameBroadcast"/>

    <aop:config>
        <!--   引用gameBroadcast bean     -->
        <aop:aspect ref="gameBroadcast">
            <aop:before pointcut="execution(* chapterfour.hero.Hero.killEnemy(..))" method="beforeKill"/>
            <aop:before pointcut="execution(* chapterfour.hero.Hero.killEnemy(..))" method="lockEnemy"/>
            <aop:after-returning pointcut="execution(* chapterfour.hero.Hero.killEnemy(..))" method="afterKill"/>
            <aop:after-throwing pointcut="execution(* chapterfour.hero.Hero.killEnemy(..))" method="heroDead"/>
        </aop:aspect>
    </aop:config>
这段代码和使用注解方式实现的功能是一样的,看元素的名称就可以理解各个通知的功能,不再加以解释。
2. 声明环绕通知
public class GameBroadcast {
    public void aroundGame(ProceedingJoinPoint joinPoint) {
        try {
            System.out.println("英雄击杀敌人前");
            System.out.println("英雄锁定目标敌人");
            joinPoint.proceed();
            System.out.println("英雄击杀敌人后");
        } catch (Throwable e) {
            System.out.println("英雄阵亡");
        }
    }
}
 <bean id="gameBroadcast" class="chapterfour.hero.GameBroadcast"/>

    <aop:config>
        <!--   引用gameBroadcast bean     -->
        <aop:aspect ref="gameBroadcast">
            <aop:pointcut id="killPoint" expression="execution(* chapterfour.hero.Hero.killEnemy(..))"/>
            <aop:around pointcut-ref="killPoint" method="aroundGame"/>
        </aop:aspect>
    </aop:config>
3. 为通知传递参数
public class GameBroadcast {
    public void afterBuy(String equip) {
        System.out.println("英雄购买了装备:"+ equip);
    }
}
<bean id="gameBroadcast" class="chapterfour.hero.GameBroadcast"/>

    <aop:config>
        <!--   引用gameBroadcast bean     -->
        <aop:aspect ref="gameBroadcast">
            <aop:pointcut id="broadcast" expression="execution(* chapterfour.hero.Hero.buy(String)) and args(equip)"/>
            <aop:after-returning pointcut-ref="broadcast" method="afterBuy"/>
        </aop:aspect>
    </aop:config>
4. 通过切面引入新的功能
 <bean id="gameBroadcast" class="chapterfour.hero.GameBroadcast"/>
 <bean id="skillIntorducer" class="chapterfour.hero.SkillIntorducer"/>

    <aop:config>
        <aop:aspect>
            <aop:declare-parents types-matching="chapterfour.hero.Hero+" implement-interface="chapterfour.hero.Skill" default-impl="chapterfour.hero.SkillImpl" />
        </aop:aspect>
    </aop:config>
五、注入AspectJ切面
创建一个评论员切面(创建Aspect文件):
public aspect Commentator {

    pointcut commentKill(): execution(* chapterfour.hero.Hero.killEnemy(..));

    after() returning: commentKill(){
        System.out.println("一次完美的击杀");
    }
}
通过aspectOf()工厂方法获得切面的引用:
<bean class="chapterfour.hero.Commentator" factory-method="aspectOf" />

 浙公网安备 33010602011771号