RocketMQ学习笔记-消息存储
RocketMQ学习笔记-消息存储
一、前言
RocketMQ主要存储的文件包括Commitlog文件、ConsumeQueue文件、IndexFile文件。其中,所有主题的消息都存储在Commitlog文件中;为了便于根据主题检索消息,引入了ConsumerQueue消息队列文件;为了加速具体消息的检索性能,根据消息的属性(key)快速从Commitlog文件中检索消息,引入了IndexFile文件。首先,我们要关注数据流向。
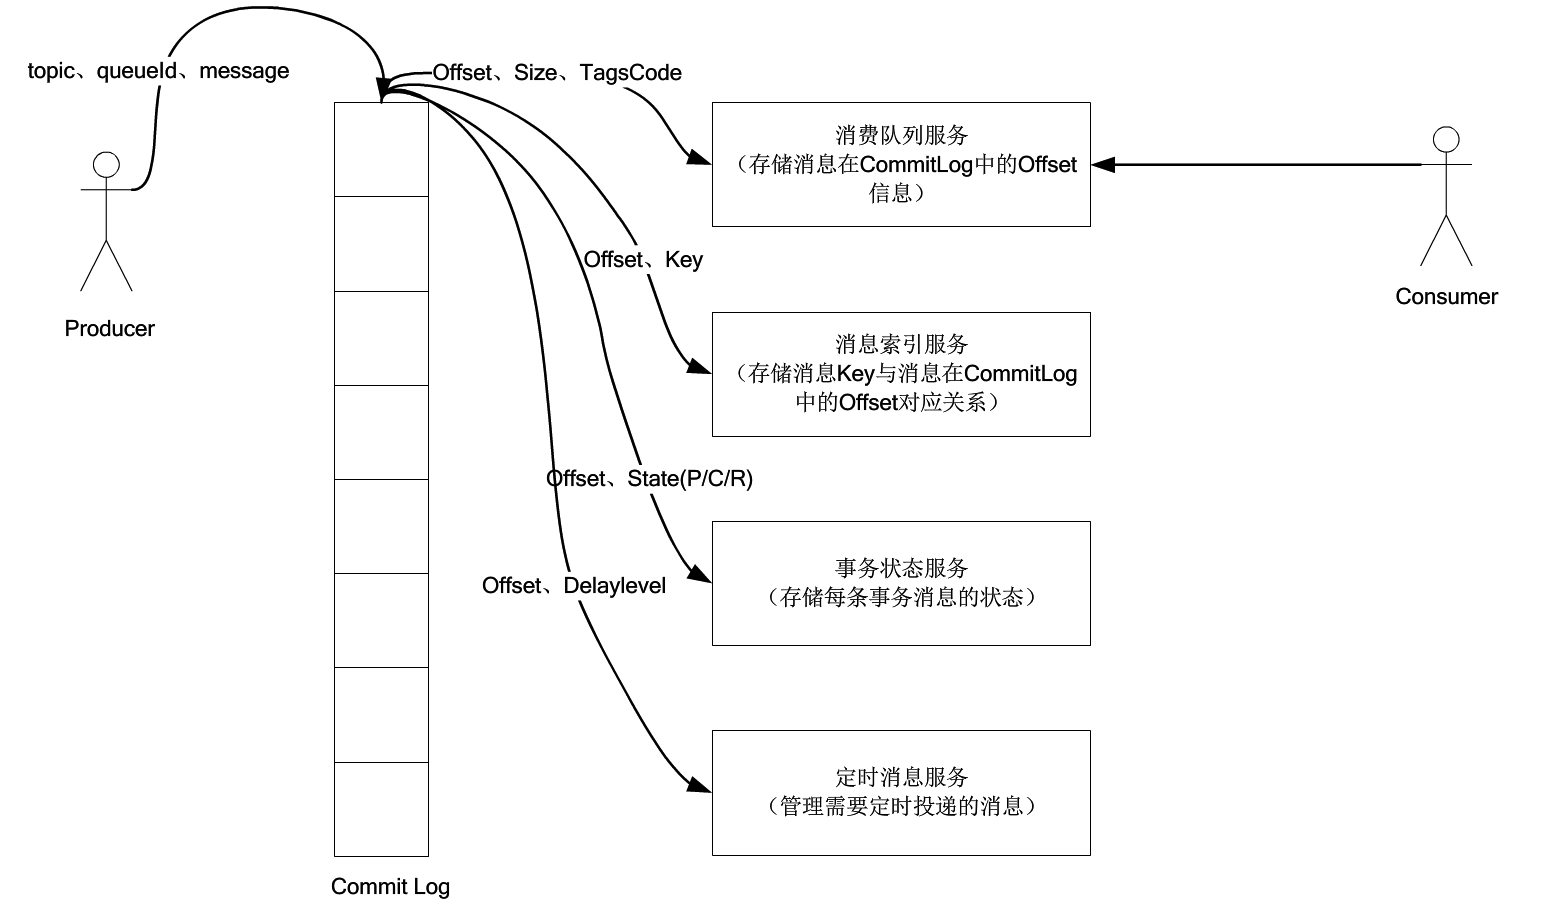
图片引用自《RocketMQ学习》
- CommitLog:消息存储文件,所有主题的消息都存储在CommitLog文件中。
- ConsumeQueue:消息消费队列,消息到达CommitLog文件后,将异步转发到消息消费队列,供消息消费者消费。
- IndexFile:消息索引文件,主要存储Key和Offset的对应关系。
- 事务状态服务:存储每条消息的事务状态。(这块与后面事务一起填坑)
- 定时消息服务:每一个延迟级别对应一个消息消费队列,存储延迟队列的消息拉取进去。(RocketMQ共有18种延迟级别,也就预设置了18个队列,值为0则表示没有延迟)
此外,本文也会剖析RocketMQ是如何提高IO访问性能的,比如刷盘机制。
二、消息存储
2.1 存储文件
RocketMQ存储路径为${ROCKET_HOME}/stroe,主要存储文件如下图所示。
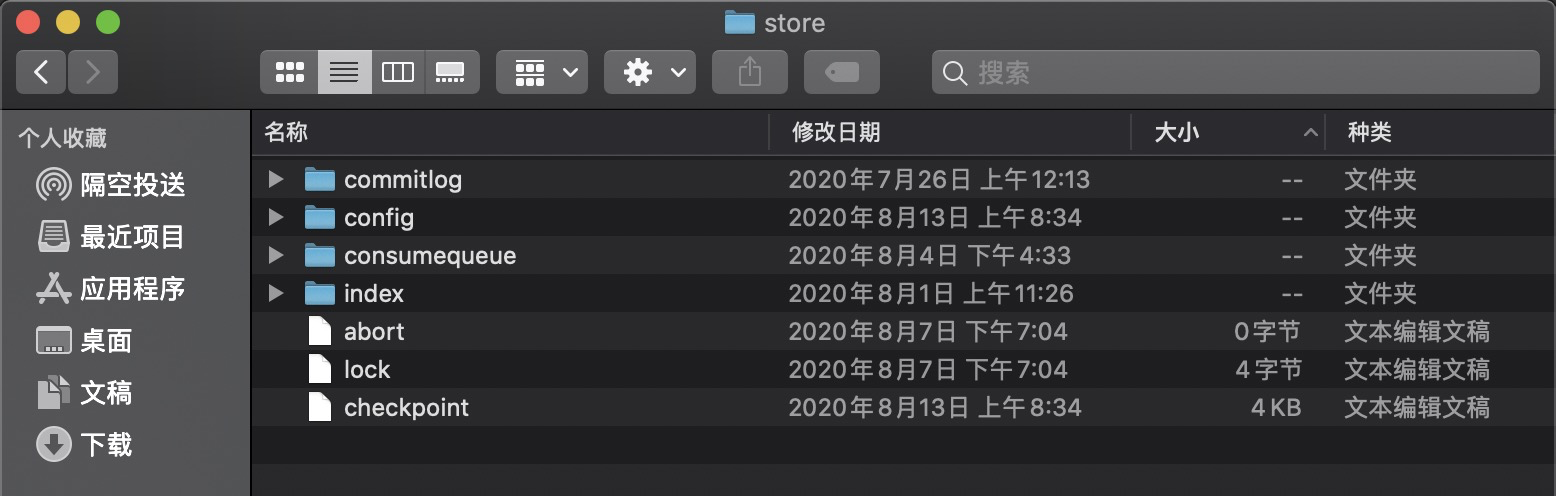
先说一部分:
- config:运行期间一些配置信息。
- abort:如果存在abort文件说明Broker非正常关闭,该文件默认启动时创建,正常退出之前删除。
- checkpoint:文件检索点,存储commitlog文件最后一次刷盘时间戳、consumequeue最后一次刷盘时间、index索引文件最后一次刷盘时间戳。
剩下的一一介绍。
2.1.1 CommitLog文件
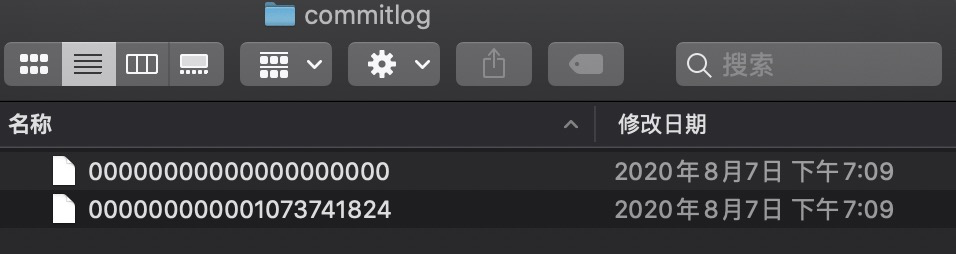
该目录下的文件是用于存储消息,所有接受的消息按照顺序写入到文件中,CommitLog文件默认大小为1G,也可以通过配置属性来改变默认大小。
无论是CommitLog、ConsumeQueue还是IndexFile,单个文件都是固定长度的,如果一个文件写满后再创建一个新的文件,文件名就为该文件的第一条消息对应的全局物理偏移量。CommitLog文件组织如下所示。
每个CommitLog文件是固定大小的,但里面存储的每一条消息长度不相同,CommitLog文件存储的逻辑视图如下图所示。

每条消息的前面4个字节存储该条消息的总长度。
2.1.2 ConsumeQueue文件
RocketMQ基于主题订阅模式实现消息消费,消费者关心的是自己订阅主题下的所有消息,而CommitLog文件存储了所有主题消息,如果消费者直接从CommitLog文件中遍历查找订阅主题下的消息,效率会极其低下。
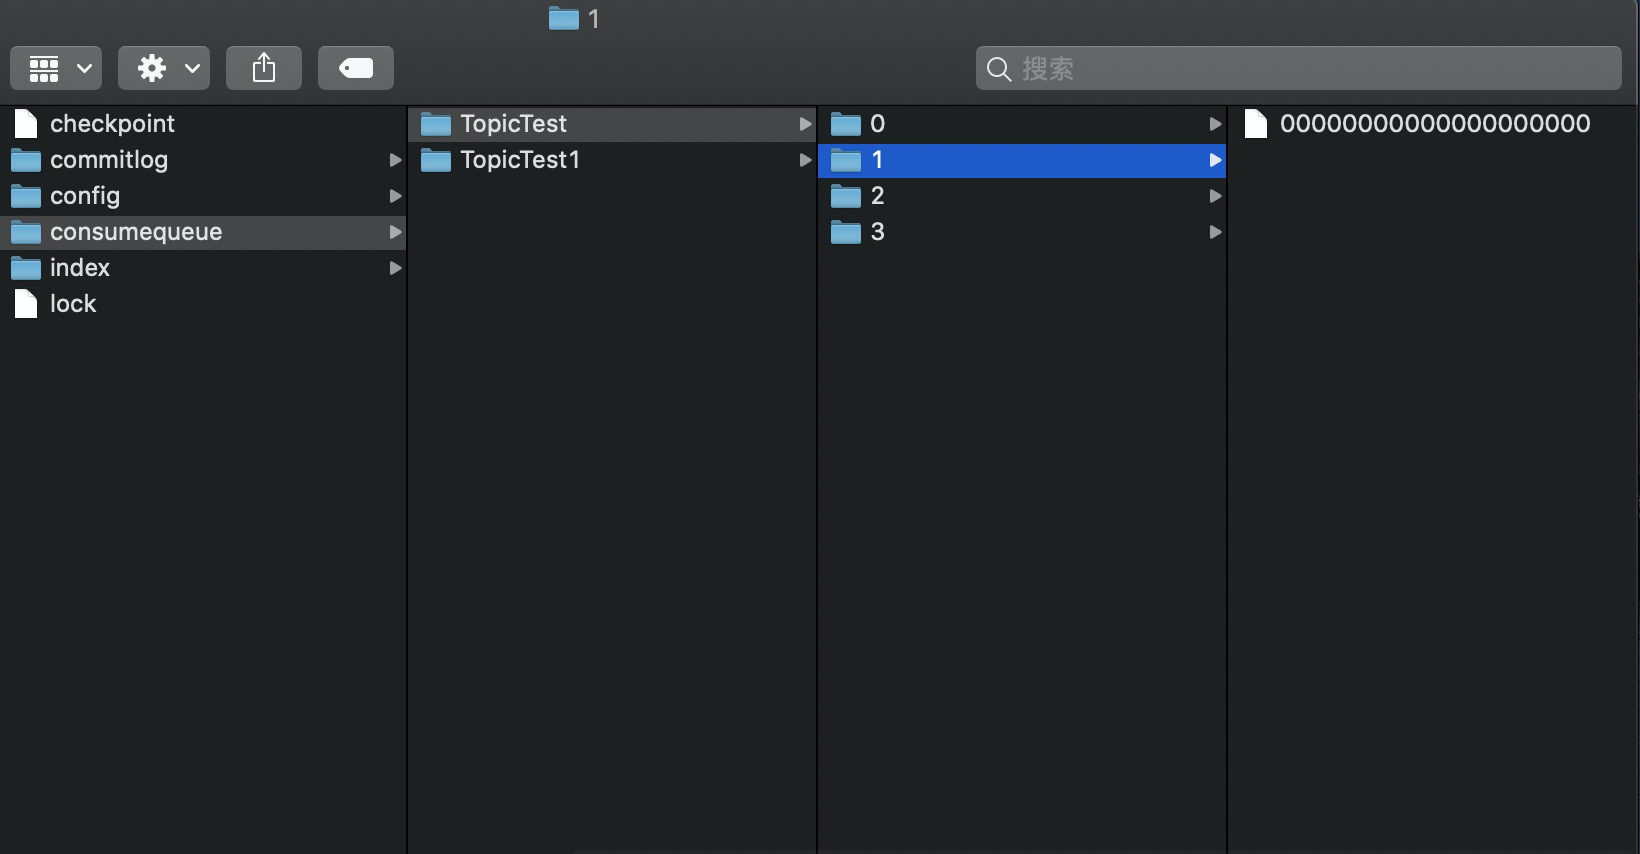
RocketMQ为了适应消息消费的检索需求,设计了消息消费队列文件(ConsumeQueue),该文件可以看成是CommitLog关于消息消费的主题“索引”文件,consumequeue的第一级目录为消息主题,第二级目录为主题的消息队列。如下图所示。
为了加速Consumer消息条目的检索速度与节省磁盘空间,每一个ConsumeQueue条目都不会存储消息的全量消息,其存储格式如下所示。

单个ConsumeQueue文件默认包括30万个条目,单个文件的大小为30w*20字节,单个ConsumeQueue文件可以看作是一个ConsumeQueue条目的数组,其下标为逻辑偏移量(消息消费进度存储的偏移量)。基于这个,我们可以根据消息逻辑偏移量来查找具体消息,当然,也可以通过时间戳来查找消息(结合commitlog用二分法)。
ConsumeQueue可以看作是主题的索引,其构建机制是当消息到达CommitLog文件后,由专门的线程产生消息转发任务,从而构建消息消费队列与下面提到的index索引文件。
2.1.3 Index索引文件
RocketMQ还引入了Hash索引机制为消息建立索引,文件布局如下所示。
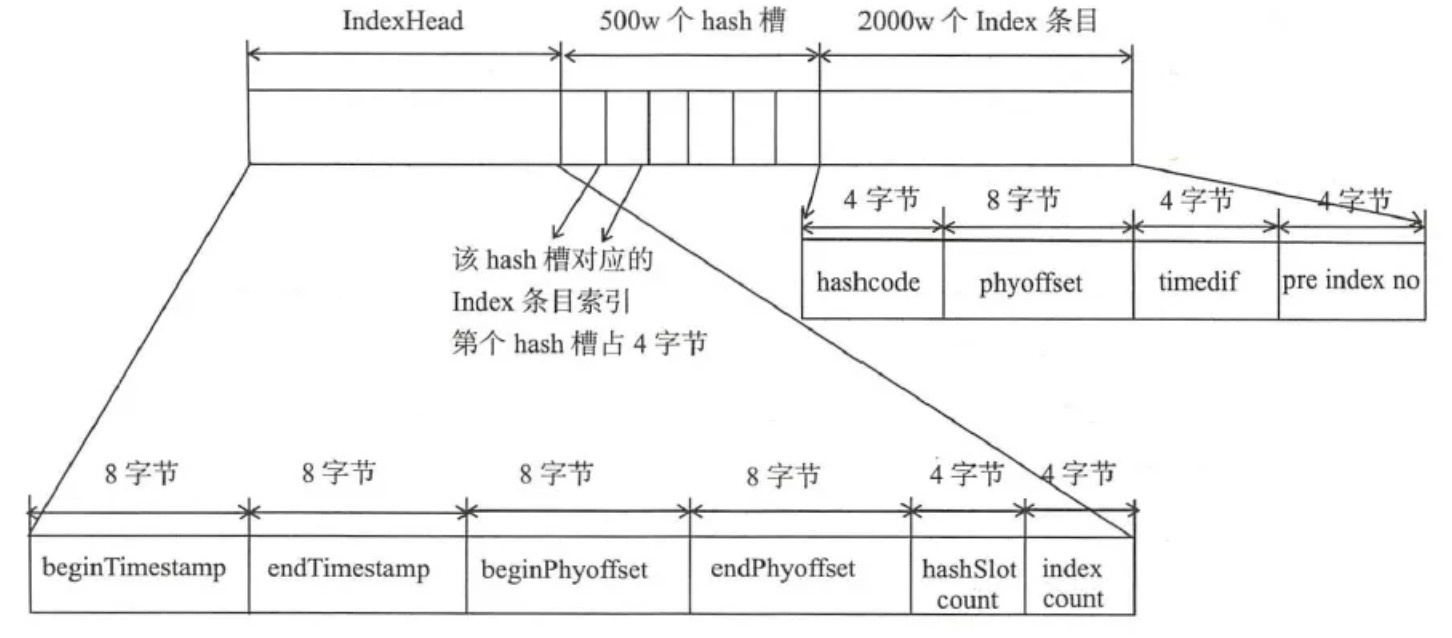
这里,根据消息KEY的hash%slotNum(数组的最大长度)即可得到槽(slot)的位置,需要注意的是,槽里面不是直接存放的链表,而是链表最后一个节点(index条目,可以根据这个条目获取链表)。得到KEY的index条目后,根据里面存储的消息物理偏移量,在CommitLog文件中查找得到具体的消息主体。
从上图中也可以看出来,IndexFile总共包含IndexHeader、Hash槽、Hash条目(数据信息)。
- IndexHeader头部,包括40个字节,记录该IndexFile的统计信息,包括存储时间、物理偏移量等。
- Hash槽,一个IndexFile默认有500万个槽,每个槽存储的是落在该Hash槽的hashcode最新的index条目索引。
- Index条目列表,默认一个索引文件包含2000万个条目,每一个条目结果如下:
- hashcode:消息key的hashcode。
- phyoffset:消息对应的物理偏移量(在CommitLog中存储)。
- timedif:该消息存储时间与第一条消息的时间戳的差值,若小于0则代表该消息无效。
- preIndexNo:该条目的前一条记录的Index索引。当出现hash冲突时,构建的链表结构,很类似于JDK8之前HashMap的设计机制。
2.2 内存映射
RocketMQ通过使用内存映射文件来提高IO访问性能,无论是CommitLog、ConsumeQueue还是IndexFile,单个文件都是固定长度的,如果一个文件写满后再创建一个新的文件,文件名就为该文件的第一条消息对应的全局物理偏移量。RocketMQ使用MappedFile、MappedFileQueue来封装存储文件(CommitLog和ConsumerQueue)。本节以CommitLog为例子,其关系如下图所示。
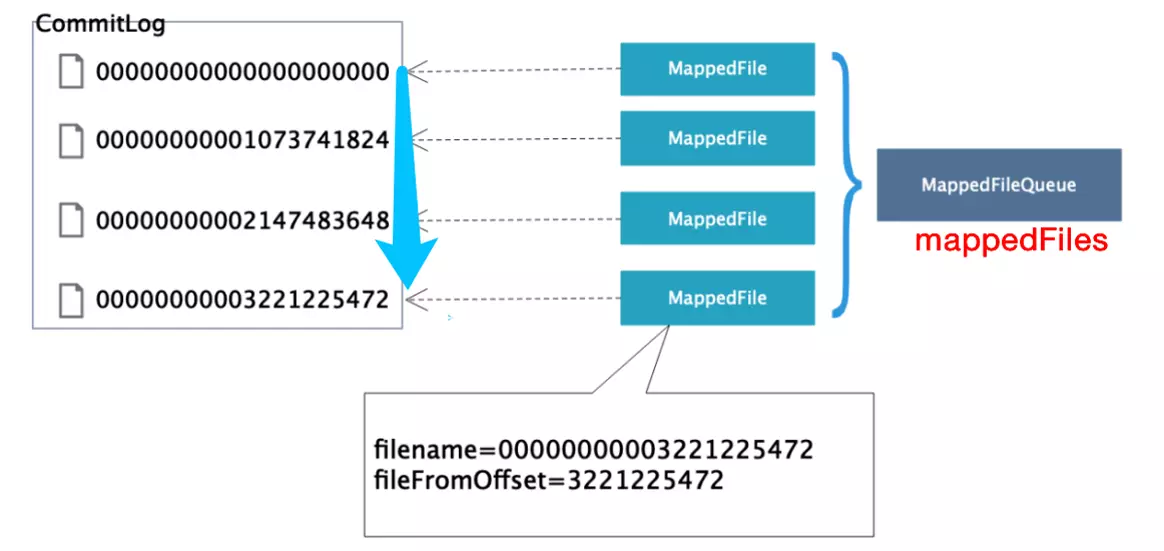
图片引用自《RocketMQ 解析》
2.2.1 MappedFile内存映射文件
MappedFile是RocketMQ内存映射文件的具体实现,它对应着CommitLog、ConsumeQueue文件,拥有的主要字段如下:
public class MappedFile extends ReferenceResource {
    // 每页大小,默认4k
    public static final int OS_PAGE_SIZE = 1024 * 4;
    // 当前JVM实例中MappedFile虚拟内存
    private static final AtomicLong TOTAL_MAPPED_VIRTUAL_MEMORY = new AtomicLong(0);
    // 当前JVM实例中MappedFile对象个数
    private static final AtomicInteger TOTAL_MAPPED_FILES = new AtomicInteger(0);
    // 当前文件的写指针,从0开始(内存映射文件中的写指针)
    protected final AtomicInteger wrotePosition = new AtomicInteger(0);
    // 当前文件的提交指针,如果开启transientStorePoolEnable,则数据会存储在TransientStorePool中,然后提交到内存映射ByteBuffer中,再刷写到磁盘
    protected final AtomicInteger committedPosition = new AtomicInteger(0);
    // 刷写到磁盘指针,该指针之前的数据持久化到磁盘中
    private final AtomicInteger flushedPosition = new AtomicInteger(0);
    // 文件大小
    protected int fileSize;
    // 文件通道
    protected FileChannel fileChannel;
    /**
     * Message will put to here first, and then reput to FileChannel if writeBuffer is not null.
     * 堆外内存ByteBuffer,如果不为空,数据首先将存储在该buffer中,然后跳到MappedFile对应的内存映射文件Buffer。transientStorePoolEnable为true时不为空。
     */
    protected ByteBuffer writeBuffer = null;
    // 堆外内存池,该内存池中的内存会提供内存锁定机制。transientStorePoolEnable为true时启用
    protected TransientStorePool transientStorePool = null;
    // 文件名称
    private String fileName;
    // 该文件的初始偏移量
    private long fileFromOffset;
    // 物理文件
    private File file;
    // 物理文件对应的内存映射Buffer
    private MappedByteBuffer mappedByteBuffer;
    // 文件最后一次内容写入时间
    private volatile long storeTimestamp = 0;
    // 是否是MappedFileQueue队列中第一个文件
    private boolean firstCreateInQueue = false;
}
内存映射用到了MappedByteBuffer,它使用虚拟内存,其占用内存不受JVM参数限制。这里还提到了TransientStorePool堆外内存池,我们在后面讲一下。
这个类有点类似于充血模型(有些牵强附会了),各种相关的方法都在类中实现的。
2.2.2.1 MappedFile初始化
初始化时用消息的起始偏移量作为文件名,通过RandomAccessFile创建读写文件通道,并将文件内容使用NIO的内存映射Buffer将文件映射到内存。
private void init(final String fileName, final int fileSize) throws IOException {
    this.fileName = fileName;
    this.fileSize = fileSize;
    this.file = new File(fileName);
    this.fileFromOffset = Long.parseLong(this.file.getName());
    boolean ok = false;
    // 确保存储路径存在,不存在的话就创建
    ensureDirOK(this.file.getParent());
    try {
        this.fileChannel = new RandomAccessFile(this.file, "rw").getChannel();
        // 将实际文件映射为内存映射文件
        this.mappedByteBuffer = this.fileChannel.map(MapMode.READ_WRITE, 0, fileSize);
        TOTAL_MAPPED_VIRTUAL_MEMORY.addAndGet(fileSize);
        TOTAL_MAPPED_FILES.incrementAndGet();
        ok = true;
    } catch  {
        //
    } finally {
        if (!ok && this.fileChannel != null) {
            this.fileChannel.close();
        }
    }
}
如果transientStorePoolEnable为true,则额外初始化一下MappedFile的writeBuffer,该Buffer从transientStorePool中获取。
2.2.2.2 MappedFile追加MessageExt消息
追加MessageExt消息相关函数主要体现在appendMessagesInner函数,如下。
public AppendMessageResult appendMessagesInner(final MessageExt messageExt, final AppendMessageCallback cb) {
    assert messageExt != null;
    assert cb != null;
    int currentPos = this.wrotePosition.get();
    // 文件还有剩余空间
    if (currentPos < this.fileSize) {
        // 选择追加的buffer
        ByteBuffer byteBuffer = writeBuffer != null ? writeBuffer.slice() : this.mappedByteBuffer.slice();
        byteBuffer.position(currentPos);
        AppendMessageResult result;
        if (messageExt instanceof MessageExtBrokerInner) {
            result = cb.doAppend(this.getFileFromOffset(), byteBuffer, this.fileSize - currentPos, (MessageExtBrokerInner) messageExt);
        } else if (messageExt instanceof MessageExtBatch) {
            result = cb.doAppend(this.getFileFromOffset(), byteBuffer, this.fileSize - currentPos, (MessageExtBatch) messageExt);
        } else {
            return new AppendMessageResult(AppendMessageStatus.UNKNOWN_ERROR);
        }
        // 更新写位置
        this.wrotePosition.addAndGet(result.getWroteBytes());
        this.storeTimestamp = result.getStoreTimestamp();
        return result;
    }
    log.error("MappedFile.appendMessage return null, wrotePosition: {} fileSize: {}", currentPos, this.fileSize);
    return new AppendMessageResult(AppendMessageStatus.UNKNOWN_ERROR);
}
只要文件还有剩余空间,先根据writeBuffer是否为空(是否开启TransientStorePool),选择操作的内存映射,然后调用AppendMessageCallback#doAppend方法完成底层append逻辑,最后更新写的位置以及存储时间。
2.2.2.3 MappedFile提交(commit)
提交主要是针对transientStorePoolEnable为true的场景,即通过Commit线程将数据从writeBuffer写入FileChannel文件通道中。
public int commit(final int commitLeastPages) {
    if (writeBuffer == null) {
        // 无需将数据提交到FileChannel,因此只需将writePosition视为commitPosition。
        return this.wrotePosition.get();
    }
    if (this.isAbleToCommit(commitLeastPages)) {
        if (this.hold()) {
            commit0(commitLeastPages);
            this.release();
        } else {
            log.warn("in commit, hold failed, commit offset = " + this.committedPosition.get());
        }
    }
    // 所有脏数据都已经提交到FileChannel
    if (writeBuffer != null && this.transientStorePool != null && this.fileSize == this.committedPosition.get()) {
        this.transientStorePool.returnBuffer(writeBuffer);
        this.writeBuffer = null;
    }
    return this.committedPosition.get();
}
protected void commit0(final int commitLeastPages) {
    // 当前写指针
    int writePos = this.wrotePosition.get();
    // 上一次提交的位置
    int lastCommittedPosition = this.committedPosition.get();
    // 存在脏读数据
    if (writePos - this.committedPosition.get() > 0) {
        try {
            // 开辟一个新的共享缓冲区
            ByteBuffer byteBuffer = writeBuffer.slice();
            byteBuffer.position(lastCommittedPosition);
            byteBuffer.limit(writePos);
            this.fileChannel.position(lastCommittedPosition);
            this.fileChannel.write(byteBuffer);
            // 更新提交指针
            this.committedPosition.set(writePos);
        } catch (Throwable e) {
            log.error("Error occurred when commit data to FileChannel.", e);
        }
    }
}
protected boolean isAbleToCommit(final int commitLeastPages) {
    int flush = this.committedPosition.get();
    int write = this.wrotePosition.get();

    if (this.isFull()) {
        return true;
    }

    if (commitLeastPages > 0) {
        // 脏页数量是否大于等于最小提交的页数
        return ((write / OS_PAGE_SIZE) - (flush / OS_PAGE_SIZE)) >= commitLeastPages;
    }
    // 写指针大于提交指针,表示只要有脏数据就提交
    return write > flush;
}
若writeBuffer为空,则直接返回。若存在脏读数据的话,将writeBuffer中[lastCommittedPosition,writePos)的部分写入到fileChannel,并更新提交指针,最后将writeBuffer归还给transientStorePool,返回committedPosition。
其中,还涉及到一个isAbleToCommit函数,用于判断是否执行commit操作。若commitLeastPages(提交的的最小页数)大于0,则比较写指针与上一次提交指针的差值,除以OS_PAGE_SIZE得到当前脏页数量,如果大于commitLeastPages则返回true;如果commitLeastPages小于0,则表示只要有脏数据就提交。
另外,函数中用到了ByteBuffer.slice()方法,它是创建了一个共享缓存区,与原先的ByteBuffer共享内存但维护一套独立的指针(position、mark、limit)。
2.2.2.4 MappedFile刷盘(flush)
刷盘是指将内存中的数据刷写到磁盘中,永久存储在磁盘中。
public int flush(final int flushLeastPages) {
    if (this.isAbleToFlush(flushLeastPages)) {
        if (this.hold()) {// 引用+1
            int value = getReadPosition();
            try {
                //We only append data to fileChannel or mappedByteBuffer, never both.
                if (writeBuffer != null || this.fileChannel.position() != 0) {
                    this.fileChannel.force(false);
                } else {
                    this.mappedByteBuffer.force();
                }
            } catch (Throwable e) {
                log.error("Error occurred when force data to disk.", e);
            }

            this.flushedPosition.set(value);
            this.release();
        } else {
            log.warn("in flush, hold failed, flush offset = " + this.flushedPosition.get());
            this.flushedPosition.set(getReadPosition());
        }
    }
    return this.getFlushedPosition();
}
public int getReadPosition() {
    return this.writeBuffer == null ? this.wrotePosition.get() : this.committedPosition.get();
}
private boolean isAbleToFlush(final int flushLeastPages) {
    int flush = this.flushedPosition.get();
    int write = getReadPosition();

    // 文件已经写满,fileSize == wrotePosition
    if (this.isFull()) {
        return true;
    }
    if (flushLeastPages > 0) {
        // 未flush部分超过flushLeastPages
        return ((write / OS_PAGE_SIZE) - (flush / OS_PAGE_SIZE)) >= flushLeastPages;
    }
    // 有新写入部分
    return write > flush;
}
刷写磁盘,直接调用mappedByteBuffer或fileChannel的force方法将内存中的数据持久化到磁盘,此时,更新刷盘指针有两种情况,若writeBuffer为空,则flushPosition等于mappedByteBuffer的写指针;若不为空,则flushPosition等于上一次提交指针,因为生一次提交的数据就是进入了fileChannel。
2.2.2 TransientStorePool堆外内存池
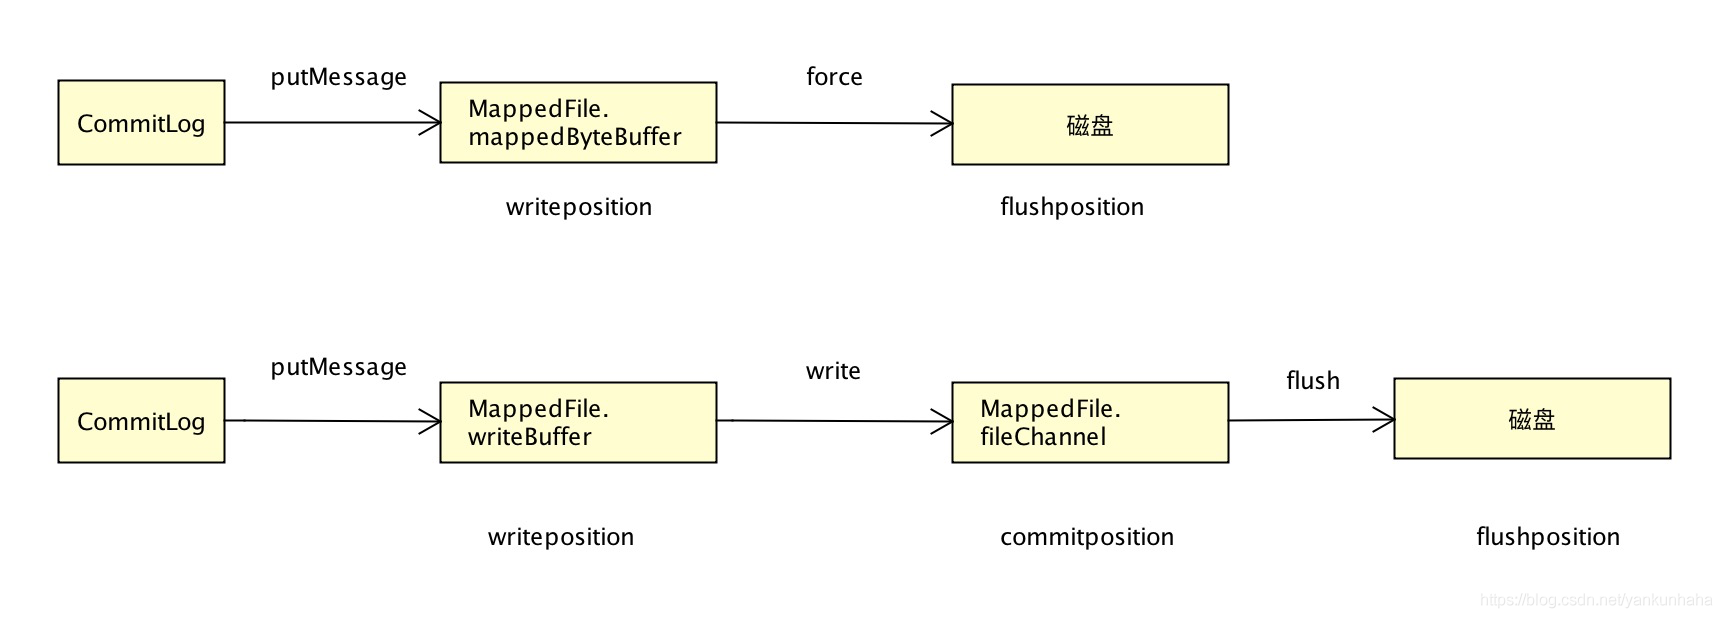
暂存池TransientStorePool只在异步刷盘的模式下,并且配置了MessageStoreConfig.transientStorePoolEnable的时候才会开启。暂存池维护了一系列的堆外内存,通过将消息写到堆外内存中来提高性能。如果启用,只会向writeBuffer写入数据,通过Commit线程将数据提交到内存映射Buffer中,再通过Flush线程将内存映射Buffer中的数据持久化到磁盘中。否则只会向mappedByteBuffer写入数据,不会同时写入,看下图。
具体用个表格来描述,很直观。
| transientStorePoolEnable状态 | writeBuffer状态 | 步骤1:appendMessagesInner追加消息操作 | 步骤2:commit提交操作 | 步骤3:flush刷盘操作 |
|---|---|---|---|---|
| true,开启堆外内存池 | writeBuffer!=null | 写入到writeBuffer | writeBuffer写入到fileChannel | fileChannel.force() |
| false | writeBuffer==null | 写入到mappedByteBuffer | 无事可做 | mappedByteBuffer.force() |
2.2.3 MappedFileQueue映射文件队列
MappedFileQueue是MappedFile的管理容器,MappedFileQueue是对存储目录的封装,用于管理CommitLog文件存储路径下的多个内存映射文件(MappedFile)。
public class MappedFileQueue {
    private static final InternalLogger log = InternalLoggerFactory.getLogger(LoggerName.STORE_LOGGER_NAME);
    private static final InternalLogger LOG_ERROR = InternalLoggerFactory.getLogger(LoggerName.STORE_ERROR_LOGGER_NAME);

    private static final int DELETE_FILES_BATCH_MAX = 10;

    // 存储目录
    private final String storePath;
    // 单个文件的存储大小
    private final int mappedFileSize;
    // MappedFile文件集合
    private final CopyOnWriteArrayList<MappedFile> mappedFiles = new CopyOnWriteArrayList<MappedFile>();
    // 创建MappedFile服务类
    private final AllocateMappedFileService allocateMappedFileService;
    // 当前刷盘指针,表示该指针之前的所有数据全部持久化到磁盘
    private long flushedWhere = 0;
    // 当前数据提交指针,内存中ByteBuffer当前的写指针,该值大于等于flushedWhere
    private long committedWhere = 0;
}
简单来说,这个类是管理MappedFile的队列的,与MappedFile就是1:n的关系。它提供了一系列根据offset或者timestamp来查找,定位,删除,清除MappedFile的逻辑,同时提供flushedWhere,committedWhere 标记整个队列中flush以及commit的物理偏移量offset。
举个例子,通过消息偏移量offset找到所在的mappedFile。
public MappedFile findMappedFileByOffset(final long offset, final boolean returnFirstOnNotFound) {
    try {
        MappedFile firstMappedFile = this.getFirstMappedFile();
        MappedFile lastMappedFile = this.getLastMappedFile();
        if (firstMappedFile != null && lastMappedFile != null) {
            if (offset < firstMappedFile.getFileFromOffset() || offset >= lastMappedFile.getFileFromOffset() + this.mappedFileSize) {
                // 提示错误日志
            } else {
                // 查找对应MappedFile所在队列的位置
                int index = (int) ((offset / this.mappedFileSize) - (firstMappedFile.getFileFromOffset() / this.mappedFileSize));
                MappedFile targetFile = null;
                try {
                    targetFile = this.mappedFiles.get(index);
                } catch (Exception ignored) {
                }
                if (targetFile != null && offset >= targetFile.getFileFromOffset()
                    && offset < targetFile.getFileFromOffset() + this.mappedFileSize) {
                    return targetFile;
                }
                // 如果上面取到的MappedFile不符合要求,则遍历查找
                for (MappedFile tmpMappedFile : this.mappedFiles) {
                    if (offset >= tmpMappedFile.getFileFromOffset()
                        && offset < tmpMappedFile.getFileFromOffset() + this.mappedFileSize) {
                        return tmpMappedFile;
                    }
                }
            }
            if (returnFirstOnNotFound) {
                return firstMappedFile;
            }
        }
    } catch (Exception e) {
        log.error("findMappedFileByOffset Exception", e);
    }
    return null;
}
2.3 存储原理
为追求高性能,RocketMQ要在存储方面做足了功夫,我们首先回顾一些基础知识,然后再看一下RocketMQ在存储方案的优化。
2.3.1 零拷贝
RocketMQ采用零拷贝来提高IO性能,这个也常用在netty、kafka等框架中。在说起零拷贝之前,先来了解下服务器中文件数据通过网络传输到客户端的流程。作为应用服务器,其中会有很多从磁盘中读取数据,然后应用程序对加载到内存中的数据进行处理,然后通过网卡发送给客户端,传统数据处理通过以下两个函数实现:
read(file, tmp_buf, len);
write(socket, tmp_buf, len);
在这个过程中,代码看似就两行,但数据至少复制了四次,并且执行了几乎相同数量的用户/内核上下文切换,对性能消耗较大。流转的大致过程如下:

图片引用自《零拷贝sendfile解析》
第一步:应用程序通过read进行操作系统函数调用,此时cpu由用户态切换到内核态,DMA引擎直接将磁盘上数据读取到内核缓冲区。
第二步:将数据从内核缓冲区中复制到用户空间缓冲区,在内存空间之间数据拷贝,是需要cpu来参与的,拷贝结束cpu状态由内核态转换到用户态。此时系统调用read读取返回。
第三步:用户空间的数据想要发送到客户端,通过write进行操作系统函数调用,这个时候发生了cpu状态的切换,由用户态转换到内核态。然后用户缓冲区数据拷贝到内核socket发送缓冲区,这个时候的复制也需要cpu进行参与。
第四步:socket缓冲区中的数据需要复制到网卡缓冲区中,由网卡发送到客户端,然后cpu状态再次切换回用户态。
可以见到,在这个过程中发生了2次cpu copy和2次DMA copy,以及发生了数次cpu状态切换。这个操作对于应用服务器来说很频繁,因此带来的开销也是非常大。
因此所谓的零拷贝就是,让其中的2次cpu拷贝省略掉,因为这两次cpu拷贝的数据其实已经在内存中,没有必要再让cpu参与进来进行数据的拷贝,浪费cpu。在大量文件读写的时候,这个优化带来的收益还是比较可观的。
零拷贝的实现方式有两种:
- mmap+write
- sendfile
RocketMQ采用的零拷贝技术是mmap+write,因为mmap+write适合小块数据的快速传输,而sendfile更加适合大块数据的传输。使用零拷贝时,读取和写出过程的代码修改为以下形式。
tmp_buf = mmap(file, len);
write(socket, tmp_buf, len);
mmap通过虚拟内存映射,让多个虚拟地址指向同一个物理内存地址,用户空间的虚拟地址和内核空间的虚拟地址指向同一个物理内存地址,这样用户空间和内核空间共享同一个内存数据。某种程度来说,这里已经没有读取数据到用户态的操作了。这里的tmp_buf是虚拟内存中文件的一个映射缓存,通过这个映射缓存就可以将内核态的缓存数据直接拷贝到内核态的scoket缓存,而不需要在内核态和用户态之间拷贝数据,减少了一次cpu拷贝,整体如下图所示。

2.3.2 PageCache(页面缓存)
PageCache是OS对文件的缓存,用于加速对文件的读写,每一页的大小通常是4K。一般来说,程序对文件进行顺序读写的速度几乎接近于内存的读写访问,这里的主要原因就是在于OS使用PageCache机制对读写访问操作进行了性能优化,将一部分的内存用作PageCache,此时读写性能接近于内存。
在Linux系统中写入数据的时候并不会直接写到硬盘上,而是会先写到Page Cache中,并打上dirty标识,由内核线程flusher定期将被打上dirty的页发送给IO调度层,最后由IO调度决定何时落地到磁盘中,而Linux一般会把还没有使用的内存全拿来给Page Cache使用。而读的过程也是类似,会先到Page Cache中寻找是否有数据,有的话直接返回,如果没有才会到磁盘中去读取并写入Page Cache然后再次读取Page Cache并返回。并且读的这个过程中操作系统也会有一个预读的操作,每一次读取操作系统都会帮你预读出后面一部分数据(ps:顺序读入紧随其后的少数几个页面),而且当你一直在使用预读数据的时候,系统会帮你预读出更多的数据(最大到128K)。
2.3.3 RocketMQ存储优化
在MappedFIle读写中,RocketMQ采用了nio的文件通道fileChannel和内存映射mappedByteBuffer。
this.fileChannel = new RandomAccessFile(this.file, "rw").getChannel();
// 将实际文件映射为内存映射文件
this.mappedByteBuffer = this.fileChannel.map(MapMode.READ_WRITE, 0, fileSize);
相比传统IO,FileChannel配合着内存缓冲区MappedByteBuffer(继承自ByteBuffer),满足了高性能需求。当然,ByteBuffer中的数据和磁盘中的数据还隔了一层,这一层便是 PageCache,是用户内存和磁盘之间的一层缓存。我们都知道磁盘IO和内存IO的速度可是相差了好几个数量级。我们可以认为 filechannel.write写入PageCache便是完成了落盘操作(对应上文中的Commit操作),但实际上,操作系统最终帮我们完成了PageCache到磁盘的最终写入;但是,我们不能一直等操作系统帮我们做事,我们要自己把握主动权才行,上文中的MappedFile的刷盘操作,就是用FileChannel的 force()方法,主动通知操作系统进行及时的刷盘,将PageCache数据写入到磁盘。
RocketMQ使用MMAP来把文件映射到用户空间里的虚拟内存,省去了从内核缓冲区复制到用户空间的过程。高性能的优势我们上面都充分解释过了,但也是存在一些不足的:
- MMAP使用时必须实现指定好内存映射的大小,并且一次map的大小限制在 1.5G 左右,重复map又会带来虚拟内存的回收、重新分配的问题,对于文件不确定大小的情形实在是太不友好了。这点对于RocketMQ来说不是问题,CommitLog文件指定是1G大小。
- MMAP使用的是虚拟内存,和PageCache一样是由操作系统来控制刷盘的,虽然可以通过 force() 来手动控制,但这个时间把握不好,在小内存场景下会很令人头疼。
- MMAP的回收问题,当MappedByteBuffer不再需要时,需要手动释放占用的虚拟内存。
到现在为止,我们去总结一下RocketMQ的大致做法:
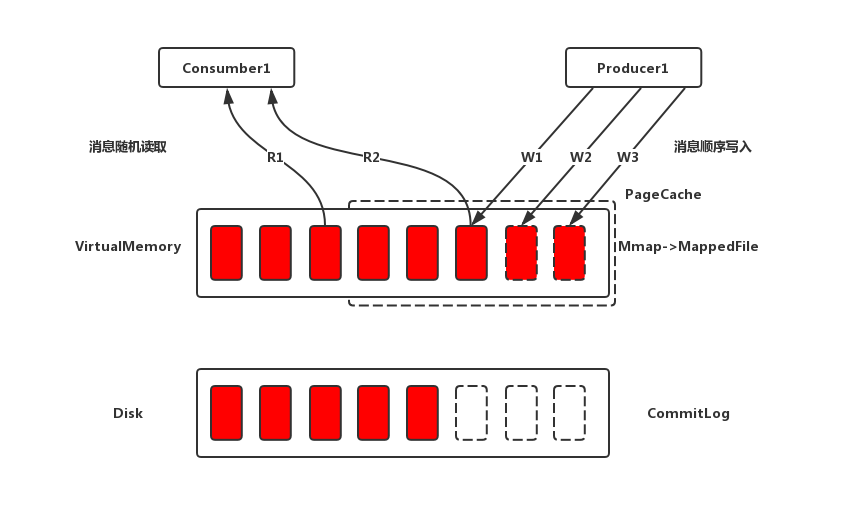
- 存储消息时,将数据文件映射到OS的虚拟内存中(通过JDK NIO的MappedByteBuffer),写消息的时候首先写入PageCache(Commit操作),并通过异步刷盘的方式将消息批量的做持久化(同时也支持同步刷盘)。
- 订阅消费消息时(对CommitLog操作是随机读取),由于PageCache的局部性热点原理且整体情况下还是从旧到新的有序读,因此大部分情况下消息还是可以直接从Page Cache(cache hit)中读取,不会产生太多的缺页(Page Fault)中断而变成从磁盘读取。
PageCache机制也不是完全无缺点的,当遇到OS进行脏页回写、内存回收、内存swap等情况时,就会引起较大的消息读写延迟。对于这些情况,RocketMQ采用了多种优化技术,比如内存预分配,文件预热,mlock系统调用等,来保证在最大可能地发挥PageCache机制优点的同时,尽可能地减少其缺点带来的消息读写延迟。
2.3.3.1 预分配
讲到这了,我们还没有去说MappedFile的创建场景。在消息写入过程中(调用CommitLog的putMessage()方法,后面会讲到),CommitLog会先从MappedFileQueue队列中获取一个最新的MappedFile(调用MappedFileQueue的getLastMappedFile方法),如果没有就创建一个。具体如下:
public MappedFile getLastMappedFile(final long startOffset, boolean needCreate) {
    long createOffset = -1;
    MappedFile mappedFileLast = getLastMappedFile();
    if (mappedFileLast == null) {
        // 目前没有mappedFile
        createOffset = startOffset - (startOffset % this.mappedFileSize);
    }
    if (mappedFileLast != null && mappedFileLast.isFull()) {
        // 最近的mappedFile已经满了
        createOffset = mappedFileLast.getFileFromOffset() + this.mappedFileSize;
    }
    // 创建新的mappedFile
    if (createOffset != -1 && needCreate) {
        // 下一个文件的路径
        String nextFilePath = this.storePath + File.separator + UtilAll.offset2FileName(createOffset);
        // 下下一个文件的路径
        String nextNextFilePath = this.storePath + File.separator
            + UtilAll.offset2FileName(createOffset + this.mappedFileSize);
        MappedFile mappedFile = null;

        if (this.allocateMappedFileService != null) {
            // 添加请求
            mappedFile = this.allocateMappedFileService.putRequestAndReturnMappedFile(nextFilePath,
                                                                                      nextNextFilePath, this.mappedFileSize);
        } else {
            try {
                mappedFile = new MappedFile(nextFilePath, this.mappedFileSize);
            } catch (IOException e) {
                log.error("create mappedFile exception", e);
            }
        }

        if (mappedFile != null) {
            if (this.mappedFiles.isEmpty()) {
                // 写入的第一个MappedFile文件
                mappedFile.setFirstCreateInQueue(true);
            }
            this.mappedFiles.add(mappedFile);
        }
        return mappedFile;
    }
    return mappedFileLast;
}
在这里,MappedFile的创建过程走到了putRequestAndReturnMappedFile函数,它的入参是将下一个文件的路径、下下一个文件的路径和文件大小。
public MappedFile putRequestAndReturnMappedFile(String nextFilePath, String nextNextFilePath, int fileSize) {
    int canSubmitRequests = 2;
    if (this.messageStore.getMessageStoreConfig().isTransientStorePoolEnable()) {
        if (this.messageStore.getMessageStoreConfig().isFastFailIfNoBufferInStorePool()
            && BrokerRole.SLAVE != this.messageStore.getMessageStoreConfig().getBrokerRole()) { //if broker is slave, don't fast fail even no buffer in pool
            canSubmitRequests = this.messageStore.getTransientStorePool().availableBufferNums() - this.requestQueue.size();
        }
    }
    // 创建第一个MappedFile映射文件
    AllocateRequest nextReq = new AllocateRequest(nextFilePath, fileSize);
    // 如果是第二次来这个函数,这个对应nextFilePath路径的MappedFile已经被创建,则nextPutOK=false,直接nextNextFile。
    boolean nextPutOK = this.requestTable.putIfAbsent(nextFilePath, nextReq) == null;

    if (nextPutOK) {
        if (canSubmitRequests <= 0) {
            log.warn("[NOTIFYME]TransientStorePool is not enough, so create mapped file error, " +
                     "RequestQueueSize : {}, StorePoolSize: {}", this.requestQueue.size(), this.messageStore.getTransientStorePool().availableBufferNums());
            this.requestTable.remove(nextFilePath);
            return null;
        }
        boolean offerOK = this.requestQueue.offer(nextReq);
        if (!offerOK) {
            log.warn("never expected here, add a request to preallocate queue failed");
        }
        canSubmitRequests--;
    }
    // 创建第二个MappedFile映射文件
    AllocateRequest nextNextReq = new AllocateRequest(nextNextFilePath, fileSize);
    boolean nextNextPutOK = this.requestTable.putIfAbsent(nextNextFilePath, nextNextReq) == null;
    if (nextNextPutOK) {
        if (canSubmitRequests <= 0) {
            log.warn("[NOTIFYME]TransientStorePool is not enough, so skip preallocate mapped file, " +
                     "RequestQueueSize : {}, StorePoolSize: {}", this.requestQueue.size(), this.messageStore.getTransientStorePool().availableBufferNums());
            this.requestTable.remove(nextNextFilePath);
        } else {
            boolean offerOK = this.requestQueue.offer(nextNextReq);
            if (!offerOK) {
                log.warn("never expected here, add a request to preallocate queue failed");
            }
        }
    }
    // 获取被创建的MappedFile
    AllocateRequest result = this.requestTable.get(nextFilePath);
    try {
        if (result != null) {
            // 等待创建完成
            boolean waitOK = result.getCountDownLatch().await(waitTimeOut, TimeUnit.MILLISECONDS);
            if (!waitOK) {
                log.warn("create mmap timeout " + result.getFilePath() + " " + result.getFileSize());
                return null;
            } else {
                this.requestTable.remove(nextFilePath);
                return result.getMappedFile();
            }
        } else {
            log.error("find preallocate mmap failed, this never happen");
        }
    } catch (InterruptedException e) {
        log.warn(this.getServiceName() + " service has exception. ", e);
    }

    return null;
}
AllocateMappedFileService服务线程会在Broker启动时被创建并一直运行,它里面维护了两个队列,如下:
// 用来保存当前所有待处理的分配请求,其中KEY是filePath,VALUE是分配请求。如果分配请求被成功处理,即获取到映射文件则从请求会从requestTable中移除
private ConcurrentMap<String, AllocateRequest> requestTable =
    new ConcurrentHashMap<String, AllocateRequest>();
// 分配请求队列,注意是优先级队列,从该队列中获取请求,进而根据请求创建映射文件
private PriorityBlockingQueue<AllocateRequest> requestQueue =
    new PriorityBlockingQueue<AllocateRequest>();
在第一次进入putRequestAndReturnMappedFile函数时(之前还没有MappedFiled),会先后创建next和nextNext的AllocateRequest请求,压入到requestTable和requestQueue队列中,在创建分配完下个MappedFile后,还会将下下个MappedFile预先创建并保存(mmapOperation函数)至请求队列requestTable中等待下次获取时直接返回。
在第二次或之后进入该函数时,由于上一次调用已经生成了下下个的MappedFile,所以可以直接从requestTable中获取下下个MappedFile并返回,而省去了等待MappedFile创建分配所产生的时间延迟。简单来说,requestTable中一直存着一个已经创建好的MappedFile,等待着被使用。
线程会通过run函数循环调用mmapOperation函数,一直消费requestQueue中的请求,执行具体的MappedFile映射文件的创建和预分配工作。
// 无限循环
public void run() {
    log.info(this.getServiceName() + " service started");
    while (!this.isStopped() && this.mmapOperation()) {}
    log.info(this.getServiceName() + " service end");
}
private boolean mmapOperation() {
    boolean isSuccess = false;
    AllocateRequest req = null;
    try {
        // 从requestQueue阻塞队列中获取AllocateRequest任务,这是一个优先队列。
        req = this.requestQueue.take();
        AllocateRequest expectedRequest = this.requestTable.get(req.getFilePath());
        /**省略判断**/
        if (req.getMappedFile() == null) {
            long beginTime = System.currentTimeMillis();
            MappedFile mappedFile;
            // 判断是否开启isTransientStorePoolEnable,如果开启则使用直接内存进行写入数据,最后从直接内存中commit到FileChannel中
            if (messageStore.getMessageStoreConfig().isTransientStorePoolEnable()) {
                try {
                    mappedFile = ServiceLoader.load(MappedFile.class).iterator().next();
                    mappedFile.init(req.getFilePath(), req.getFileSize(), messageStore.getTransientStorePool());
                } catch (RuntimeException e) {
                    log.warn("Use default implementation.");
                    mappedFile = new MappedFile(req.getFilePath(), req.getFileSize(), messageStore.getTransientStorePool());
                }
            } else {
                // 使用MMAP方式创建MappedFile
                mappedFile = new MappedFile(req.getFilePath(), req.getFileSize());
            }
            long elapsedTime = UtilAll.computeElapsedTimeMilliseconds(beginTime);
            if (elapsedTime > 10) {
                int queueSize = this.requestQueue.size();
                log.warn("create mappedFile spent time(ms) " + elapsedTime + " queue size " + queueSize
                         + " " + req.getFilePath() + " " + req.getFileSize());
            }
            // 判断mappedFile大小,只有CommitLog才进行文件预热
            // 预写入数据。用mmap方式把映射的文件都加载到内存中。
            if (mappedFile.getFileSize() >= this.messageStore.getMessageStoreConfig()
                .getMappedFileSizeCommitLog()
                &&
                this.messageStore.getMessageStoreConfig().isWarmMapedFileEnable()) {
                // 预热
                mappedFile.warmMappedFile(this.messageStore.getMessageStoreConfig().getFlushDiskType(),
                                          this.messageStore.getMessageStoreConfig().getFlushLeastPagesWhenWarmMapedFile());
            }
            // 放回请求队列
            req.setMappedFile(mappedFile);
            this.hasException = false;
            isSuccess = true;
        }
    } catch (InterruptedException e) {
        // 省略
    } finally {
        if (req != null && isSuccess)
            // 创建完成
            req.getCountDownLatch().countDown();
    }
    return true;
}
根据是否开启isTransientStorePoolEnable,分配的时候有两种策略,一种是使用Mmap的方式来构建MappedFile实例,另外一种是从TransientStorePool堆外内存池中获取相应的DirectByteBuffer来构建MappedFile。从代码中可以看出,当MappedFile的大小等于或大于CommitLog的大小(默认为1G)时,开启文件预热功能。
2.3.3.2 预热
在看预热代码之前,先来思考一个问题。在创建MappedFile时调用Mmap进行内存映射后,OS只是建立虚拟内存地址至物理地址的映射表,而实际并没有加载任何文件至内存中。程序要访问数据时OS会检查该部分的分页是否已经在内存中,如果不在,则发出一次缺页中断。可以想象下1G的CommitLog需要发生多少次缺页中断,才能使得对应的数据才能完全加载至物理内存中(ps:X86的Linux中一个标准页面大小是4KB)?这时候,可以考虑一下madvise的思路,进行预加载。
应对这种场景,RocketMQ的做法是,在做Mmap内存映射的同时,将文件数据尽可能多的预加载至内存中,从而达到内存预热的效果。至于预加载的值,可以先用假值来代替,比如0,这样,我们就把mmap映射全部加载到物理内存中了。具体代码实现如下。
public void warmMappedFile(FlushDiskType type, int pages) {
    long beginTime = System.currentTimeMillis();
    ByteBuffer byteBuffer = this.mappedByteBuffer.slice();
    int flush = 0;
    long time = System.currentTimeMillis();
    for (int i = 0, j = 0; i < this.fileSize; i += MappedFile.OS_PAGE_SIZE, j++) {
        // 预加载的假值
        byteBuffer.put(i, (byte) 0);
        // 如果是同步写盘操作,则进行强行刷盘操作
        if (type == FlushDiskType.SYNC_FLUSH) {
            if ((i / OS_PAGE_SIZE) - (flush / OS_PAGE_SIZE) >= pages) {
                flush = i;
                mappedByteBuffer.force();
            }
        }
        /** gc **/
    }

    // 将剩余的数据强制刷新到磁盘中
    if (type == FlushDiskType.SYNC_FLUSH) {
        log.info("mapped file warm-up done, force to disk, mappedFile={}, costTime={}",
                 this.getFileName(), System.currentTimeMillis() - beginTime);
        mappedByteBuffer.force();
    }
    log.info("mapped file warm-up done. mappedFile={}, costTime={}", this.getFileName(),
             System.currentTimeMillis() - beginTime);
    // 锁定内存
    this.mlock();
}
2.3.3.3 锁定内存Mlock
public void mlock() {
    final long beginTime = System.currentTimeMillis();
    final long address = ((DirectBuffer) (this.mappedByteBuffer)).address();
    Pointer pointer = new Pointer(address);
    {
        int ret = LibC.INSTANCE.mlock(pointer, new NativeLong(this.fileSize));
        log.info("mlock {} {} {} ret = {} time consuming = {}", address, this.fileName, this.fileSize, ret, System.currentTimeMillis() - beginTime);
    }
    {
        int ret = LibC.INSTANCE.madvise(pointer, new NativeLong(this.fileSize), LibC.MADV_WILLNEED);
        log.info("madvise {} {} {} ret = {} time consuming = {}", address, this.fileName, this.fileSize, ret, System.currentTimeMillis() - beginTime);
    }
}
该方法主要是实现文件预热后,防止把预热过的文件被操作系统调到swap空间中。当程序在次读取交换出去的数据的时候会产生缺页异常。
LibC.INSTANCE.mlock 和 LibC.INSTANCE.madvise 都是调用的 Native 方法。
- LibC.INSTANCE.mlock 方法:实现是将锁住指定的内存区域避免被操作系统调到swap空间中。
- LibC.INSTANCE.madvise 方法:实现是一次性先将一段数据读入到映射内存区域,这样就减少了缺页异常的产生。
2.4 消息存储流程
消息存储实现类:org.apache.rocketmq.store.DefaultMessageStore,它是存储模块里面最重要的一个类,包含了许多对存储文件操作的API,其他模块对消息实体的操作都是通过DefaultMessageStore进行操作。
public class DefaultMessageStore implements MessageStore {
    // 消息存储配置属性
    private final MessageStoreConfig messageStoreConfig;
    // CommitLog文件的存储实现类,下属有MappedFileQueue
    private final CommitLog commitLog;
    // 消息队列存储缓存表,按消息主题分组
    private final ConcurrentMap<String/* topic */, ConcurrentMap<Integer/* queueId */, ConsumeQueue>> consumeQueueTable;
    // 消息队列文件ConsumerQueue刷盘线程
    private final FlushConsumeQueueService flushConsumeQueueService;
    // 清除CommitLog文件服务
    private final CleanCommitLogService cleanCommitLogService;
    // 清除ConsumerQueue文件服务
    private final CleanConsumeQueueService cleanConsumeQueueService;
    // 索引文件实现类
    private final IndexService indexService;
    // MappedFile分配服务
    private final AllocateMappedFileService allocateMappedFileService;
    // CommitLog消息分发,根据CommitLog文件构建ConsumerQueue、IndexFile文件
    private final ReputMessageService reputMessageService;
    // 存储HA机制
    private final HAService haService;
    // 定时消息任务
    private final ScheduleMessageService scheduleMessageService;
    // 消息堆内存缓存
    private final TransientStorePool transientStorePool;
    private final ScheduledExecutorService scheduledExecutorService =
        Executors.newSingleThreadScheduledExecutor(new ThreadFactoryImpl("StoreScheduledThread"));
    private final BrokerStatsManager brokerStatsManager;
    // 消息拉取长轮询模式消息到达监听器
    private final MessageArrivingListener messageArrivingListener;
    // Broker配置属性
    private final BrokerConfig brokerConfig;
    // 文件刷盘检测点
    private StoreCheckpoint storeCheckpoint;
    // CommitLog文件转发请求
    private final LinkedList<CommitLogDispatcher> dispatcherList;
}
消息发送存储的入口则为:org.apache.rocketmq.store.DefaultMessageStore#putMessage,函数首先是消息参数校验(Topic长度等),然后是将延迟级别大于0的消息压入延迟队列(后续统一讲定时消息实现),就来到了关键点CommitLog.putMessage函数。
public PutMessageResult putMessage(final MessageExtBrokerInner msg) {
    String topic = msg.getTopic();
    int queueId = msg.getQueueId();
    // @1
    final int tranType = MessageSysFlag.getTransactionValue(msg.getSysFlag());
    if (tranType == MessageSysFlag.TRANSACTION_NOT_TYPE
        || tranType == MessageSysFlag.TRANSACTION_COMMIT_TYPE) {
        // Delay Delivery
        // 如果延迟级别大于0
        if (msg.getDelayTimeLevel() > 0) {
            /****/
        }
    }
    MappedFile unlockMappedFile = null;
    // @2 获取最新的MappedFile用于存储消息
    MappedFile mappedFile = this.mappedFileQueue.getLastMappedFile();
    // @3 加锁,消息存储是串行的
    putMessageLock.lock(); //spin or ReentrantLock ,depending on store config
    try {
        if (null == mappedFile || mappedFile.isFull()) {
            // @4 说明消息是第一次发送,用偏移量0创建第一个commit文件,之前讲过了
            mappedFile = this.mappedFileQueue.getLastMappedFile(0); // Mark: NewFile may be cause noise
        }
        if (null == mappedFile) {
            // 创建MappedFile失败
            log.error("create mapped file1 error, topic: " + msg.getTopic() + " clientAddr: " + msg.getBornHostString());
            beginTimeInLock = 0;
            return new PutMessageResult(PutMessageStatus.CREATE_MAPEDFILE_FAILED, null);
        }
        // @5
        result = mappedFile.appendMessage(msg, this.appendMessageCallback);
        switch (result.getStatus()) {
            case PUT_OK:
                break;
            case END_OF_FILE:
                // 超过文件大小,需要创建一个新的文件
                unlockMappedFile = mappedFile;
                // Create a new file, re-write the message
                mappedFile = this.mappedFileQueue.getLastMappedFile(0);
                if (null == mappedFile) {
                    // XXX: warn and notify me
                    log.error("create mapped file2 error, topic: " + msg.getTopic() + " clientAddr: " + msg.getBornHostString());
                    beginTimeInLock = 0;
                    return new PutMessageResult(PutMessageStatus.CREATE_MAPEDFILE_FAILED, result);
                }
                result = mappedFile.appendMessage(msg, this.appendMessageCallback);
                break;
            /** 异常结果 **/
        }
    } finally {
        putMessageLock.unlock();
    }
    PutMessageResult putMessageResult = new PutMessageResult(PutMessageStatus.PUT_OK, result);
    // @6
    handleDiskFlush(result, putMessageResult, msg);
    // @7
    handleHA(result, putMessageResult, msg);
    return putMessageResult;
}
先对 ComitLog 写入消息做一个简单描述,有一个大体的流程印象:
- 代码@1:获取消息类型(事务消息,非事务消息,Commit消息)。
- 代码@2:获取一个 MappedFile 对象,内存映射的具体实现。
- 代码@3,追加消息需要加锁,串行化处理。
- 代码@4:如果没有MappedFile,则需要创建一个。
- 代码@5:通过MappedFile对象写入文件。
- 代码@6:根据刷盘策略刷盘。
- 代码@7:主从同步。
以上的1-5步骤之前已经讲过了,剩下的6、7步骤在后面去探讨。
2.5 索引更新流程
消息消费队列文件、消息key索引文件都是基于CommitLog文件构建的,当消息生产者提交的消息存储在CommitLog文件中,ConsumeQueue、IndexFile需要及时更新,否则消息无法及时被消费,根据消息属性查找消息也会出现较大的延迟。RocketMQ通过开启一个线程ReputMessageService(就在上面提到的DefaultMessageStore类中实现的,这个类太全面了)来准实时转发CommitLog文件更新事件,相应的任务处理器根据转发的消息及时更新ConsumeQueue、IndexFile文件。
RocketMQ中此过程的核心服务是ReputMessageService,与4.0之前版本不同的是,consumeQueue与indexFile数据更新的服务线程独立出来了,分别使用CommitLogDispatcherBuildConsumeQueue和CommitLogDispatcherBuildIndex类处理,在初始化DefaultMessageStore时,将这两个类存放入dispatcherList列表中,与新云梯中校验流的做法是相似的:
this.dispatcherList = new LinkedList<>();
this.dispatcherList.addLast(new CommitLogDispatcherBuildConsumeQueue());
this.dispatcherList.addLast(new CommitLogDispatcherBuildIndex());
DefaultMessageStore的start启动函数中,初始化ReputMessageService,将reputFromOffset(开始解析物理队列的位置)设置为CosumeQueue存储的最大offset。
long maxPhysicalPosInLogicQueue = commitLog.getMinOffset();
for (ConcurrentMap<Integer, ConsumeQueue> maps : this.consumeQueueTable.values()) {
    for (ConsumeQueue logic : maps.values()) {
        if (logic.getMaxPhysicOffset() > maxPhysicalPosInLogicQueue) {
            maxPhysicalPosInLogicQueue = logic.getMaxPhysicOffset();
        }
    }
}
if (maxPhysicalPosInLogicQueue < 0) {
    maxPhysicalPosInLogicQueue = 0;
}
if (maxPhysicalPosInLogicQueue < this.commitLog.getMinOffset()) {
    maxPhysicalPosInLogicQueue = this.commitLog.getMinOffset();
    log.warn("[TooSmallCqOffset] maxPhysicalPosInLogicQueue={} clMinOffset={}", maxPhysicalPosInLogicQueue, this.commitLog.getMinOffset());
}
log.info("[SetReputOffset] maxPhysicalPosInLogicQueue={} clMinOffset={} clMaxOffset={} clConfirmedOffset={}",
         maxPhysicalPosInLogicQueue, this.commitLog.getMinOffset(), this.commitLog.getMaxOffset(), this.commitLog.getConfirmOffset());
this.reputMessageService.setReputFromOffset(maxPhysicalPosInLogicQueue);
this.reputMessageService.start();
在ReputMessageService服务线程开启后,不断run去执行doReput函数,从CommitLog中解析数据,生成dispatchRequest,然后转发给更新请求处理器。
private void doReput() {
    if (this.reputFromOffset < DefaultMessageStore.this.commitLog.getMinOffset()) {
        log.warn("The reputFromOffset={} is smaller than minPyOffset={}, this usually indicate that the dispatch behind too much and the commitlog has expired.",
                 this.reputFromOffset, DefaultMessageStore.this.commitLog.getMinOffset());
        this.reputFromOffset = DefaultMessageStore.this.commitLog.getMinOffset();
    }
    for (boolean doNext = true; this.isCommitLogAvailable() && doNext; ) {

        if (DefaultMessageStore.this.getMessageStoreConfig().isDuplicationEnable()
            && this.reputFromOffset >= DefaultMessageStore.this.getConfirmOffset()) {
            break;
        }
        // 获取对应offset的数据(包括MappedFile)
        SelectMappedBufferResult result = DefaultMessageStore.this.commitLog.getData(reputFromOffset);
        if (result != null) {
            try {
                // 更新offset
                this.reputFromOffset = result.getStartOffset();
                for (int readSize = 0; readSize < result.getSize() && doNext; ) {
                    // 通过ByteBuffer读取消息并封装成DispatchRequest 返回
                    DispatchRequest dispatchRequest =
                        DefaultMessageStore.this.commitLog.checkMessageAndReturnSize(result.getByteBuffer(), false, false);
                    int size = dispatchRequest.getBufferSize() == -1 ? dispatchRequest.getMsgSize() : dispatchRequest.getBufferSize();

                    if (dispatchRequest.isSuccess()) {
                        if (size > 0) {
                            // 分发处理器,去构建ConsumeQueue和IndexFile
                            DefaultMessageStore.this.doDispatch(dispatchRequest);
                            // 长轮询相关
                            if (BrokerRole.SLAVE != DefaultMessageStore.this.getMessageStoreConfig().getBrokerRole()
                                && DefaultMessageStore.this.brokerConfig.isLongPollingEnable()) {
                                DefaultMessageStore.this.messageArrivingListener.arriving(dispatchRequest.getTopic(),
                                                                                          dispatchRequest.getQueueId(), dispatchRequest.getConsumeQueueOffset() + 1,
                                                                                          dispatchRequest.getTagsCode(), dispatchRequest.getStoreTimestamp(),
                                                                                          dispatchRequest.getBitMap(), dispatchRequest.getPropertiesMap());
                            }
                            // 构建ConsumeQueue完成后,reputFromOffset应该增加,下次在这里开始
                            this.reputFromOffset += size;
                            readSize += size;
                            /****/
                        } else if (size == 0) {
                            this.reputFromOffset = DefaultMessageStore.this.commitLog.rollNextFile(this.reputFromOffset);
                            readSize = result.getSize();
                        }
                    } else if (!dispatchRequest.isSuccess()) {
                        /** 请求分发失败处理 **/
                    }
                }
            } finally {
                result.release();
            }
        } else {
            doNext = false;
        }
    }
}
checkMessageAndReturnSize函数是在MappedFile的byteBuffer中获取消息实体,然后打包为DispatchRequest请求,然后分发执行请求,去构建consumeQueue和indexFile。
public void doDispatch(DispatchRequest req) {
    for (CommitLogDispatcher dispatcher : this.dispatcherList) {
        dispatcher.dispatch(req);
    }
}
上文中提到过,分发请求列表dispatcherList中包括更新ConsumeQueue的CommitLogDispatcherBuildConsumeQueue处理器和更新index的CommitLogDispatcherBuildIndex处理器,我们分开来看。
2.5.1 ConsumeQueue消息队列
首先,我们要明确的是,ConsumeQueue与CommitLog类似, 内部也采用MappedFileQueue实现了消息位置文件队列功能。
上文中说到分发请求DispatchRequest来到了CommitLogDispatcherBuildConsumeQueue处理器,判断消息类型(事务性消息不做处理),根据消息主题与队列ID,获取对应的ConsumeQueue文件,并将该请求执行添加新的数据,最终来到了ConsumeQueue.putMessagePositionInfo函数。
private boolean putMessagePositionInfo(final long offset, final int size, final long tagsCode,
                                       final long cqOffset) {
    this.byteBufferIndex.flip();
    this.byteBufferIndex.limit(CQ_STORE_UNIT_SIZE);
    this.byteBufferIndex.putLong(offset);
    this.byteBufferIndex.putInt(size);
    this.byteBufferIndex.putLong(tagsCode);
    final long expectLogicOffset = cqOffset * CQ_STORE_UNIT_SIZE;
    MappedFile mappedFile = this.mappedFileQueue.getLastMappedFile(expectLogicOffset);
    if (mappedFile != null) {
        return mappedFile.appendMessage(this.byteBufferIndex.array());
    }
    return false;
}
依次将消息偏移量、消息长度、tag hashcode写入到ByteBuffer中,并根据consumeQueueOffset计算ConsumeQueue中的物理地址,将内容追加到consumeQueue的内存映射文件中(本操作只追加,不刷盘),consumeQueue的刷盘方式固定为异步刷盘。
2.5.2 Index索引文件
和ConsumeQueue相似,DispatchRequest请求分发最终来到了后台线程服务IndexService的buildIndex函数。
public void buildIndex(DispatchRequest req) {
    // 获取最近的索引文件,同时也将上一次索引改动做刷盘处理,具体可以细看这个方法
    IndexFile indexFile = retryGetAndCreateIndexFile();
    if (indexFile != null) {
        long endPhyOffset = indexFile.getEndPhyOffset();
        DispatchRequest msg = req;
        String topic = msg.getTopic();
        String keys = msg.getKeys();
        if (msg.getCommitLogOffset() < endPhyOffset) {
            return;
        }
        final int tranType = MessageSysFlag.getTransactionValue(msg.getSysFlag());
        switch (tranType) {
            case MessageSysFlag.TRANSACTION_NOT_TYPE:
            case MessageSysFlag.TRANSACTION_PREPARED_TYPE:
            case MessageSysFlag.TRANSACTION_COMMIT_TYPE:
                break;
            case MessageSysFlag.TRANSACTION_ROLLBACK_TYPE:
                return;
        }
        // 如果存在唯一的key,先构建它的索引
        if (req.getUniqKey() != null) {
            indexFile = putKey(indexFile, msg, buildKey(topic, req.getUniqKey()));
            if (indexFile == null) {
                log.error("putKey error commitlog {} uniqkey {}", req.getCommitLogOffset(), req.getUniqKey());
                return;
            }
        }
        // 对每一个key都会添加索引
        if (keys != null && keys.length() > 0) {
            String[] keyset = keys.split(MessageConst.KEY_SEPARATOR);
            for (int i = 0; i < keyset.length; i++) {
                String key = keyset[i];
                if (key.length() > 0) {
                    indexFile = putKey(indexFile, msg, buildKey(topic, key));
                    if (indexFile == null) {
                        log.error("putKey error commitlog {} uniqkey {}", req.getCommitLogOffset(), req.getUniqKey());
                        return;
                    }
                }
            }
        }
    } else {
        log.error("build index error, stop building index");
    }
}
获取最新的IndexFile文件(没有则创建),并得到最大的物理偏移量,如果本次请求消息的物理偏移量小于索引文件中的物理偏移量,则说明是重复数据,忽略本次索引。然后除了回滚的消息后,其他消息都会为其uniqKey(如果存在的话)和key建立索引。RocketMQ支持为同一个消息建立多个索引,其中多个索引键用空格分开。
构建索引就是将消息key键与消息偏移量映射关系写入到IndexFile中,具体实现方法在IndexFile#putKey中,和HashMap的put方法很相似,就是把红黑树换成了链表结构来解决hash冲突罢了,get方法也相似,在这里就不再赘述了。
三、文件刷盘机制
RocketMQ的存储与读写是基于JDK NIO的内存映射机制(MappedByteBuffer)的,消息存储时首先将消息追加到内存,再根据配置的刷盘策略在不同时间进行刷写磁盘。如果是同步刷盘,消息追加到内存后,将同步调用MappedByteBuffer的force()方法;如果是异步刷盘,在消息追加到内存后立刻返回给消息发送端。RocketMQ使用一个单独的线程按照某一个设定的频率执行刷盘操作。我们可以通过在broke配置文件中来设定刷盘方式,默认是异步刷盘。
本节以CommitLog文件刷盘机制为例来剖析RocketMQ的刷盘机制,ConusmeQueue的刷盘实现原理与CommitLog刷盘机制类似。需要注意的是,索引文件的刷盘并不是定时刷盘机制,而是每更新一次索引文件后将会将上一次的改动刷写到磁盘中。
处理刷盘的流程在CommitLog#handleDiskFlush()方法中,这个方法在上述说消息存储流程中提到过,就在消息存储结束后执行的。
public void handleDiskFlush(AppendMessageResult result, PutMessageResult putMessageResult, MessageExt messageExt) {
    // 同步刷盘
    if (FlushDiskType.SYNC_FLUSH == this.defaultMessageStore.getMessageStoreConfig().getFlushDiskType()) {
        final GroupCommitService service = (GroupCommitService) this.flushCommitLogService;
        if (messageExt.isWaitStoreMsgOK()) {
            GroupCommitRequest request = new GroupCommitRequest(result.getWroteOffset() + result.getWroteBytes());
            service.putRequest(request);
            CompletableFuture<PutMessageStatus> flushOkFuture = request.future();
            PutMessageStatus flushStatus = null;
            try {
                flushStatus = flushOkFuture.get(this.defaultMessageStore.getMessageStoreConfig().getSyncFlushTimeout(),
                                                TimeUnit.MILLISECONDS);
            } catch (InterruptedException | ExecutionException | TimeoutException e) {
                //flushOK=false;
            }
            if (flushStatus != PutMessageStatus.PUT_OK) {
                /** 刷盘错误  **/
                }
        } else {
            service.wakeup();
        }
    }
    // 异步刷盘
    else {
        if (!this.defaultMessageStore.getMessageStoreConfig().isTransientStorePoolEnable()) {
            flushCommitLogService.wakeup();
        } else {
            commitLogService.wakeup();
        }
    }
}
根据上述代码,可以了解到:
同步刷盘:用刷盘点偏移量来构建GroupCommitRequest同步任务并提交到GroupCommitService,等待同步刷盘任务完成,如果超时则返回刷盘错误,刷盘成功后正常返回给调用方。
异步刷盘:如果开启transientStorePoolEnable机制,消息首先追加到堆外内存,这时候需要先唤醒CommitRealTimeService服务,将消息提交到与物理文件映射的文件通道FileChannel中,再flush到磁盘;否则,直接唤醒FlushRealTimeService服务,执行刷盘操作。这点我们在上文堆外内存池中说过流程了。
3.1 Broker同步刷盘
同步刷盘由GroupCommitService服务来专门处理,它维护了两个队列,具体用途后面再分析。
// 同步刷盘任务暂存容器
private volatile List<GroupCommitRequest> requestsWrite = new ArrayList<GroupCommitRequest>();
// GroupCommitService线程每次处理的Request容器
private volatile List<GroupCommitRequest> requestsRead = new ArrayList<GroupCommitRequest>();
客户端提交同步刷盘任务到requestsWrite队列,同时唤醒线程。
public synchronized void putRequest(final GroupCommitRequest request) {
    synchronized (this.requestsWrite) {
        this.requestsWrite.add(request);
    }
    // 唤醒
    this.wakeup();
}
GroupCommitService线程不停地run,处理刷盘任务,具体在doCommit函数。
public void run() {
    CommitLog.log.info(this.getServiceName() + " service started");

    while (!this.isStopped()) {
        try {
            // 休息10ms,并执行requestsWrite和requestsRead的交换
            this.waitForRunning(10);
            this.doCommit();
        } catch (Exception e) {
            CommitLog.log.warn(this.getServiceName() + " service has exception. ", e);
        }
    }
}
private void doCommit() {
    synchronized (this.requestsRead) {
        if (!this.requestsRead.isEmpty()) {
            for (GroupCommitRequest req : this.requestsRead) {
                // There may be a message in the next file, so a maximum of two times the flush
                boolean flushOK = false;
                // 如果是同一个mappedFile,那么执行一次flush就成功
                // 如果跨越了两个mappedFile,那么执行两次flush才成功
                for (int i = 0; i < 2 && !flushOK; i++) {
                    flushOK = CommitLog.this.mappedFileQueue.getFlushedWhere() >= req.getNextOffset();
                    if (!flushOK) {
                        // 去执行刷盘操作,0表示有脏数据就去刷盘
                        CommitLog.this.mappedFileQueue.flush(0);
                    }
                }
                // 但我认为这块是少一个代码的,来判断是否刷盘成功,需要再执行一遍
                // flushOK = CommitLog.this.mappedFileQueue.getFlushedWhere() >= req.getNextOffset();
                req.wakeupCustomer(flushOK ? PutMessageStatus.PUT_OK : PutMessageStatus.FLUSH_DISK_TIMEOUT);
            }
            // 清空刷盘任务
            this.requestsRead.clear();
        } else {
            // Because of individual messages is set to not sync flush, it
            // will come to this process
            CommitLog.this.mappedFileQueue.flush(0);
        }
    }
}
doCommit函数内逻辑为:
- 遍历同步遍历任务列表,根据加入顺序逐一执行刷盘逻辑。
- 消息有可能跨越两个MappedFile中存储,最多执行两次flush。
- 正常情况下,消息只在一个mappedfile中存储,进入for循环,第一次:由于刷盘起始点小于下次刷盘点,故flushOK为false,执行刷盘操作。第二次:由于刷盘成功,刷盘起始点等于下次刷盘点,flushOK为true。结束循环。
- 若有一个消息在下个MappedFile来存储,第一次flushOK为false,刷盘之后刷盘起始点还是小于下次刷盘点,故开始第二次刷盘。而第二次刷盘成功,而这时循环却结束了。可flushOK还是为false,返回错误!这个地方本来刷盘成功,却返回错误,我推测是个bug(更多概率是我没看懂),应该在循环结束后再加一个flushOK的判断才对。
- 调用mappedFileQueue#flush刷盘操作,最终会落到MappedFile#flush方法,这个之前就看过了。入参为0表示只要有脏数据就刷盘。
现在回头去看,两个队列的设计是一个亮点,其中requestsWrite队列只负责接受外边提交进来的请求信息。而requestsRead队列负责刷盘执行,当requestsRead队列刷盘任务执行完毕后,两个队列进行交换,相当于把这段时间接收到的请求任务再次添加到requestsRead队列中,这样避免了任务提交和任务执行的锁冲突。
3.2 Broker异步刷盘
异步刷盘根据是否开启transientStorePoolEnable机制,过程稍有区别,简单来说就是,开启堆外内存池后,会多一个commit操作,然后才flush。我们以机制开启为例,简单介绍一下异步刷盘,代码部分就不再多余展示了。
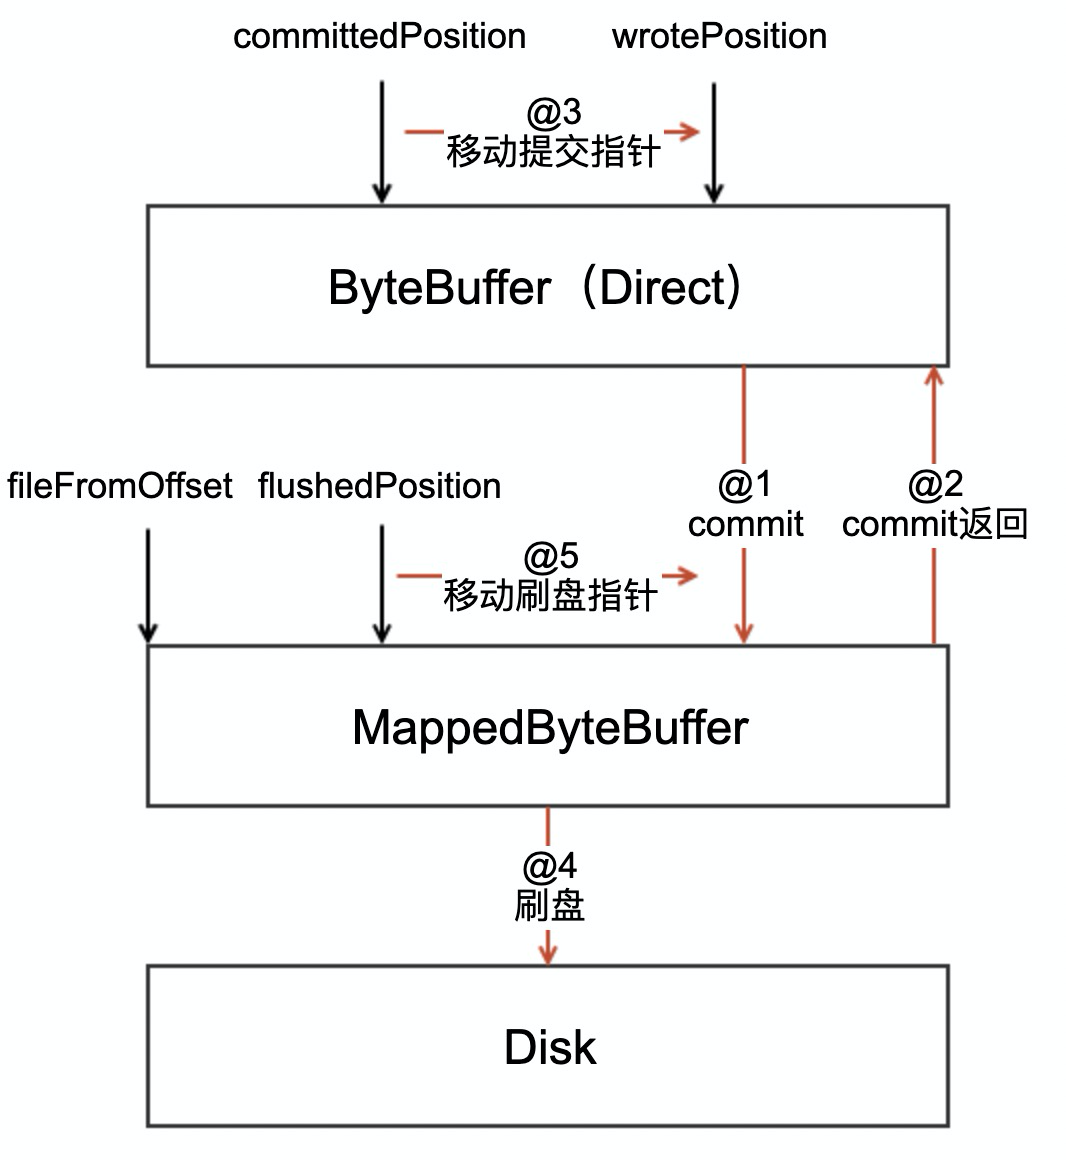
- 首先,先将消息直接追加到ByteBuffer(堆外内存DirectByteBuffer),写指针wrotePosition随着消息的不断追加而往后移动。
- CommitRealTimeService线程默认每隔200ms将ByteBuffer新追加的内容(wrotePosition减去commitedPosition)的数据提交到FileChannel(MappedByteBuffer映射)。对应@1步骤。
- FileChannel在通道内追加提交的内容,commit操作成功返回,将committedPosition指针向后移动本次提交的内容长度,也就是到当前wrotePosition的位置。wrotePosition可以继续随着消息追加往后走了。对应@2、@3步骤。
- FlushRealTimeService线程默认每隔500ms将FileChannel中新追加的内存(committedPosition减去flushedPosition),通过调用force方法,将数据刷写到磁盘上。对应@4步骤。
- 刷写成功后,移动刷盘指针flushedPosition到committedPosition位置,本次刷盘结束。
四、总结
我觉得用一个图就可以总结消息存储的关键信息,对其有一个清晰认识。

 浙公网安备 33010602011771号