
http://www.methodshop.com/gadgets/tutorials/macmini-ram/index.shtml
How to Upgrade the RAM in an Apple Mac
Mini
Mac Mini RAM Upgrade Tutorial
![]() Want
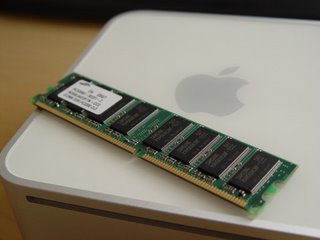
to upgrade the RAM in your Mac Mini? It's definitely a good idea if you have an older
Want
to upgrade the RAM in your Mac Mini? It's definitely a good idea if you have an older 
Traditionally, Apple computers
have easily come apart with a few screws and levers. In fact, some
 Many
people speculate that Apple made opening the Mac
Mini difficult on purpose. Apple would prefer that you let an authorized Apple service
provider handle all hardware upgrades and part replacements with
their consumer level products. While we're on the subject, please
keep in mind that if you ruin your computer while trying to open
it, Apple will not replace it for you. Also, don't come complaining
to us. Any damage you inflict on your computer is your fault, not
ours.
Many
people speculate that Apple made opening the Mac
Mini difficult on purpose. Apple would prefer that you let an authorized Apple service
provider handle all hardware upgrades and part replacements with
their consumer level products. While we're on the subject, please
keep in mind that if you ruin your computer while trying to open
it, Apple will not replace it for you. Also, don't come complaining
to us. Any damage you inflict on your computer is your fault, not
ours.
Proceed at your own risk and before you begin, you might want to consider backing up all important files. Better safe than sorry.
Requirements:
-
 putty knives ($0.86
plastic putty knives are recommended if you hate scratches)
putty knives ($0.86
plastic putty knives are recommended if you hate scratches)- fingernails
- standard size regular head screwdriver
- small Phillips head screwdriver (magnetic if possible)
- RAM (DDR2 SDRAM)
- shot glass or cereal bowl
- static wrist guard
- Mac Mini
| NERD NOTE: All Intel Macs, including the Mac Mini, work better when the RAM is equally paired (i.e.. two 512 MB RAM chips work better than an unequal 512 and 256 MB pair). |
|
|
|
|
|
Opening Up the Mac Mini
Print out this tutorial so you can refer to it later if needed.
| 01) Find a flat, clean, sturdy and dry surface that you can use for your Mac Mini's "operating table". Your kitchen table will probably work nicely. Some bad work-surface examples include: a diving board, the ball pit at Chucky Cheese, and a sauna. You should also try to reduce the chance of static shock in your surroundings by not standing on carpet, not wearing a cell phone, putting on a static wrist guard and repeatedly grounding yourself. |
|
02) If your computer is on, then shut it down. Unplug every cable that's connected to your Mac Mini and carry it over to your operating table. Then flip the Mac Mini upside down. |
|
Be careful not to dig the putty knife in too deep or you will tear up some of the gray foam on the inside of the case. Opening the Mac Mini is not an easy task. Turn back now if you don't feel comfortable. |
|
Once you have loosened the top cover, carefully slide it off. |
|
05) Be careful and take your time. Here's a video of us removing the Mac Mini cover.
|
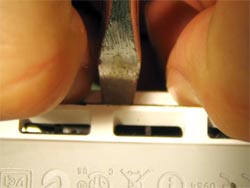 03) Use
your fingernails to slightly pry apart the top case of the Mac
Mini. Using a metal
03) Use
your fingernails to slightly pry apart the top case of the Mac
Mini. Using a metal 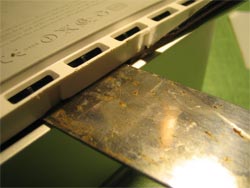 04) Once
you have the putty knife inserted into the side, use it to carefully
pry the top case apart from the rest of the Mac Mini. You may
have to push back until the putty knife starts to bend.
04) Once
you have the putty knife inserted into the side, use it to carefully
pry the top case apart from the rest of the Mac Mini. You may
have to push back until the putty knife starts to bend. Do you have a PowerPC or Intel Mac Mini?
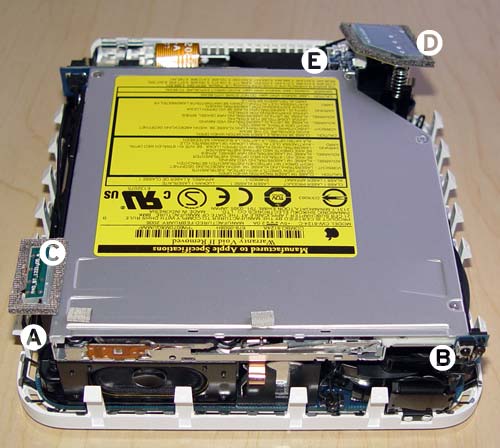
06) Congratulations 1st generation Mac Mini owners. If you have a Mac Mini with a PowerPC chip you can skip this step because your RAM slot is unobstructed. However, Mac Mini Intel owners will have to remove the AirPort card antenna, upper chassis and a tiny cable before getting access to the RAM slots.
Take a quick moment to look at the image below and familiarize yourself with the inside of the Mac Mini and locations of specific parts.
 |
|
Removing the 4 Corner Screws
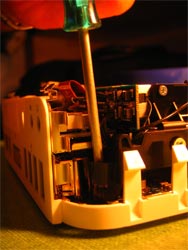
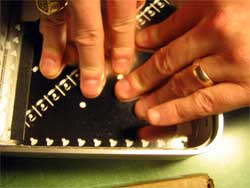
To remove the upper chassis, which holds the hard drive and the CD/DVD drive, you will need to take out 4 corner screws (3 small screws and one big one) surrounding a black plastic chassis. We suggest a magnetic screwdriver. Getting the 4 screws in and out is very difficult without one.
| IMPORTANT: At first glance you'll notice what is essentially three "levels" of screws. The first or top level holds the metal lid on top of the hard drive... leave these alone! The second or middle level holds the hard drive to the black chassis... leave these alone as well. The third or bottom level of screws are what need to be removed. These are the corner screws. |
|
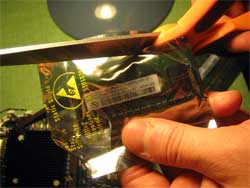
07) Three of the screws are easily removed. It's the 4th screw that's a pain in the ass. To access to 4th screw, you will have to pop out the airport antenna. Also, several users have emailed us about a piece of yellow transparent tape attaching a wire to the chassis right below the airport antenna. We haven't seen this piece of tape yet in person, but obviously it has to be removed.
|
|
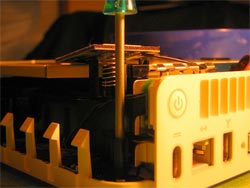
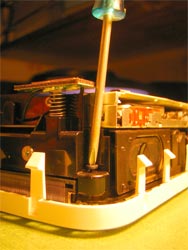
08) Slowly remove all 4 screws. Grab that souvenir shot glass you got at South Padre Island or a cereal bowl to hold the tiny screws after you remove them from the Mac Mini. These tiny black screws are a major pain in the ass to find if they happen to fall on the floor. We dropped one of the screws and had to use a magnetic wand to find it again. Click on the images below for a bigger view of the four screw locations.
|
|
09) Once you have all 4 screws sitting safely in a shot glass or cereal bowl, take a close look at them. You should have 3 small screws and one bigger one. The big screw goes in the front right corner of the Mac Mini. This tidbit will come in handy later when you are putting the computer back together. |


Accessing the RAM Slots
|
Don't pull the wire too hard or it will rip out and you'll be screwed. Finding someone to replace and install this part will be very pricey. When putting the Mac Mini back together, don't forget to reattach this tiny plug. It's a bit of a no brainer but I bet someone out there will forget! |
|
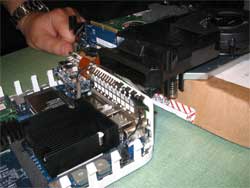
11) Properly bracing the upper chassis is very important. After you've removed the 4 screws and the tiny cable next to the battery, the chassis can be removed. Gently lift the chassis
straight up - pay close attention to the wires and the daughter
board. This sounds more ominous than it actually is, just be careful.
Flip the upper chassis over, it should still be connected by
a few wires in the back. At this point you can either ask a
friend to gently hold the upper chassis in place while you
insert the RAM or you can rest it on a book or box. Don't rip the cables or you'll be screwed.
|
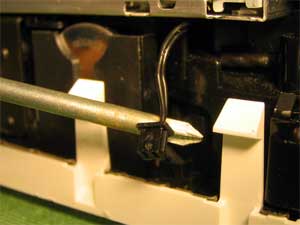 10) The next step is to unplug the tiny cable next to the battery.
Your Mac Mini has what looks like a giant watch battery inside.
To the right of this battery is a tiny black cable plugged
into the main board of the Mac Mini. Gently pull
upwards on
the cable and it will pop out of it's socket. If it
doesn't pop out, try to gently lift or pry it up from the plastic
connector using a a small flat head screwdriver.
10) The next step is to unplug the tiny cable next to the battery.
Your Mac Mini has what looks like a giant watch battery inside.
To the right of this battery is a tiny black cable plugged
into the main board of the Mac Mini. Gently pull
upwards on
the cable and it will pop out of it's socket. If it
doesn't pop out, try to gently lift or pry it up from the plastic
connector using a a small flat head screwdriver. 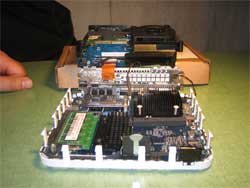
Adding / Removing RAM Chips
|
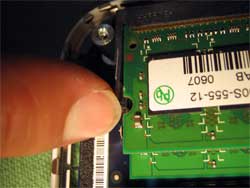
12) Sticking the RAM into
place is the easy part. But before you touch anything inside
the computer, make sure you are static free. Touch
the metal cover on the inside of the Mac Mini top cover.
If you
are replacing RAM, grab the tiny metal hinges, spread them apart
and gently pull out the RAM chip(s). Insert your new RAM at an
angle and push it down until it snaps into place. |
Test It Out
|
13) Before you put the Mac Mini back together, you should power it on and test out your new RAM. The last thing you want to do is put the cover back on, find out that the RAM wasn't seated properly, and then have to take it apart again. Remember several internal components of your computer will be exposed while the top cover is removed. Please be extra cautious.
|
|
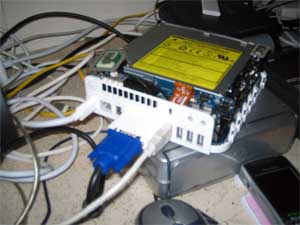
OPTION A - Loosely lay the cover back on. and make sure there are no exposed areas where you could electrocute yourself. Safety first! Then carefully plug in all the cables and turn on your computer while holding down the following keys: P, R, Option, Apple. You should hear the Macintosh startup chime. Don't let go until you hear the chime ring 3 times. This is called "zapping" the PRAM.
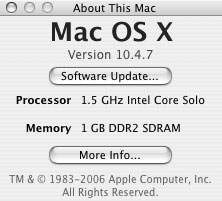
If your
computer starts up fine, then checkout the About This Mac window under
the Apple menu. Everything look OK? The About screen should indicate the
presence of your newly
added RAM. You can click on the "More Info" button
to see the status of each chip. If everything looks
good, Shutdown
the computer, unplug all the cables and go to the next
step. If you
ran into any problems, then try some of these RAM
troubleshooting tips.
|
|
15) If the RAM is good and everything checks out, then you can put the Mac Mini back together . Shutdown the computer, unplug everything and bring it back over to the operating table.
|
 14)
Zap the PRAM! It's
a good idea to zap the PRAM whenever putting new
hardware inside your
computer. If you forget the zap the PRAM, you computer
will probably boot up and present you with a folder icon and question
mark warning. There are 2 ways to zap the PRAM:
14)
Zap the PRAM! It's
a good idea to zap the PRAM whenever putting new
hardware inside your
computer. If you forget the zap the PRAM, you computer
will probably boot up and present you with a folder icon and question
mark warning. There are 2 ways to zap the PRAM: OPTION B - You can also reset the PRAM before closing up your computer buy

 浙公网安备 33010602011771号