
Android TabHost
1.概念
盛放Tab的容器就是TabHost。TabHost的实现有两种方式:
第一种继承TabActivity,从TabActivity中用getTabHost()方法获取TabHost。各个Tab中的内容在布局文件中定义就行了。
第二种方式,不继承TabActivity,在布局文件中定义TabHost即可,但是TabWidget的id必须是@android:id/tabs,FrameLayout的id必须是@android:id/tabcontent。
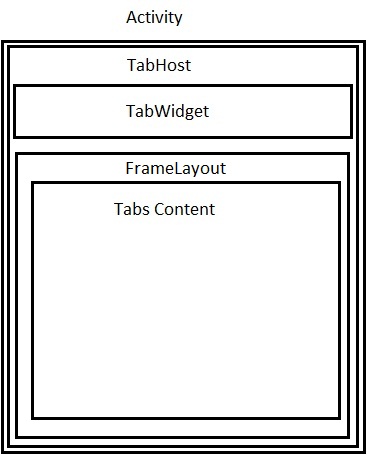
Tab应用的结构
TabHost的Activity的结构如下:
2.案例
1)继承TabActivity
res/layout/main.xml
<?xml version="1.0" encoding="utf-8"?>
 <!-- 定义TabHost组件 -->
 <TabHost xmlns:android="http://schemas.android.com/apk/res/android" android:layout_width="fill_parent" android:layout_height="fill_parent">
   <!-- 定义第一个标签页的内容 -->
   <LinearLayout android:id="@+id/tab01" android:orientation="vertical" android:layout_width="fill_parent" android:layout_height="fill_parent">
     <!-- 定义两个TextView用于显示标签页中的内容 -->
     <TextView android:layout_width="fill_parent" android:layout_height="wrap_content" android:text="孙悟空-2011/07/12"/>
     <TextView android:layout_width="fill_parent" android:layout_height="wrap_content" android:text="猪八戒-2011/07/10"/>
   </LinearLayout>
   <!-- 定义第二个标签页的内容 -->
   <LinearLayout android:id="@+id/tab02" android:orientation="vertical" android:layout_width="fill_parent" android:layout_height="fill_parent">
     <TextView android:layout_width="fill_parent" android:layout_height="wrap_content" android:text="萨僧-2011/07/11"/>
     <TextView android:layout_width="fill_parent" android:layout_height="wrap_content" android:text="唐僧-2011/07/10"/>
   </LinearLayout>
   <!-- 定义第三个标签页的内容 -->
   <LinearLayout android:id="@+id/tab03" android:orientation="vertical" android:layout_width="fill_parent" android:layout_height="fill_parent">
     <TextView android:layout_width="fill_parent" android:layout_height="wrap_content" android:text="孙悟空-2011/07/12"/>
     <TextView android:layout_width="fill_parent" android:layout_height="wrap_content" android:text="萨僧-2011/07/08"/>
   </LinearLayout>
 </TabHost>
HelloTabHost.java
public class HelloTabHost extends TabActivity {

   @Override
   public void onCreate(Bundle savedInstanceState) {
     super.onCreate(savedInstanceState);

     //调用TabActivity的getTabHost()方法获取TabHost对象
     TabHost tabHost = getTabHost();

     //设置使用TabHost布局
     LayoutInflater.from(this).inflate(R.layout.main, tabHost.getTabContentView(),true);

     //添加第一个标签页
     tabHost.addTab(tabHost.newTabSpec("tab01").setIndicator("已接电话").setContent(R.id.tab01));

     //添加第二个标签页,并在其标签上添加一个图片
     tabHost.addTab(tabHost.newTabSpec("tab02").setIndicator("未接电话",getResources().getDrawable(R.drawable.icon)).setContent(R.id.tab02));

     //添加第三个标签页
     tabHost.addTab(tabHost.newTabSpec("tab03").setIndicator("已拨电话").setContent(R.id.tab03));
   }
 }
运行效果:


2)不继承TabActivity
继承普通Activity,<TabWidget>标签id必须为tabs、<FrameLayout>标签id必须为tabcontent.这个方式在通过findViewById获得TabHost之后,必须要调用setup方法。
main.xml代码
<?xml version="1.0" encoding="utf-8"?>
  <!-- TabHost必须包含一个 TabWidget和一个FrameLayout-->
  <TabHost android:id="@+id/tabhost" android:layout_width="fill_parent" android:layout_height="wrap_content">
        <LinearLayout android:orientation="vertical" android:layout_width="fill_parent" android:layout_height="fill_parent">
            <!-- TabWidget的id属性必须为 @android:id/tabs-->
            <TabWidget android:id="@android:id/tabs" android:orientation="horizontal" android:layout_width="fill_parent"
              android:layout_height="wrap_content" />
            <!-- FrameLayout的id属性必须为 @android:id/tabcontent-->
             <FrameLayout android:id="@android:id/tabcontent" android:layout_width="fill_parent" android:layout_height="fill_parent">
                <TextView android:id="@+id/view1" android:layout_width="fill_parent" android:layout_height="fill_parent"/>
                <TextView android:id="@+id/view2" android:layout_width="fill_parent" android:layout_height="fill_parent"/>
                <TextView android:id="@+id/view3" android:layout_width="fill_parent" android:layout_height="fill_parent"/>
             </FrameLayout>
         </LinearLayout>
    </TabHost>
</LinearLayout>
Java代码
public class TabHostTest extends Activity {
    @Override
    public void onCreate(Bundle savedInstanceState) {
        super.onCreate(savedInstanceState);
        setContentView(R.layout.main);
        // 获取TabHost对象
        TabHost tabHost = (TabHost) findViewById(R.id.tabhost);
        // 如果没有继承TabActivity时,通过该种方法加载启动tabHost
        tabHost.setup();
        tabHost.addTab(tabHost.newTabSpec("tab1").setIndicator("第一个标签",
                getResources().getDrawable(R.drawable.icon)).setContent(
                R.id.view1));

        tabHost.addTab(tabHost.newTabSpec("tab3").setIndicator("第三个标签")
                .setContent(R.id.view3));

        tabHost.addTab(tabHost.newTabSpec("tab2").setIndicator("第二个标签")
                .setContent(R.id.view2));
    }
}
效果图

设置tab的内容
上面的例子展示了使用tab显示不同的layout资源。如果我们需要通过tab导航到不同的Activity,该怎么办?
这种情况,我们需要有一个activity作为应用的根activity。这个Activity包含TabHost,通过intents导航不同的activity。
注意:根Activity必须继承TabActivity。代码如下:
Layout:
<?xml version="1.0" encoding="utf-8"?>
    <TabHost android:layout_width="fill_parent"
    android:layout_height="fill_parent"
    android:id="@android:id/tabhost"
    xmlns:android="http://schemas.android.com/apk/res/android"
    >
    <TabWidget
    android:layout_width="fill_parent"
    android:layout_height="wrap_content"
    android:id="@android:id/tabs"
    />
     <FrameLayout
    android:layout_width="fill_parent"
    android:layout_height="fill_parent"
    android:id="@android:id/tabcontent"
     >
     </FrameLayout>
    </TabHost>
Activity:
public class TabDemo extends TabActivity {
    /** Called when the activity is first created. */
    @Override
    public void onCreate(Bundle savedInstanceState) {
        super.onCreate(savedInstanceState);
        setContentView(R.layout.main);

        TabHost tabHost=getTabHost();
        // no need to call TabHost.Setup()

        //First Tab
        TabSpec spec1=tabHost.newTabSpec("Tab 1");
        spec1.setIndicator("Tab 1",getResources().getDrawable(R.drawable.sun));
        Intent in1=new Intent(this, Act1.class);
        spec1.setContent(in1);

        TabSpec spec2=tabHost.newTabSpec("Tab 2");
        spec2.setIndicator("Tab 2",getResources().getDrawable(R.drawable.chart));
        Intent in2=new Intent(this,Act2.class);
        spec2.setContent(in2);

        tabHost.addTab(spec2);
        tabHost.addTab(spec3);
    }
}
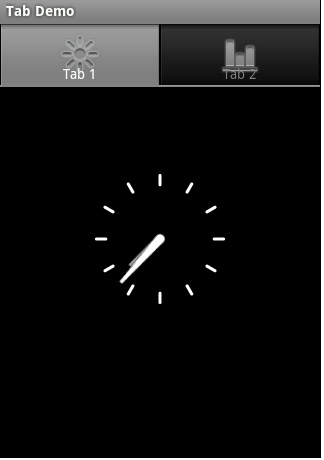
运行效果

在运行时添加Tab
在运行时我们可以通过调用TabSepc.setContent(TabContentFactory)方法添加Tab。
<span style="white-space:pre">    </span>TabSpec spec1=tabHost.newTabSpec("Tab 1");
        spec1.setIndicator("Tab 1",getResources().getDrawable(R.drawable.sun));

        spec1.setContent(new TabContentFactory() {

  <span style="white-space:pre">        </span> @Override
  <span style="white-space:pre">        </span> public View createTabContent(String tag) {
  <span style="white-space:pre">        </span>  // TODO Auto-generated method stub

   <span style="white-space:pre">        </span> return (new AnalogClock(TabDemo.this));
  <span style="white-space:pre">        </span> }
 <span style="white-space:pre">    </span> });

 浙公网安备 33010602011771号