
Vivado Design Suite用户指南之约束的使用第二部分(约束方法论)
Constraints Methodology(约束方法论)
关于约束方法论
设计约束定义了编译流程必须满足的要求,以使设计在板上起作用。 并非所有步骤都使用所有约束
在编译流程中。 例如,物理约束仅在实现步骤期间使用(即,由布局器和路由器)。
由于Xilinx®Vivado®集成设计环境(IDE)综合和实现算法是时序驱动的,因此必须创建适当的时序约束。
过度约束或设计不足会使时序收敛变得困难。 您必须使用符合您的应用程序要求的合理约束。
也就是说这一章主要就是讲解约束的行为规范,上一章讲述的是如何输入约束文件,这都是有一定顺序的
组织你的约束(个人认为比较重要,应该是我所需要的部分)
The Vivado IDE allows you to use one or many constraint files. While using a single
constraint file for the entire compilation flow might seem more convenient, it can be a
challenge to maintain all the constraints as the design becomes more complex. This is
usually the case for designs that use several IP cores or large blocks developed by different
teams.
After the timing and physical constraints have been imported, independent of the number
of source files or whether the design is in Project/Non-Project mode, all the constraints can
be exported as a single file with the write_xdc command. The constraints are written to
the specified output file in the same order that they were read into the project or design.
The command line option write_xdc -type can be used to select a sub-set of
constraints (timing, physical, or waiver) to export.
又是一大段英文,不归说真的,技术开发人员一些技术资料一定要看懂,但是比较权威的大部分都源自英文版,所以学好英语很重要!!! 不过没有那么多时间让我现学英文
只能退而求其次,想想办法,
Vivado IDE允许您使用一个或多个约束文件。 虽然对整个编译流使用单个约束文件似乎更方便,但随着设计变得更加复杂,维护所有约束可能是一个挑战。 对于使用由不同团队开发的多个IP核或大块的设计,通常就是这种情况。
导入定时和物理约束后,独立于源文件的数量或设计是否处于项目/非项目模式,可以使用write_xdc命令将所有约束导出为单个文件。
约束以与读入项目或设计相同的顺序写入指定的输出文件。
命令行选项write_xdc -type可用于选择要导出的约束(时间,物理或豁免)子集。
不过这里有一个建议:
RECOMMENDED: Xilinx recommends that you separate timing constraints and physical constraints by
saving them into two distinct files. You can also keep the constraints specific to a certain module in a
separate file.
建议:Xilinx建议您将时序约束和物理约束分开,将它们保存为两个不同的文件。 您还可以将特定于某个模块的约束保存在单独的文件中。
项目模式(工程模式)/非项目模式(非工程模式)的概念:
这是两种VIVADO的两种设计流程模式
(一) 设计者可以使用基于工程的方法自动管理设计过程和设计数据,这个就是说可以用VIVADO软件来进行
(二)可以根据TCL脚本的方法,可以自己设计管理源文件和设计流程,这种方法称为非工程模式,这就非常高大上了,就像是Linux里shell Windows里的doc,不过我作为初学者,还是选用第一种方法吧。
Project Flows
You can add your Xilinx Design Constraints (XDC) files to a constraints set during the
creation of a new project, or later, from the Vivado IDE menus.
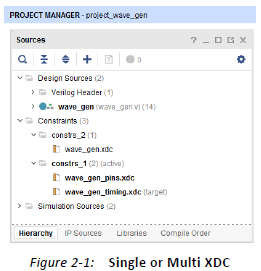
Figure 2-1 shows two constraint sets in a project, which are Single or Multi XDC. The first
constraint set includes two XDC files. The second constraint set uses only one XDC file
containing all the constraints.
You can also add Tcl scripts to your constraints set as unmanaged constraints or
unmanaged Tcl scripts. The Vivado Design Suite does not write modified constraints back
into an unmanaged Tcl script. Tcl scripts and XDC files are loaded in the same sequence as
displayed in the Vivado IDE (if they belong to the same PROCESSING_ORDER group) or as
reported by the command report_compile_order -constraints.
An XDC file or a Tcl script can be used in several constraints sets if needed. For more
information on how to create and add constraint files and constraints sets to your project,
see Working with Constraints in the Vivado Design Suite User Guide: System-Level Design
Entry (UG895) [Ref 2].
项目流程
您可以在创建新项目期间或稍后从Vivado IDE菜单中将Xilinx设计约束(XDC)文件添加到约束集中。
图2-1显示了项目中的两个约束集,即单XDC或多XDC。 第一个约束集包括两个XDC文件。 第二个约束集仅使用一个包含所有约束的XDC文件。
如果项目包含使用其自身约束的IP,则相应的约束文件不会出现在约束集中。 相反,它与IP源文件一起列出。
您还可以将Tcl脚本添加到约束集中作为非托管约束或非托管Tcl脚本。 Vivado设计套件不会重新编写修改的约束
进入一个非托管的Tcl脚本。 Tcl脚本和XDC文件的加载顺序与Vivado IDE中显示的顺序相同(如果它们属于同一个PROCESSING_ORDER组)或命令report_compile_order -constraints报告的顺序。
如果需要,可以在多个约束集中使用XDC文件或Tcl脚本。 有关如何为项目创建和添加约束文件和约束集的更多信息,请参阅“Vivado Design Suite用户指南”中的使用约束:系统级设计
参赛作品(UG895)[参考文献2]。
非项目流程
在非项目模式下,必须在执行编译命令之前单独读取每个文件。
下面的示例脚本显示了如何使用一个或多个XDC文件进行综合和实现。
示例脚本:
read_verilog [glob src / * .v]
read_xdc wave_gen_timing.xdc
read_xdc wave_gen_pins.xdc
synth_design -top wave_gen -part xc7k325tffg900-2
opt_design
place_design
route_design
语境外约束
在HD或PR流中,通常以上下文(OOC)方法合成设计的各部分。 当使用这样的流时,可以仅为OOC合成指定一些约束。 例如,当块合成OOC时,必须定义在块的输入边界处传播的时钟。 这些时钟在OOC XDC文件中定义。
In Project Mode:
add_file constraints_ooc.xdc
set_property USED_IN {synthesis out_of_context} [get_files constraints_ooc.xdc]
The Out-of-Context can also be set on the XDC file through the GUI (property on file
constraints_ooc.xdc).
也可以通过GUI(文件constraints_ooc.xdc上的属性)在XDC文件上设置Out-of-Context。
In Non-Project Mode:
read_xdc -mode out_of_context constraints_ooc.xdc
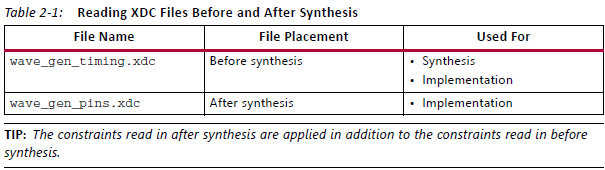
Synthesis and Implementation Constraint Files
By default, all XDC files and Tcl scripts added to a constraint set are used for both synthesis
and implementation. Set the USED_IN_SYNTHESIS and USED_IN_IMPLEMENTATION
properties on the XDC file or the Tcl script to change this behavior. This property can take
the value of either TRUE or FALSE.
合成和实现约束文件
默认情况下,添加到约束集的所有XDC文件和Tcl脚本都用于合成和实现。 在XDC文件或Tcl脚本上设置USED_IN_SYNTHESIS和USED_IN_IMPLEMENTATION属性以更改此行为。 此属性可以采用TRUE或FALSE的值。
重要信息:DONT_TOUCH属性不遵循USED_IN_SYNTHESIS和USED_IN_IMPLEMENTATION的属性。 如果在合成XDC中使用DONT_TOUCH属性,则为
无论USED_IN_IMPLEMENTATION的值如何,都会传播到实现中。 有关DONT_TOUCH属性的更多信息,请参阅RTL属性,第58页,这可能是最需要注意的地方
For example, to use a constraint file for implementation only:
1. Select the constraint file in the Sources window.
2. In the Source File Properties window:
a. Uncheck Synthesis.
b. Check Implementation.
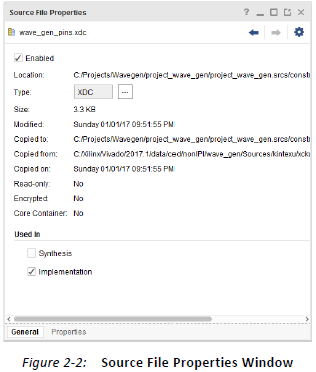
The equivalent Tcl commands are:
set_property USED_IN_SYNTHESIS false [get_files wave_gen_pins.xdc]
set_property USED_IN_IMPLEMENTATION true [get_files wave_gen_pins.xdc]
When running the Vivado IDE in Non-Project Mode, you can read in the constraints directly
between any steps of the flow. The properties USED_IN_SYNTHESIS and
USED_IN_IMPLEMENTATION do not matter in this mode.
在非项目模式下运行Vivado IDE时,您可以直接在流的任何步骤之间读取约束。 在此模式下,属性USED_IN_SYNTHESIS和USED_IN_IMPLEMENTATION无关紧要。
The following compilation Tcl script shows how to read two XDC files for different steps of
the flow:
以下编译Tcl脚本显示了如何读取不同步骤的两个XDC文件
流程:
read_verilog [glob src/*.v]
read_xdc wave_gen_timing.xdc
synth_design -top wave_gen -part xc7k325tffg900-2
read_xdc wave_gen_pins.xdc
opt_design
place_design
route_design
Ordering Your Constraints
Because XDC constraints are applied sequentially, and are prioritized based on clear
precedence rules, you must review the order of your constraints carefully. For more
information, see Chapter 7, XDC Precedence.
由于XDC约束是按顺序应用的,并且基于明确的优先级规则进行优先级排序,因此必须仔细检查约束的顺序。 有关更多信息,请参见第7章,XDC优先级
注意:如果多个物理约束发生冲突,则最新约束将获胜。 例如,如果I / O端口通过多个XDC文件分配了不同的位置(LOC),则为最新位置
分配给端口优先。
The Vivado IDE provides full visibility into your design. To validate your constraints step by
step:
Vivado IDE可全面了解您的设计。 要逐步验证您的约束:
1. Run the appropriate report commands.
2. Review the messages in the Tcl Console or the Messages window.
建议:无论是为设计使用一个还是多个XDC文件,都按以下顺序组织约束。
## Timing Assertions Section
# Primary clocks
# Virtual clocks
# Generated clocks
# Clock Groups
# Bus Skew constraints
# Input and output delay constraints


## Timing Exceptions Section
# False Paths
# Max Delay / Min Delay
# Multicycle Paths
# Case Analysis
# Disable Timing


## Physical Constraints Section
# located anywhere in the file, preferably before or after the timing constraints
# or stored in a separate constraint file
Note: The case analysis constraints that change the clock relationships or clock propagation should
be defined prior to defining the generated clocks. This includes cases analysis defined on clock
buffers that result in the output clock of the buffer to be impacted by the case analysis.
注:应在定义生成的时钟之前定义更改时钟关系或时钟传播的案例分析约束。 这包括在时钟上定义的案例分析
缓冲区导致缓冲区的输出时钟受到案例分析的影响。
Start with the clock definitions. The clocks must be created before they can be used by any
subsequent constraints. Any reference to a clock before it has been declared results in an
error and the corresponding constraint is ignored. This is true within an individual
constraint file, as well as across all the XDC files (or Tcl scripts) in your design.
The order of the constraint files matters. You must be sure that the constraints in each file
do not rely on the constraints of another file. If this is the case, you must read the file that
contains the constraint dependencies last. If two constraint files have interdependencies,
you must either merge them manually into one file that contains the proper sequence, or
divide the files into several separate files and order them correctly.
从时钟定义开始。 必须先创建时钟,然后才能将它们用于任何后续约束。 声明之前对时钟的任何引用都会导致错误,并忽略相应的约束。 在单个约束文件中以及设计中的所有XDC文件(或Tcl脚本)中都是如此。
从时钟定义开始。 必须先创建时钟,然后才能将它们用于任何后续约束。 声明之前对时钟的任何引用都会导致错误,并忽略相应的约束。
在单个约束文件中以及设计中的所有XDC文件(或Tcl脚本)中都是如此。
约束文件的顺序很重要。 您必须确保每个文件中的约束不依赖于另一个文件的约束。 如果是这种情况,则必须最后读取包含约束依赖项的文件。
如果两个约束文件具有相互依赖关系,则必须将它们手动合并到一个包含正确序列的文件中,或者将文件分成几个单独的文件并正确排序。
Constraints Sequence Editing
The Vivado IDE constraints manager saves any edited constraint back to its original location
in the XDC files, but not in Tcl scripts. Any new constraint is saved at the end of the XDC file
marked as target. In many cases, when your constraints set contains several XDC files, the
target constraint file is not the last file in the list, and will not be loaded last when opening
or reloading your design. As a consequence, the constraints sequence saved on disk can be
different from the one you had previously in memory.
Vivado IDE约束管理器将任何已编辑的约束保存回XDC文件中的原始位置,但不会保存在Tcl脚本中。 任何新约束都保存在标记为目标的XDC文件的末尾。 在许多情况下,当约束集包含多个XDC文件时,目标约束文件不是列表中的最后一个文件,并且在打开或重新加载设计时不会最后加载。 因此,保存在磁盘上的约束序列可能与之前在内存中的约束序列不同。
IMPORTANT: You must verify that the final sequence stored in the constraint files still works as
expected. If you must modify the sequence, you must modify it by directly editing the constraint files.
This is especially important for timing constraints
重要信息:您必须验证存储在约束文件中的最终序列是否仍按预期工作。 如果必须修改序列,则必须通过直接编辑约束文件来修改它。 这对时序约束尤为重要。
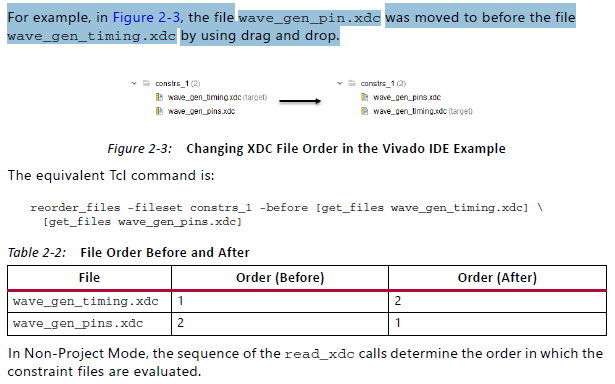
For example, in Figure 2-3, the file wave_gen_pin.xdc was moved to before the file
wave_gen_timing.xdc by using drag and drop.
在没有任何IP的项目流程中,所有约束都位于约束集中。 默认情况下,Vivado IDE中显示的XDC文件(或Tcl脚本)的顺序定义了将elaborated design或synthesized design加载到内存时工具使用的读取顺序。 首先读取列表顶部的文件,最后读取底部的文件。 您只需在IDE中选择文件并将其移动到列表中的所需位置即可更改顺序。
例如,在图1中,使用拖放操作将文件wave_gen_pin.xdc移动到文件wave_gen_timing.xdc之前。

Figure 1: Changing XDC File Order in the Vivado IDE Example
The equivalent Tcl command is:
reorder_files -fileset constrs_1 -before [get_files wave_gen_timing.xdc] [get_files wave_gen_pins.xdc]
Figure 2: XDC Files in the IP Sources
Figure 1: Changing XDC File Order in the Vivado IDE Example
The equivalent Tcl command is:
reorder_files -fileset constrs_1 -before [get_files wave_gen_timing.xdc] [get_files wave_gen_pins.xdc]
在非项目模式下,read_xdc调用的顺序决定了约束文件的计算顺序。
Constraint Files Order with IP Cores
许多IP内核随附一个或多个XDC文件。 在RTL项目中生成此类IP内核时,还会在各种设计编译步骤中使用其XDC文件。
例如,图2显示项目中的一个IP核带有一个XDC文件。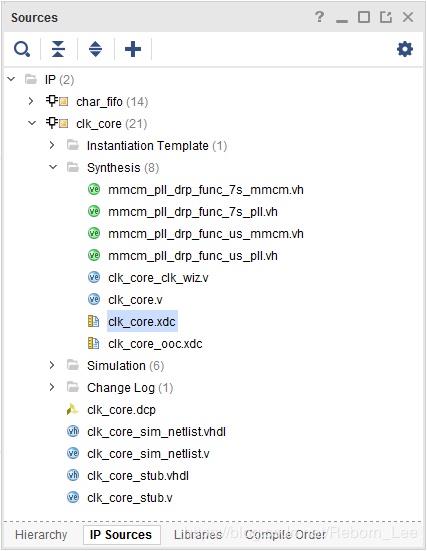
Figure 2: XDC Files in the IP Sources
默认情况下,在用户XDC文件之前读入IP XDC文件。 以这种方式处理它允许IP创建可在XDC中引用的时钟对象。 它还允许您覆盖由IP内核设置的物理约束,因为在IP之后评估用户约束。 对于依赖于由用户或其他IP创建的时钟对象的IP核,此顺序有一个例外(例如,get_clocks -of_objects [get_ports clka])。 在这种情况下,在用户文件之后读取IP XDC。
此行为由PROCESSING_ORDER属性控制,为每个XDC文件设置:
•EARLY:必须先读取的文件
•NORMAL:默认
•LATE:必须最后读取的文件
IP XDC将其PROCESSING_ORDER属性设置为EARLY或LATE。 没有哪个 IP提供属于NORMAL约束组的XDC文件。 对于属于同 一PROCESSING_ORDER组的用户XDC(或Tcl)文件,Vivado IDE中显示的相对顺序决定了它们的读取顺序。 可以通过移动Vivado IDE约束集中的文件或使用reorder_files命令来修改组中的顺序。
对于属于同一PROCESSING_ORDER组的IP XDC文件,顺序由IP内核的导入或创建顺序确定。 创建项目后,无法更改此顺序。
最后,用户组和IP XDC PROCESSING_ORDER组之间的相对顺序如下:
1.标记为EARLY的用户约束
2.标记为EARLY的IP约束(默认)
3.标记为NORMAL的用户约束
4.标记为LATE的IP约束(包含时钟依赖性)
5.标记为LATE的用户约束
注意:将其PROCESSING_ORDER设置为LATE(以便在用户约束后进行处理)的IP XDC文件命名为<IP_NAME> _clocks.xdc。
下图显示了如何设置PROCESSING_ORDER属性的示例: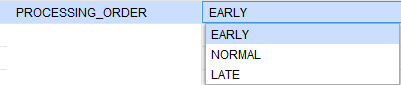
Figure 3: Setting the XDC File PROCESSING_ORDER Example
The equivalent Tcl command is:
set_property PROCESSING_ORDER EARLY [get_files wave_gen_pins.xdc]
建议:使用Tcl控制台中的report_compile_order -constraints命令报告由工具根据上述属性确定的XDC文件读取顺序,包括IS_ENABLED,USED_IN_SYNTHESIS和USED_IN_IMPLEMENTATION。
Changing Read Order
要在约束集中更改XDC文件或非托管Tcl脚本的读取顺序,请执行以下操作:
1.在“源”窗口中,选择要移动的XDC文件或Tcl脚本。
2.将文件拖放到约束集中的所需位置。
对于图1中所示的示例,等效的Tcl命令是:
reorder_files -fileset constrs_1 -before [get_files wave_gen_timing.xdc] [get_files wave_gen_pins.xdc]
在非项目模式下,read_xdc或source命令的顺序决定了约束文件的读取顺序。
如果使用带有约束的IP内核,则会自动处理两组约束,如下所示:
•不依赖于时钟的约束被分组到XDC文件中,PROCESSING_ORDER设置为EARLY,
•依赖于时钟的约束在PROCESSING_ORDER设置为LATE的XDC文件中分组。
默认情况下,用户XDC文件属于PROCESSING_ORDER NORMAL组。 它们在EARLY XDC文件之后和LATE XDC文件之前加载。 对于每个PROCESSING_ORDER组,IP XDC文件的加载顺序与IP Sources窗口中IP核的列表顺序相同。 例如,下图显示了XDC文件附带的项目IP内核之一。
Figure 4: XDC Files in the IP Sources
打开设计时,日志文件显示最后加载了IP XDC文件:


Parsing XDC File

[C:/project_wave_gen_hdl.srcs/sources_1/ip/clk_core/clk_core.xdc] for cell 'clk_gen_i0/clk_core_i0/inst'
Finished Parsing XDC File
[C:/project_wave_gen_hdl.srcs/sources_1/ip/clk_core/clk_core.xdc] for cell 'clk_gen_i0/clk_core_i0/inst'
Parsing XDC File
[C:/project_wave_gen_hdl.srcs/sources_1/ip/char_fifo/char_fifo/char_fifo.xdc] for cell 'char_fifo_i0/U0'
Finished Parsing XDC File
[C:/project_wave_gen_hdl.srcs/sources_1/ip/char_fifo/char_fifo/char_fifo.xdc] for cell 'char_fifo_i0/U0'
Parsing XDC File
[C:/project_wave_gen_hdl.srcs/constrs_1/imports/verilog/wave_gen_timing.xdc]
Finished Parsing XDC File
[C:/project_wave_gen_hdl.srcs/constrs_1/imports/verilog/wave_gen_timing.xdc]
Parsing XDC File
[C:/project_wave_gen_hdl.srcs/sources_1/ip/char_fifo/char_fifo/char_fifo_clocks.xdc ] for cell 'char_fifo_i0/U0'
Finished Parsing XDC File
[C:/project_wave_gen_hdl.srcs/sources_1/ip/char_fifo/char_fifo/char_fifo_clocks.xdc ] for cell 'char_fifo_i0/U0'
Completed Processing XDC Constraints
与用户XDC文件不同,您无法直接更改属于同一PROCESSING_ORDER组的IP XDC文件的读取顺序。 如果必须修改订单,请执行以下操作:
1.禁用相应的IP XDC文件(IS_ENABLED设置为false)。
2.复制他们的内容。
3.将内容粘贴到约束集中包含的一个XDC文件中。
4.在需要的地方使用完整的分层网表对象路径名更新复制的IP XDC命令。 这样做是必需的,因为IP XDC约束以这样的方式编写,即它们可以作用于IP实例。
5.查看以特殊方式处理范围约束的get_ports查询。
Entering Constraints
The Vivado IDE provides several ways to enter constraints. Unless you directly edit the XDC
file in a text editor, you must open a design database (elaborated, synthesized or
implemented) in order to access the constraints windows in the Vivado IDE.
Vivado IDE提供了几种输入约束的方法。 除非您在文本编辑器中直接编辑XDC文件,否则必须打开设计数据库(详细说明,综合或实现)才能访问Vivado IDE中的约束窗口。
Saving Constraints in Memory
You must have a design in memory to validate your constraints during editing. When you
edit a constraint using the Vivado IDE user interface, the equivalent XDC command is issued
in the Tcl Console in order to apply it in memory. An edited timing constraint must be
applied in memory before it can be saved to the XDC file.
Before you can run synthesis or implementation, you must save the constraints in memory
back to an XDC file that belongs to the project. The Vivado IDE prompts you to save your
constraints whenever necessary.
您必须在内存中设计一个设计才能在编辑期间验证您的约束。 使用Vivado IDE用户界面编辑约束时,将在Tcl控制台中发出等效的XDC命令,以便将其应用于内存。 必须先将已编辑的时序约束应用于内存,然后才能将其保存到XDC文件中。(啥意思?将已编辑的时序约束应用于内存然后才能保存XDC文件???)
在运行综合或实现之前,必须将内存中的约束保存回属于项目的XDC文件。 Vivado IDE会在必要时提示您保存约束。
Do one of the following to save your constraints manually:
执行以下操作之一以手动保存约束:
•单击“保存约束”。
•选择“文件”>“约束”>“保存”。
Note: When you save the in-memory constraints, a dialog box opens to remind you that this could
cause the synthesis and implementation to go out of date. Select the Remember Preference check
box on this dialog box to disable future instances of this warning.
注意:保存内存中的约束时,会打开一个对话框,提醒您这可能导致合成和实现过时。 选中此对话框上的“记住首选项”复选框以禁用此警告的未来实例。
When you run these commands, Vivado does the following:
• Saves all new constraints to the XDC file marked target in the constraints set
associated with your design.
• Saves all edited constraints back to the XDC file from which they originated.
Note: The constraints management system preserves the original XDC files format as much as
possible.
运行这些命令时,Vivado会执行以下操作:
•将所有新约束保存到与设计关联的约束集中标记为目标的XDC文件。
•将所有已编辑的约束保存回源自它们的XDC文件。
注意:约束管理系统尽可能保留原始XDC文件格式。
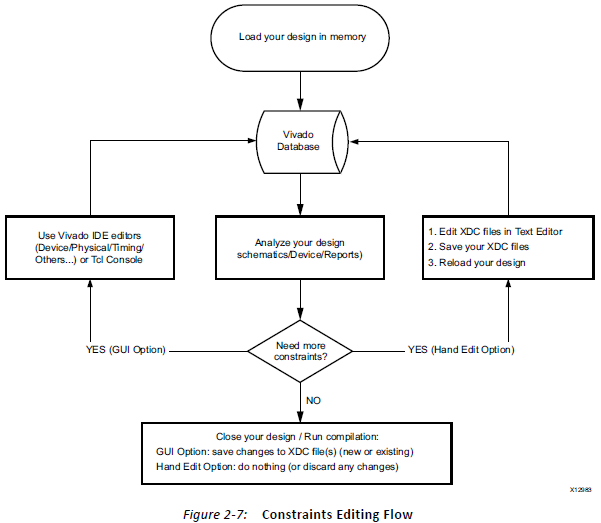
Constraints Editing Flow Options
Figure 2-7 shows the recommended flow options. Do not use both options at the same
time. Mixing these options might cause you to lose constraints. The recommended flow
options are:
图2-7显示了推荐的流量选项。 不要同时使用这两个选项。 混合这些选项可能会导致您失去约束。 推荐的流程选项包括:
• User Interface Option
• Hand Edit Option
User Interface Option
Because the Vivado IDE manages your constraints, you must not edit your XDC files at the
same time. When the Vivado IDE saves the memory content, the following occurs:
• The modified constraints replace the original constraints in their original file.
• The new constraints are appended to the file marked as target.
• All manual edits in the XDC files are overwritten.
用户界面选项
由于Vivado IDE管理您的约束,因此您不能同时编辑XDC文件。 当Vivado IDE保存内存内容时,会发生以下情况:
•修改的约束替换原始文件中的原始约束。
•新约束将附加到标记为目标的文件中。
•将覆盖XDC文件中的所有手动编辑。
Hand Edit Option
When you use the Hand Edit option, you are in charge of editing and maintaining the XDC
files. While you will probably use the Tcl Console to verify the syntax of some constraints,
you must discard the changes made in memory when closing or reloading your design.
In case of a conflict when saving the constraints, you are prompted to choose one of the
following:
• Discarding the changes made in memory
• Saving the changes in a new file
• Overwriting the XDC files
手编辑选项
使用“手动编辑”选项时,您负责编辑和维护XDC文件。 虽然您可能会使用Tcl控制台来验证某些约束的语法,
关闭或重新加载设计时,必须放弃在内存中所做的更改。
如果在保存约束时发生冲突,系统会提示您选择其中一个
以下:
•放弃在内存中进行的更改
•将更改保存在新文件中
•覆盖XDC文件
Constraints creation is iterative. You can use IDE editors in some cases, and hand edit the
constraint files in others.
在图2-7中描述的每次迭代中,不要同时使用这两个选项。
如果在两个选项之间切换,则必须先保存约束或重新加载设计,以确保内存中的约束与XDC文件正确同步。
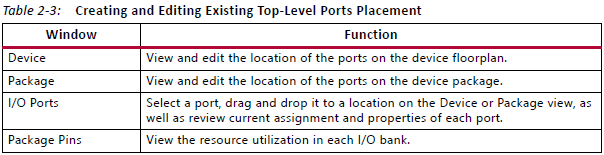
Pin Assignment
To create and edit existing top-level ports placement when using the RTL Analysis,
Synthesis, or Implementation views:
在使用RTL Analysis,Synthesis或Implementation视图时创建和编辑现有的顶级端口放置:
1. Select the I/O Planning pre-configured layout.
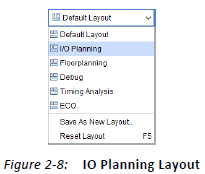
2. Open the windows shown in Table 2-3.
有关引脚分配的更多信息,请参阅“Vivado Design Suite用户指南”中的此链接:
I / O和时钟规划(UG899)[参考3]。
布局规划
在使用RTL分析,综合或实施视图时创建和编辑Pblock:
1.选择布局规划预配置布局。

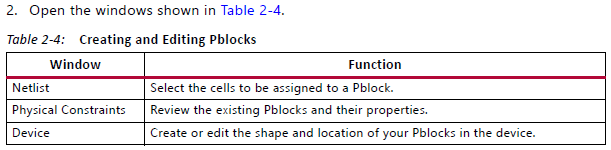
To create cell placement constraints on a particular BEL or SITE:
1. Select the cell in the Netlist view.
2. Drag and drop the cell to the target location in the Device view.
要在特定的BEL或SITE上创建单元格放置约束:
1.在“网表”视图中选择单元格。
2.将单元格拖放到“设备”视图中的目标位置。
有关布局规划的更多信息,请参阅“Vivado Design Suite用户指南”中的以下链接:
设计分析和关闭技术(UG906)[参考文献4]。
Timing Constraints Wizard
The Timing Constraints Wizard identifies missing timing constraints on a synthesized or
implemented design. It analyzes the netlist, the clock nets connectivity, and the existing
timing constraints in order to provide recommendations as per the UltraFast Design
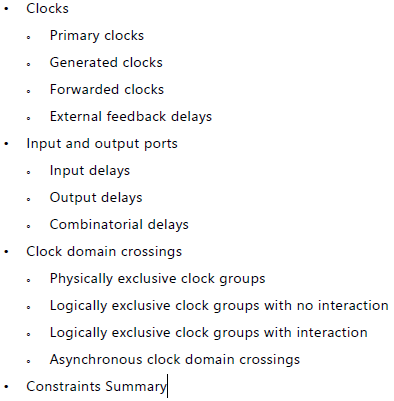
Methodology Guide for the Vivado Design Suite (UG949) [Ref 5]. Three categories of
constraints are covered by the following 11 pages of the wizard, followed by a summary.
The following steps are included:
时序约束向导
时序约束向导识别合成或实现的设计上缺少的时序约束。 它分析网表,时钟网络连接和现有的时序约束,以便根据Vivado设计套件(UG949)的UltraFast设计方法指南[参考文献5]提供建议。 向导的以下11页包含三类约束,后面是摘要。
包括以下步骤:
在每个步骤中,您可以接受建议的约束或通过选中或取消选中每个建议的约束来修改列表。 但是,在向导的早期取消选中建议的约束可能会阻止在后续步骤中识别其他缺少的约束。 例如,如果您决定跳过创建时钟,则向导将不会识别并推荐任何引用此时钟或其自动派生时钟的约束。
向导的最后一页提供了将要创建的约束的摘要。 您可以单击每个单独的超链接以查看约束详细信息,或在退出向导后在“时序约束”窗口中显示新约束。
您还可以选择在单击“完成”后生成以下建议的报告,以验证设计是否完全受约束:
Create Timing Summary report: Timing slack is reported with the new constraints, in
addition to a check_timing report. Timing violations will likely display if the period
or I/O delay constraints that you entered are too difficult.
• Create Check Timing report: This report identifies missing or inappropriate
constraints by running the check_timing command.
• Create DRC Report using only Timing Checks: this report runs the Timing DRCs.
重要信息:除非单击“取消”,否则新添加的约束将自动保存到目标XDC文件中。 退出向导后,您可以在Timing Constraints窗口中编辑或删除新约束。
The Timing Constraint Wizard does not recommend a constraint if it introduces unsafe timing analysis. Also, the wizard does not fix inappropriate constraints that already existed when loading the design in memory. Nevertheless, some invalid constraints might become valid after creating all the missing clocks when using Vivado Design Suite in project mode;
for more details, see Constraints Processing Order and Invalid Constraints, below. Also, after using the wizard, if check_timing or report_drc still flag some constraints issues, it is usually due to a constraint problem that already existed in the source XDC files. You must address these problems directly instead of using the wizard to resolve them.
如果定时约束向导引入了不安全的时序分析,则不建议使用约束。 此外,向导不会修复在内存中加载设计时已存在的不适当约束。 然而,在项目模式下使用Vivado Design Suite时,创建所有丢失的时钟后,某些无效约束可能会生效;
有关更多详细信息,请参阅下面的约束处理顺序和无效约束。 此外,在使用向导之后,如果check_timing或report_drc仍标记一些约束问题,则通常是由于源XDC文件中已存在的约束问题。 您必须直接解决这些问题,而不是使用向导来解决它们。
约束处理顺序和无效约束
时序约束向导建议缺少定义时钟或引用时钟的约束,这些约束将在项目模式下保存在目标XDC文件的末尾,或者在其他模式的所有约束结束时保存。出于这个原因,你必须明白
以下规则:
•项目模式:在启动“计时约束”向导之前,必须指定目标XDC文件,其处理顺序设置为“正常”。目标XDC文件必须属于在内存中打开且当前选定的设计的约束集。目标XDC文件在其他XDC文件中的位置很重要,因为它指定了以后应用和保存建议约束的位置。此外,向导会尝试重新应用属于目标之后解析的XDC文件的任何无效约束
XDC文件以提供最完整和准确的建议。
例如,考虑来自synth_1的网表在内存中使用约束集constr_1运行。此约束集包含序列a.xdc,b.xdc和c.xdc中的三个XDC文件。如果选择b.xdc作为目标XDC文件并且每个文件包含无效约束,则Timing Constraints向导将应用推荐的时钟,然后在继续执行下一步并发现其他缺少的约束之前从c.xdc重新应用无效约束。
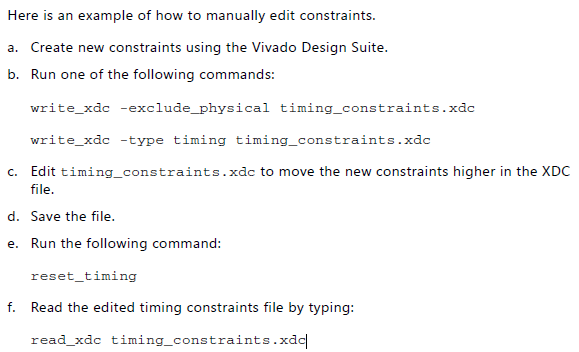
您无法在这些模式下指定目标XDC文件,因此“时序约束”向导会在约束序列的最后位置推荐并应用新约束。 这相当于在Tcl控制台中输入新约束或通过Timing Constraints窗口输入新约束。 在这些模式下,向导不会尝试重新应用无效约束。 如果需要在整个约束序列中更早地应用新约束以解决约束依赖性或优先级问题,则必须手动编辑约束序列。
以下是如何手动编辑约束的示例
You cannot specify a target XDC file in these modes, so the Timing Constraints wizard recommends and applies new constraints at the last position of the constraints sequence. This is equivalent to entering new constraints in the Tcl Console or via the Timing Constraints window. In these modes, the wizard does not attempt to re-apply invalid constraints. If the new constraints need to be applied earlier in the overall constraints sequence in order to resolve constraints dependencies or precedence issues, you must edit the constraints sequence manually.
您无法在这些模式下指定目标XDC文件,因此“时序约束”向导会在约束序列的最后位置推荐并应用新约束。 这相当于在Tcl控制台中输入新约束或通过Timing Constraints窗口输入新约束。 在这些模式下,向导不会尝试重新应用无效约束。 如果需要在整个约束序列中更早地应用新约束以解决约束依赖性或优先级问题,则必须手动编辑约束序列。
您可以使用Timing Constraints窗口查看更新的时序约束序列。 查看新约束后,可以将序列保存到DCP中
向导打开时可用的报告功能当“时序约束”向导打开时,它会阻止Vivado IDE中的大多数操作,包括使用Tcl控制台或运行时序分析,以避免数据库差异。 向导窗口始终位于其他Vivado IDE窗口的前面。 如果需要访问Vivado IDE菜单或窗口,则必须将向导窗口移到侧面。
Timing Constraints向导打开时,只有以下功能可用:
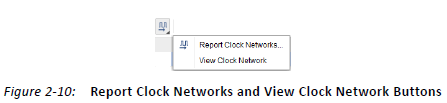
•报告和可视化时钟网络
Most pages of the wizard have buttons to generate and access the clock network report in order to visualize the clock topologies, their source point, and the shared segments for some of the clocks.
向导的大多数页面都有按钮来生成和访问时钟网络报告,以便可视化时钟拓扑,它们的源点以及某些时钟的共享段。
有关时钟网络报告的更多详细信息,请参阅“Vivado设计套件用户指南:设计分析和关闭技术”(UG906)[参考4]。
Searching a name in source files or an object in the design in memory
The Find and Find In Files dialog boxes are available from the Edit menu. You can use these dialog boxes to retrieve some information about the design while entering the constraints in the wizard.
• Creating and Viewing schematics
You can select design objects in the main Vivado IDE window and visualize them in schematics. All schematics features are available. Only the last step of the Timing Constraints wizard, Asynchronous Clock Domain Crossings, supports convenient schematics cross-probing when selecting one or several entries in the Timing Paths tab.
Refer to the Vivado Design Suite User Guide: Using the Vivado IDE (UG893) [Ref 7] for more info on using schematics.
在源文件中搜索名称或在内存中搜索设计中的对象
“编辑”菜单中提供了“查找和查找文件”对话框。 在向导中输入约束时,可以使用这些对话框检索有关设计的一些信息。
•创建和查看原理图
您可以在主Vivado IDE窗口中选择设计对象,并在原理图中将其可视化。 所有原理图功能均可用。 只有时序约束向导的最后一步,异步时钟域交叉,在“时序路径”选项卡中选择一个或多个条目时,支持方便的原理图交叉探测。
有关使用原理图的更多信息,请参阅“Vivado Design Suite用户指南:使用Vivado IDE(UG893)[参考7]”。
Visualizing constraints in memory with the Timing Constraints window Each page of the wizard includes a tab that shows the existing constraints of the same type as recommended by the step. This is convenient for quickly reviewing the details of constraints already created in the XDC files. For a complete view of all timing constraints in memory, the Timing Constraints window shows the full sequence of constraints, organized by XDC file, including scoping information. It also displays the invalid constraints.
使用“时序约束”窗口可视化内存中的约束向导的每个页面都包含一个选项卡,该选项卡显示与步骤建议的相同类型的现有约束。 这对于快速查看已在XDC文件中创建的约束的详细信息很方便。 有关内存中所有时序约束的完整视图,Timing Constraints窗口显示由XDC文件组织的完整约束序列,包括作用域信息。 它还显示无效约束。
Constraints Editing within the Wizard
Each step of the wizard can recommend several constraints. Depending on the constraint,you must take one of the following actions:
• Uncheck the constraints you do not want to create, using one of the following
methods:
° Remove each constraint from the list, one at a time, by unchecking each line.
° Remove all constraints by unchecking the upper left check box of the table.
约束在向导中编辑
向导的每个步骤都可以推荐几个约束。 根据约束,您必须执行以下操作之一:
•使用以下方法之一取消选中您不想创建的约束
方法:
°通过取消选中每一行,从列表中删除每个约束,一次一个。
°通过取消选中表格的左上角复选框来删除所有约束。
提示:或者,您可以右键单击约束,然后选择“不创建约束”,如图所示
图2-11。
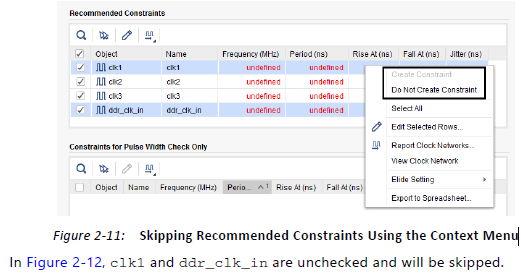
在图2-12中,clk1和ddr_clk_in未选中,将被跳过。
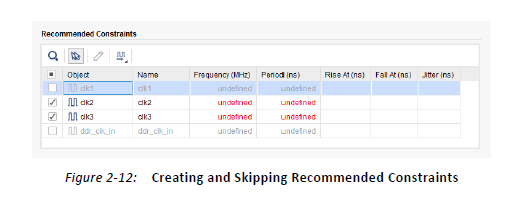
通过单击显示未定义的单元格输入缺少的值(例如,图2-12中的clk2和clk3的频率或周期值)。
您可以通过选择相应的行并单击Edit Selected Rows按钮同时编辑多个约束,如图2-13所示。

接下来,填写所有必填字段,如Frequency和Period,如图2-14所示。
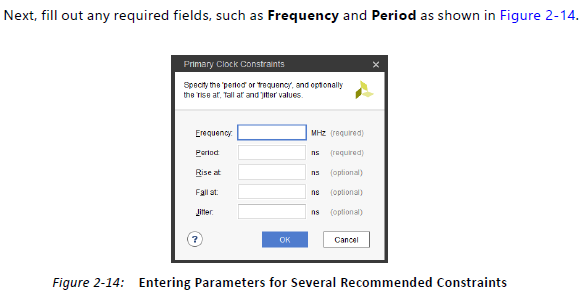
一次编辑多个约束对输入和输出延迟特别有用
限制。
•如果不需要采取任何措施,只需查看约束。
检查并完成所有已检查的建议约束后,单击“下一步”继续下一页。 您错过的任何条目都会阻止向导进入下一步。
您可以使用“后退”按钮重新访问页面。 如果在上一页上编辑任何约束并单击“下一步”,则向导将重新分析设计并相应地推荐新约束。 在大多数情况下,先前建议的约束不受影响
更改已恢复。 如果只查看上一页而不修改任何建议的约束,则向导不会重新运行任何分析,这通常会节省运行时间。
重要信息:您无法使用“时序约束”向导编辑现有时序约束。 相反,您必须使用Timing Constraints窗口。
Constraints Recommended by the Wizard
Primary Clocks
Two categories of clocks are identified by the wizard, as shown in Figure 2-15.
向导标识两类时钟,如图2-15所示。
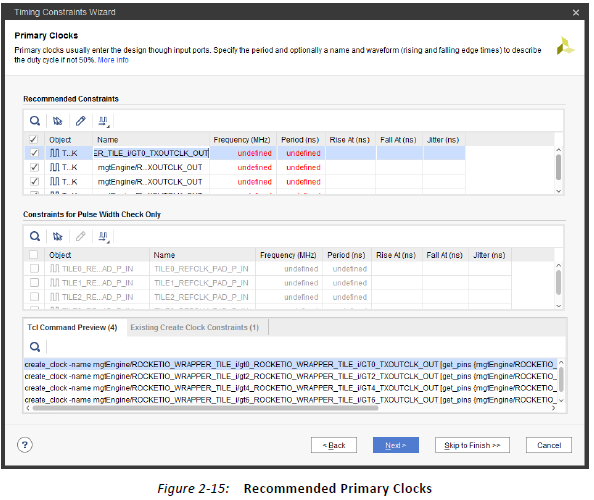
计算时序松弛所需的主要时钟
建议约束表中显示建立/保持/恢复/删除检查。
•仅执行脉冲宽度检查所需的时钟(min_period,max_period,max_skew,min_low_pulse_width和min_high_pulse_width)出现在“仅限脉冲宽度检查限制”表中。 默认情况下,这些时钟未选中,因为它们仅用于报告目的而不会影响
实施工具的结果质量。
向导会自动识别约束的正确时钟源点。 它对应于时钟树根,其中时钟信号实际进入设计。 在大多数情况下,时钟源点是输入时钟端口,在某些特殊情况下,它是没有定时弧的基元的输出。 例如,在7系列设备中,向导会识别GT_CHANNEL基元输出上缺少的主时钟。 对于UltraScale™器件,Vivado Design Suite能够根据输入时钟特性以及GT_CHANNEL配置和连接自动导出GT_CHANNEL输出时钟。 因此,向导会建议位于设计边界上GT_CHANNEL单元上游的主时钟。
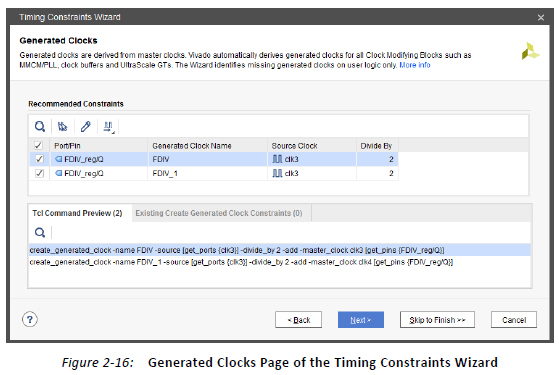
生成的时钟
Timing Constraints(时序约束)向导建议在顺序单元的输出上直接或通过某些互连逻辑驱动其他顺序单元的时钟引脚时,创建生成时钟。 与PLL或MMCM不同,用户逻辑不能乘以主时钟的频率,因此向导仅提供指定除法系数的选项,如图2-16所示。

当多个主时钟到达生成的时钟源点时,向导将使用唯一的名称和对各个主时钟的清晰引用来创建所有相应的生成时钟。 图2-16说明了两个时钟(clk3和clk4)到达的情况
顺序单元FDIV_Reg。 因此,建议使用两个生成的时钟约束(FDIV和FDIV_1)。
注意:某些时钟拓扑(例如时钟路径上的级联寄存器)可能需要多次运行“时序约束”向导才能发现所有丢失的生成时钟。
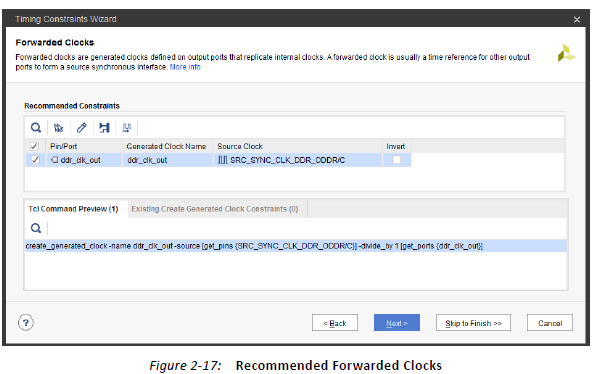
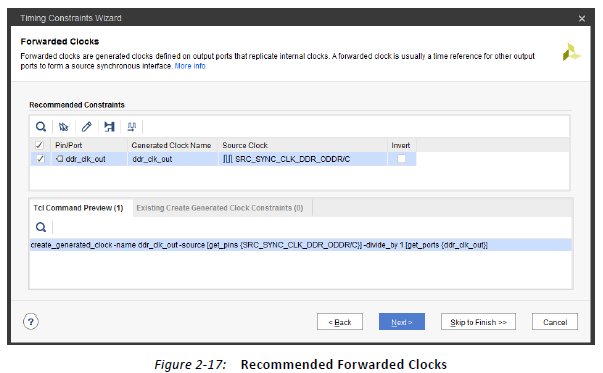
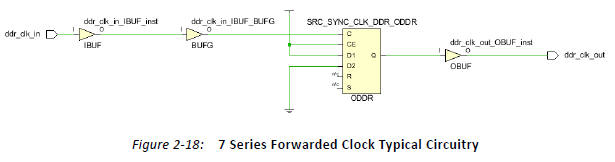
转发时钟
Timing Constraints向导建议在输出端口上生成时钟约束,该输出端口由具有常量输入的双倍数据速率寄存器驱动。 基于输入恒定连接性,将生成的时钟相位调整为正(0度相移)或反相(180度相移)。 约束中使用的主时钟是到达双倍数据速率寄存器的时钟引脚的时钟。 查看源时钟
图2-17中推荐约束表的列。
对于7系列器件系列,向导识别的拓扑结构如下所示
图2-18。 主时钟或输出缓冲器的性质没有限制。

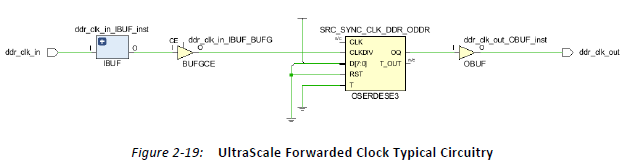
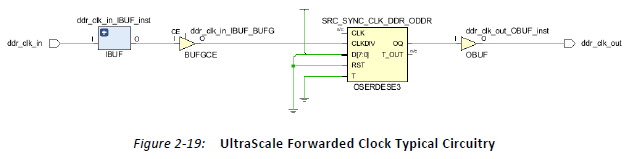
对于UltraScale器件系列,ODDR和ODDRE1原语会自动重定向到OSERDESE3,其属性为ODDR_MODE = TRUE。 向导识别图2-19中所示的拓扑,其中OSERDESE3 / D [0]连接到1和
OSERDESE3 / D [4]连接到0(无相移)
外部反馈延迟
Timing Constraints(时序约束)向导分析设计中存在的MMCM和PLL单元的反馈环路连接。 建议使用外部延迟约束(最小和最大)
当CLKFBIN和CLKFBOUT引脚通过IO缓冲器和MMCM或PLL属性COMPENSATION = EXTERNAL连接到设计端口时。 图2-20说明了推荐的外部延迟约束。
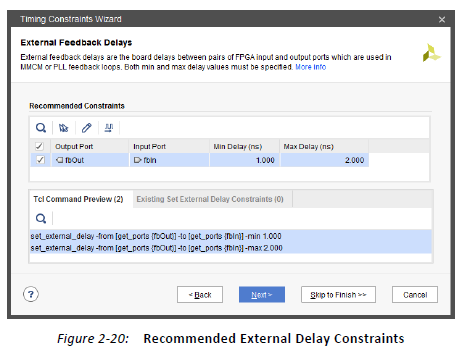
图2-21显示了具有外部反馈路径电路的典型MMCM。
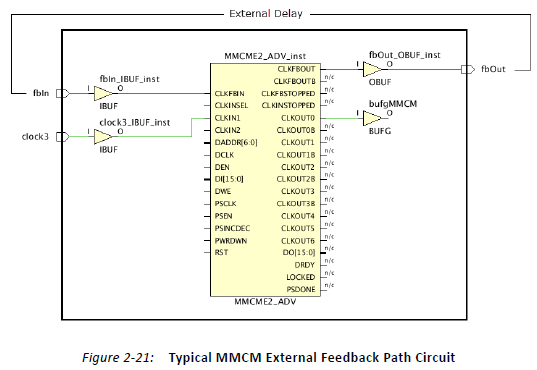
In the current Vivado Design Suite release, the Timing Constraints wizard cannot
recommend external delay constraints when there is a sequential cell in the feedback path,
such as ODDR, which is used for generating a forwarded clock. In this case, you must create
the external delay constraints manually or using the Timing Constraints window after
exiting the wizard.
在当前的Vivado Design Suite版本中,当反馈路径中存在连续单元(例如ODDR,用于生成转发时钟)时,Timing Constraints向导不建议使用外部延迟约束。 在这种情况下,您必须在退出向导后手动或使用Timing Constraints窗口创建外部延迟约束。
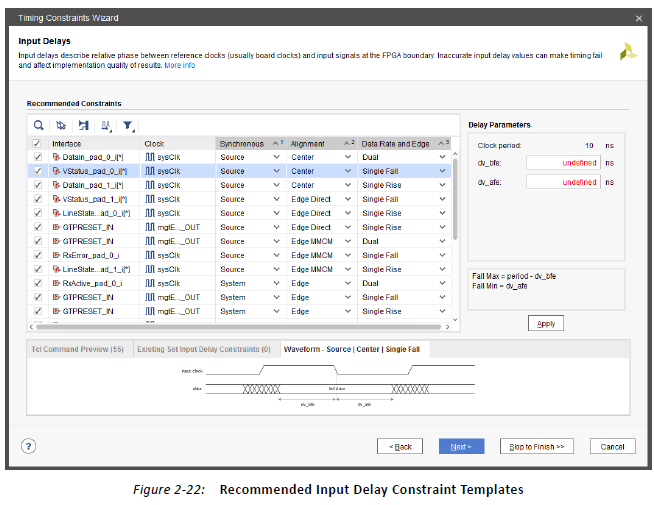
Input Delays
The Timing Constraints wizard analyzes all paths from input ports to identify their
destination clock inside the design and their active edges. Based on this information, the
wizard recommends basic system synchronous input delay constraints that are based on the
XDC templates available in the Vivado IDE (see XDC Templates, page 55 for templates). The
waveform associated with the selected template is displayed at the bottom of the window
in the Waveform tab when you select a constraint entry in the Recommended Constraints
table.
输入延迟
Timing Constraints(时序约束)向导分析来自输入端口的所有路径,以识别设计中的目标时钟及其活动边缘。 根据此信息,向导会建议基于的基本系统同步输入延迟约束
Vivado IDE中提供的XDC模板(有关模板,请参阅XDC模板,第55页)。 在“推荐约束”表中选择约束条目时,与所选模板关联的波形将显示在“波形”选项卡中窗口的底部。
图2-22显示了向导提出并由用户进行部分编辑的几个输入约束的示例。
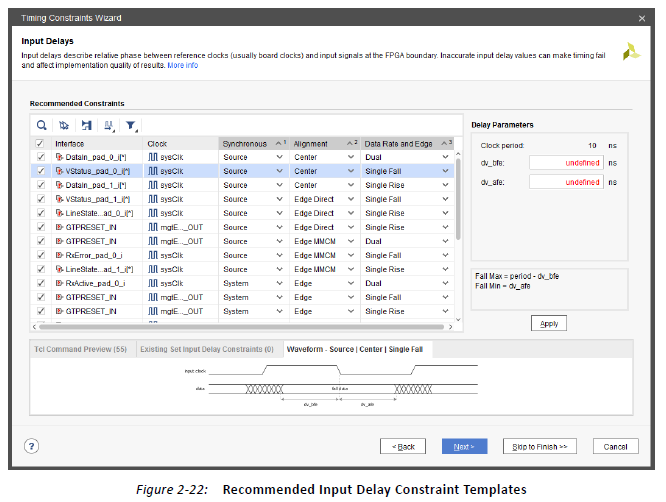
For each constraint, you can edit three characteristics in order to specify the appropriate waveform that corresponds to the actual interface timing on the board:
• Synchronous describes the nature of the clock-data relationship.
° System (for System Synchronous interface): use this setting when the data is launched and captured by different clock edges that are 1 period or ½ period apart.
° Source (for Source Synchronous interface): use this setting when the data is launched and captured by the same clock edge.
• Alignment describes the data transition alignment with respect to the active clock edge.
° For System Synchronous interfaces only:
- Edge: use this setting when the clock and data transition at the same time.
对于每个约束,您可以编辑三个特征,以指定与电路板上实际接口时序对应的相应波形:
•同步描述时钟数据关系的性质。
°系统(用于系统同步接口):当数据通过1个周期或相隔1/2周期的不同时钟边沿启动和捕获时使用此设置。
°Source(用于源同步接口):当数据以相同的时钟边沿启动和捕获时使用此设置。
•对齐描述了与活动时钟边沿相关的数据转换对齐。
°仅适用于系统同步接口:
- Edge:当时钟和数据同时转换时使用此设置。
仅适用于源同步接口:
- 中心:当时钟在数据有效窗口中间转换时使用此设置。
- Edge Direct:当时钟在数据有效窗口的开头转换时使用此设置。
- Edge MMCM:当时钟在数据有效窗口结束时转换时使用此设置。
•Data Rate和Edge描述了受模板约束的活动时钟边沿。 向导建议的默认值基于捕获顺序单元的活动时钟边沿。
°Single Rise:使用此设置用于只有上升时钟沿启动FPGA外部数据的情况。
°Single Fall:使用此设置用于仅下降时钟边沿FPGA外部数据启动的情况。
°Dual:使用此设置用于上升和下降时钟沿启动FPGA外部数据的情况。
You can also choose to generate the following recommended reports upon clicking Finish to verify that the design is completely and properly constrained:
• Create Timing Summary report: Timing slack is reported with the new constraints, in addition to a check_timing report. Timing violations will likely display if the period or I/O delay constraints that you entered are too difficult.
• Create Check Timing report: This report identifies missing or inappropriate constraints by running the check_timing command.
• Create DRC Report using only Timing Checks: this report runs the Timing DRCs.
您还可以选择在单击“完成”后生成以下建议的报告,以验证设计是否完全受约束:
•创建时序摘要报告:除了check_timing报告之外,还会使用新约束报告时序松弛。 如果您输入的周期或I / O延迟限制太难,则可能会显示时序违规。
•创建检查时间报告:此报告通过运行check_timing命令来识别缺失或不适当的约束。
•仅使用时序检查创建DRC报告:此报告运行时序DRC。
重要信息:除非单击“取消”,否则新添加的约束将自动保存到目标XDC文件中。 退出后,您可以在Timing Constraints窗口中编辑或删除新约束
向导会自动识别约束的正确时钟源点。 它对应于时钟树根,其中时钟信号实际进入设计。 在大多数情况下,时钟源点是输入时钟端口,在某些特殊情况下,它是没有定时弧的基元的输出。 例如,在7系列设备中,向导会识别GT_CHANNEL基元输出上缺少的主时钟。 对于UltraScale™器件,Vivado Design Suite能够根据输入时钟特性和GT_CHANNEL配置和连接自动导出GT_CHANNEL输出时钟。 因此,向导会建议位于设计边界上GT_CHANNEL单元上游的主时钟。
当多个主时钟到达生成的时钟源点时,向导将使用唯一的名称和对各个主时钟的清晰引用来创建所有相应的生成时钟。 图2-16说明了两个时钟(clk3和clk4)到达的情况
顺序单元FDIV_Reg。 因此,建议使用两个生成的时钟约束(FDIV和FDIV_1)。
注意:某些时钟拓扑(例如时钟路径上的级联寄存器)可能需要多次运行“时序约束”向导才能发现所有丢失的生成时钟。
转发时钟
Timing Constraints向导建议在输出端口上生成时钟约束,该输出端口由具有常量输入的双倍数据速率寄存器驱动。 基于输入恒定连接性,将生成的时钟相位调整为正(0度相移)或反相(180度相移)。 约束中使用的主时钟是到达双倍数据速率寄存器的时钟引脚的时钟。 查看源时钟
图2-17中推荐约束表的列。
对于7系列器件系列,向导识别的拓扑结构如下所示
图2-18。 主时钟或输出缓冲器的性质没有限制。
For the UltraScale device family, the ODDR and ODDRE1 primitives are automatically
retargeted to OSERDESE3 with the property ODDR_MODE=TRUE. The wizard recognizes the
topology shown in Figure 2-19, where OSERDESE3/D[0] is connected to 1 and
OSERDESE3/D[4] is connected to 0 (no phase-shift).
对于UltraScale器件系列,ODDR和ODDRE1原语会自动重定向到OSERDESE3,其属性为ODDR_MODE = TRUE。向导识别图2-19中所示的拓扑,其中OSERDESE3 / D [0]连接到1,OSERDESE3 / D[4]连接到0(无相移)。
外部反馈延迟
Timing Constraints(时序约束)向导分析设计中存在的MMCM和PLL单元的反馈环路连接。 建议使用外部延迟约束(最小和最大)
当CLKFBIN和CLKFBOUT引脚通过IO缓冲器和MMCM或PLL属性COMPENSATION = EXTERNAL连接到设计端口时。 图2-20说明了推荐的外部延迟约束。

Timing Constraints(时序约束)向导分析来自输入端口的所有路径,以识别设计中的目标时钟及其活动边缘。 根据此信息,向导会建议基于的基本系统同步输入延迟约束
Vivado IDE中提供的XDC模板(有关模板,请参阅XDC模板,第55页)。 在“推荐约束”表中选择约束条目时,与所选模板关联的波形将显示在“波形”选项卡中窗口的底部。
图2-22显示了向导提出并由用户进行部分编辑的几个输入约束的示例。
对于每个约束,您可以编辑三个特征,以指定与电路板上实际接口时序对应的相应波形:
•同步描述时钟数据关系的性质。
°系统(用于系统同步接口):当数据通过1个周期或相隔1/2周期的不同时钟边沿启动和捕获时使用此设置。
°Source(用于源同步接口):当数据以相同的时钟边沿启动和捕获时使用此设置。
•对齐描述了与活动时钟边沿相关的数据转换对齐。
°仅适用于系统同步接口:
- Edge:当时钟和数据同时转换时使用此设置。
输出延迟
与输入延迟步骤类似,时序约束向导分析所有输出端口的路径,以识别设计中的源时钟及其活动边沿。 模板选择规则与输入延迟中描述的相同。 图2-24显示了向导提出的几个输出约束,并由用户进行了部分编辑。
对于每个约束,可以编辑三个特征,以便指定与板上实际接口时序相对应的适当波形:
•Synchronous描述时钟数据关系的性质(有关详细信息,请参阅输入延迟,页面33)。
•对齐描述了与活动时钟边沿相关的数据转换对齐。
°建立/保持:当根据FPGA外部的数据有效窗口时序特性指定模板延迟参数时,使用此设置。
°Skew(仅限源同步):根据FPGA的输出引脚的偏斜要求指定模板延迟参数时,使用此设置。
•Data Rate和Edge描述了受模板约束的活动时钟边沿(请参阅
输入延迟,第33页了解更多详情)。
与推荐的输入延迟约束一样,参考时钟通常是电路板时钟,但以下情况除外:
•电路板时钟和输出路径内部时钟具有不同的时钟周期。输出约束引用与内部时钟具有相同波形的虚拟时钟,以便以1周期路径要求执行设置分析。
自动创建虚拟时钟。
•与电路板时钟相比,输出路径内部时钟具有负相移。该向导使用虚拟时钟作为参考时钟。使用与电路板时钟相同的波形自动创建虚拟时钟。此外,向导还指定虚拟时钟和内部时钟之间的多周期路径约束,以将默认分析调整为1个周期+设置的相移量。虚拟时钟和多周期路径约束的组合为Vivado Design Suite定时器提供了更简单的约束,可以处理并且只能影响输出端口
那个对虚拟时钟的引用。
注意:对于正相移,不需要虚拟时钟和多周期路径约束,因为默认设置路径要求是1个周期减去相移量。
A forwarded clock has been identified for timing the output path based on the shared
clocking connectivity.
The forwarded clock must have been created during the third step of the wizard
"Forwarded Clocks," or else the board clock or a virtual clock will be used as the output
delay constraint reference clock.
已经识别出转发时钟,用于基于共享时钟连接对输出路径进行定时。
必须在向导“转发时钟”的第三步中创建转发时钟,否则电路板时钟或虚拟时钟将用作输出延迟约束参考时钟。
时间限制电子表格
时序约束电子表格显示特定类型的所有现有约束的详细信息。使用时序约束电子表格查看和编辑约束选项。

该小组的最后两列显示:
•源文件:约束来自的XDC文件或Tcl脚本的名称
•Scoped Cell:应用约束时的当前实例的名称。 此名称通常对应于使用专用约束传递的IP实例。 有关更多信息,请参阅约束范围,第67页。
通过双击电子表格的最后一行,可以创建所选类型的新约束。 将打开相应的约束创建对话框,您可以填写新约束的详细信息。 单击“确定”将约束应用于内存并关闭
窗口。 电子表格中的新行显示新的约束信息。
您可以通过直接在电子表格中修改值来编辑任何现有约束。
完成编辑后,单击“应用”以将修改的约束应用于内存。
重要信息:应用新约束或已修改约束不会将其保存在XDC文件中。 您必须单击“保存约束”以保存它。
重要信息:无法编辑或删除IP约束。 要修改使用IP提供的约束,必须禁用相应的IP XDC文件,将约束复制到XDC文件,然后根据需要编辑约束。
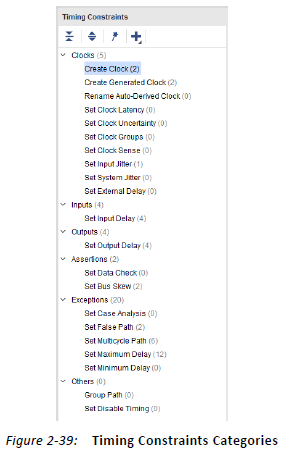
Constraints Creation, Grouped by Category
When you select a constraint type, the corresponding spreadsheet appears on the right
sub-window panel. This allows you to view all the constraints of the same type that have
already been created.
约束创作,按类别分组
选择约束类型时,相应的电子表格将显示在右侧子窗口面板上。 这允许您查看已创建的相同类型的所有约束。
要创建新约束,请双击目标约束的名称。 使用对话框可以指定每个选项的值。 单击“确定”后,该工具将执行以下操作:
1.验证语法。
2.将语法应用于内存。
3.在电子表格的末尾添加新约束。
4.在完整约束列表的末尾添加新约束。
所有约束
窗口底部显示内存中加载的约束的完整列表,其顺序与应用的顺序相同。 约束根据XDC文件或它们所源自的Tcl脚本进行分组。 当XDC文件的范围限定为
特定的分层单元格,单元格名称显示在文件名旁边。
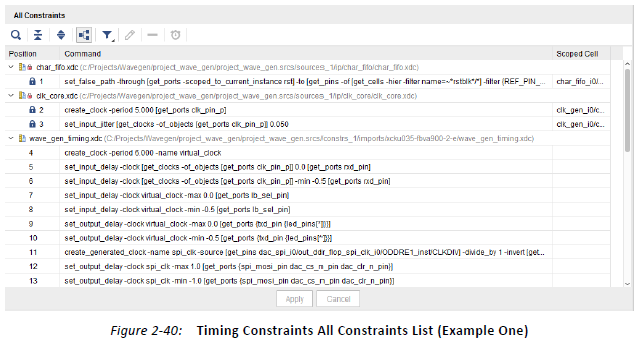
您可以展开和折叠每个关联源文件的约束,也可以通过单击面板左侧的两个相应按钮完全展开和折叠约束。
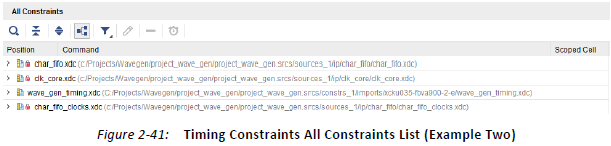
提示:折叠视图提供了在内存中加载哪些约束文件以及使用范围机制的位置的简要概述。 通过report_compile_order -constraints命令可以获得相同的信息。
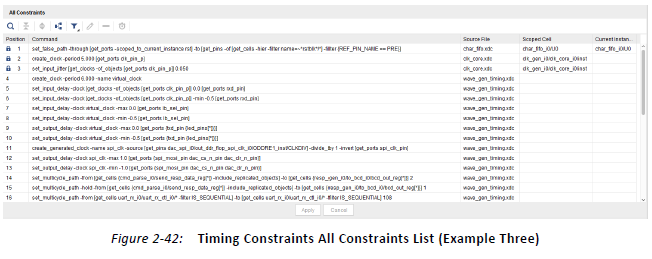
取消选择“按源分组”图标,将视图切换到一个表,其中源约束文件和作用域单元格信息显示在右侧两列中。
要删除约束,请选择它并单击X.
•要编辑非只读的约束,请使用电子表格视图。 在工具注册了更改后,必须单击“应用”以刷新内存中的约束。
•要添加新约束,请使用前面所述的对话框,或在Tcl控制台中键入约束。 新约束在名为<unsaved_constraints>的roup中出现在列表的末尾。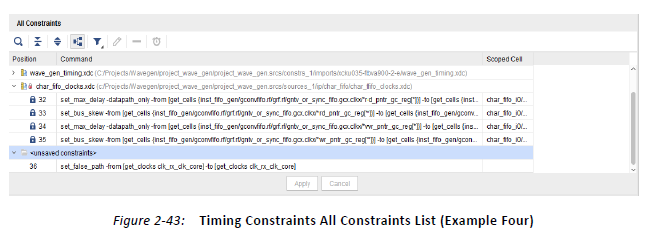
保存约束时,新约束将保存在标记为目标的XDC文件的末尾。 如果与内存中的设计关联的约束集中没有目标XDC文件,或者约束集中只有一个Tcl脚本,则会提示您指定保存约束的位置。
Regularly save your constraints. Click Save, or select File > Constraints > Save.
重要信息:无法将新约束和已修改约束保存回Tcl脚本。
警告! 如果尚未应用Timing Constraints窗口中的任何约束,请不要在Tcl控制台中输入新约束。 编辑器中的最终约束顺序可能与内存中的约束顺序不同。 为避免混淆,每次编辑现有约束时都必须重新应用所有约束。

 浙公网安备 33010602011771号