

人脸识别《二、 基于Dlib库实现人脸检测、特征点检测、人脸对齐、人脸识别》
首先需要安装dlib库以及opencv,上一节已经说明如何安装dlib,这边需要再安装一下opencv
pip install numpy
由于我安装的python版本是3.6,直接使用pip install opencv-python安装会报错。
pip install -i https://pypi.douban.com/simple/ pip install opencv-python==4.3.0.38
以下demo是基于shape_predictor_68_face_landmarks.dat的模型进行推理的。该模型在上一节有下载地址。
1.人脸检测
# encoding:utf-8

import dlib
import numpy as np
import cv2

def rect_to_bb(rect): # 获得人脸矩形的坐标信息
    x = rect.left()
    y = rect.top()
    w = rect.right() - x
    h = rect.bottom() - y
    return (x, y, w, h)

def resize(image, width=1200):  # 将待检测的image进行resize
    r = width * 1.0 / image.shape[1]
    dim = (width, int(image.shape[0] * r))
    resized = cv2.resize(image, dim, interpolation=cv2.INTER_AREA)
    return resized

def detect():
    image_file = "test.jpg"
    detector = dlib.get_frontal_face_detector()
    image = cv2.imread(image_file)
    image = resize(image, width=1200)
    gray = cv2.cvtColor(image, cv2.COLOR_BGR2GRAY)
    rects = detector(gray, 1)
    for (i, rect) in enumerate(rects):
        (x, y, w, h) = rect_to_bb(rect)
        cv2.rectangle(image, (x, y), (x + w, y + h), (0, 255, 0), 2)
        cv2.putText(image, "Face: {}".format(i + 1), (x - 10, y - 10), cv2.FONT_HERSHEY_SIMPLEX, 0.5, (0, 255, 0), 2)

    cv2.imshow("Output", image)
    cv2.waitKey(0)

if __name__ == "__main__":

    detect()
结果:

2.特征点检测
# encoding:utf-8

import dlib
import numpy as np
import cv2

def rect_to_bb(rect): # 获得人脸矩形的坐标信息
    x = rect.left()
    y = rect.top()
    w = rect.right() - x
    h = rect.bottom() - y
    return (x, y, w, h)

def shape_to_np(shape, dtype="int"): # 将包含68个特征的的shape转换为numpy array格式
    coords = np.zeros((68, 2), dtype=dtype)
    for i in range(0, 68):
        coords[i] = (shape.part(i).x, shape.part(i).y)
    return coords


def resize(image, width=1200):  # 将待检测的image进行resize
    r = width * 1.0 / image.shape[1]
    dim = (width, int(image.shape[0] * r))
    resized = cv2.resize(image, dim, interpolation=cv2.INTER_AREA)
    return resized

def feature():
    image_file = "test.jpg"
    detector = dlib.get_frontal_face_detector()
    predictor = dlib.shape_predictor("shape_predictor_68_face_landmarks.dat")
    image = cv2.imread(image_file)
    image = resize(image, width=1200)
    gray = cv2.cvtColor(image, cv2.COLOR_BGR2GRAY)
    rects = detector(gray, 1)
    shapes = []
    for (i, rect) in enumerate(rects):
        shape = predictor(gray, rect)
        shape = shape_to_np(shape)
        shapes.append(shape)
        (x, y, w, h) = rect_to_bb(rect)
        cv2.rectangle(image, (x, y), (x + w, y + h), (0, 255, 0), 2)
        cv2.putText(image, "Face: {}".format(i + 1), (x - 10, y - 10), cv2.FONT_HERSHEY_SIMPLEX, 0.5, (0, 255, 0), 2)

    for shape in shapes:
        for (x, y) in shape:
            cv2.circle(image, (x, y), 2, (0, 0, 255), -1)
    cv2.imshow("Output", image)
    cv2.waitKey(0)

if __name__ == "__main__":

    feature()
结果:

3. 人脸对齐
执行:
pip install matplotlib
代码:
# encoding:utf-8

import dlib
import cv2
import matplotlib.pyplot as plt
import numpy as np
import math

def rect_to_bb(rect): # 获得人脸矩形的坐标信息
    x = rect.left()
    y = rect.top()
    w = rect.right() - x
    h = rect.bottom() - y
    return (x, y, w, h)

def face_alignment(faces):

    predictor = dlib.shape_predictor("shape_predictor_68_face_landmarks.dat") # 用来预测关键点
    faces_aligned = []
    for face in faces:
        rec = dlib.rectangle(0,0,face.shape[0],face.shape[1])
        shape = predictor(np.uint8(face),rec) # 注意输入的必须是uint8类型
        order = [36,45,30,48,54] # left eye, right eye, nose, left mouth, right mouth  注意关键点的顺序,这个在网上可以找
        for j in order:
            x = shape.part(j).x
            y = shape.part(j).y
            cv2.circle(face, (x, y), 2, (0, 0, 255), -1)

        eye_center =((shape.part(36).x + shape.part(45).x) * 1./2, # 计算两眼的中心坐标
                      (shape.part(36).y + shape.part(45).y) * 1./2)
        dx = (shape.part(45).x - shape.part(36).x) # note: right - right
        dy = (shape.part(45).y - shape.part(36).y)

        angle = math.atan2(dy,dx) * 180. / math.pi # 计算角度
        RotateMatrix = cv2.getRotationMatrix2D(eye_center, angle, scale=1) # 计算仿射矩阵
        RotImg = cv2.warpAffine(face, RotateMatrix, (face.shape[0], face.shape[1])) # 进行放射变换,即旋转
        faces_aligned.append(RotImg)
    return faces_aligned

def demo():

    im_raw = cv2.imread('test.jpg').astype('uint8')

    detector = dlib.get_frontal_face_detector()
    gray = cv2.cvtColor(im_raw, cv2.COLOR_BGR2GRAY)
    rects = detector(gray, 1)

    src_faces = []
    for (i, rect) in enumerate(rects):
        (x, y, w, h) = rect_to_bb(rect)
        detect_face = im_raw[y:y+h,x:x+w]
        src_faces.append(detect_face)
        cv2.rectangle(im_raw, (x, y), (x + w, y + h), (0, 255, 0), 2)
        cv2.putText(im_raw, "Face: {}".format(i + 1), (x - 10, y - 10), cv2.FONT_HERSHEY_SIMPLEX, 0.5, (0, 255, 0), 2)

    faces_aligned = face_alignment(src_faces)

    cv2.imshow("src", im_raw)
    i = 0
    for face in faces_aligned:
        cv2.imshow("det_{}".format(i), face)
        i = i + 1
    cv2.waitKey(0)

if __name__ == "__main__":

    demo()
结果:

4. 人脸识别
问题:
ModuleNotFoundError: No module named 'skimage'
解决:
pip install scikit-image
代码:
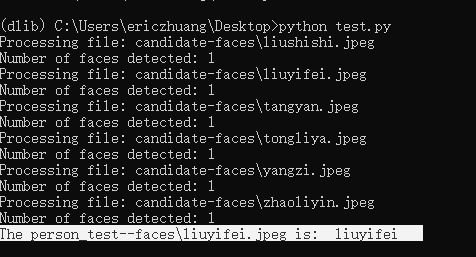
# encoding:utf-8

import dlib
import cv2
import matplotlib.pyplot as plt
import numpy as np
import math
import os, glob
from skimage import io

def create_face_space():

    # 对文件夹下的每一个人脸进行:
    # 1.人脸检测
    # 2.关键点检测
    # 3.描述子提取

    # 候选人脸文件夹
    faces_folder_path = "candidate-faces/"
    # 候选人脸描述子list
    descriptors = []
    for f in glob.glob(os.path.join(faces_folder_path, "*.jpeg")):
        print("Processing file: {}".format(f))
        img = io.imread(f)

        # 1.人脸检测
        dets = detector(img, 1)
        print("Number of faces detected: {}".format(len(dets)))

        for k, d in enumerate(dets):
            # 2.关键点检测
            shape = sp(img, d)

            # 3.描述子提取,128D向量
            face_descriptor = facerec.compute_face_descriptor(img, shape)

            # 转换为numpy array
            v = np.array(face_descriptor)
            descriptors.append(v)

    return descriptors


def predict(descriptors,path):
    # 对需识别人脸进行同样处理
    # 提取描述子

    img = io.imread(path)
    dets = detector(img, 1)

    dist = []
    for k, d in enumerate(dets):
        shape = sp(img, d)
        face_descriptor = facerec.compute_face_descriptor(img, shape)
        d_test = np.array(face_descriptor)

        # 计算欧式距离
        for i in descriptors:
            dist_ = np.linalg.norm(i-d_test)
            dist.append(dist_)
    return dist

def demo():
    global detector, sp, facerec
    # 加载正脸检测器
    detector = dlib.get_frontal_face_detector()

    # 加载人脸关键点检测器
    sp = dlib.shape_predictor("shape_predictor_68_face_landmarks.dat")

    # 3. 加载人脸识别模型
    facerec = dlib.face_recognition_model_v1("dlib_face_recognition_resnet_model_v1.dat")

    descriptors = create_face_space()
    # 候选人名单
    candidate = ['zhaoliying', 'liuyifei',
                 'liushishi', 'tangyan',
                 'tongliya', 'yangzi']

    predict_path = "test--faces/"
    for f in glob.glob(os.path.join(predict_path, "*.jpeg")):
        dist = predict(descriptors, f)
        # 候选人和距离组成一个dict
        c_d = dict(zip(candidate, dist))

        cd_sorted = sorted(c_d.items(), key=lambda d:d[1])
        print ("The person_{} is: ".format(f),cd_sorted[0][0])

if __name__ == "__main__":

    demo()
在candidate-faces/文件夹中放6个明星的照片,格式要转换成jpg,不能直接改后缀名,不然会报错。
在test--faces/放入待检测的图片

 浙公网安备 33010602011771号