

《驱动学习 - LED驱动程序》
1.编写LED驱动程序步骤
1.1 框架
1.2 完善硬件操作
1.2.1 查看原理图
1.2.2 看2440手册
1.2.3 写代码
其中需要注意的是:单片机通常直接用物理地址去操作寄存器。而这里要将物理地址映射为虚拟地址,用ioremap函数。
2.查看原理图和2440手册

从mini2440的原理图可以看到,2440是低电平点亮LED。然后继续查看nLED引脚

所以对应的是:

查看上s3c2440芯片手册:

可以看到GPBCON和GPBDAT的物理地址,这个是后面点亮LED的需要操作的两个寄存器。

需要把GPB4.5.6.7设置为Output模式。
3.编写LED驱动代码
volatile unsigned long *gpbcon = NULL;
volatile unsigned long *gpbdat = NULL;

static int first_drv_init(void)
{
    gpbcon = (volatile unsigned long *)ioremap(0x56000010, 16);
    gpbdat = gpbcon + 1;
}
通过ioremap讲CPBCON的物理地址映射为虚拟地址。其中第一个参数0x56000010是GPBCON的物理地址,第二个参数是映射的大小。比如一个寄存器是32位的,那么写4就可以了。
gpbdat = gpbcon + 1是因为GPBDAT和GPBCON的物理地址相差0x4,也就是32位。GPBCON就是32位的指针类型。所以指针+1操作就是偏移32位。
static void first_drv_exit(void)
{
    iounmap(gpbcon);
}
然后在卸载函数中把映射取消。
static int first_drv_open(struct inode *inode, struct file *file)
{
    //printk("first_drv_open\n");
    /*
     * LED1,LED2,LED4对应GPB5、GPB6、GPB7、GPB8
     */
    /* 配置GPB5,6,7,8为输出 */
    *gpbcon &= ~((0x3<<(5*2)) | (0x3<<(6*2)) | (0x3<<(7*2)) | (0x3<<(8*2)));
    *gpbcon |= ((0x1<<(5*2)) | (0x1<<(6*2)) | (0x1<<(7*2)) | (0x1<<(8*2)));
    return 0;
}
先将GPBCON的5.6.7.8清零,然后再或上1。这样就将GPBCON的5.6.7.8引脚设置为了Output模式。
static ssize_t first_drv_write(struct file *file, const char __user *buf, size_t count, loff_t * ppos)
{
    int val;
    //printk("first_drv_write\n");
    copy_from_user(&val, buf, count); //    copy_to_user();

    if (val == 1)
    {
        // 点灯
        *gpbdat &= ~((1<<5) | (1<<6) | (1<<7) | (1<<8));
    }
    else
    {
        // 灭灯
        *gpbdat |= (1<<5) | (1<<6) | (1<<7) | (1<<8);
    }

    return 0;
}
copy_from_user(&val, buf, count)将用户空间的数据拷贝到内核空间。copy_to_user将内核空间中的数据拷贝到用户空间。
其中在应用程序中会调用write函数。
int main(int argc, char **argv)
{
    int fd;
    int val = 1;
    中间略
    write(fd, &val, 4);
    return 0;
}
&val对应*buf,4对应count。所以就数据就这样拷贝到内核空间。(write的第三个参数是字节数,val是init类型的变量,所以是4个字节)
以上一个简单的LED驱动程序就写完了。
还有一种是读取此设备号,可以通过此设备号去开光每个单独的灯。后面可以做一下试验。
4.编译驱动程序
Makefile
KERN_DIR = /work/system/linux-2.6.22.6

all:
    make -C $(KERN_DIR) M=`pwd` modules

clean:
    make -C $(KERN_DIR) M=`pwd` modules clean
    rm -rf modules.order

obj-m    += first_drv.o
内核路径根据自身修改。
make
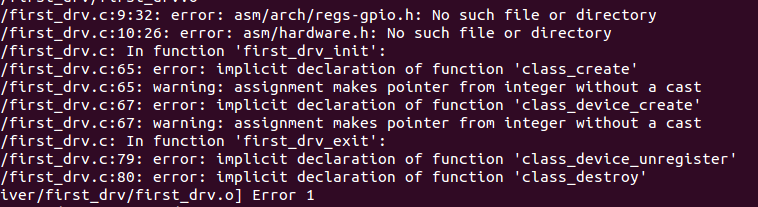
提示错误找不到regs-gpio.h。因为我用的是2.6.32.2的内核,而原本驱动程序用的是2.6.22.6。所以有些文件的位置不一样。
find -name regs-gpio.h和find -name hardware.h


所以修改驱动程序:
#include <asm/arch/regs-gpio.h>
#include <asm/hardware.h>
修改成
#include <mach/regs-gpio.h>
#include <mach/hardware.h>
class_device_create 和 class_device_destroy 是最期版本的API。
现在已经改成device_create 和 device_destroy。在包含#include <linux/device.h>中。
static struct class_device *firstdrv_class_dev要修改成static struct device *firstdrv_class_dev;
完整代码:
#include <linux/module.h>
#include <linux/kernel.h>
#include <linux/fs.h>
#include <linux/init.h>
#include <linux/delay.h>
#include <asm/uaccess.h>
#include <asm/irq.h>
#include <asm/io.h>
#include <mach/regs-gpio.h>
#include <mach/hardware.h>
#include <linux/device.h>

static struct class *firstdrv_class;
static struct device    *firstdrv_class_dev;

volatile unsigned long *gpbcon = NULL;
volatile unsigned long *gpbdat = NULL;
int major;

static int first_drv_open(struct inode *inode, struct file *file)
{
    //printk("first_drv_open\n");
    /*
     * LED1,LED2,LED4对应GPB5、GPB6、GPB7、GPB8
     */
    /* 配置GPB5,6,7,8为输出 */
    *gpbcon &= ~((0x3<<(5*2)) | (0x3<<(6*2)) | (0x3<<(7*2)) | (0x3<<(8*2)));
    *gpbcon |= ((0x1<<(5*2)) | (0x1<<(6*2)) | (0x1<<(7*2)) | (0x1<<(8*2)));
    return 0;
}

static ssize_t first_drv_write(struct file *file, const char __user *buf, size_t count, loff_t * ppos)
{
    int val;

    //printk("first_drv_write\n");

    copy_from_user(&val, buf, count); //    copy_to_user();

    if (val == 1)
    {
        // 点灯
        *gpbdat &= ~((1<<5) | (1<<6) | (1<<7) | (1<<8));
    }
    else
    {
        // 灭灯
        *gpbdat |= (1<<5) | (1<<6) | (1<<7) | (1<<8);
    }

    return 0;
}

static struct file_operations first_drv_fops = {
    .owner  =   THIS_MODULE,    /* 这是一个宏,推向编译模块时自动创建的__this_module变量 */
    .open   =   first_drv_open,
    .write    =    first_drv_write,
};


static int first_drv_init(void)
{
    major = register_chrdev(0, "first_drv", &first_drv_fops); // 注册, 告诉内核

    firstdrv_class = class_create(THIS_MODULE, "firstdrv");

    firstdrv_class_dev = device_create(firstdrv_class, NULL, MKDEV(major, 0), NULL, "xyz"); /* /dev/xyz */

    gpbcon = (volatile unsigned long *)ioremap(0x56000010, 16);
    gpbdat = gpbcon + 1;

    return 0;
}

static void first_drv_exit(void)
{
    unregister_chrdev(major, "first_drv"); // 卸载

    device_unregister(firstdrv_class_dev);
    class_destroy(firstdrv_class);
    iounmap(gpbcon);
}

module_init(first_drv_init);
module_exit(first_drv_exit);


MODULE_LICENSE("GPL");

 浙公网安备 33010602011771号