
源码简析Spring-Integration执行过程
一,前言
Spring-Integration基于Spring,在应用程序中启用了轻量级消息传递,并支持通过声明式适配器与外部系统集成。这一段官网的介绍,概况了整个Integration的用途。个人感觉消息传递是真正的重点。

如上图所示,典型的生产者-消费者模式,中间通过一个特定的通道进行数据传输,说到这,是不是隐隐感觉到queue的存在。确实事实上这个所谓的通道默认就是用的 blockingqueue。
Spring-Integration网上的资料是真少,再加上源码分析的是更少。关于Spring-Integration的基本介绍直接去官网上看更加的直观,这边就不累述了。
今天主要是看个简单的hello word进来分析下整个执行过程。
先看下代码:
<?xml version="1.0" encoding="UTF-8"?>
<beans:beans xmlns="http://www.springframework.org/schema/integration"
	xmlns:xsi="http://www.w3.org/2001/XMLSchema-instance"
	xmlns:beans="http://www.springframework.org/schema/beans"
	xsi:schemaLocation="http://www.springframework.org/schema/beans
			https://www.springframework.org/schema/beans/spring-beans.xsd
			http://www.springframework.org/schema/integration
			https://www.springframework.org/schema/integration/spring-integration.xsd">

	<annotation-config/>

	<channel id="oc" >
		<queue/>
	</channel>
	<beans:bean id="Beans" class="com.example.demo.Beans"/>

</beans:beans>
@Configuration
public class Beans {
    @ServiceActivator(inputChannel = "ic", outputChannel = "oc")
    public String sayHello(String name) {
        return "Hello " + name;
    }
}
public class HelloWorldDemo {
    @Test
    public void testDemo() throws Exception {
        ClassPathXmlApplicationContext context =
                new ClassPathXmlApplicationContext("/demo.xml", HelloWorldDemo.class);
        DirectChannel inputChannel = context.getBean("ic", DirectChannel.class);
        PollableChannel outputChannel = context.getBean("oc", PollableChannel.class);
        inputChannel.send(new GenericMessage<String>("World"));
        System.out.println("==> HelloWorldDemo: " + outputChannel.receive(0).getPayload());
        context.close();
    }

}

out:
==> HelloWorldDemo: Hello World
二,ServiceActivator
上面的代码演示了调用方法的入站通道适配器和标准的出站通道适配器, 它们之间是一个带注解的ServiceActivator。关于这个ServiceActivator就是一个消息端点。
消息端点的主要作用是以非侵入性方式将应用程序代码连接到消息传递框架。换句话说,理想情况下,应用程序代码应该不知道消息对象或消息管道。这类似于 MVC 范式中controller 的作用。正如controller 处理 HTTP 请求一样,消息端点处理消息。以及controller 映射到 URL 模式一样,消息端点映射到消息通道。这两种情况的目标是相同的。
ServiceActivator是用于将服务实例连接到消息传递系统的通用端点。必须配置输入消息通道,如果要调用的服务方法能够返回值,还可以提供输出消息通道。
具体流程如下图:

上面的代码比较简单,但是或许会发现我们只定义了输出通道oc,输入通道ic竟然没有定义也能正常应用,是不是很奇怪?带着疑问我们先看下ServiceActivator的源码:
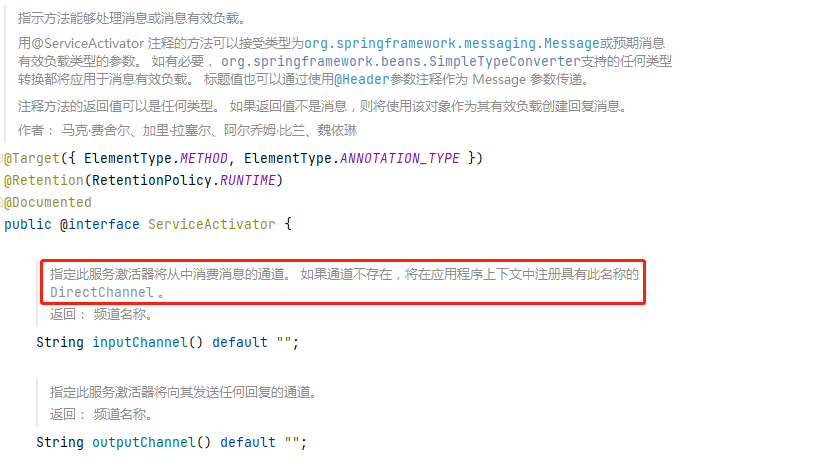
注释上写的很清楚,如果输入通道不存在,将在应用程序上下文中注册具有此名称的DirectChannel 。具体在哪定义,我们后面会看到,现在不急,先一步步来看他的执行过程。
我们全局查找ServiceActivator,看他是哪边进行处理的,最后发现了MessagingAnnotationPostProcessor类,用来处理方法级消息注解的BeanPostProcessor实现。

	@Override
	public void afterPropertiesSet() {
		Assert.notNull(this.beanFactory, "BeanFactory must not be null");
		((BeanDefinitionRegistry) this.beanFactory).registerBeanDefinition(
				IntegrationContextUtils.DISPOSABLES_BEAN_NAME,
				BeanDefinitionBuilder.genericBeanDefinition(Disposables.class, Disposables::new)
						.getRawBeanDefinition());
		this.postProcessors.put(Filter.class, new FilterAnnotationPostProcessor(this.beanFactory));
		this.postProcessors.put(Router.class, new RouterAnnotationPostProcessor(this.beanFactory));
		this.postProcessors.put(Transformer.class, new TransformerAnnotationPostProcessor(this.beanFactory));
		this.postProcessors.put(ServiceActivator.class, new ServiceActivatorAnnotationPostProcessor(this.beanFactory));
		this.postProcessors.put(Splitter.class, new SplitterAnnotationPostProcessor(this.beanFactory));
		this.postProcessors.put(Aggregator.class, new AggregatorAnnotationPostProcessor(this.beanFactory));
		this.postProcessors.put(InboundChannelAdapter.class,
				new InboundChannelAdapterAnnotationPostProcessor(this.beanFactory));
		this.postProcessors.put(BridgeFrom.class, new BridgeFromAnnotationPostProcessor(this.beanFactory));
		this.postProcessors.put(BridgeTo.class, new BridgeToAnnotationPostProcessor(this.beanFactory));
		Map<Class<? extends Annotation>, MethodAnnotationPostProcessor<?>> customPostProcessors =
				setupCustomPostProcessors();
		if (!CollectionUtils.isEmpty(customPostProcessors)) {
			this.postProcessors.putAll(customPostProcessors);
		}
	}
在afterPropertiesSet方法中,我们看到定义了一个后处理器postProcessors,里面注册了相关的注解处理类。包含各种消息端点处理,除了上面写的ServiceActivator,还有过滤器,路由,转换器等各种不同的端点方法。
接着往向下看,既然实现了BeanPostProcessor,那必然要用到postProcessAfterInitialization方法实现,这里的流程大概就是遍历出包含有@ServiceActivator的bean方法,用来做后续处理。我们直接看重点的代码。
Object result = postProcessor.postProcess(bean, beanName, targetMethod, annotations);
三,postProcess
在AbstractMethodAnnotationPostProcessor中有个共通方法postProcess用来生成对应的端点信息。具体代码:
	@Override
	public Object postProcess(Object bean, String beanName, Method method, List<Annotation> annotations) {
		Object sourceHandler = null;
		if (beanAnnotationAware() && AnnotatedElementUtils.isAnnotated(method, Bean.class.getName())) {
			if (!this.beanFactory.containsBeanDefinition(resolveTargetBeanName(method))) {
				this.logger.debug("Skipping endpoint creation; perhaps due to some '@Conditional' annotation.");
				return null;
			}
			else {
				sourceHandler = resolveTargetBeanFromMethodWithBeanAnnotation(method);
			}
		}
                //生成对应的MessageHandler,用来执行对应的注解的方法
		MessageHandler handler = createHandler(bean, method, annotations);

		if (!(handler instanceof ReactiveMessageHandlerAdapter)) {
			orderable(method, handler);
			producerOrRouter(annotations, handler);

			if (!handler.equals(sourceHandler)) {
				handler = registerHandlerBean(beanName, method, handler);
			}

			handler = annotated(method, handler);
			handler = adviceChain(beanName, annotations, handler);
		}
                //将MessageHandler实现连接到消息端点,生成对应的endpoint。
		AbstractEndpoint endpoint = createEndpoint(handler, method, annotations);
		if (endpoint != null) {
			return endpoint;
		}
		else {
			return handler;
		}
	}
这里面主要是两件事:
- 根据模板模式中不同的createHandler抽象方法实现,生成对应的MessageHandler。譬如说我们这边的
ServiceActivatorAnnotationPostProcessor - 将MessageHandler实现连接到消息端点,生成对应的endpoint。
1.createHandler
	@Override
	protected MessageHandler createHandler(Object bean, Method method, List<Annotation> annotations) {
		AbstractReplyProducingMessageHandler serviceActivator;
		if (AnnotatedElementUtils.isAnnotated(method, Bean.class.getName())) {
			...
		else {
			serviceActivator = new ServiceActivatingHandler(bean, method);
		}

		String requiresReply = MessagingAnnotationUtils.resolveAttribute(annotations, "requiresReply", String.class);
		if (StringUtils.hasText(requiresReply)) {
			serviceActivator.setRequiresReply(resolveAttributeToBoolean(requiresReply));
		}

		String isAsync = MessagingAnnotationUtils.resolveAttribute(annotations, "async", String.class);
		if (StringUtils.hasText(isAsync)) {
			serviceActivator.setAsync(resolveAttributeToBoolean(isAsync));
		}
                //是否设置了输出通道
		setOutputChannelIfPresent(annotations, serviceActivator);
		return serviceActivator;
	}
createHandler的代码比较简单,就是根据注解中的几个属性还有对应的方法参数,生成ServiceActivatingHandler。追溯下去ServiceActivatingHandler中最后会生成一个委托对象MessagingMethodInvokerHelper用来以反射的方式来执行目标方法。
2.createEndpoint
createEndpoint字面上都能知道是生成消息端点,事实上也是,把生成的handler和对应的管道进行关联。具体看下代码体会:
	protected AbstractEndpoint createEndpoint(MessageHandler handler, @SuppressWarnings("unused") Method method,
			List<Annotation> annotations) {

		AbstractEndpoint endpoint = null;
                //取得注解中inputChannelName
		String inputChannelName = MessagingAnnotationUtils.resolveAttribute(annotations, getInputChannelAttribute(),
				String.class);
		if (StringUtils.hasText(inputChannelName)) {
			MessageChannel inputChannel;
			try {
                //从beanFactory中取得对应的通道bean
				inputChannel = this.channelResolver.resolveDestination(inputChannelName);
			}
			catch (DestinationResolutionException e) {
                               //取不到,则自动注册一个类型为DirectChannel的inputChannel
				if (e.getCause() instanceof NoSuchBeanDefinitionException) {
					inputChannel = new DirectChannel();
					this.beanFactory.registerSingleton(inputChannelName, inputChannel);
					inputChannel = (MessageChannel) this.beanFactory.initializeBean(inputChannel, inputChannelName);
					if (this.disposables != null) {
						this.disposables.add((DisposableBean) inputChannel);
					}
				}
				else {
					throw e;
				}
			}
			Assert.notNull(inputChannel, () -> "failed to resolve inputChannel '" + inputChannelName + "'");
                        //生成endpoint
			endpoint = doCreateEndpoint(handler, inputChannel, annotations);
		}
		return endpoint;
	}
上面的代码中,我们就能清楚的看到为什么我们在demo中没有注册输入通道也能正常应用的原因了,从而回答之前的疑问。
	protected AbstractEndpoint doCreateEndpoint(MessageHandler handler, MessageChannel inputChannel,
			List<Annotation> annotations) {
		....
		else if (inputChannel instanceof SubscribableChannel) {
                        //生成SubscribableChannel类型对应的执行端点
			return new EventDrivenConsumer((SubscribableChannel) inputChannel, handler);
		}
		else if (inputChannel instanceof PollableChannel) {
			return pollingConsumer(inputChannel, handler, pollers);
		}
		else {
			throw new IllegalArgumentException("Unsupported 'inputChannel' type: '"
					+ inputChannel.getClass().getName() + "'. " +
					"Must be one of 'SubscribableChannel', 'PollableChannel' or 'ReactiveStreamsSubscribableChannel'");
		}
	}
通道类型一共有两种,一种是发布订阅,一种是可轮询的,我们是默认是走的第一种,因为DirectChannel默认就是个SubscribableChannel。所以最终我们生成了对应的信息端点类EventDrivenConsumer。
我们先看下EventDrivenConsumer整体结构:

EventDrivenConsumer上面有一个抽象类AbstractEndpoint,最上面实现了Lifecycle接口,所以生命周期跟着容器走,我们直接跳到star方法看:
	@Override
	protected void doStart() {
		this.logComponentSubscriptionEvent(true);
                //把handler和inputChannel进行绑定
		this.inputChannel.subscribe(this.handler);
		if (this.handler instanceof Lifecycle) {
			((Lifecycle) this.handler).start();
		}
	}
	@Override
	public synchronized boolean addHandler(MessageHandler handler) {
		Assert.notNull(handler, "handler must not be null");
		Assert.isTrue(this.handlers.size() < this.maxSubscribers, "Maximum subscribers exceeded");
		boolean added = this.handlers.add(handler);
		if (this.handlers.size() == 1) {
			this.theOneHandler = handler;
		}
		else {
			this.theOneHandler = null;
		}
		return added;
	}
上面的代码主要就是把handler注册到inputChannel中,这样只要inputChannel通道一收到信息,就会通知他注册的handlers进行处理。代码中比较清楚的记录了一切的操作,就不多解释了。
四,发送信息
执行完上面一系列的注册,已经把这一些的通道打通了,剩下的就是真正的发送操作了。下面分析下inputChannel.send(new GenericMessage<String>("World"));看看send操作:
    /**
     *     在此频道上发送消息。 如果通道已满,则此方法将阻塞,直到发生超时或发送线程中断。 如果指定的超时时间为 0,则该方法将立即返回。 如果小于零,它将无限期阻塞(请参阅send(Message) )。
     *     参数:
     *     messageArg – 要发送的消息
     *     timeout - 以毫秒为单位的超时时间
     *     返回:
     *     true如果消息发送成功, false如果消息无法在规定时间内发送或发送线程被中断
     */
	@Override
	public boolean send(Message<?> messageArg, long timeout) {
		...
		try {
                        //message是否需要转换
			message = convertPayloadIfNecessary(message);
		        //发送前拦截器
			if (interceptorList.getSize() > 0) {
				interceptorStack = new ArrayDeque<>();
				message = interceptorList.preSend(message, this, interceptorStack);
				if (message == null) {
					return false;
				}
			}
			if (this.metricsCaptor != null) {
				sample = this.metricsCaptor.start();
			}
                        //发送操作
			sent = doSend(message, timeout);
			if (sample != null) {
				sample.stop(sendTimer(sent));
			}
			metricsProcessed = true;

			if (debugEnabled) {
				logger.debug("postSend (sent=" + sent + ") on channel '" + this + "', message: " + message);
			}
                        //发送后拦截器
			if (interceptorStack != null) {
				interceptorList.postSend(message, this, sent);
				interceptorList.afterSendCompletion(message, this, sent, null, interceptorStack);
			}
			return sent;
		}
		catch (Exception ex) {
			...
		}
	}
真正的send操作跟下去,会发现层次极深,碍于篇幅,我们直接跟到重点代码:
	@Override
	protected final void handleMessageInternal(Message<?> message) {
		Object result;
		if (this.advisedRequestHandler == null) {
                        //反射执行对应的端点方法
			result = handleRequestMessage(message);
		}
		else {
			result = doInvokeAdvisedRequestHandler(message);
		}
		if (result != null) {
                        //往outputChannel发送执行结果
			sendOutputs(result, message);
		}
		...
	}
handleRequestMessage的操作就是用之前我们handler中的委托类MessagingMethodInvokerHelper去反射运行对应的端点方法,然后把执行结果发送outputChannel。最后我们直接定位到具体的发送操作:
	@Override
	protected boolean doSend(Message<?> message, long timeout) {
		Assert.notNull(message, "'message' must not be null");
		try {
			if (this.queue instanceof BlockingQueue) {
				BlockingQueue<Message<?>> blockingQueue = (BlockingQueue<Message<?>>) this.queue;
				if (timeout > 0) {
					return blockingQueue.offer(message, timeout, TimeUnit.MILLISECONDS);
				}
				if (timeout == 0) {
					return blockingQueue.offer(message);
				}
				blockingQueue.put(message);
				return true;
			}
			else {
				try {
					return this.queue.offer(message);
				}
				finally {
					this.queueSemaphore.release();
				}
			}
		}
		catch (InterruptedException e) {
			Thread.currentThread().interrupt();
			return false;
		}
	}
看到这,我们就明白了数据的去向,存储在队列里了,生产者产生的数据就已经生成了,所以发送的操作基本上就告一段落了。
五,接收信息
数据已经生成,后面就是看如何消费操作了,下面分析下 outputChannel.receive(0).getPayload()操作:
/**
 *     从该通道接收第一条可用消息。 如果通道不包含任何消息,则此方法将阻塞,直到分配的超时时间过去。 如果指定的超时时间为 0,则该方法将立即返回。 如果小于零,它将无限期阻塞(参见receive() )。
 *     参数:
 *     timeout - 以毫秒为单位的超时时间
 *     返回:
 *     如果在分配的时间内没有可用的消息或接收线程被中断,则为第一个可用消息或null 。
 */

	@Override // NOSONAR complexity
	@Nullable
	public Message<?> receive(long timeout) {
		...
		try {
			//接受前拦截器操作
			if (interceptorList.getSize() > 0) {
				interceptorStack = new ArrayDeque<>();
                                //一旦调用接收并在实际检索消息之前调用
				if (!interceptorList.preReceive(this, interceptorStack)) {
					return null;
				}
			}
                        //接收操作
			Message<?> message = doReceive(timeout);
		        ...
                        //在检索到 Message 之后但在将其返回给调用者之前立即调用。 必要时可以修改消息
			if (interceptorStack != null && message != null) {
				message = interceptorList.postReceive(message, this);
			}
                        //在接收完成后调用,而不管已引发的任何异常,从而允许适当的资源清理
			interceptorList.afterReceiveCompletion(message, this, null, interceptorStack);
			return message;
		}
		catch (RuntimeException ex) {
			...
		}
	}
最后的doReceive操作,其实大家都心知肚明了,就是从上面的队列中直接读取数据,代码比较简单,就不注释了:
	@Override
	@Nullable
	protected Message<?> doReceive(long timeout) {
		try {
			if (timeout > 0) {
				if (this.queue instanceof BlockingQueue) {
					return ((BlockingQueue<Message<?>>) this.queue).poll(timeout, TimeUnit.MILLISECONDS);
				}
				else {
					return pollNonBlockingQueue(timeout);
				}
			}
			if (timeout == 0) {
				return this.queue.poll();
			}

			if (this.queue instanceof BlockingQueue) {
				return ((BlockingQueue<Message<?>>) this.queue).take();
			}
			else {
				Message<?> message = this.queue.poll();
				while (message == null) {
					this.queueSemaphore.tryAcquire(50, TimeUnit.MILLISECONDS); // NOSONAR ok to ignore result
					message = this.queue.poll();
				}
				return message;
			}
		}
		catch (InterruptedException e) {
			Thread.currentThread().interrupt();
			return null;
		}
	}
六,结语
能坚持看到这的,基本上都是勇士了。这一系列的执行过程其实还是比较绕的,我估计有些人看得也是云里雾里。其实我已经尽量精简了许多,Spring-Integration其实涉及到的应用分支更多,我这也只是十分基础的东西,我只能把我自己知道的先记录下来。如果让你对Spring-Integration产生了兴趣,那本文的目的就达到了。这需要你自己去实地操作研究下,总是有收获的。O(∩_∩)O谢谢

 浙公网安备 33010602011771号