
React组件的使用
React组件简述
组件是React的一等公民,使用React就是在用组件。
组件是整个页面中的一小块,把这一小块抽成独立的,可复用的,UI小部件。
一个页面有多个组件构成,组件可复用,可以独立,可以组合。
创建组件的方式
创建组件有2种方法:创建函数组件和创建类组件。
创建函数组件
React的函数组件是一个纯函数,返回值是一个jsx对象。
/*
  函数组件
  1.函数名称开头字母要大写, 在使用组件时是直接把函数名当做标签
  2.要有return返回值, 如果没有组件内容return null
 */
function Hello() {
  return (
      <p>这是第一个函数组件</p>
  )
}

//2. 将组件渲染到页面上
        ReactDOM.render(<Hello/>, document.getElementById('rootReact'))
        // ReactDOM.render函数执行的过程
        // 1.React 解析组件标签MyComponent, 找到了组件MyComponent
        // 2.发现这个组件是使用函数自定义的,执行这个函数,随后将返回的虚拟DOM转成真是DOM,呈现到屏幕上
创建类组件
类组件:通过ES6的class定义一个类,在里面实现render方法
类:包含了属性和方法的对象。属性和方法是放在一起的。
对于类组件,webpack编译器解析到那个组件时,会new 这个类得到一个实例对象,然后调用这个实例的render方法。
/*
 类组件
 1.使用ES6的类class创建组件
 2.类名的首字母为大写
 3.类需要继承自React.Component
 4.必须要实现render方法,在render方法中通过return返回值或者return null
 */
class World extends React.Component {
  render() {
    return (
        <div>
          <p>这是第一个类组件</p>
        </div>
    )
  }
}

ReactDOM.render(<World/>, document.getElementById('rootReact'))
        // ReactDOM.render函数执行的过程
        // 1.React 解析组件标签MyClassComponent, 找到了组件MyClassComponent
        // 2.发现这个组件是类自定义组件,就new出这个类的实例对象,然后调用实例对象的render方法
        // 3.随后将返回的虚拟DOM转成真是DOM,呈现到屏幕上
类组件的两大特性:变量state与生命周期。
对应的函数组件实现:State hook 与 Effect Hook。
创建一个React组件
定义一个文件,文件名称为类的名称.js
1.导入React库:import React, 为什么只需要导入React库就可以了呢?因为React组件就是返回一个JSX对象就可以了。
2.导出模块:export default 类名
3.定义一个组件【函数组件或类组件】
import React from "react";

class HelloWorld extends React.Component {
  render() {
    return (
        <div>
          这是第一个文件抽离组件
        </div>
    )
  }
}

export default HelloWorld
事件绑定
类组件事件监听
类组件的事件处理函数,定义格式和复写函数的格式一样。
JS中类的定义为无序属性集合,所以类中的我们看到的属性和方法,其本质都是属性,都是key,value键值对。
在class中定义的方法可以看成是定义属性,key: value, 而在定义属性时,如果key和value的名称一样,可以简写成下面的形式而已。
而且因为是定义在类中的属性,那么调用时是已经被实例化后的实例对象,所以调用时用this.click()。
class MyBtn extends React.Component{
  handleClick() {
    console.log('按钮点击了')
  }

  render() {
    return (
        <button onClick={this.handleClick}>类组件按钮:点击我</button>
    )
  }
}
函数组件事件监听
函数组件的处理函数,定义格式为私有函数声明的格式。
在函数中定义私有函数,只是所用域不同,定义的方式和函数组件是一样的。其实函数组件也只是一个普通的函数,只是它返回的是一个jsx对象而已。
function MyBigBtn() {
  function handleClick() {
    console.log("函数按钮被点击了")
  }

  return (
      <button onClick={handleClick}>函数组件按钮:点击我</button>
  )
}
事件对象
React的事件对象e是一个合成事件,默认兼容所用的浏览器
function MyBigBtn() {
  function handleClick(e) {
    e.preventDefault()//阻止事件默认行为
    console.log("函数按钮被点击了",e)
  }

  return (
      <button onClick={handleClick}>函数组件按钮:点击我</button>
  )
}
React组件状态
React组件分为状态组件和无状态组件
状态组件为:类组件
无状态组件为:函数组件
状态就是React对象中的属性。
this.setState({})是一个异步方法,在for循环中连续调用并不会导致状态变化,因为React会合并相同的操作。
this.setState((nextState)=>{})用这个方法在for循环中连续调用,可以实现连续的变化,每次调用都有值,原因是nextState表示的是state的最新值。
函数组件的state和setState
状态state就是类组件中的数据。
import React from "react";

class State extends React.Component{
  //state初始化方式一
  constructor() {
    super();
    this.state = {
      count:0
    }
  }
  //state初始化方式一
  // state={
  //   count:0
  // }

  render() {
    return (
        <div>
          计数值:{this.state.count}
        </div>
    );
  }
}

export default State
setState
setState的作用:1.更改变量this.state 2.刷新UI
setState的思想:数据驱动视图
通过setState的方式修改state变量,不要直接修改
render() {
  return (
      <div>
        计数值:{this.state.count}
        <button onClick={()=>{
          this.setState({
            count: this.state.count+1
          })
        }}>+1</button>
      </div>
  );
}
JSX中逻辑抽离,使JSX保持结构清晰
但是会报this为undefined错误,
注意这个问题只会出现在class类组件中,函数组件是不存在的。
class State extends React.Component{
  incrementCount() {
    //this为undefined
    this.setState({
      count: this.state.count+1
    })
  }

  render() {
    return (
        <div>
          计数值:{this.state.count}
          <button onClick={this.incrementCount}>+1</button>
        </div>
    );
  }
}
解决方法有3中:
1.使用()=>{}箭头函数, 箭头函数中没有this, 所以在它里面使用的this会沿着作用域往外层找,并使用外部作用域的this,此时用的render()内的this就是组件的实例,它可以获取组件的变量, 而函数是哪个this调用它,它里面的this就是谁。
{()=>this.incrementCount()}
{/*<button onClick={this.incrementCount}>+1</button>*/}
<button onClick={()=>this.incrementCount()}>+1</button>
this.incrementCount = this.incrementCount.bind(this)
class State extends React.Component{
  //state初始化方式一
  constructor() {
    super();
    this.state = {
      count:0
    }
    this.incrementCount = this.incrementCount.bind(this)
  }
  incrementCount() {
    //this为undefined
    this.setState({
      count: this.state.count+1
    })
  }
3.将class实例方法改造成箭头函数的形式【推荐】
incrementCount = () => {}
incrementCount = () => {
  //this为undefined
  this.setState({
    count: this.state.count+1
  })
}

render() {
  return (
      <div>
        计数值:{this.state.count}
        <button onClick={this.incrementCount}>+1</button>
      </div>
  );
表单-受控组件与非受控组件
受控组件:其值受到React中state控制的表单输入控件。
React库中要求所有组件的状态都要state来控制,通过setState来 修改。
而html中的表单组件如input输入框,却自己用于自己的状态,这个实现与react的理解不一致。
这里如果把拥有自己状态的html组件的状态也由react来管理,那么就称这个input组件为受控组件。
实现方式是,通过value="this.state.text"给组件设置状态值,通过onChange={this.handleClick}来更新值的改变。
受控组件input例子
class Form extends React.Component{
  state={
    txt: ""
  }

  handleTextChange = (e) => {
    this.setState({
      txt: e.target.value
    })
  }

  render() {
    return (
        <div>
          <input type={"text"} value={this.state.txt} onChange={this.handleTextChange}/>
        </div>
    );
  }
}
表单受控组件
import React from "react";

class Form extends React.Component{
  state={
    txt: "",
    content:"",
    selectV:"sh",
    isChecked:true
  }

  handleTextChange = (e) => {
    this.setState({
      txt: e.target.value
    })
  }

  handleContent = e => {
    this.setState({
      content: e.target.value
    })
  }

  handleSelectV = e => {
    this.setState({
      selectV: e.target.value
    })
  }

  handleChecked = e => {
    this.setState({
      isChecked: e.target.isChecked
    })
  }

  render() {
    return (
        <div>
          <input type={"text"} value={this.state.txt} onChange={this.handleTextChange}/>
          <textarea value={this.state.content} onChange={this.handleContent}></textarea>
          <select value={this.state.selectV} onChange={this.handleSelectV}>
            <option value="sh">上海</option>
            <option value="bj">北京</option>
            <option value="gz">广州</option>
          </select>
          <input type="checkbox" checked={this.state.isChecked} onChange={this.handleChecked}/>
        </div>
    );
  }
}
使用动态name属性更新状态,动态替换state中的key, 用[]包裹一个变量
 handleChange = (e) => {
    // 获取标签的值
    const value = e.target.type === 'checkbox' ? e.target.checked : e.target.value
    // 获取标签的name属性
    const name = e.target.name

    // 更新动态属性的状态
    this.setState({
      [name]: value
    })
}

  render() {
    return (
        <div>
          {/* 使用动态name属性更新 */}
          <input name="txt" type={"text"} value={this.state.txt} onChange={this.handleChange}/>
          <textarea name="content" value={this.state.content} onChange={this.handleChange}></textarea>
          <select name="selectV" value={this.state.selectV} onChange={this.handleChange}>
            <option value="sh">上海</option>
            <option value="bj">北京</option>
            <option value="gz">广州</option>
          </select>
          <input name="checkName" type="checkbox" checked={this.state.checkName} onChange={this.handleChange}/>
        </div>
    );
  }
通过ref获取在React中获取非受控组件的值,一般不推荐这种方式,推荐使用受控组件。
ref代表一个Dom,组件
先通过React.createRef()创建一个ref对象,然后把这个ref对象动态绑定到组件上,然后这个ref对象就表示这个DOM元素了。
class Form extends React.Component{
  constructor() {
    super();
    this.txtRef = React.createRef()
  }

  handleClick = () => {
      console.log(this.txtRef.current.value)
    }

  render() {
  return (
      <div>
        <input type={"text"} ref={this.txtRef}/>
        <button onClick={this.handleClick}>获取非受控组件上的值</button>
      </div>
  );
}
组件间通信
React是组件化开发的。组件化开发就是一个页面有多个组件构成的。
而多个组件之间会存在传递信息,共享数据的需求,这里就涉及到组件的通信了。
消息传递
React中组件是一个封闭的个体,外界可以传递消息到组件内部的。
外界传递方式:
通过在标签内加属性实现。
ReactDom.render(<PropsTest name={"jack"} age={30} />, document.getElementById("root"))
组件内部接收方式:
函数组件是通过props参数接收
类组件是通过this.props属性接收
//类组件接收参数
class PropsTest extends React.Component{
  render() {
    let {name, age} = this.props
    return (
        <div>
          类组件名字: {name}
          <br/>
          类组件年龄: {age}
        </div>
    );
  }
}

//函数组件接收参数
function PropsTest(props) {
  return (
      <div>
           函数组件名字: {props.name}
           <br/>
           函数组件年龄: {props.age}
      </div>
  )
}
props特点
1.外部传入的参数类型可以是任意类型
2.组件内部不能修改props中的参数,因为那是只读的
3.类组件的constructer构造函数重写时,需要在内部调用super(props), 否则父组件没有将props赋值
//1.任意类型传参
ReactDom.render(
    <PropsTest name={"jack"}
               age={30}
               fn={()=>console.log("这是一个函数")}
               list={["red","blue","green"]}/>,
    document.getElementById("root"))
class PropsTest extends React.Component{
  //构造函数调用super(props)
  constructor(props) {
    super(props);
    console.log(props)
  }

  render() {
    // 2.props中的属性不能修改
    // this.props.name = "lucy"

    console.log(this.props)
    let {name, age} = this.props
    return (
        <div>
          类组件名字: {name}
          <br/>
          类组件年龄: {age}
        </div>
    );
  }
}
组件间消息传递
1.父组件传递数据到子组件
2.子组件传递数据到父组件
3.兄弟组件之间传递数据
1.父组件传递数据到子组件
class Parent extends React.Component{
  constructor(props) {
    super(props);
  }
  render() {
    let {name, age} = this.props
    return (
        <div>
          <Child lastName={"王"}/>
        </div>
    );
  }
}

function Child(props) {
  return (
      <div>
        子组件:{props.lastName}
      </div>
  )
}
class Parent extends React.Component{

  getChildMsg= (data) => {
    console.log("接收到子组件数据:",data)
  }

  render() {
    return (
        <div>
          父组件:
          <Child tap={this.getChildMsg}/>
        </div>
    );
  }
}

function Child(props) {
  function handleClick() {
    props.tap("刷抖音")
  }

  return (
      <div>
        子组件:{props.lastName}
        <button onClick={handleClick}>点击我,传递消息到父组件</button>
      </div>
  )
}
兄弟之间的数据传递采用的是状态提升的方法,比如子组件A,子组件B它们2个共享一个状态数据,那么就可以把这个状态提升到它们共同的父组件中,然后在子组件A中调用更新方法,子组件B展示最新的状态数据。
//父组件
class Parent extends React.Component{
  state={
    tag: ''
  }

  handleChange = (data) => {
    this.setState({
      tag: this.state.tag + " " + data
    })
  }

  render() {
    return (
        <div>
          父组件:
          <Child lastName={this.state.tag}/>
          <ChildB changeAction={this.handleChange}/>
        </div>
    );
  }
}

//子组件A
function Child(props) {
  return (
      <div>
        子组件:{props.lastName}
      </div>
  )
}
//子组件B
function ChildB(props) {
  return (
      <div>
        <button onClick={()=>{props.changeAction("B")}}>传递子组件B的B到A组件中去</button>
      </div>
  )
}
Context上下文跨层传递
如果React组件,子组件,子孙组件之间要进行值传递,跨层太多时,通常需要使用Context上下文做跨层传递。
Provider : 数据的提供者
Consumer: 数据的消费者
import React from "react";

const {Provider, Consumer} = React.createContext()
1.在根组件的render内容部分的最外部,嵌套
class Parent extends React.Component{
  render() {
    return (
        <Provider value={"pink"}>
          <div>
            父组件:
            <Child lastName={this.state.tag} tap={this.getChildMsg}/>
            <ChildB changeAction={this.handleChange}/>
          </div>
        </Provider>

    );
  }
}
2.在子孙组件的内部,通过内回调方法获取根组件提供的数据
function ChildBB(props) {
  return (
      <div>
        这是B组件的子组件,BB组件
        <Consumer>
          {data => <div>通过context跨层传递的值为:  {data}</div>}
        </Consumer>
      </div>
  )
}
Props深入用法
1.props.children属性
children属性可以当成是标签的一个普通属性,如果自定义组件中添加了子标签,就会在props中有这个属性,没有没有包含就没这个属性。
props.children属性的值可以像普通属性的值一样,是任意类型,标签,字符串,函数等。
function ChildA() {
  return (
      <div>
        子组件A
        <ChildAA>
          <button>ChildAA标签的子组件</button>
        </ChildAA>
      </div>
  )
}

const ChildAA = (props) => {
  console.log(props.children)
  return (
      <div>
        {props.children}
        子组件AA
        <Consumer>
          {data => <div>根节点跨层传递数据{data}</div>}
        </Consumer>
      </div>
  )
}
2.props传入的类型做约束
添加组件类型约束后,如果外界传入组件的参数类型有误,就会报对应的错误,可以方便改错
//1.在项目目录下安装类型约束工具prop-types
npm i prop-types
//2.导入类型约束工具
import PropTypes from "prop-types"
//3.为一个组件设置类型约束
ChildAA.propTypes = {
  colors: PropTypes.array
}
PropTypes常用的约束类型和默认值
ChildAA.propTypes = {
  colors: PropTypes.array,
  fn: PropTypes.func,
  age: PropTypes.number.isRequired,
  ele: PropTypes.element,
  person: PropTypes.shape({
    title: PropTypes.string,
    age: PropTypes.number
  })
}

ChildAA.defaultProps = {
  age: 10,
  colors: ['red', 'blue', 'green']
}
组件的生命周期
组件的生命周期,只有类组件有,函数组件没有这个概念。
理解组件的运行方式,从组件创建,到挂载运行,到卸载销毁等组件的运行流程。
组件在生命周期的每个阶段,都会调用对应的钩子函数,它们对应了组件的生命周期阶段。
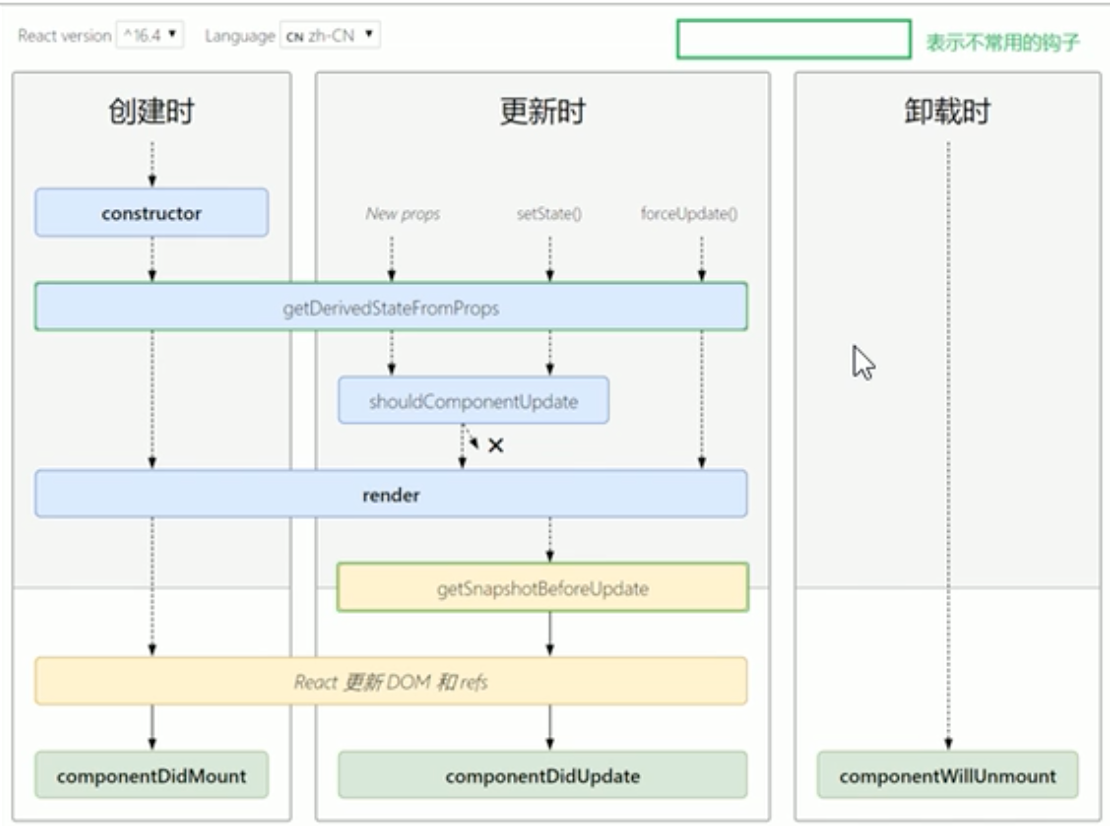
React组件有三个生命周期阶段:
1.挂载阶段
2.更新阶段
3.卸载阶段
挂载阶段
constructor -> render -> componentDidMount
class LifeCircle extends React.Component{
  constructor() {
    super();
    console.warn("生命周期-挂载阶段-1:constructor")
  }

  componentDidMount() {
    //componentDidMount执行时,DOM页面已经渲染完成,可以进行dom操作了
    //是操作DOM,发送网络请求的地方
    const title = document.getElementById("title")
    console.warn("生命周期-挂载阶段-3:componentDidMount", title)
  }

  render() {
    //每次渲染都会调用(包括:挂载阶段,更新阶段)
    //render中不可用调用setState,会循环调用, setState流程做了2件事,一是更新状态数据,二是更新UI调用render方法
    console.warn("生命周期-挂载阶段-2:render")
    return (
        <div>
          生命周期组件
          <h2 id={"title"}>标题</h2>
        </div>
    );
  }
}
更新阶段
render -> componentDidUpdate
触发更新的条件有3种:
1.调用this.setState,先更新数据状态后刷新UI
2.传入的数据由修改function Counter(props),导致刷新UI
3.this.forceUpdate(),强制刷新
class LifeCircle extends React.Component{
  handleClick = () => {
    // this.setState({
    //   count: this.state.count + 1
    // })

    this.forceUpdate()
  }

  render() {
    return (
        <div>
          生命周期组件
          <Counter count={this.state.count}/>
          <h2 id={"title"}>标题</h2>
          <button onClick={this.handleClick}>点击更新</button>
        </div>
    );
  }
}
//组件更新调用方法
class Counter extends React.Component{
  componentDidUpdate(prevProps, prevState, snapshot) {
    console.log("更新阶段:componentDidUpdate-2")
    //此阶段一般用于Dom操作,网络发送,如果调用了this.setState必须加if判断
    if (prevProps.count !== this.props.count) {
      this.state({})
    }
  }

  render() {
    console.log("更新阶段:render-1")
    return (
        <div>
          计数器: {this.props.count}
        </div>
    );
  }
}
卸载阶段
componentWillUnmount
在组件卸载时,可以处理一些清理工作,比如:清除定时器
class Counter extends React.Component{
  componentDidMount() {
    this.timerId = setInterval(()=>{
      console.log("定时器打印了...")
    }, 1000)
  }

  componentWillUnmount() {
    console.log("组件要被卸载了:componentWillUnmount")
    clearInterval(this.timerId)
  }

  render() {
    console.log("更新阶段:render-1")
    return (
        <div>
          豆豆被打了: {this.props.count} 次
        </div>
    );
  }
}
老版本的钩子函数流程,红框的表示待废弃的。

新版本的钩子函数流程,绿色框标识不常用的
组件功能复用
两个组件中有相似的功能如何处理?
复用相似的功能,复用state和操作state的方法操作状态的逻辑
方式有两种:render props和 高阶组件
这2种模式是结合React特点形成的固定模式。
render props模式
render props模式表示的并不一定要是在标签上添加一个属性render
它只是一种模式,也可以将render那部分改成children
<Mouse>
{}
</Mouse>
此时在Mouse内部props.render(this.state)的调用也要改成props.children(this.state)的调用。
1.子组件内部封装状态逻辑
2.子组件通过props.render(state)将状态传递到外部
3.使用props.render(state)的return返回值作为子组件要展示的内容
render props方式实现
class ReUseComponent extends React.Component{
  render() {
    return (
        <div>
          父组件
          //外部设置要展示的子组件内容
          <Mouse render={(mouse) => {
            return <p>当前坐标为:{mouse.x}, {mouse.y}</p>
          }}/>
          //猫捉老鼠
          <Mouse render={(mouse) => {
              return (
                  <img src={'./img/cat.jpeg'}
                       style={{position: "absolute", top:mouse.y,left:mouse.x}}/>
              )
            }}/>
        </div>
    );
  }
}

class Mouse extends React.Component{
  state = {
    x: 0,
    y: 0
  }

  handleMouseMove = (e) => {
    this.setState({
      x: e.clientX,
      y: e.clientY
    })
  }

  componentDidMount() {
    window.addEventListener("mousedown", this.handleMouseMove)
  }

  render() {
      //2.将state传递到外部
      //3.使用props.render的返回值作为要展示的内容
    return this.props.render(this.state);
  }
}
children子元素方式实现
class ReUseComponent extends React.Component{
  render() {
    return (
        <div>
          父组件
          <Mouse>
            {(mouse) => {
              return <p>当前坐标为:{mouse.x}, {mouse.y}</p>
            }}
          </Mouse>
        </div>
    );
  }
}

class Mouse extends React.Component{
  state = {
    x: 0,
    y: 0
  }

  handleMouseMove = (e) => {
    this.setState({
      x: e.clientX,
      y: e.clientY
    })
  }

  componentDidMount() {
    window.addEventListener("mousedown", this.handleMouseMove)
  }

  render() {
    return this.props.children(this.state);
  }
}
另外对于工具设计需要注意点:添加类型约束和卸载处理
class Mouse extends React.Component{
  componentDidMount() {
    window.addEventListener("mousedown", this.handleMouseMove)
  }

  componentWillUnmount() {
    window.removeEventListener("mousedown", this.handleMouseMove)
  }

  render() {
    return this.props.children(this.state);
  }
}

Mouse.propTypes = {
  children: PropTypes.func.isRequired
}
高阶组件模式
高阶组件是一个函数,它接收要包装的组件,返回增强后的组件。
高阶组件内部创建一个类组件,这个类组件中替换可复用的 状态逻辑 ,并通过prop将状态传递到被包装组件WrappedComponent。
1.创建一个函数,名称以with开头
2.指定函数参数,参数已大写字母开头(作为要渲染的组件)
3.函数内部创建一个类组件,提供复用的状态逻辑代码,并返回这个类
4.在类组件中渲染参数组件,并将状态传递给参数组件
5.调用高阶组件,传入要增强的组件,并返回增强后的组件,将其渲染到页面中。
function withMouse(WrappedComponent) {
  class Mouse extends React.Component{
    state = {
      x: 0,
      y: 0
    }

    componentDidMount() {
      window.addEventListener("mousemove", this.handleMouseMove)
    }

    componentWillUnmount() {
      window.removeEventListener("mousemove", this.handleMouseMove)
    }

    handleMouseMove = e => {
      this.setState({
        x: e.clientX,
        y: e.clientY
      })
    }

    render() {
      return (
          <WrappedComponent {...this.state}/>
      );
    }
  }
  return Mouse
}

class PurePosition extends React.Component{
  render() {
    return (
        <div>
          高阶组件坐标位置:{this.props.x}, {this.props.y}
        </div>
    );
  }
}

const MouseP = withMouse(PurePosition)

<MouseP />
高阶组件调试问题
使用高阶组件函数withMouse返回的结果组件默认在调试页面里组件的名字都一样,不好区分
解决方法是为返回的组件命名设置displayName
return Mouse.displayName = `WithMouse${getDisplayName(WrappedComponent)}`

function getDisplayName(WrappedComponent) {
  return WrappedComponent.displayName || WrappedComponent.name || "Component"
}
高阶组件props传递丢失问题
因为在使用withMouse返回的高阶组件设置props时,在withMouse函数内部并没有将props传递给参数组件,所以需要增加传递
function withMouse(WrappedComponent) {
  class Mouse extends React.Component{
    state = {
      x: 0,
      y: 0
    }

    componentDidMount() {
      window.addEventListener("mousemove", this.handleMouseMove)
    }

    componentWillUnmount() {
      window.removeEventListener("mousemove", this.handleMouseMove)
    }

    handleMouseMove = e => {
      this.setState({
        x: e.clientX,
        y: e.clientY
      })
    }

    render() {
      return (
          <WrappedComponent {...this.state} {...this.props}/>
      );
    }
  }
  return Mouse.displayName = `WithMouse${getDisplayName(WrappedComponent)}`
}

 浙公网安备 33010602011771号